如何制作一个可以用Bochs调试的最新内核系统盘
参考:http://blog.chinaunix.net/uid-26207112-id-3332621.html
1. 正确地创建一个包含启动分区的磁盘映像
1.1 创建磁盘映像文件
首先需要对磁盘的结构有一个直观的了解,参考:http://en.wikipedia.org/wiki/Cylinder-head-sector
(Head, Cylinder, Sector)这个三元组用于在磁盘上快速地定位一个扇区(Sector)。
而且一个磁盘的容量也可以根据这三个参数的范围计算出来。
在这里,我们设置heads=16, sector=63, cylinder=100,那么这块磁盘的容量为
1: daniel@ubuntu:~$ echo $((16*63*100*512)) bytes
2: 51609600 bytes
大约49MB。
1: daniel@ubuntu:~$ dd if=/dev/zero of=linux.img count=$((16*63*100))
2: 100800+0 records in
3: 100800+0 records out
4: 51609600 bytes (52 MB) copied, 0.266729 s, 193 MB/s
1.2 将磁盘映像文件挂载为loop块设备
我们需要对磁盘映像文件进行块设备操作,因此需要将其挂载为loop块设备(参考:http://en.wikipedia.org/wiki/Loop_device)。
In Unix-like operating systems, a loop device, vnd (vnode disk), or lofi (loopback file interface) is a pseudo-device that makes a file accessible as a block device.
1: daniel@ubuntu:~$ sudo losetup /dev/loop0 linux.img
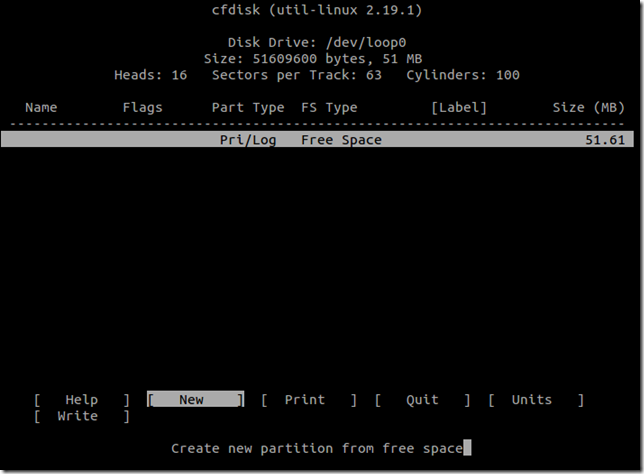
1.3 在/dev/loop0上创建启动分区
使用cfdisk分区工具,其中-s参数指定块设备的sector参数,-h参数指定块设备的磁头参数。
1: daniel@ubuntu:~$ sudo cfdisk -h 16 -s 63 /dev/loop0
“New”按钮创建一个新的[Primary]类型的分区,在MBR分区表中只保存Primary类型的分区,因此只有Primary类型的分区能够作为启动分区。分区的大小选默认,即占据整个磁盘空间,因为我们只需要一个分区。
分完区后,将该分区设置成“Bootable”。
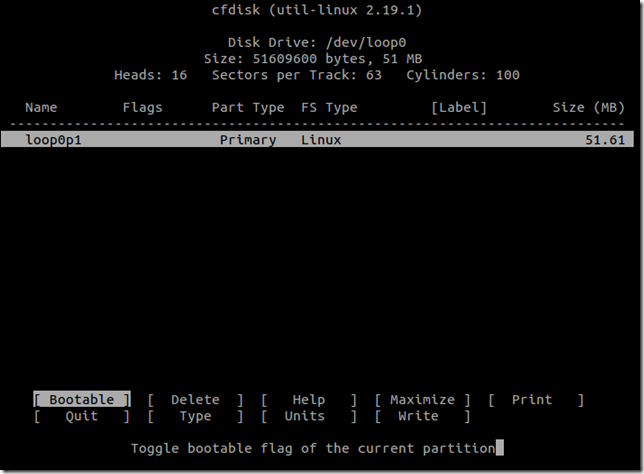
选择“Write”,将改动写入到目标块设备,在要求确认提示时输入yes。
选择“Quit”退出cfdisk界面。
1.4 将新创建的分区格式化成Ext4文件系统
查看新创建的分区的起始扇区号
1: daniel@ubuntu:~$ sudo fdisk -l /dev/loop0
2:
3: Disk /dev/loop0: 51 MB, 51609600 bytes
4: 16 heads, 63 sectors/track, 100 cylinders, total 100800 sectors
5: Units = sectors of 1 * 512 = 512 bytes
6: Sector size (logical/physical): 512 bytes / 512 bytes
7: I/O size (minimum/optimal): 512 bytes / 512 bytes
8: Disk identifier: 0x00000000
9:
10: Device Boot Start End Blocks Id System
11: /dev/loop0p1 100799 50368+ 83 Linux
将磁盘映像文件的第64个扇区开始的区域挂载成/dev/loop1。注意,如果磁盘映像文件分配了多个分区的话,还需要使用—sizelimit设置区域大小。
1: Setup loop device:
2:
3: losetup [{-e|-E} encryption] [-o offset]
[--sizelimit size]
4: [-p pfd] [-r] {-f[--show]|loopdev} file
1: daniel@ubuntu:~$ sudo losetup /dev/loop1 linux.img -o $((63*512))
将分区格式化为Ext4文件系统:
1: daniel@ubuntu:~$ sudo mkfs.ext4 /dev/loop1
2: mke2fs 1.41.14 (22-Dec-2010)
3: Filesystem label=
4: OS type: Linux
5: Block size=1024 (log=0)
6: Fragment size=1024 (log=0)
7: Stride=0 blocks, Stripe width=0 blocks
8: 12600 inodes, 50368 blocks
9: 2518 blocks (5.00%) reserved for the super user
10: First data block=1
11: Maximum filesystem blocks=51642368
12: 7 block groups
13: 8192 blocks per group, 8192 fragments per group
14: 1800 inodes per group
15: Superblock backups stored on blocks:
16: 8193, 24577, 40961
17:
18: Writing inode tables: done
19: Creating journal (4096 blocks): done
20: Writing superblocks and filesystem accounting information: done
21:
22: This filesystem will be automatically checked every 32 mounts or
23: 180 days, whichever comes first. Use tune2fs -c or -i to override.
2. 安装Grub2(Boot Loader)到该磁盘映像文件中
参考:http://members.iinet.net/~herman546/p20/GRUB2%20Bash%20Commands.html
Boot Loader是加载操作系统的必要程序,其实就是一大段代码,这段代码负责将Linux内核文件从文件系统中读入到内存里,进行解压、搬移以及初始化参数的传递操作,然后将系统的控制权交给Linux内核。
Boot Loader通常分为两部分,第一部分安装到MBR的前446字节中,第二部分安装到其他的位置,通常是MBR与第一个分区之间的磁盘区域。
2.1 拷贝grub程序到目标根文件系统中的/boot目录
1: daniel@ubuntu:~$ sudo mkdir linux
2: daniel@ubuntu:~$ sudo mount /dev/loop1 linux
3: daniel@ubuntu:~$ sudo mkdir linux/boot
4: daniel@ubuntu:~$ sudo cp -r /usr/lib/grub/i386-pc/ linux/boot/grub
2.2 创建grub代码程序
1: daniel@ubuntu:~$ sudo grub-mkimage -O i386-pc -o linux/boot/grub/core.img biosdisk part_msdos ext2
生成一个core.img, biosdisk负责读取磁盘, part_msdos负责处理MBR, ext2负责读取ext3分区.
2.3 将core.img安装到磁盘上
SYNOPSIS

       grub-setup [OPTION]... DEVICE

DESCRIPTION

       Set  up images to boot from DEVICE.  DEVICE must be a GRUB device (e.g.

       `(hd0,1)').

       -b, --boot-image=FILE

              use FILE as the boot image [default=boot.img]

       -c, --core-image=FILE

              use FILE as the core image [default=core.img]

       -d, --directory=DIR

              use GRUB files in the directory DIR [default=/boot/grub]

       -m, --device-map=FILE

              use FILE as the device map [default=/boot/grub/device.map]

       -r, --root-device=DEV

              use DEV as the root device [default=guessed]
http://man.he.net/man8/grub-setup
1: daniel@ubuntu:~$ sudo vi linux/boot/grub/device.map
2: (hd0) /dev/loop0
1: daniel@ubuntu:~$ sudo grub-setup -m linux/boot/grub/device.map -d linux/boot/grub/ -r '(hd0,1)''(hd0)' /dev/loop0
If the device map file exists, the GRUB utilities (
grub-probe,grub-setup, etc.) read it to map BIOS drives to OS devices. This file consists of lines like this:(device) filedevice is a drive specified in the GRUB syntax (see Device syntax), and file is an OS file, which is normally a device file.
http://www.gnu.org/software/grub/manual/html_node/Device-map.html
3. 将最小的根文件系统添加到启动分区中
可以参考:http://blog.csdn.net/deansrk/article/details/6661293
将最新的内核文件,以及/bin/sh及其依赖文件都拷贝到目标文件系统中。
如果想要制造一个更加完善的根文件系统,可以选择busybox。
参考:http://blog.chinaunix.net/uid-14720887-id-3033771.html
编译BusyBox的步骤:
3.1 配置
1: sudo make menuconfig
选中“Busybox Settings-> Build Options-> Build Busybox as a static binary”。
3.2 编译,安装
1: sudo make
2: sudo make install
3.3 定制化
在_install目录下生成目标根目录结构,我们需要对该目录结构做一些修改:
3.3.1 创建子目录
1: mkdir proc sys etc dev
3.3.2 创建设备文件
1: cd dev
2: sudo mknod console c 5 1
3: sudo mknod null c 1 3
4:
5:
3.3.3 编辑/etc/fstab
proc /proc proc defaults 0 0
sysfs /sys sysfs defaults 0 0
3.3.4 编辑/etc/inittab
::sysinit:/etc/init.d/rcS
console::respawn:-/bin/sh
::ctrlaltdel:/sbin/reboot
::shutdown:/bin/umount –a -r
3.3.5 编辑/etc/init.d/rcS,并赋予其执行权限
#!/bin/sh
mount -a
3.3.6 修改init文件
1: rm linuxrc
2: ln –sv bin/busybox init
3:
3.4 与Grub生成的根文件系统合并
1: sudo cp -r busybox/_install/* linux/
4. 64位主机系统下创建Bochs可以使用的busybox根文件系统
64位系统编译出来的busybox无法被Bochs使用,因为Bochs是32位模拟器,会在内核启动后期提示:
1: request_module: runaway loop modprobe binfmt-464c
因此需要参考:http://www.cnblogs.com/long123king/p/3562020.html
1: sudo apt-get install libc6-dev-i386 gcc-multilib g++-multilib
2:
在Makefile中添加
1: CFLAGS += -m32
2: LDFLAGS += -m32
3: CPPFLAGS += -m32
4:
然后,再按上文3中的步骤重新编译。
最新文章
- Array的个人总结
- RabbitMQ详解
- javamail 利用qq邮箱做邮箱服务器,简单小demo
- Android EditText 密码框默认是小圆点 怎么改成其它的(*)?
- 【转载】SAP的标准对话框函数
- QT5.1.1中MinGW4.8的环境变量配置
- Qt Creator编译问题
- C# 读取XML文件示例
- Android ViewPager 打造炫酷欢迎页
- oracle学习笔记(二)表的查询
- Dubbo源码学习--服务是如何发布的
- 【jquery】ajax请求
- 包packages
- Sublime text3 插件HTML/CSS/JS prettify 格式化代码
- memory consistency
- Python模块和包使用
- Talend 从Excel导入Saleforce数据(二) TMAP是精髓
- 2018.4.2 sqlite优化
- vs2015 npm list 更新问题
- vim窗口切换
热门文章
- NGUI的CheckBox的使用(toggle script)
- PHP中redis加锁和解锁的简单实现
- Java JNA (二)—— dll回调函数实现
- linux性能分析工具Uptime
- smbpasswd - Samba加密的口令文件。
- 挖坑指南:iView-admin动态配置route.meta.title
- Swift--Unmanaged使用
- Mac brew 安装Postgres 开机自启动
- pythonerror ValueError:invalid literal for int() with base 10: '3.14'
- jQuery中keyup() 和 keydown()方法