java的GUI之SWT框架 配置开发环境(包含但不限于WindowBuilder完整教程,解决Unknown GUI toolkit报错,解决导入SWT包错误)
官网(资料挺多的,API文档截图以及示例都有):https://www.eclipse.org/swt/
克隆官方仓库
git clone --depth=1 git://git.eclipse.org/gitroot/platform/eclipse.platform.swt.git
里面只有 org.eclipse.swt.snippets 目录里面有 300多个代码片段,初学直接看这部分源码即可。
其他 example 目录是成品小 demo,学完snippet再看,然后就能做东西了
本次环境:
Eclipse IDE for Java Developers
Version: 2018-12 (4.10.0)
Build id: 20181214-0600
JAVA:JDK11
Windows10 Pro 预览版 18334——19H1
去网上找了配置SWT开发环境的,发现很多教程都过时了。SWT是一个利用Java的JNI对接原生系统的框架
(做到了系统原生里有的GUi Api 就尽量用系统的,没有的就绘制,大大提高了运行效率,是真正可以考虑的贴合系统的GUI,不过理论上移植性比Swing Awt差点)
被GFW和Dns污染光环之下的请换源(享受秒开的喜悦):https://lug.ustc.edu.cn/wiki/mirrors/help/eclipse#使用科大镜像更新插件
一,Eclipse里安装WindowBuilder来可视化设计SWT程序的完整教程
(完美解决Unknown GUI toolkit或无法导入swt包的错误报错):
如果仅仅是想在Eclipse里使用WindowBuilder来可视化设计SWT程序,可以参考按这里做:eclipse安装WindowBuilder插件以及简单使用(近更) - Akatsuki - CSDN博客(如果last good build不行可以选第一个Lastest)
注意:上面这教程中的
“然后进入到工程,右键src->new->other->WindowBuilder->Swing Designer->Application Window->next->起名->Finish”
应改为:
“然后进入到工程,右键src->new->Packages,(必须勾上Create package-info.java),再右击src->other->WindowBuilder->Swing Designer->SWT->Application Window->next->起名->Finish”
然后如果design界面还是用不了,提示Unknown GUI toolkit The parser parsed the compilation unit, but can't identifyany GUI toolkit, If you wish to use SWT,please add the appropriate SWT jars to your classpath, or create a new SWT/JF
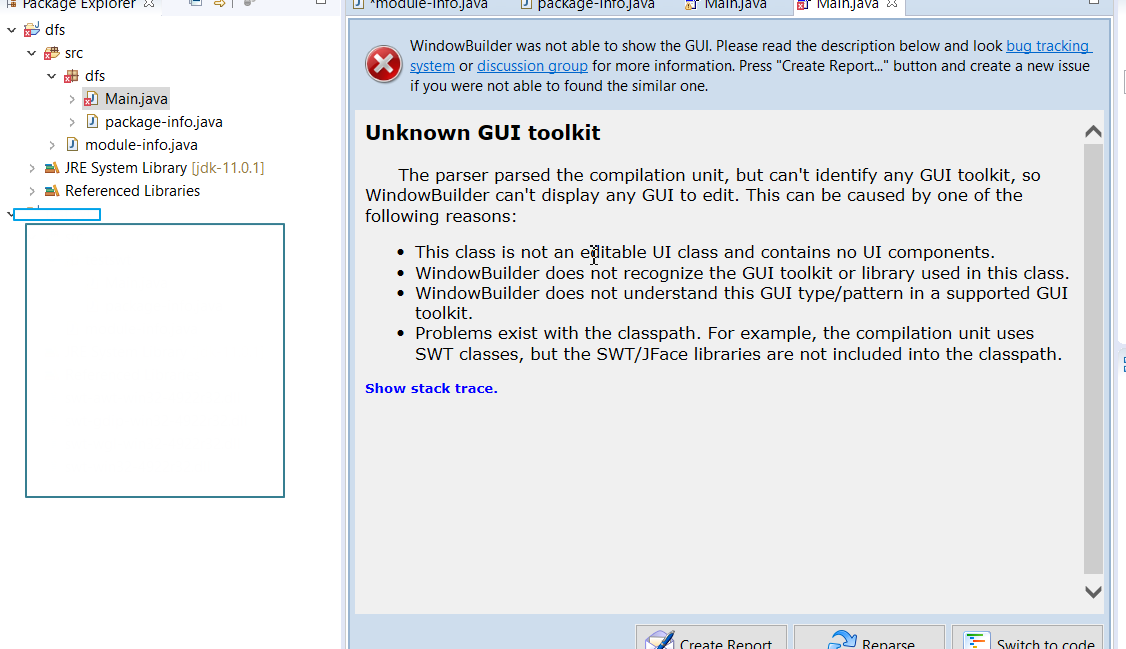
点击Switch to code切换到代码区
然后就如下图操作(点击代码区import所在行号栏里的×号):
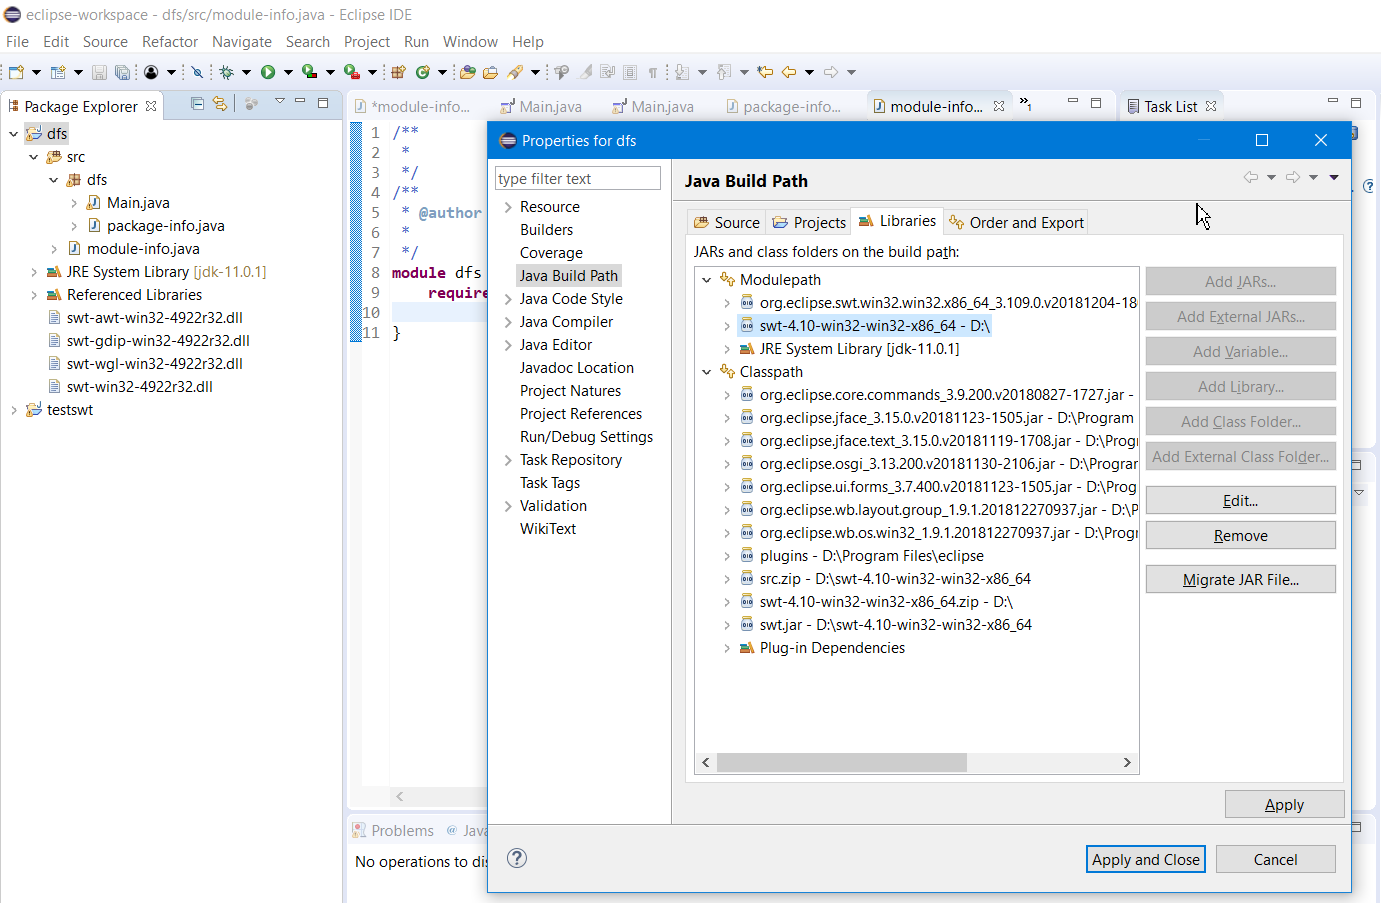
点击+号展开import,再双击 Add 'requires org.*' to module-info.java

然后打开同工程里的module-info.java,鼠标悬浮在requires后面的org.eclipse.swt.win32.win32.x86_64上,然后双击Move classpath entry 'org.eclipse.swt.win32*',
如果有 requires swt; 那一行就删掉(因为我截图里写错了又懒得改)
为什么需要在module-info.java里添加requires?这是Java9引入的新特性,至于作用和用法,我还在思考....

然后SWT报错少了一些,嗯,快成功了。
先下载swt.jar并解压到任意一个目录,下载请看这里:下载SWT
导入SWT的ClassPath
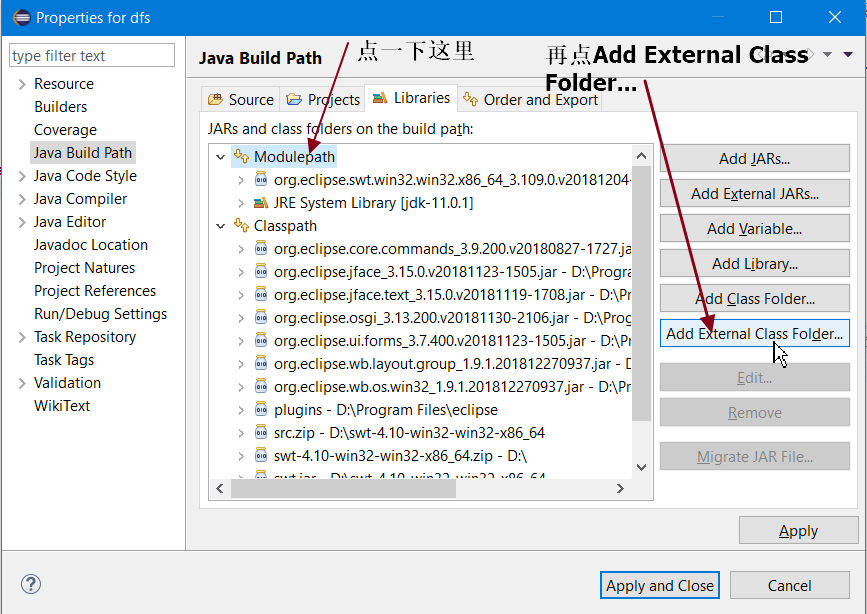
在Eclipse里添加额外的Class Folder,选择解压好的目录(即swt.jar所在目录)
然后再添加DLL支持,具体操作实例:
在Eclipse安装目录下的plugins目录下,找到文件org.eclipse.swt.win32.win32.x86_64_3.109.0.v20181204-1801.jar(x86_64后面的是版本号,你我的可能版本略微不同),复制出来并解压到某一目录(该jar文件里面有4个dll文件)
然后在Eclipse包资源管理器中,右击项目名 → 导入 → 常规 → 文件系统 → 下一步 → 浏览 并选择dll文件所在目录,勾选4个dll文件确认即可。
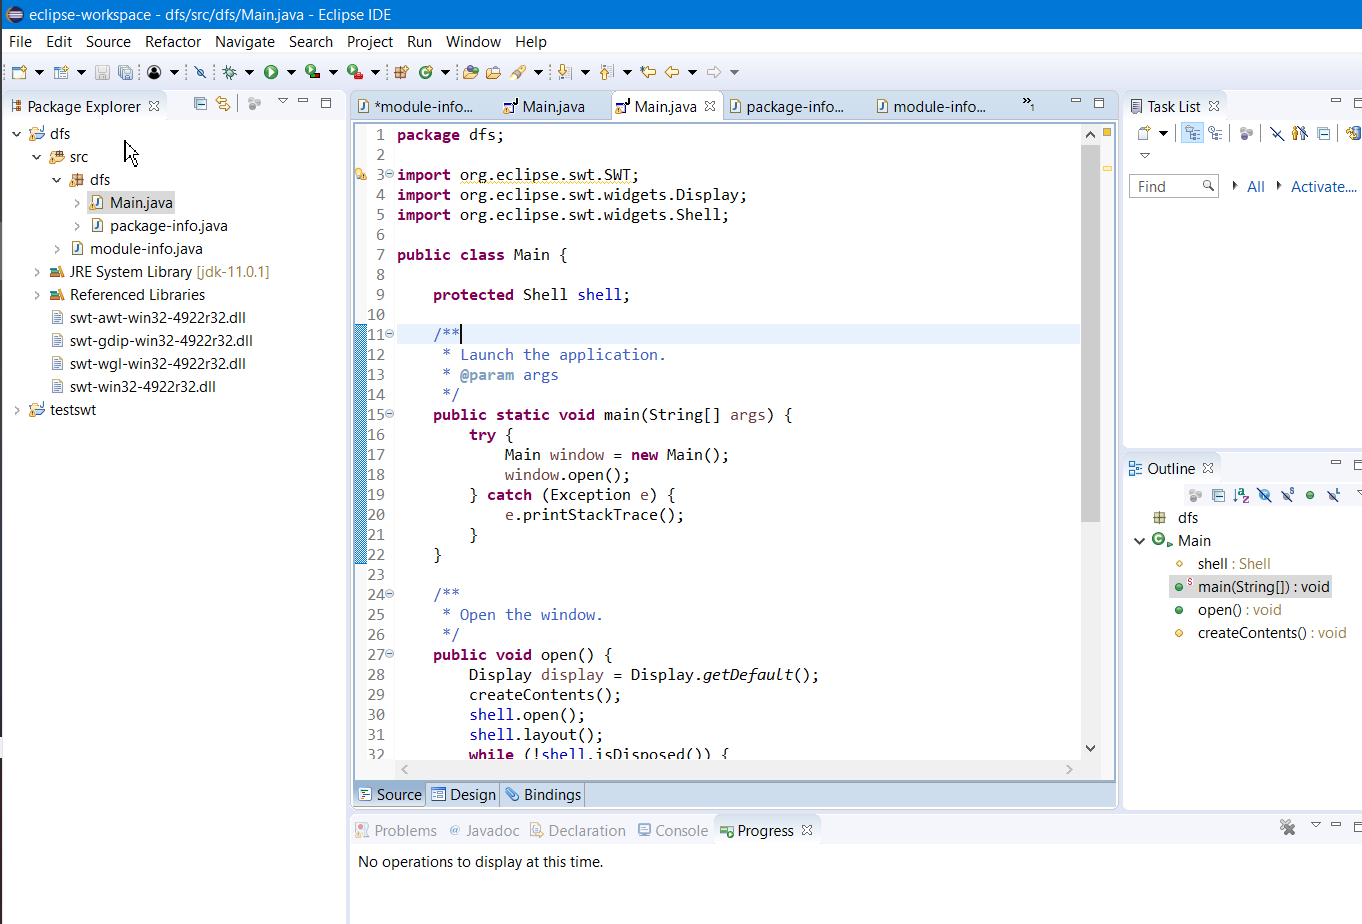
发现包资源管理器都没红×了吧!那就是成功了
最后点Main.java(Eclipse生成的swt程序示例),然后切换design界面,点Reparse重新加载可视化界面即可

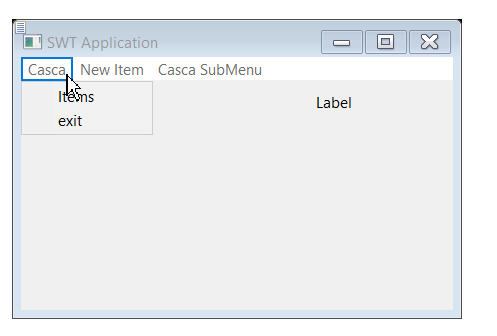
最后效果:

测试添加组件(一切正常)
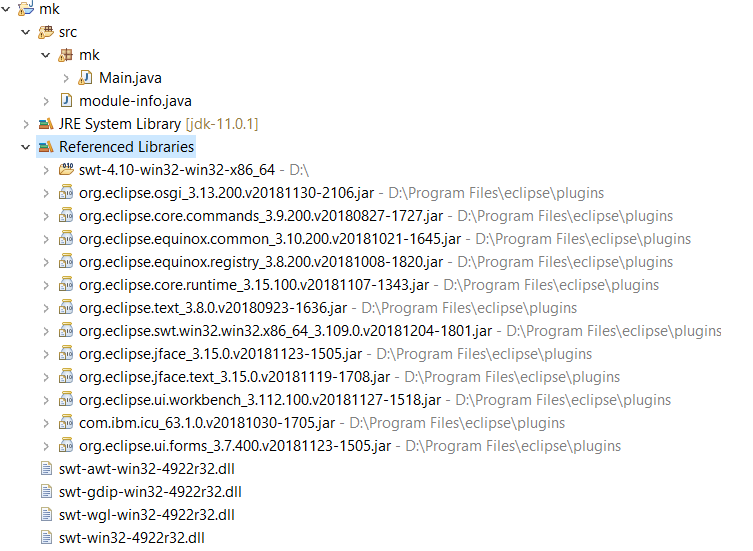
附上包资源一栏截图:
二,在非Eclipse里配置SWT开发环境,例如VSCode
1,下载SWT:
进入https://www.eclipse.org/swt/
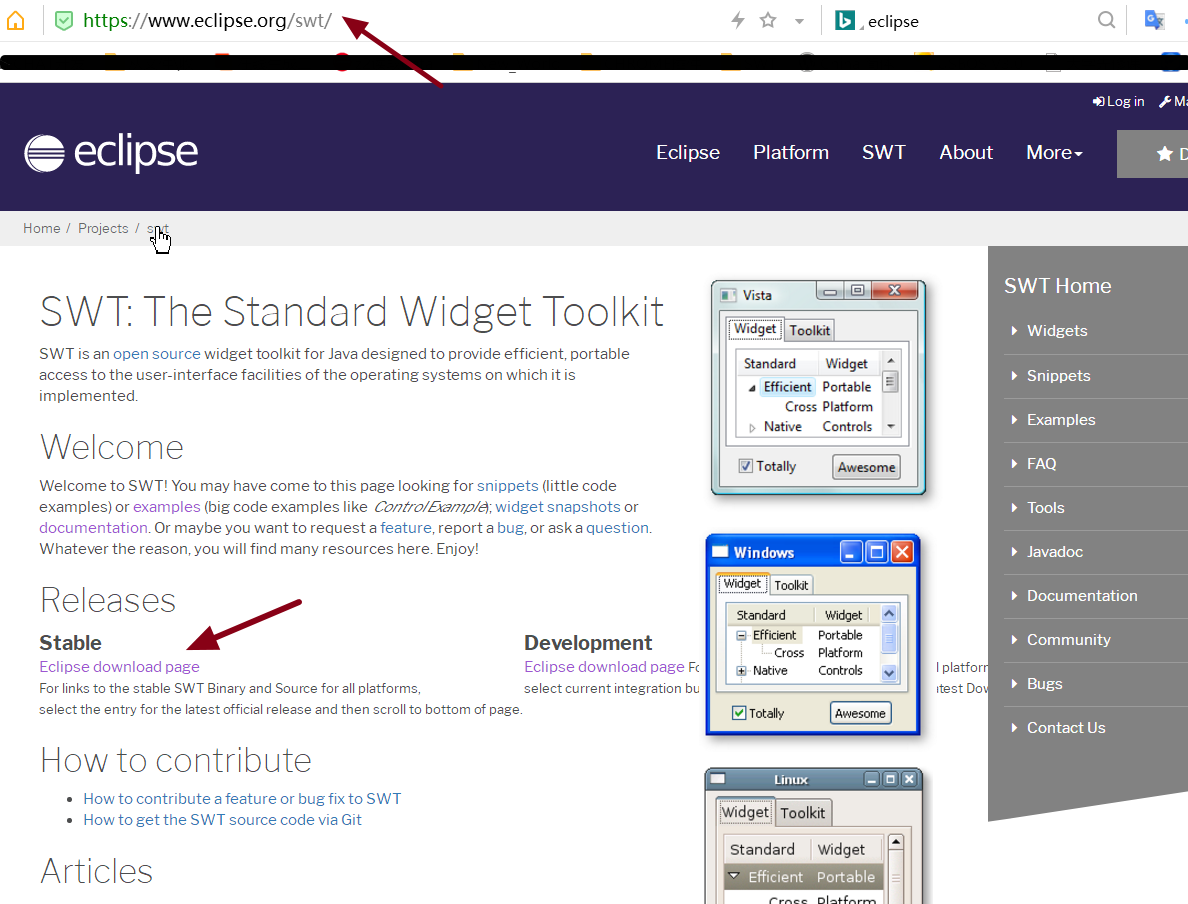
在Lastest Release里点击你Eclipse对应的版本号。
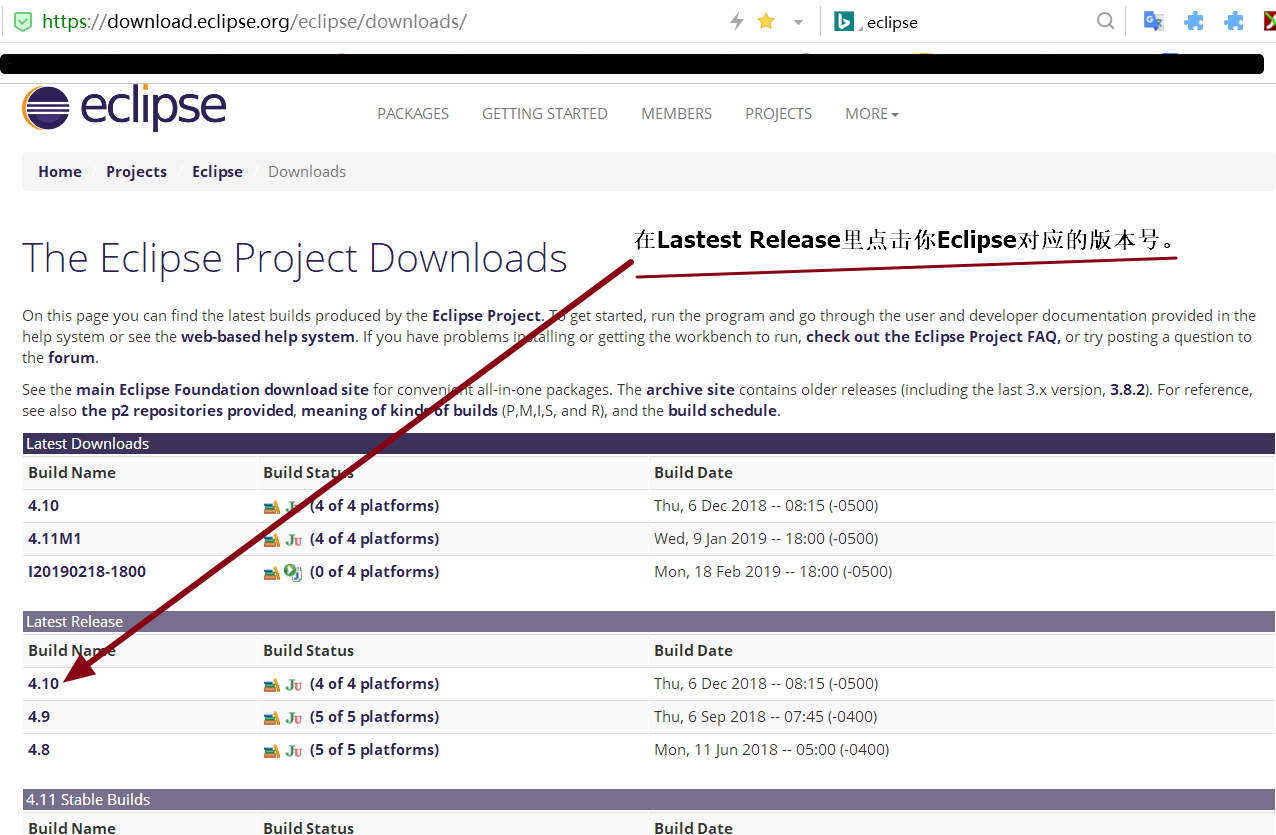
进入后你会发现这里有你选择的Eclipse版本所对应的全部SDK及其运行环境(如下图),
往下翻找到SWT Binary and Source,点击swt-<Eclipse版本号>-win32-win32-x86_64.zip下载即可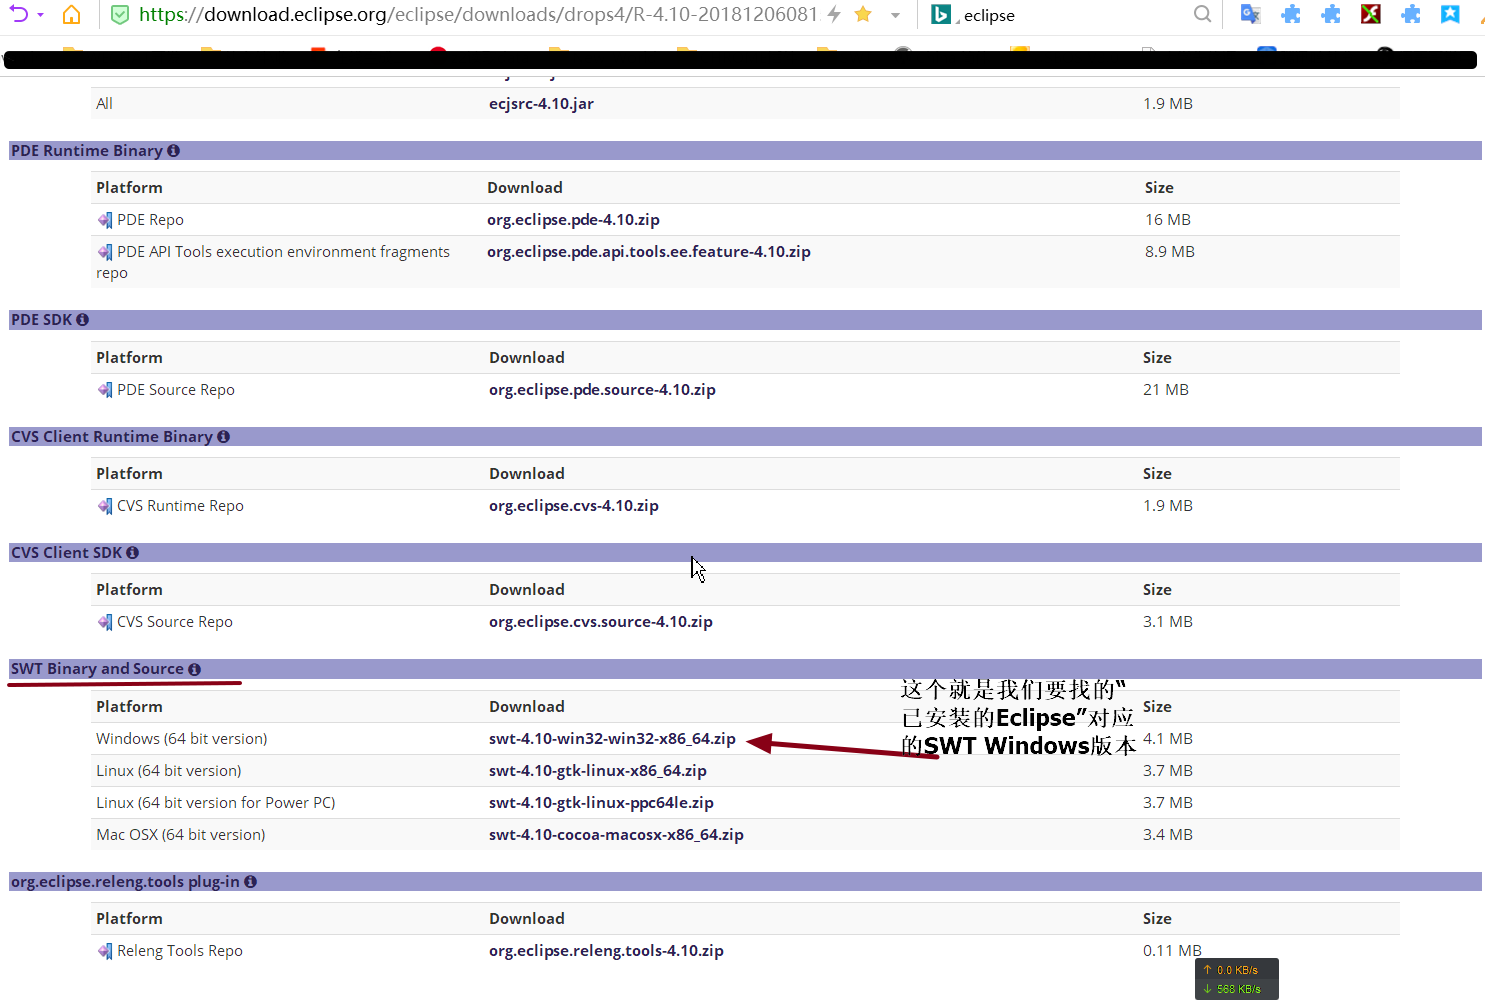
下载完成。

写好HelloWorld 并按照以下目录结构放置
+ lib
- swt.jar
+ src
- HelloWorld.java
 package org.yu;

 /**

  * Hello world!

  *

  */

 import org.eclipse.swt.widgets.Display;

 import org.eclipse.swt.widgets.Shell;

 import org.eclipse.swt.SWT;

 public class App {

     public static void main(String[] args){

         Display aDisplay = new Display();

         Shell shell = new Shell(aDisplay,SWT.);

         shell.setLocation(200, 200);

         shell.setSize(400, 300);

         shell.setText("Title is Mine");

         shell.open();

         while (!shell.isDisposed())         // 窗体是否关闭

         {

             if (!aDisplay.readAndDispatch())         // 检验 Display 线程状态是否忙

                 aDisplay.sleep();            // Display 类线程休眠

         }

         aDisplay.dispose();                 // 注销 Display 对象资源

     }

 }
测试一下
javac -classpath "../lib/swt.jar" HelloWorld.java
2,配置SWT环境(以VSCode为例)
配好JDK环境变量,然后按照VSCode官方说明安装好Java插件,然后有几种方法:
一:把 swt.jar 加入CLASSPATH变量如 E:\japi\swt.jar,然后在VSCode里设置,特别麻烦....(但是可以用到最新版4.924)
 <?xml version="1.0" encoding="UTF-8"?>

 <project xmlns="http://maven.apache.org/POM/4.0.0" xmlns:xsi="http://www.w3.org/2001/XMLSchema-instance"

   xsi:schemaLocation="http://maven.apache.org/POM/4.0.0 http://maven.apache.org/xsd/maven-4.0.0.xsd">

   <modelVersion>4.0.0</modelVersion>

   <groupId>org.yu</groupId>

   <artifactId>demoSwt</artifactId>

   <version>1.0-SNAPSHOT</version>

   <name>demoSwt</name>

   <!-- FIXME change it to the project's website -->

   <url>http://www.example.com</url>

 <repositories>

     <repository>

         <id>maven-eclipse-repo</id>

         <url>http://maven-eclipse.github.io/maven</url>

     </repository>

 </repositories>

   <properties>

     <project.build.sourceEncoding>UTF-8</project.build.sourceEncoding>

     <maven.compiler.source>1.8</maven.compiler.source>

     <maven.compiler.target>1.8</maven.compiler.target>

     <swt.version>4.6.1</swt.version>

   </properties>

   <dependencies>

     <dependency>

       <groupId>junit</groupId>

       <artifactId>junit</artifactId>

       <version>4.11</version>

       <scope>test</scope>

     </dependency>

     <!-- <dependency>

       <groupId>org.eclipse.swt</groupId>

       <artifactId>org.eclipse.swt.win32.win32.x86</artifactId>

       <version>${swt.version}</version>

       - To use the debug jar, add this -

       <classifier>debug</classifier>

     </dependency> -->

     <!-- <dependency>

       <groupId>org.eclipse.swt</groupId>

       <artifactId>org.eclipse.swt.win32.win32.x86_64</artifactId>

       <version>${swt.version}</version>

     </dependency> -->

     <!-- <dependency>

       <groupId>org.eclipse.swt</groupId>

       <artifactId>org.eclipse.swt.gtk.linux.x86</artifactId>

       <version>${swt.version}</version>

       <classifier>debug</classifier>

     </dependency> -->

     <dependency>

       <groupId>org.eclipse.swt</groupId>

       <artifactId>org.eclipse.swt.gtk.linux.x86_64</artifactId>

       <version>${swt.version}</version>

       <classifier>debug</classifier>

     </dependency>

     <!-- <dependency>

       <groupId>org.eclipse.swt</groupId>

       <artifactId>org.eclipse.swt.cocoa.macosx.x86_64</artifactId>

       <version>${swt.version}</version>

     </dependency> -->

 </dependencies>

   <build>

     <pluginManagement><!-- lock down plugins versions to avoid using Maven defaults (may be moved to parent pom) -->

       <plugins>

         <!-- clean lifecycle, see https://maven.apache.org/ref/current/maven-core/lifecycles.html#clean_Lifecycle -->

         <plugin>

           <artifactId>maven-clean-plugin</artifactId>

           <version>3.1.0</version>

         </plugin>

         <!-- default lifecycle, jar packaging: see https://maven.apache.org/ref/current/maven-core/default-bindings.html#Plugin_bindings_for_jar_packaging -->

         <plugin>

           <artifactId>maven-resources-plugin</artifactId>

           <version>3.0.2</version>

         </plugin>

         <plugin>

           <artifactId>maven-compiler-plugin</artifactId>

           <version>3.8.0</version>

         </plugin>

         <plugin>

           <artifactId>maven-surefire-plugin</artifactId>

           <version>2.22.1</version>

         </plugin>

         <plugin>

           <artifactId>maven-jar-plugin</artifactId>

           <version>3.0.2</version>

         </plugin>

         <plugin>

           <artifactId>maven-install-plugin</artifactId>

           <version>2.5.2</version>

         </plugin>

         <plugin>

           <artifactId>maven-deploy-plugin</artifactId>

           <version>2.8.2</version>

         </plugin>

         <!-- site lifecycle, see https://maven.apache.org/ref/current/maven-core/lifecycles.html#site_Lifecycle -->

         <plugin>

           <artifactId>maven-site-plugin</artifactId>

           <version>3.7.1</version>

         </plugin>

         <plugin>

           <artifactId>maven-project-info-reports-plugin</artifactId>

           <version>3.0.0</version>

         </plugin>

       </plugins>

     </pluginManagement>

   </build>

 </project>
附上Maven换源方法:
 ~/.m2$ cat settings.xml

 <settings xmlns="http://maven.apache.org/SETTINGS/1.0.0"

       xmlns:xsi="http://www.w3.org/2001/XMLSchema-instance"

       xsi:schemaLocation="http://maven.apache.org/SETTINGS/1.0.0

                           https://maven.apache.org/xsd/settings-1.0.0.xsd">

       <mirrors>

         <mirror>

             <id>alimaven</id>

             <name>aliyun maven</name>

             <url>http://maven.aliyun.com/nexus/content/groups/public/</url>

             <mirrorOf>central</mirrorOf>

         </mirror>

       </mirrors>

 </settings>
Maven 方式只在 Linux 下测试通过,Windows 可能还需用把dll文件放到class生成目录里(可能),MacOSX(买不起....)
但是Maven私人仓库的已经停更了,懂的可以自己做个私人仓库更新到最新版,然后按照原作者那样放 github 就行(不用服务器)
效果图(由于SWT的原理,所以皮肤会和系统一致)

没有关闭按钮:只是因为用了SWT.NO这个常量
Ps.如果提示:
Exception in thread "main" java.lang.UnsatisfiedLinkError: Cannot load 32-bit SWT libraries on 64-bit JVM
那么就把32位库拿开,只用64位库,用Maven的只需改一下pom.xml
最后放个快速入门资料(在两个qq群找到的,非常感谢他们,侵权请联系):
链接: https://pan.baidu.com/s/1zid8jDgl4wQFSle2OD3lcg
提取码: dbw5
当然在 百度文档搜 SWT 也是能找到不少资料的(想不到吧hh)
引用一句话:JFace与SWT的关系好比Microsoft的MFC与SDK的关系
最后,现在建议使用 JavaFX,官方支持的,参照了 SWT 调用系统底层的方式,这样保证稳定性和样式与系统的一致性
学过JAVA ,想学GUI。网友说swing awt被淘汰了。请教现在主流的JAVA gui开发学啥?- 知乎
JavaFX,更先进的图形库
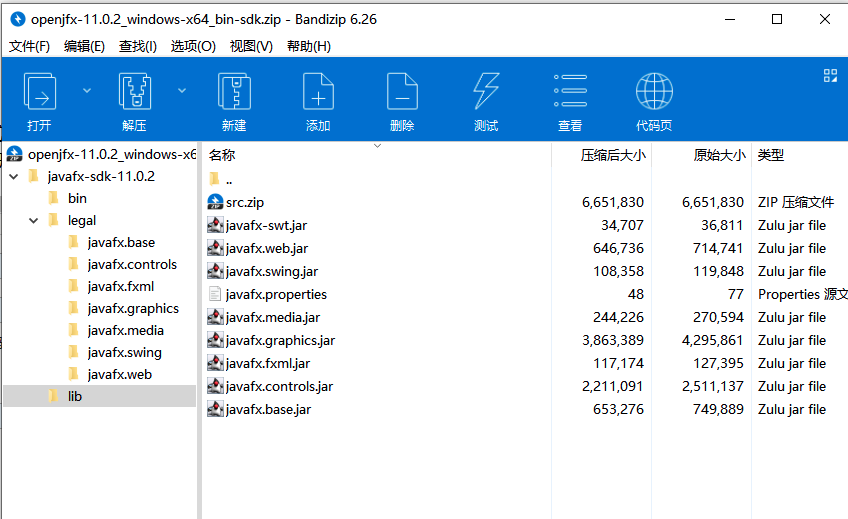
JavaFx的lib如下,可见包含了SWT Swing Fxml等优点,JDK8自带,而从JDK9开始JavaFX独立了出来(可能是考虑到全球桌面软件市场萎缩的原因)
JavaFX资料
https://www.jetbrains.com/help/idea/javafx.html#
https://openjfx.io/openjfx-docs/#IDE-Intellij
javafx自动缩放例子 按照淘宝自适应框架方法便编写-Main.java 公式(DPR = 物理像素 宽/高 , fontsize/= DPR)
可以用Maven或Gradle来管理依赖,这是我 javaFx 项目里的 pom.xml (最重要的是两个 JavaFX 的依赖,以及一个JavaFX的maven plugin)
 <?xml version="1.0" encoding="UTF-8"?>

 <project xmlns="http://maven.apache.org/POM/4.0.0" xmlns:xsi="http://www.w3.org/2001/XMLSchema-instance"

          xsi:schemaLocation="http://maven.apache.org/POM/4.0.0 http://maven.apache.org/xsd/maven-4.0.0.xsd">

     <modelVersion>4.0.0</modelVersion>

     <groupId>com.demo</groupId>

     <artifactId>BookManage</artifactId>

     <version>1.0-SNAPSHOT</version>

     <name>BookManage</name>

     <!-- FIXME change it to the project's website -->

     <url>http://www.example.com</url>

     <properties>

         <project.build.sourceEncoding>UTF-8</project.build.sourceEncoding>

         <maven.compiler.source>11</maven.compiler.source>

         <maven.compiler.target>11</maven.compiler.target>

         <fx.version>11</fx.version>

     </properties>

     <dependencies>

 <!--        JavaFX-->

         <dependency>

             <groupId>org.openjfx</groupId>

             <artifactId>javafx-controls</artifactId>

             <version>${fx.version}</version>

         </dependency>

         <dependency>

             <groupId>org.openjfx</groupId>

             <artifactId>javafx-fxml</artifactId>

             <version>${fx.version}</version>

         </dependency>

         <dependency>

             <groupId>junit</groupId>

             <artifactId>junit</artifactId>

             <version>4.12</version>

             <scope>test</scope>

         </dependency>

         <!-- https://mvnrepository.com/artifact/org.projectlombok/lombok -->

         <dependency>

             <groupId>org.projectlombok</groupId>

             <artifactId>lombok</artifactId>

             <version>1.18.12</version>

             <scope>provided</scope>

         </dependency>

     </dependencies>

     <build>

         <resources>

             <resource>

                 <directory>src/main/java</directory>

                 <includes>

                     <include>**/*.*</include>

                     <include>**/*.yml</include>

                     <include>**/*.properties</include>

                     <include>**/*.css</include>

                     <include>**/*.fxml</include>

                 </includes>

                 <filtering>false</filtering>

             </resource>

             <resource>

                 <directory>src/main/resources</directory>

                 <includes>

                     <include>**/*.*</include>

                     <include>**/*.yml</include>

                     <include>**/*.properties</include>

                     <include>**/*.css</include>

                     <include>**/*.fxml</include>

                 </includes>

                 <filtering>false</filtering>

             </resource>

         </resources>

         <pluginManagement><!-- lock down plugins versions to avoid using Maven defaults (may be moved to parent pom) -->

             <plugins>

 <!--                javaFX JDK11+ needed-->

                 <plugin>

                     <groupId>org.openjfx</groupId>

                     <artifactId>javafx-maven-plugin</artifactId>

                     <version>0.0.4</version>

                     <configuration>

                         <mainClass>com.demo.App</mainClass>

                     </configuration>

                 </plugin>

                 <!-- clean lifecycle, see https://maven.apache.org/ref/current/maven-core/lifecycles.html#clean_Lifecycle -->

                 <plugin>

                     <artifactId>maven-clean-plugin</artifactId>

                     <version>3.1.0</version>

                 </plugin>

                 <!-- default lifecycle, jar packaging: see https://maven.apache.org/ref/current/maven-core/default-bindings.html#Plugin_bindings_for_jar_packaging -->

                 <plugin>

                     <artifactId>maven-resources-plugin</artifactId>

                     <version>3.0.2</version>

                 </plugin>

                 <plugin>

                     <artifactId>maven-compiler-plugin</artifactId>

                     <version>3.8.0</version>

                     <configuration>

                         <source>11</source>

                         <target>11</target>

                     </configuration>

                 </plugin>

                 <plugin>

                     <artifactId>maven-surefire-plugin</artifactId>

                     <version>2.22.1</version>

                 </plugin>

                 <plugin>

                     <artifactId>maven-jar-plugin</artifactId>

                     <version>3.0.2</version>

                 </plugin>

                 <plugin>

                     <artifactId>maven-install-plugin</artifactId>

                     <version>2.5.2</version>

                 </plugin>

                 <plugin>

                     <artifactId>maven-deploy-plugin</artifactId>

                     <version>2.8.2</version>

                 </plugin>

                 <!-- site lifecycle, see https://maven.apache.org/ref/current/maven-core/lifecycles.html#site_Lifecycle -->

                 <plugin>

                     <artifactId>maven-site-plugin</artifactId>

                     <version>3.7.1</version>

                 </plugin>

                 <plugin>

                     <artifactId>maven-project-info-reports-plugin</artifactId>

                     <version>3.0.0</version>

                 </plugin>

             </plugins>

         </pluginManagement>

     </build>

 </project>
pom.xml
然后在配置IDEA的运行程序的configuration,添加Maven选项,然后填入参数 javafx:run 即可(这个javafx:run 就是上面pom里的plugin)
JDK14+JAVAFX14+Maven定制jre打包瘦身,必成版
按照此贴打包出完整jar -> 在JRE上试运行 -> 精简jre,然后用exe4j把 [jar] 打成exe ,再用innosetup把 [exe和JRE以及资源文件] 合成一个新的exe
如果是JDK9+,可以使用命令
教程作者说打包后,exe所在路径就是Java 的当前项目路径
其中,用于打包完整依赖的Maven插件建议用 shade,而不是作者用的那个 assembly
插件示例配置如下
                <plugin>

                    <groupId>org.apache.maven.plugins</groupId>

                    <artifactId>maven-shade-plugin</artifactId>

                    <version>3.2.1</version>

                    <executions>

                        <execution>

                            <phase>package</phase>

                            <goals>

                                <goal>shade</goal>

                            </goals>

                        </execution>

                    </executions>

                    <configuration>

                        <transformers>

                            <transformer implementation="org.apache.maven.plugins.shade.resource.ManifestResourceTransformer">

                                <mainClass>com.demo.AppLauncher</mainClass>

                            </transformer>

                        </transformers>

                    </configuration>

                </plugin>
pom.xml中的打包插件示例
调用该打包插件的命令:
mvn package shade:shade
在 IDEA 里配置 Java SceneBuilder

添加以下代码到start()
//        for print version

        System.out.println(System.getProperty("java.version") +" and "+ System.getProperty("javafx.version")); // JBR = OPENJDK11.0.5 + 10.0.2-internal JavaFx

        //--module-path "D:\Program Files\javafx-sdk-11.0.2\lib" --add-modules=javafx.controls,javafx.fxml

        // Loading FXML document with JavaFX API of version 11.0.1 by JavaFX runtime of version 10.0.2-internal
最新文章
- android 视频录制 混淆打包 之native层 异常的解决
- [css]我要用css画幅画(六)
- PHP输出缓冲(Output Buffering)
- 【零基础学习iOS开发】【02-C语言】05-进制
- 检测SqlServer服务器内存是否瓶颈
- 【Android - 框架】之Dagger2+MVP的用法
- Ubuntu 14.1 构造NFS
- SQL_where条件的优化
- 开源OSS.Social微信项目解析
- S0.6 直方图均衡化
- laravel 服务容器
- Face Aging with Conditional Generative Adversarial Network 论文笔记
- 【BZOJ】4008: [HNOI2015]亚瑟王
- webpack打包vue项目之后生成的dist文件该怎么启动运行
- cdq分治解决三维偏序
- python 导出mongoDB数据中的数据
- STL 笔记(四) 迭代器 iterator
- BZOJ 50题纪念?
- cocos2dx常见场景切换动画(转)
- Codeforces Round #335 (Div. 2) D. Lazy Student 贪心+构造