打造自己的3D全景漫游
2024-10-18 16:52:11
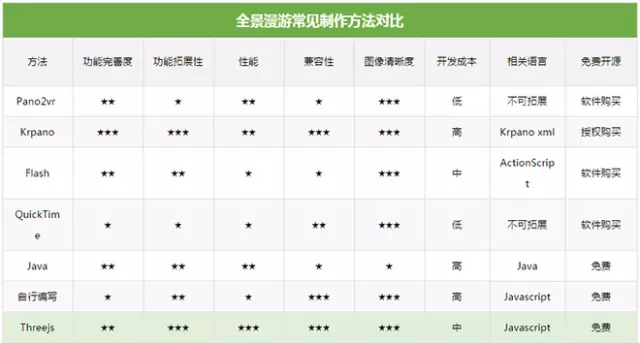
three.js
示例:
打造H5里的“3D全景漫游”秘籍 - 腾讯ISUX
QQ物联星球计划
通过
pano2vr直接将鱼眼全景图生成立体空间的六个面;也可通过Photoshop或其他的专业3D建模工具,将鱼眼图贴到3D球面上,再将球面转为立方面,获得立体空间的六个面。使用到的JS库:
- three.min.js
- CSS3DRenderer.js
GitHub地址:http://mrleo.github.io/3DPanorama
设置相机
//设置相机

camera = new THREE.PerspectiveCamera(50, window.innerWidth / window.innerHeight, 1, 1000);
设置场景
//设置场景

scene = new THREE.Scene();
定义3D空间的6个面的背景
//设置3D空间的6个面

var sides = [{

	url: '../static/img/gugong/posx.jpg',

	position: [-512, 0, 0],

	rotation: [0, Math.PI / 2, 0]

}, {

	url: '../static/img/gugong/negx.jpg',

	position: [512, 0, 0],

	rotation: [0, -Math.PI / 2, 0]

}, {

	url: '../static/img/gugong/posy.jpg',

	position: [0, 512, 0],

	rotation: [Math.PI / 2, 0, Math.PI]

}, {

	url: '../static/img/gugong/negy.jpg',

	position: [0, -512, 0],

	rotation: [-Math.PI / 2, 0, Math.PI]

}, {

	url: '../static/img/gugong/posz.jpg',

	position: [0, 0, 512],

	rotation: [0, Math.PI, 0]

}, {

	url: '../static/img/gugong/negz.jpg',

	position: [0, 0, -512],

	rotation: [0, 0, 0]

}];
将定义好的6各面添加到空间中
//将六个面添加到空间中,并为每个空间指定ID

for (var i = 0; i < sides.length; i++) {

	var side = sides[i];

	var element = document.createElement('section');

	element.id = 'section_'+i;

	var imgElement = document.createElement('img');

	imgElement.width = 1026; // 2 pixels extra to close the gap.

	imgElement.src = side.url;

	element.appendChild(imgElement);

	var object = new THREE.CSS3DObject(element);

	object.position.fromArray(side.position);

	object.rotation.fromArray(side.rotation);

	scene.add(object);

}
设置渲染器
//设置渲染器

renderer = new THREE.CSS3DRenderer();//定义渲染器

renderer.setSize(window.innerWidth, window.innerHeight);//设置尺寸

document.body.appendChild(renderer.domElement);//将场景加入页面
空间实时渲染
/**

 * 实时渲染

 */

function animate() {

	requestAnimationFrame(animate);

	//lon = Math.max(-180, Math.min(180, lon));//限制固定角度内旋转

	//lon += 0.1;//自动旋转

	lon += 0;

	lat = Math.max(-85, Math.min(85, lat));

	phi = THREE.Math.degToRad(90 - lat);

	theta = THREE.Math.degToRad(lon);

	target.x = Math.sin(phi) * Math.cos(theta);

	target.y = Math.cos(phi);

	target.z = Math.sin(phi) * Math.sin(theta);

	camera.lookAt(target);

	renderer.render(scene, camera);

}
为每个面构建空间的图标物件
/*

 * 添加图标

 */

function addIcon(){

	var imgIcon = document.createElement('img');

	imgIcon.src = '../static/img/arrow_right.png';

	imgIcon.classList.add('icon');

	document.getElementById('section_4').appendChild(imgIcon);

}

addIcon();
窗体大小改变更新相机
/**

 * 窗体大小改变

 */

function onWindowResize() {

	camera.aspect = window.innerWidth / window.innerHeight;

	camera.updateProjectionMatrix();

	renderer.setSize(window.innerWidth, window.innerHeight);

}
监听鼠标事件
function onDocumentMouseDown(event) {

	event.preventDefault();

	document.addEventListener('mousemove', onDocumentMouseMove, false);

	document.addEventListener('mouseup', onDocumentMouseUp, false);

}

function onDocumentMouseMove(event) {

	var movementX = event.movementX || event.mozMovementX || event.webkitMovementX || 0;

	var movementY = event.movementY || event.mozMovementY || event.webkitMovementY || 0;

	lon -= movementX * 0.1;

	lat += movementY * 0.1;

}

function onDocumentMouseUp(event) {

	document.removeEventListener('mousemove', onDocumentMouseMove);

	document.removeEventListener('mouseup', onDocumentMouseUp);

}

/**

 * 鼠标滚轮改变相机焦距

 */

function onDocumentMouseWheel(event) {

	camera.fov -= event.wheelDeltaY * 0.05;

	camera.updateProjectionMatrix();

}
监听触摸事件
//监听触摸事件

function onDocumentTouchStart(event) {

	event.preventDefault();

	var touch = event.touches[0];

	touchX = touch.screenX;

	touchY = touch.screenY;

}

function onDocumentTouchMove(event) {

	event.preventDefault();

	var touch = event.touches[0];

	lon -= (touch.screenX - touchX) * 0.1;

	lat += (touch.screenY - touchY) * 0.1;

	touchX = touch.screenX;

	touchY = touch.screenY;

}
WebGL中文网
基于Three.js的360X180度全景图预览插件
Photo Sphere Viewer是一款基于Three.js的360X180度全景图预览js插件。该js插件可以360度旋转查看全景图,也可以上下180度查看图片。使用该插件的唯一要求是浏览器支持canvas或WebGL。
使用方法
使用该全景图插件时要引入three.min.js和photo-sphere-viewer.min.js文件。
<script src="js/three.min.js"></script>

<script src="js/photo-sphere-viewer.min.js"></script>
HTML结构
可以创建一个空的<div>来放置全景图,通过CSS来设置它的尺寸。
<div id="container"></div>
初始化插件
要初始化该全景图插件,可以创建一个新的PhotoSphereViewer对象,然后在这个对象中插入一个参数对象,有两个参数是必须设置的:
var PSV = new PhotoSphereViewer({

    // Path to the panorama

    panorama: '1.jpg',

    // Container

    container: div

});
配置参数
下面是该全景图插件的所有可用配置参数:
panorama:必填参数,全景图的路径。container:必填参数,放置全景图的div元素。autoload:可选,默认值为true,true为自动调用全景图,false为在后面加载全景图(通过.load()方法)。usexmpdata:可选,默认值为true,如果Photo Sphere Viewer必须读入XMP数据则为true。default_position:可选,默认值为{},定义默认的位置,及用户看见的第一个点,例如:{long: Math.PI, lat: Math.PI/2}。min_fov:可选,默认值为30,观察的最小区域,单位degrees,在1-179之间。max_fov:可选,默认值为90,观察的最大区域,单位degrees,在1-179之间。allow_user_interactions:可选,默认值为true,设置为false则禁止用户和全景图交互(导航条不可用)。tilt_up_max:可选,默认值为Math.PI/2,向上倾斜的最大角度,单位radians。tilt_down_max:可选,默认值为Math.PI/2,向下倾斜的最大角度,单位radians。zoom_level:可选,默认值为0,默认的缩放级别,值在0-100之间。long_offset:可选,默认值为PI/360,mouse/touch移动时每像素经过的经度值。lat_offset:可选,默认值为PI/180,mouse/touch移动时每像素经过的纬度值。time_anim:可选,默认值为2000,全景图在time_anim毫秒后会自动进行动画。(设置为false禁用它)theta_offset:过时的选项,可选,默认值为1440,自动动画时水平方向的速度。anim_speed:可选,默认值为2rpm,动画的速度,每秒/分钟多少radians/degrees/revolutions。navbar:可选值,默认为false。显示导航条。navbar_style:可选值,默认为{}。导航条的自定义样式。下面是可用的样式列表:backgroundColor:导航条的背景颜色,默认值为rgba(61, 61, 61, 0.5)。buttonsColor:按钮的前景颜色,默认值为transparent。activeButtonsBackgroundColor:按钮激活状态的背景颜色,默认值为rgba(255, 255, 255, 0.1)。buttonsHeight:按钮的高度,单位像素,默认值为20。autorotateThickness:autorotate图标的厚度,单位像素,默认值为1。zoomRangeWidth:缩放的范围,单位显示,默认值50。zoomRangeThickness:缩放的范围的厚度,单位像素,默认值1。zoomRangeDisk:缩放范围的圆盘直径,单位像素,默认值为7。fullscreenRatio:全屏图标的比例,默认值为3/4。fullscreenThickness:全屏图标的厚度,单位像素,默认值为2。
loading_msg:可选,默认值为Loading…,图片加载时的提示文字。loading_img:可选,默认值为null,在加载时显示的图片的路径。size:可选,默认值null,全景图容器的最终尺寸。例如:{width: 500, height: 300}。onready:可选值,默认值为null。当全景图准备就绪并且第一张图片显示时的回调函数。
最新文章
- selenium自动化-java-IE启动
- linux REDHAT6.4下安装ArcGIS Server 10.1
- paip 自定义输入法多多输入法词库的备份导出以及导入
- win10初体验,我的错误代码哪里去了
- Grunt - grunt-contrib-connect
- BZOJ 3199 escape
- (转)深入理解javascript的function
- 退出myeclipse 8.5配置中心
- node.weiChat
- 关于Ansi_Nulls、Quoted_Identifier、Ansi_Padding的用法
- create-keyframe-animation-js实现css3动画
- ecstore中怎样使用ajax提交数据
- Android编程 控件与布局
- Pycharm 中You are using pip version 10.0.1, however version 18.1 is available. You should consider upgrading via the 'python -m pip install --upgrade pip' command.
- ldap集成nexus
- MySQL Export--导出数据
- presto调研和json解析函数的使用
- java-结合c3p0封装的db 事务 类
- (转)ASP连接sql server实例解析
- python函数可变参数*args和**kwargs区别
热门文章
- [转]Android中内存占用的含义:(VSS,PSS,RSS,USS)
- 【Shell脚本学习21】Shell break和continue命令
- uva 10054 The Necklace 拼项链 欧拉回路基础应用
- Frameset使用教程 小结
- xe5 android sample 中的 SimpleList 是怎样绑定的
- codeforces 680B B. Bear and Finding Criminals(水题)
- codeforces 675C C. Money Transfers(贪心)
- poj 1390 动态规划
- 4560 NOIP2015 D2T2 子串
- ankhSVN安装后,VS2010使用