深入浅出 Cocoa 之 Core Data(4)- 使用绑定
深入浅出 Cocoa 之 Core Data(4)- 使用绑定
罗朝辉(http://blog.csdn.net/kesalin)
CC 许可,转载请注明出处
前面讲解了 Core Data 的框架,并完全手动编写代码演示了 Core Data 的运作过程。下面我们来演示如何结合 XCode 强大的可视化编辑以及 Cocoa 键值编码,绑定机制来使用 Core Data。有了上面提到的哪些利器,在这个示例中,我们无需编写 NSManagedObjectModel 代码,也无需编写 NSManagedObjectContext,工程模版在背后为我们做了这些事情。
今天要完成的这个示例,有两个 Entity:StudentEntity 与 ClassEntity,各自有一个名为 name 的 Attribute。其中 StudentEntity 通过一个名为 inClass 的 relationship 与 ClassEntity关联,而 ClassEntity 也有一个名为 students 的 relationship 与 StudentEntity 关联,这是一个一对多的关系。此外 ClassEntity 还有一个名为 monitor 的 relationship 关联到 StudentEntity,表示该班的班长。
代码下载:点此下载
=========================================================================
7,创建 NSArrayController,关联对象
现在回到 xib 中来,选中 StudentView.xib,设置StudentView 的 File's Owner 的类为 StudentViewController;使用 Control-Drag 将 File's Owner 的 view 指向 custom view。
向其中拖入两个 NSArrayController:ClassPopup 和 Students。
设置 ClassPopup 的 Object Controller Mode 为 Entity Name,实体名为:ClassEntity,并勾选 Prepare Content。
设置 Students 的 Object Controller Mode 为 Entity Name,实体名为:StudentEntity,并勾选 Prepare Content。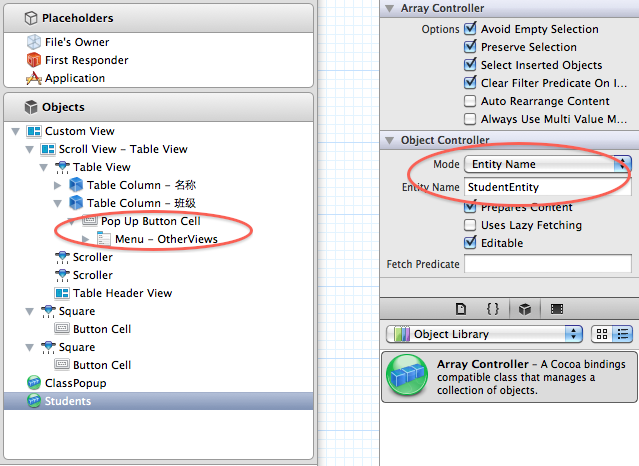
上面的这些操作,ClassPopup ArrayController 管理 ClassEntity 的数据,Students ArrayController 管理 StudentEntity 的数据,后面我们就要将控件与这些 ArrayController 绑定起来。下面我们将这两个 NSArrayController 的 ManagedObjectContext 参数与 ManagedViewController(File's Owner) 中的 managedObjectContext 绑定起来,这样 NSDocuments 的 NSManagedObjectContext 就作用到的 ArrayController 中来了。下面只演示了 ClassPopup,请自行完成 Students 的绑定: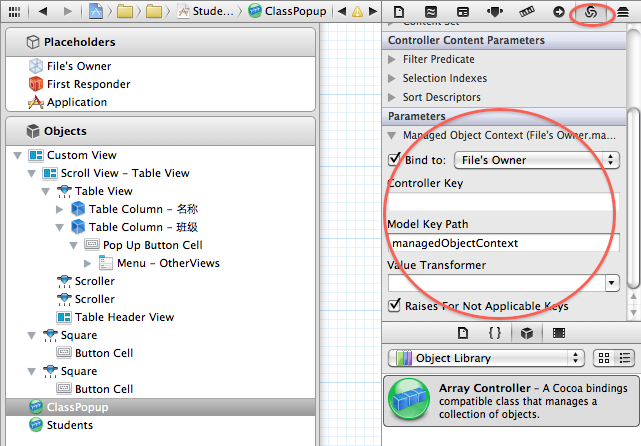
前面我们在 ManagedViewController 创建了一个 IBOutlet contentArrayController,现在是将它关联的时候了,使用 Control-Drag 将 File's Owner 的 contentArrayController 关联到 Students。
重复上面的过程,选中 ClassView.xib,将 File's Owner 的类为 ClassViewController,并将其 view 指向 custom view。
向其中拖入三个 NSArrayController:Classes,MonitorPopup 和 Students。
设置 Classes 的 Object Controller Mode 为 Entity Name,实体名为:ClassEntity,并勾选 Prepare Content。
将 Classes 的 ManagedObjectContext 参数与 ManagedViewController(File's Owner) 中的 managedObjectContext 绑定起来。
注意:这里没有对 MonitorPopup 和 Students 进行修改。
使用 Control-Drag 将 File's Owner 的 contentArrayController 关联到 Classes。
将 Students 和 MonitorPopup 的 Content set 绑定到 Classes 的 Model key path: students,表示这两个 ArrayController 是管理对应 ClassEntity 的 students 的数据。
至此,模型, ArrayController 都准备好了,下面我们将控件绑定到这些对象上。上面已经够繁琐的了,下面我们得更加仔细,很容易出错的。
选中 StudentView.xib,展开 Custom View 中的 TableView,直到我们看到名称和班级两个 Table Column。
选中名称列,将其 value 绑定到 Students,model key path 为:name,表明第一列显示学生的名称;
选择班级列,注意这一列是popup button cell,
将其 Content 绑定到 ClassPopup;
将其 ContentValues 绑定到 ClassPopup,model key path 为:name,表明第二列的选项为班级的名称;
将其 Selected Object 绑定到 Students,model key path 为:inClass;表明将学生添加为选中班级的一员;
选中 + button,使用 Control+Drag将其托拽到 Students 上,选择 add: 动作关联;
选中 - button,使用 Control+Drag将其托拽到 Students 上,选择 remove: 动作关联;
选中 - button,将其 Eanbled 绑定到 Students, ctroller key 为:canRemove;
以上操作是将添加,删除学生的操作直接与 Students ArrayController 绑定,无需编写一点儿代码!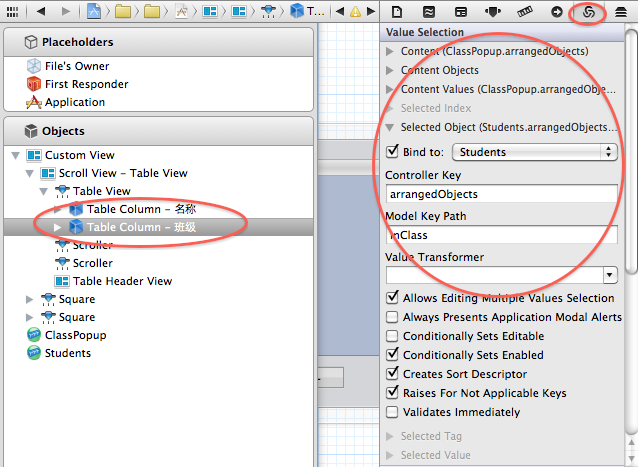
选中 ClassView.xib
展开 Custom View 中的班级表,,直到我们看到班级 Table Column:选择班级列,将其 value 绑定到 Classes,model key path 为:name,表明这一列显示班级的名称;
选中 Box,将其 Title 绑定到 Classed,model key path 为:name,并设置下方的 No Selection Placeholder 为:No Selection,Null Placeholder 为:Unnamed Class。 表明 box 显示的信息为选中班级的信息,如果没有选中任何班级,则显示 No Selection。
展开 Box
选中 Pop up button
将其 Content 绑定到 MonitorPopup;
将其 ContentValues 绑定到 MonitorPopup,model key path 为:name,表明其选项为班级中的学生的名称;
将其 Selected Object 绑定到 Classes,model key path 为:monitor;表明将选中的学生当作该班级的班长;
展开学生 tabel view,直到我们看到学生这个 Table Column。
选择学生列,将其 Value 绑定到 Students,Model key path 为:name,表明学生列表显示该班级中所有学生的名称。
选中 + button,使用 Control+Drag 将其托拽到 Classes 上,选择 add: 动作关联;
选中 - button,使用 Control+Drag 将其托拽到 Classes 上,选择 remove: 动作关联;
选中 - button,将其 Eanbled 绑定到 Classes, ctroller key 为:canRemove;
以上操作是将添加,删除班级的操作直接与 Classes ArrayController 绑定。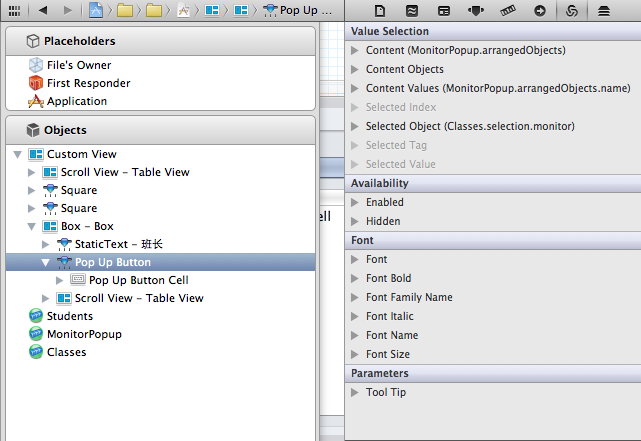
至此,绑定也大功告成,如果你的程序运行不正确,多半是这地方的关联与绑定错了,请回到这部分,仔细检查每一项。
8,显示,切换 view。
现在到了设置主界面的时候,修改 MyDocument.h 中的代码如下:
- #import <Cocoa/Cocoa.h>
- @class ManagedViewController;
- @interface MyDocument : NSPersistentDocument {
- @private
- NSBox * box;
- NSPopUpButton * popup;
- NSMutableArray *viewControllers;
- NSInteger currentIndex;
- }
- @property (nonatomic, retain) IBOutlet NSBox * box;
- @property (nonatomic, retain) IBOutlet NSPopUpButton * popup;
- - (IBAction) changeViewController:(id)sender;
- - (void) displayViewController:(ManagedViewController *)mvc;
- @end
修改 MyDocument.m 中的代码如下:
- #import "MyDocument.h"
- #import "ClassViewController.h"
- #import "StudentViewController.h"
- @implementation MyDocument
- @synthesize popup;
- @synthesize box;
- - (id)init
- {
- self = [super init];
- if (self) {
- // create view controllers
- //
- viewControllers = [[NSMutableArray alloc] init];
- ManagedViewController * mvc;
- mvc = [[ClassViewController alloc] init];
- [mvc setManagedObjectContext:[self managedObjectContext]];
- [viewControllers addObject:mvc];
- [mvc release];
- mvc = [[StudentViewController alloc] init];
- [mvc setManagedObjectContext:[self managedObjectContext]];
- [viewControllers addObject:mvc];
- [mvc release];
- }
- return self;
- }
- - (void) dealloc
- {
- self.box = nil;
- self.popup = nil;
- [viewControllers release];
- [super dealloc];
- }
- - (NSString *)windowNibName
- {
- // Override returning the nib file name of the document
- // If you need to use a subclass of NSWindowController or if your document supports multiple NSWindowControllers, you should remove this method and override -makeWindowControllers instead.
- return @"MyDocument";
- }
- - (void)windowControllerDidLoadNib:(NSWindowController *)aController
- {
- [super windowControllerDidLoadNib:aController];
- // init popup
- //
- NSMenu *menu = [popup menu];
- NSInteger itemCount = [viewControllers count];
- for (NSInteger i = 0; i < itemCount; i++) {
- NSViewController *vc = [viewControllers objectAtIndex:i];
- NSMenuItem *item = [[NSMenuItem alloc] initWithTitle:[vc title]
- action:@selector(changeViewController:)
- keyEquivalent:@""];
- [item setTag:i];
- [menu addItem:item];
- [item release];
- }
- // display the first controller
- //
- currentIndex = 0;
- [self displayViewController:[viewControllers objectAtIndex:currentIndex]];
- [popup selectItemAtIndex:currentIndex];
- }
- #pragma mark -
- #pragma mark Change Views
- - (IBAction) changeViewController:(id)sender
- {
- NSInteger tag = [sender tag];
- if (tag == currentIndex) {
- return;
- }
- currentIndex = tag;
- ManagedViewController *mvc = [viewControllers objectAtIndex:currentIndex];
- [self displayViewController:mvc];
- }
- - (void) displayViewController:(ManagedViewController *)mvc
- {
- NSWindow *window = [box window];
- BOOL ended = [window makeFirstResponder:window];
- if (!ended) {
- NSBeep();
- return;
- }
- NSView *mvcView = [mvc view];
- // Adjust window's size and position
- //
- NSSize currentSize = [[box contentView] frame].size;
- NSSize newSize = [mvcView frame].size;
- float deltaWidth = newSize.width - currentSize.width;
- float deltaHeight = newSize.height - currentSize.height;
- NSRect windowFrame = [window frame];
- windowFrame.size.width += deltaWidth;
- windowFrame.size.height += deltaHeight;
- windowFrame.origin.y -= deltaHeight;
- [box setContentView:nil];
- [window setFrame:windowFrame display:YES animate:YES];
- [box setContentView:mvcView];
- // add viewController to the responder-chain
- //
- [mvcView setNextResponder:mvc];
- [mvc setNextResponder:box];
- }
- @end
在 MyDocument 中,我们创建了两个 ManagedViewController,并将 managedObjectContext 传入其中。这两个ViewController分别代表班级与学生两个界面,然后通过 popup button 的选择在他们之间切换显示;在 displayViewController 中,我们还根据当前界面的大小来调整主界面的大小。这需要我们设置主界面中 box 的自动大小。打开 MyDocument.xib,作如下设置: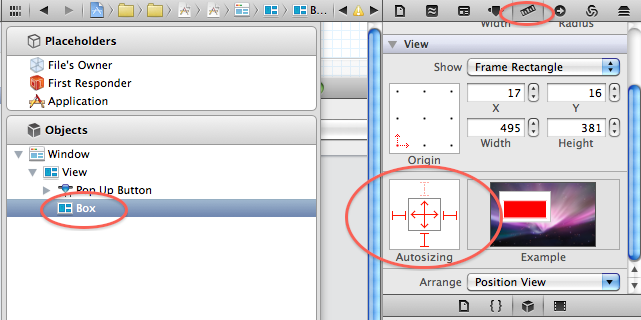
然后,使用 Control+Drag,将 File's Owner的 popup 和 popup button相联,box 与 box相联,并将 popup button 的 action 设置为 File's Owner 的 - (IBAction) changeViewController:(id)sender。
至此,所有的工作都完成了。编译运行程序,如果不出意外的话,我们应该可以添加学生,班级,并设置学生的班级,班级的班长等信息了。
最新文章
- 吃透Javascript数组操作的正确姿势—再读《Js高程》
- SPI
- thinkphp计划任务使用cronRun
- android studio 修改成自己jks(keystore)签名文件
- ubuntu下取代ping的好工具tcpping
- Scala Collection简介
- Java初学之华容道游戏
- RaidoGroup+RadioButton模拟android下拉框弹出List
- 【M9】利用destructors避免泄漏资源
- QVector&lt;QString&gt; 显示器里面的动态数组元素QString和char *转变
- HBase集群安装
- php处理表单中的复选框问题以及js实现全选
- .net到Java那些事儿--structs做了那些事(二)
- Spark-1.6.0之Application运行信息记录器JobProgressListener
- HTTP,RFC自学心得
- Starting zookeeper ... already running as process 1805错误
- webpack打包去掉console.log打印与debugger调试
- R语言函数总结(转)
- 【贪心策略】USACO 越野跑
- 20155332 补交ch12课下作业