python笔记-11 rabbitmq
一、理解rabbitmq的基本背景
1、理解消息队列
1.1 普通queue
在前面的博客中所提到的队列,此处均称之为普通队列
简述一下普通队列的一些分类及不足
1.1.1 基本Queue:queue
1.1.2 线程queue:threading.queue()
1.1.3 进程queue:multiprocessing.queue()、
普通queue的不足:
不同的线程可以通过线程queue来进行通信,但其他的子进程无法使用这个线程queue
父进程的子进程之间可以使用进程queue进行通信,但是无关的进程直接无法使用进程queueu进行通信
即,如果多个不相干的进程(没有父子关系),进程queue依然无法解决
1.2 rabbitmq 一种消息队列,用于无关联的多进程直接通信
2、rabbitmq的基本原理
多个进程交互不通的方式分析
2.1 通过硬盘进行交互,即在以往提到的序列化,使用json、pickle 交互,较慢
2.2 多个进程建立socket,相比硬盘,此方法快,但是需要两两建立socket,复杂
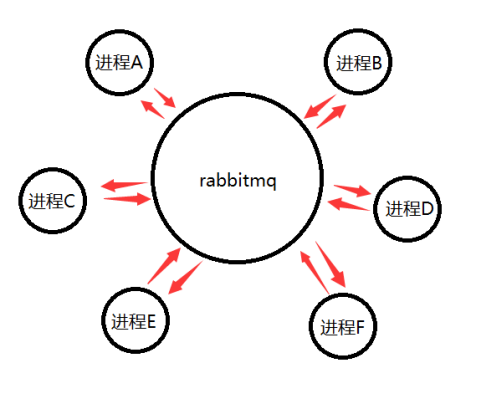
2.3 多个进程通过第三方中间商如rabbitmq、activemq来交互
Rabbitmq就是个中间商,所有的进程和它建立socket交互数据
3、rabbitmq的安装及启动
启动rabbitmq需要安装erlang及rabbitmq,此处不叙述安装过程
需要知道的是系统服务中,rabbitmq的运行,端口5672
需要知道系统服务中 rabbitmq的运行

二、python与rabbitmq
1、pika模块
Python和rabbitmq的交互使用pika模块,此模块需要安装。(此处不演示安装过程)
2、分清rabbitmq的几种角色
2.1 接收端与queue:
接收端,从rabbitmq中接收数据的,那么从rabbitmq中什么地方接收数据呢,queue。
Rabbitmq中,可以有很多的queue,接收端必须明确知道我需要从哪个queue中接收消息。
2.2 发送端
发送消息的一端,需要把消息发送到rabbitmq中,那么,是直接发送给queue中吗,不是的,发送端发送的消息,需要指定两个变量,才能最终决定消息发送到哪里。
2.3 两个变量 exchange与routing_key
在exchange为空时,routing_key直接将消息发送到routing_key这个变量名的queue中。
在exchange不为空时,exchange可以和routing_key相结合,最终决定将消息分配到哪个queue中。
2.4 几种常见的exchange类型
fanout
所有bind到这个echange的queue都能接收到信息。即一个echange能同时绑定多个queue。
direct
和routingkey搭配指定唯一的queue接收消息
topic
所有符合routingkey(此时的routingkey可以是一个表达式)的routingkey所bind的queue ->此处可以看出一个routingkey和queue的关系。即queue和routingkey是两个概念 ,且routingkey可以绑定多个queue。
headers
通过header来决定把消息发送到哪个queue中
三、常见场景分析
1、 exchange 为空的情况 一对一场景
此场景为rabbitmq中最简单的场景
Exchange为空 routing_key的值就是queue的name 一个消息直接发送到一个queue

1.1 发送方发送流程
建立连接->建立通道->声明队列->通过通道发消息->关闭连接
#step1 建立连接

connect=pika.BlockingConnection(pika.ConnectionParameters('localhost'))

#step2 建立通道

channel=connect_mq.channel()

#step3 声明队列

channel.queue_declare(queue='hello',durable=True)

#step4

#发送消息 ->3个关键点 exchange routing_key(实际被声明的队列) body(信息本身)

channel.basic_publish(

exchange='',

routing_key='hello',

body='hello world',

properties=pika.BasicProperties(delivery_mode=2)

)
1.2 接收端的接收流程
建立连接->建立通道->声明队列->通过队列接收消息->定义callback函数处理接收到的结果->开始接收->持续接收
#step 1/step 2/step 3 和生产者均一致

#step 4 接收消息 两个重点 callback函数,queue,队列名称

channel.basic_consume(

callback,

queue='hello',

#no_ack=True,

no_ack=False,

)

#step 5 callback函数的定义 4个必须的参数

def callback(ch,method,properties,body):

#ch:管道对象内存地址

#method:#一般不做了结

#properties:#下面细说

#body:正文本身byte格式

#step 6 开始接收

channel.start_consuming()
1.3 生产者消费者均声明queue的意义
我们无法判断在实际环境中是生产者还是消费者先运行 如果只在其中一个程序中声明队列,另一个没有声明,则可能出现没有声明的队列先运行的情况,此处就会出现程序报错。
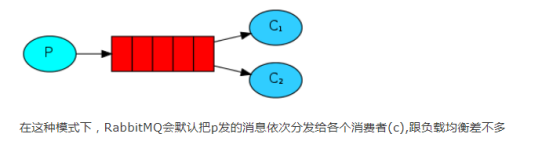
1.4 知道轮询机制
如果运行了一个发送端producer给queue中不断发送信息,此时运行了多个comsumer端(接收端)时,每个客户端将按照运行的先后顺序逐个接收包
1.5 windows为例查看rabbitmq中已有的队列及队列内的消息条数
rabbitmq 对当前队列的查看 可以查看到队列名和队列里消息的数量 rabbitmqctl list_queues
C:\rabbitmq_server-3.7.\sbin>rabbitmqctl list_queues

Timeout: 60.0 seconds ...

Listing queues for vhost / ...

hello
1.6 确认机制
确认机制 消费者在处理消息的过程中因为网络环境的关系断开 消息在rabbitmq中不会被清除,如果有多个消费者,这个消息还会轮询到其他的消费者
channel.basic_consume(

callback,

queue='hello',

#no_ack=True,

#no_ack=False,

)
默认没有ack
没有ack的情况下 rabbitmq会将所有的消息一口气发出 不管你是否处理了,此时数据端关闭,数据全丢失
E:\Program Files\RabbitMQ Server\rabbitmq_server-3.7.4\sbin>rabbitmqctl list_queues

Timeout: 60.0 seconds ...

Listing queues for vhost / ...

hello 7

channel.basic_consume(

callback,

queue='hello',

no_ack=True

)

def callback(ch,method,properties,body):

     time.sleep(10) #第一个sleep时断开 上述队列中7条数据全部丢失

     print('get info',body)
需要确认的情况,需要手工发送ack !!!ch.basic_ack(delivery_tag=method.delivery_tag)
channel.basic_consume(

no_ack=False
)

#需要手动发送ack

def callback(ch,method,properties,body):

    ch.basic_ack(delivery_tag=method.delivery_tag)
1.7 队列、消息持久化
如果是服务器down了,那消息不是就丢失了吗,如何解决,需要使用队列持久化和消息持久化,durable与delivery_mode=2
#队列持久化 队列会持续保持

channel.queue_declare(queue='hello',durable=True)

#消息持久化

channel.basic_publish(

exchange='',

routing_key='hello',

body='hello world',

properties=pika.BasicProperties(delivery_mode=2) 模式2 消息持久化

)
1.8 动态负载均衡 qos
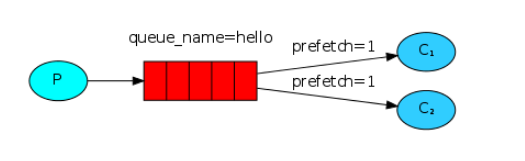
channel.basic_qos(prefetch_count=1)

#需要注意的地方 这个qos要搭配 no_ack=False一起使用才能生效
1.9 完整代码展示
#producer

import pika

#step 1  连接rabbitmq

connect_mq=pika.BlockingConnection(pika.ConnectionParameters('localhost'))

#step 2 建立通信通道

channel=connect_mq.channel()

#step 3 声明队列,告诉rabbitmq 我要和哪个队列通信

# 如果确定rabbitmq上已经存在此队列,此处可以省略

# 如果多个程序先后运行,只有一个程序声明了某队列,

# 其他程序没声明,那么若没有声明的程序先启动了。rebbitmq上没有这个队列,就会报错

channel.queue_declare(queue='hello',durable=True)

#step 4 通过通道给队列发送数据

# exchange此处先不考虑,routing_key为队列名字,body为需要发送的内容

import time

count=0

for i in range(30):

  print(count)

  xxx=str(count).encode()

  time.sleep(0)

  channel.basic_publish(exchange='',routing_key='hello',body=xxx,properties=pika.BasicProperties(delivery_mode=2))

  count+=1

print('send hello world to rabbiemq')

#step 5 关闭连接

connect_mq.close()

#consumer

import pika

import time

#step 1

connect_mq=pika.BlockingConnection(pika.ConnectionParameters('localhost'))

#step 2

channel=connect_mq.channel()

#step 3

channel.queue_declare(queue='hello',durable=True)

channel.basic_qos(prefetch_count=1)

#step 4 定义一个方法(函数)来处理队列读出来的数据

def callback(ch,method,properties,body):

#ch channel obj的内存地址

# method properties 此处先不关注 properties属性、特性

#body 实际内容

    #print(ch,method,properties)

    time.sleep(1)

    print('get info 1s',body)

    ch.basic_ack(delivery_tag=method.delivery_tag)

#step 5 接收动作

channel.basic_consume(

    callback,

    queue='hello',

    #no_ack=True

    no_ack=False,

     )

print('waiting for message')

#step 6 开始实际消耗

channel.start_consuming()
2、 rabbitmq的exchange不为空的几种场景
上面描述的是一对一发送,即发送到一个queue中
现在我们思考如何将消息广播出去,发送到多个queue中,此时我们需要使用exchange与routing_key的结合
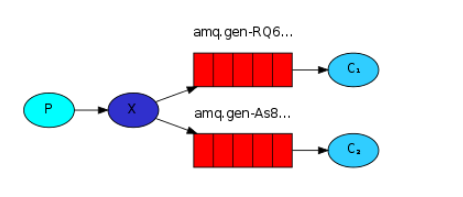
2.1 exchange 两端的理解
一端从生产者处接收消息,一端把接收到的消息push到队列中
echange它必须要准确知道如何处理接收的消息。消息是被添加到特定的queue中,还是被添加到很多个queue中,或者是这个消息应该被丢弃。
这些规则都由exchange的类型来决定
即exchange在定义的时候是有类型的,类型的选择很重要。关系到那些queue能接收消息。
2.2 一对多订阅(fanout)
订阅发布(广播) fanout 绑定过来的queue都发送
fanout的生产者流程
建立连接->建立通道->声明exchange(包括名字及类型)->指定exchange发送。
#step 1、step 2 和之前的一对一都一样

#step3 声明exchange

#此处要明确 我们是需要把消息丢给exchange处理的。rabbitmq中可以存在很多的exchange,每个exchange开发者都可以自己命名和并定义类型

channel.exchange_declare(

exchange='xxx1',

exchange_type='fanout'

)

#和队列声明对比channel.queue_declare(queue='hello',durable=True)

#在这种场景下 我们不需要声明队列,我们只关心 把消息给exchange即可,至于后期哪个queue要关联这个fanout 的exchange 我们不关心。这个是消费者自己来考虑的

#step 4 发送消息 此时指定相应的exchange名字发送

channel.basic_publish(exchange='xxx1',routing_key='',body=tmp_mess)
和之前的发送方式对比
channel.basic_publish(exchange='',routing_key='hello',body='hello world',)
一个是指定了exchange name 一个是指定了routingkey
fanout模式的消费者流程
建立连接->建立通道->声明exchange(不确定生产者消费者谁先运行)->声明队列->(临时队列的对象)->生成临时队列->临时队列与exchange绑定->定义callback函数处理接收到的结果->开始接收->持续接收
#step 1 、step 2、step 3都和上面的生产者一样

#step4 声明队列 此处我们需要生成一个随机名称的队列,用来接收订阅(广播),如果连接关闭随机队列自动结束。

#result = channel.queue_declare(exclusive=True) 队列类型声明

#exclusive 单独的 临时创建 连接断开则删除

tmp_queue_name= result.method.queue 生成临时的队列

#step5 将临时队列和exchange绑定

#fanout的定义 将消息转发给每个绑定到这个exchange的queue中(如果queue刚开始不存在,后面再连上,连上之前的数据是不回接收到的,消息到exchange后,exchange转发后,不会保留在exchange中)

#step 6 将exchange和临时队列进行绑定

channel.queue_bind(exchange='xxx1',queue=tmp_queue_name)

#step 7 callback函数定义 4元素

def callback(ch,method,properties,body)

#step 8 开始接收

channel.basic_consume(callback,queue=tmp_queue_name,no_ack=True)

#step 9 持续接收

channel.start_consuming()
完整代码
#producer

import pika

#step 1

connect_rabbitmq=pika.BlockingConnection(pika.ConnectionParameters('localhost'))

#step 2

channel=connect_rabbitmq.channel()

#step 3

channel.exchange_declare(exchange='xxx1',exchange_type='fanout')

#step 4 publish时要指定exhange 或 routing_key

while True:

   tmp_mess=input('please input the information\n>>:').strip()

   if not tmp_mess:continue

   if tmp_mess=='exit':exit('退出')

   tmp_mess=tmp_mess.encode(encoding='utf-8')

   channel.basic_publish(exchange='xxx1',routing_key='',body=tmp_mess)

#comsumer

import pika

conn_mq=pika.BlockingConnection(pika.ConnectionParameters('localhost'))

channel=conn_mq.channel()

channel.exchange_declare(exchange='xxx1',exchange_type='fanout')

#step 4 创建临时queue

result = channel.queue_declare(exclusive=True)#exclusive 单独的 临时创建 连接断开则删除

tmp_queue_name= result.method.queue

print(tmp_queue_name)

#step 5 绑定queue和exchange

channel.queue_bind(exchange='xxx1',queue=tmp_queue_name)

#step 6

def callback(ch,method,properties,body):

    print('>>:%s'%body.decode())

#step 7

channel.basic_consume(callback,queue=tmp_queue_name,no_ack=True)

#step 8

channel.start_consuming()
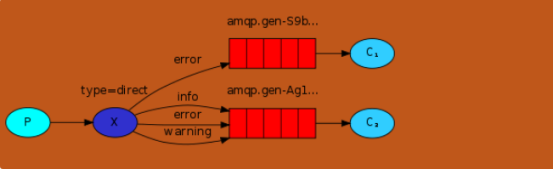
2.3 带过滤的一对多订阅(direct)
队列与关键字绑定(日志等级)
direct方式 通过exchange 和routing_key结合实现过滤(日志级别)
Direct 生产者的流程
建立连接->建立通道->声明exchange->声明routing_key->开始发送
#step 1、step 2 常规操作 奖励连接和通道

connet_it=pika.BlockingConnection(pika.ConnectionParameters('localhost'))

channel=connet_it.channel()

#step 3 声明exchange

#此时声明的exchange的type类型为direct

#相当于在fanout的基础上做了个细化

#消息到了exchange后 direct类型需要结合routing_key来将消息交到相应的queue中

channel.exchange_declare(exchange='log1',exchange_type='direct')

 #step4 step5 声明routiing_key 并发送

channel.basic_publish(

exchange='log1',

routing_key='info',

body=real_mess

)
direct消费者的流程
建立连接->建立通道->声明exchange->生成随机queue对象->生成随机queuename->queuename和exchange及routing_key进行绑定(此处发现,同一queue,同一exchange,可以绑定多个不同的routing_key)->开始接收信息->持续接收信息
#step 1 、step 2 、step3 的方式和生产者完全一样 生成了exchange type=direct

#step4、step 5 生成随机queue对象->生成随机queuename

result = channel.queue_declare(exclusive=True)#exclusive 单独的 临时创建 连接断开则删除

tmp_queue_name= result.method.queue

#step 6 队列绑定 将临时队列和exchange 及 routing_key 进行绑定

channel.queue_bind(exchange='log1', routing_key=i,queue=tmp_queue_name)

#step 7、step 8 开始接收,持续接收

channel.basic_consume(callback,queue=tmp_queue_name,no_ack=True)

channel.start_consuming()
direct完整代码
#producer

import pika

connet_it=pika.BlockingConnection(pika.ConnectionParameters('localhost'))#parameters

channel=connet_it.channel()

channel.exchange_declare(exchange='log1',exchange_type='direct')

while True:

    tmp_mess = input('please input the information\n>>:').strip()

    if not tmp_mess: continue

    if tmp_mess == 'exit': exit('退出')

    tmp_mess_list=tmp_mess.split()

    if len(tmp_mess_list)==1:

        print('error ! try again')

    else:

        log_level=tmp_mess_list[0]

        real_mess=''

        for i in tmp_mess_list[1:]:

            real_mess+=i

            real_mess+=' '

        real_mess=real_mess.strip()

        real_mess = real_mess.encode(encoding='utf-8')

        channel.basic_publish(exchange='log1', routing_key=log_level, body=real_mess)

-----------------------------------

#comsumer

import pika

connet_it=pika.BlockingConnection(pika.ConnectionParameters('localhost'))#parameters

channel=connet_it.channel()

channel.exchange_declare(exchange='log1',exchange_type='direct')

#tmp1=channel.queue_declare(exclusive=True)

#tmp_name=tmp1.method.queue()

result = channel.queue_declare(exclusive=True)#exclusive 单独的 临时创建 连接断开则删除

tmp_queue_name= result.method.queue

def callback(ch,method,properties,body):

    print('>>:%s'%body.decode())

tmp_level=input('输入日志等级:').strip()

level_list=tmp_level.split()

#level_list=['error','debug']

for i in level_list:

    channel.queue_bind(exchange='log1', routing_key=i,queue=tmp_queue_name)

channel.basic_consume(callback,queue=tmp_queue_name,no_ack=True)

channel.start_consuming()
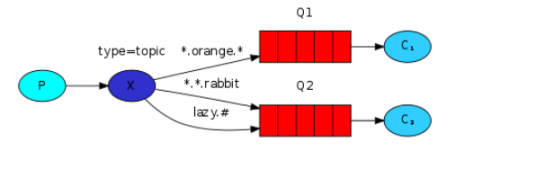
2.3 模糊匹配的一对多订阅(topic)
topic 更加细化过滤
与direct一样,需要exchange和routing_key相结合,区别就是exchange类型及routing_key可以使用过滤条件 # *.xxx xxx.* 匹配任意、尾部匹配、首部匹配
topic生产者流程
建立连接->建立通道->声明exchange->声明routing_key->开始发送
topic消费者流程
建立连接->建立通道->声明exchange->生成随机queue对象->生成随机queuename->queuename和exchange及routing_key进行绑定(此处发现,同一queue,同一exchange,可以绑定多个不同的routing_key)->开始接收信息->持续接收信息
所有的步骤和direct完全一样 只是这种方式能使用过滤条件 #任意 、xxx.*头部匹配、 *.xxx尾部匹配
#exchange type 为topic

channel.exchange_declare(exchange='superlog',exchange_type='topic')
topic完整代码
#producer

import pika

connect_it=pika.BlockingConnection(pika.ConnectionParameters('localhost'))

channel=connect_it.channel()

channel.exchange_declare(exchange='superlog',exchange_type='topic')

while True:

    tmp_mess = input('please input the information\n>>:').strip()

    if not tmp_mess: continue

    if tmp_mess == 'exit': exit('退出')

    tmp_mess_list=tmp_mess.split()

    if len(tmp_mess_list)==1:

        print('error ! try again')

    else:

        log_level=tmp_mess_list[0]

        real_mess=''

        for i in tmp_mess_list[1:]:

            real_mess+=i

            real_mess+=' '

        real_mess=real_mess.strip()

        real_mess = real_mess.encode(encoding='utf-8')

        channel.basic_publish(exchange='superlog',routing_key=log_level,body=real_mess)

-----------------------------------

#comsumer

import pika

connect_it=pika.BlockingConnection(pika.ConnectionParameters('localhost'))

channel=connect_it.channel()

channel.exchange_declare(exchange='superlog',exchange_type='topic')

result=channel.queue_declare(exclusive=True)

tmp_queue_name = result.method.queue

def callback(ch,method,properties,body):

    print('>>:%s'%body.decode())

tmp_level=input('输入日志等级:').strip()

level_list=tmp_level.split()

#level_list=['error','debug']

for i in level_list:

    channel.queue_bind(exchange='superlog', routing_key=i,queue=tmp_queue_name)

channel.basic_consume(callback,queue=tmp_queue_name,no_ack=True)

channel.start_consuming()
四、rabbitmq实现rpc
RPC(Remote Procedure Call)—远程过程调用,此部分不做过多的描述,实际实现很简单,就是上面序数内容的结合。此处只展示代码
#rpc client

import pika

import uuid

class RpcClient(object):

    def __init__(self):

        #1、连接rabbitmq 2、创建channel 3、生成一个临时的queue 用于收消息 basicconsumer

        self.connect_it=pika.BlockingConnection(pika.ConnectionParameters('localhost'))

        self.channel=self.connect_it.channel()

        self.channel.queue_declare(queue='client_sent_to_server')

        result = self.channel.queue_declare(exclusive=True)

        self.callback_queue = result.method.queue

        #临时生成一个queue

        self.channel.basic_consume(self.recv_mess,queue=self.callback_queue,no_ack=True)

    def recv_mess(self,ch,method,props,body):

        if self.ack_id==props.correlation_id:

            self.recv_body=body

    def call(self,n):

        self.recv_body=None

        self.ack_id=str(uuid.uuid4())

        self.channel.basic_publish(

            exchange='',

            routing_key='client_sent_to_server',

            properties=pika.BasicProperties(

                reply_to=self.callback_queue,

                correlation_id=self.ack_id,

            ),

            body=n

        )

        while self.recv_body is None:

            self.connect_it.process_data_events()#监听回复

            #self.channel.start_consuming()对比一下

        return self.recv_body

tmp_rpc=RpcClient()

while True:

    x=input('>>:').strip()

    if x=='exit':exit()

    if not x:continue

    x=x.encode('utf-8')

    y=tmp_rpc.call(x)

    y=y.decode()

    print(y)

-------------------------

#rpc server

import pika

class RpcServer(object):

    def __init__(self):

        #1、连接rabbitmq 2、创建channel 3、生成一个临时的queue 用于收消息 basicconsumer

        self.connect_it=pika.BlockingConnection(pika.ConnectionParameters('localhost'))

        self.channel=self.connect_it.channel()

        self.channel.queue_declare(queue='client_sent_to_server')

        #临时生成一个queue

        self.channel.basic_qos(prefetch_count=1)

        self.channel.basic_consume(self.callback,queue='client_sent_to_server',no_ack=True)

        self.channel.start_consuming()

    def callback(self,ch,method,props,body):

        print()

        self.recv_body = body

        self.channel.basic_publish(

            exchange='',

            routing_key=props.reply_to,

            body=self.recv_body.upper(),

            properties=pika.BasicProperties(correlation_id=props.correlation_id)

        )

tmp_rpc=RpcServer()
五、pika连接rabbitmq有密码的情况
connection = pika.BlockingConnection(pika.ConnectionParameters(

host='localhost'))

# rabbitmq 设有权限的连接

# connection = pika.BlockingConnection(pika.ConnectionParameters(

# host='192.168.1.105',credentials=pika.PlainCredentials('admin', 'admin')))
最新文章
- 51nod1459(带权值的dijkstra)
- Oracle基础 PL-SQL编程基础(4) 异常处理
- [HDOJ3367]Pseudoforest(并查集,贪心)
- 在Ubuntu上安装VmTools
- android: activity切换之效果
- linux C中调用shell命令和运行shell脚本
- IDEA无法创建类,接口
- DS博客作业01--日期抽象数据类型设计与实现
- spring boot 入门之 helloworld
- Scrapy基础(十四)————Scrapy实现知乎模拟登陆
- [SPOJ375]QTREE - Query on a tree【树链剖分】
- 免费的局域网协作办公方式—onlyoffice文档协作
- php mysql_connect pmysql_connect区别
- 063——VUE中vue-router之重定向redirct的使用
- scala 稀疏向量
- DataRow数组根据指定列排序
- Java之POI的excel导入导出
- 【JavaScript】类继承(对象冒充)和原型继承__深入理解原型和原型链
- vs code 写C#心得
- 用css和php脚本来使得poscms的list标签顺利输出记录
热门文章
- java开发设计六大基本原则
- layui弹窗宽度固定高度自适应界面
- 二十六 Python分布式爬虫打造搜索引擎Scrapy精讲—通过downloadmiddleware中间件全局随机更换user-agent浏览器用户代理
- [转]RGB数据保存为BMP图片
- nyoj762——分解质因数+容斥+二分
- Prism 4 文档 ---第10章 Silverlight和WPF之间共享代码
- 关于Qt中使用线程的时候函数具体在哪个线程中运行的问题
- Spring整合Hibernate:1、annotation方式管理SessionFactory
- 在微信里面打开链接,显示501 Not Implemented,但是同样的链接在其他浏览器是可以打开的。
- iscroll中文文档