Spring Boot 2 读取配置文件
开发环境:IntelliJ IDEA 2019.2.2
Spring Boot版本:2.1.8
新建一个名称为demo的Spring Boot项目。
一、默认配置文件
Spring Boot会读取名称application.properties(yml)的配置文件。
如果有多个同名文件,默认情况下,按照下面顺序读取:
(1)项目根目录的config目录
(2)项目根目录
(3)项目classpath下的config目录
(4)项目classpath根目录
如果同一个配置项出现在多份配置文件中,后面读取的值不会覆盖前面的。
测试:
在项目的4个位置各建立application.properties,内容如下:
(1)config/application.properties
test = config/application.properties

test1 = test1
(2)application.properties
test = application.properties

test2 = test2
(3)src/main/resources/config/application.properties
test = src/main/resources/config/application.properties

test3 = test3
(4)src/main/resources/application.properties
test = src/main/resources/application.properties

test4 = test4
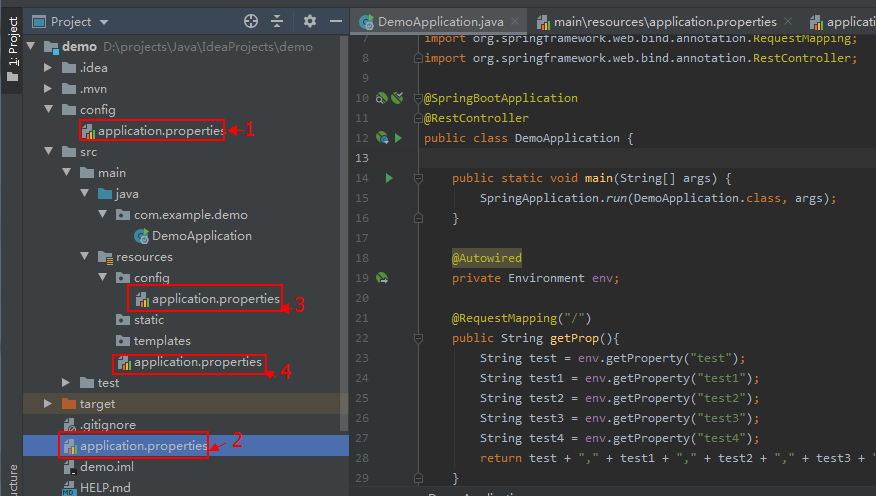
修改默认生成的启动类 DemoApplication.java 代码:
package com.example.demo;

import org.springframework.beans.factory.annotation.Autowired;

import org.springframework.boot.SpringApplication;

import org.springframework.boot.autoconfigure.SpringBootApplication;

import org.springframework.core.env.Environment;

import org.springframework.web.bind.annotation.RequestMapping;

import org.springframework.web.bind.annotation.RestController;

@SpringBootApplication

@RestController

public class DemoApplication {

    public static void main(String[] args) {

        SpringApplication.run(DemoApplication.class, args);

    }

    @Autowired

    private Environment env;

    @RequestMapping("/")

    public String getProp(){

        String test = env.getProperty("test");

        String test1 = env.getProperty("test1");

        String test2 = env.getProperty("test2");

        String test3 = env.getProperty("test3");

        String test4 = env.getProperty("test4");

        return test + "," + test1 + "," + test2 + "," + test3 + "," + test4;

    }

}
访问 http://localhost:8080/
输出:config/application.properties,test1,test2,test3,test4
二、指定配置文件
读取指定的配置文件,不使用默认的application.properties。
测试:
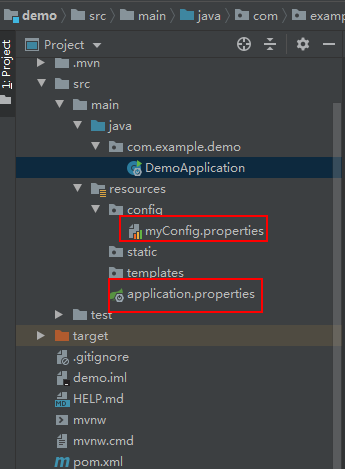
(1)src/main/resources/application.properties 内容:
test1 = application.properties
(2)在项目的src/main/resources新建目录config,新建配置文件myConfig.properties,内容:
test2= myConfig.properties
修改默认生成的启动类 DemoApplication.java 代码:
package com.example.demo;

import org.springframework.beans.factory.annotation.Autowired;

import org.springframework.boot.SpringApplication;

import org.springframework.boot.autoconfigure.SpringBootApplication;

import org.springframework.boot.builder.SpringApplicationBuilder;

import org.springframework.core.env.Environment;

import org.springframework.web.bind.annotation.RequestMapping;

import org.springframework.web.bind.annotation.RestController;

@SpringBootApplication

@RestController

public class DemoApplication {

    public static void main(String[] args) {

        //SpringApplication.run(DemoApplication.class, args);

        new SpringApplicationBuilder(DemoApplication.class).properties(

                "spring.config.location=classpath:/config/myConfig.properties"

        ).run(args);

    }

    @Autowired

    private Environment env;

    @RequestMapping("/")

    public String getProp(){

        String test1 = env.getProperty("test1");

        String test2 = env.getProperty("test2");

        return test1 + "," + test2;

    }

}
访问 http://localhost:8080/
输出:null,myConfig.properties
可见application.properties已读取不到,成功读取到配置文件myConfig.properties。
也可以使用spring.config.name指定配置文件的名称,如下面代码指定了myConfig,Spring Boot会到classpath下寻找myConfig.properties(yml)。
    public static void main(String[] args) {

        //SpringApplication.run(DemoApplication.class, args);

        /*new SpringApplicationBuilder(DemoApplication.class).properties(

                "spring.config.location=classpath:/config/myConfig.properties"

        ).run(args);*/

        new SpringApplicationBuilder(DemoApplication.class).properties(

                "spring.config.name=myConfig").run(args);

    }
三、使用profile指定配置
使用profile可以根据特定的环境来激活不同的配置。
src/main/resources/application.yml 内容如下:
spring:

  profiles: mysql

jdbc:

  driver:

    com.mysql.jdbc.Driver

---

spring:

  profiles: oracle

jdbc:

  driver:

    oracle.jdbc.driver.OracleDriver
修改默认生成的启动类 DemoApplication.java 代码:
package com.example.demo;

import org.springframework.beans.factory.annotation.Autowired;

import org.springframework.boot.SpringApplication;

import org.springframework.boot.autoconfigure.SpringBootApplication;

import org.springframework.boot.builder.SpringApplicationBuilder;

import org.springframework.core.env.Environment;

import org.springframework.web.bind.annotation.RequestMapping;

import org.springframework.web.bind.annotation.RestController;

import java.util.Scanner;

@SpringBootApplication

@RestController

public class DemoApplication {

    public static void main(String[] args) {

        //SpringApplication.run(DemoApplication.class, args);

        Scanner scan = new Scanner(System.in);

        String profile = scan.nextLine();

        new SpringApplicationBuilder(DemoApplication.class).properties(

                "spring.config.location=classpath:/application.yml"

        ).profiles(profile).run(args);

    }

    @Autowired

    private Environment env;

    @RequestMapping("/")

    public String getProp(){

        String res = env.getProperty("jdbc.driver");

        return res;

    }

}
在IDEA中点击Run按钮后,在控制台先敲回车再输入oracle,
访问 http://localhost:8080/ 输出:oracle.jdbc.driver.OracleDriver
重新Run,在控制台先敲回车再输入mysql,
访问 http://localhost:8080/ 输出:com.mysql.jdbc.Driver
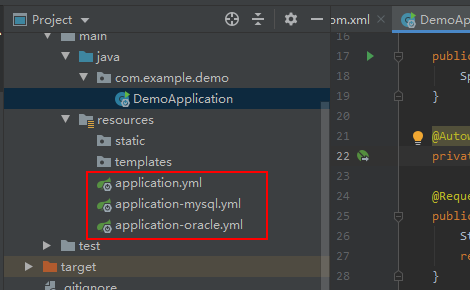
还可以通过不同配置文件的名称来设置profile,创建下面3个文件。
(1)src/main/resources/application.yml 内容:
spring:

  profiles:

    active: oracle
(2)src/main/resources/application-mysql.yml 内容:
jdbc:

  driver:

    com.mysql.jdbc.Driver
(3)src/main/resources/application-oracle.yml 内容:
jdbc:

  driver:

    oracle.jdbc.driver.OracleDriver
修改默认生成的启动类 DemoApplication.java 代码:
package com.example.demo;

import org.springframework.beans.factory.annotation.Autowired;

import org.springframework.boot.SpringApplication;

import org.springframework.boot.autoconfigure.SpringBootApplication;

import org.springframework.boot.builder.SpringApplicationBuilder;

import org.springframework.core.env.Environment;

import org.springframework.web.bind.annotation.RequestMapping;

import org.springframework.web.bind.annotation.RestController;

import java.util.Scanner;

@SpringBootApplication

@RestController

public class DemoApplication {

    public static void main(String[] args) {

        SpringApplication.run(DemoApplication.class, args);

    }

    @Autowired

    private Environment env;

    @RequestMapping("/")

    public String getProp(){

        String res = env.getProperty("jdbc.driver");

        return res;

    }

}
访问 http://localhost:8080/ 输出:oracle.jdbc.driver.OracleDriver
最新文章
- C#方法参数传递机制
- 指针和引用的区别(c/c++)
- 高大上技术之sql解析
- iOS开发之网络编程--3、NSURLSessionDataTask实现文件下载(离线断点续传下载)
- LNMP安装了哪些软件?安装目录在哪?
- Linux/Unix shell sql 之间传递变量
- HW5.25
- jbpm6 开发环境搭建
- Tinyxml 操作XML
- SQL数据转移
- Scala 令人着迷的类设计
- Javascript 面向对象编程—继承和封装
- linux操作系统基础篇(三)
- css中使用if条件在各大浏览器(IE6\IE7\IE8)中hack方法解决教程
- Java上传Excel并解析
- C语言gets雨scanf函数的用法
- FPGA_VHDL 学习课堂笔记001
- centos 7设置本地yum资源库
- TortoiseSVN 忽略文件 忽略已提交文件
- Linux输入设备详解