SpringCloud-服务注册与实现-Eureka创建服务提供者(附源码下载)
场景
SpringCloud-服务注册与实现-Eureka创建服务注册中心(附源码下载):
https://blog.csdn.net/BADAO_LIUMANG_QIZHI/article/details/102535957
上面已经搭建好服务注册中心,开始创建服务提供者。
当 Client 向 Server 注册时,它会提供一些元数据,例如主机和端口,URL,主页等。Eureka Server 从每个 Client 实例接收心跳消息。 如果心跳超时,则通常将该实例从注册 Server 中删除。
注:
博客:
https://blog.csdn.net/badao_liumang_qizhi
关注公众号
霸道的程序猿
获取编程相关电子书、教程推送与免费下载。
实现
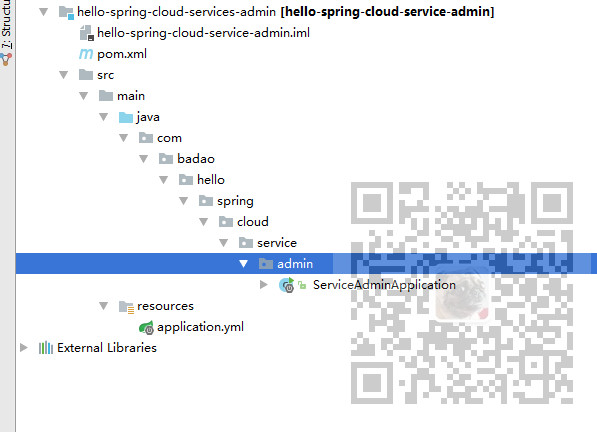
参照上面创建服务注册中心的流程,再新建目录hello-spring-cloud-service-admin
然后依次新建pom.xml并将其进行托管,新建src/main/java目录和src/main/resources目录并分别进行目录设置。
然后在java下新建包,包下新建启动类,在resources下新建配置文件application.yml。
完成后的目录为:
其中pom.xml代码:
<?xml version="1.0" encoding="UTF-8"?>

<project xmlns="http://maven.apache.org/POM/4.0.0" xmlns:xsi="http://www.w3.org/2001/XMLSchema-instance"

         xsi:schemaLocation="http://maven.apache.org/POM/4.0.0 http://maven.apache.org/xsd/maven-4.0.0.xsd">

    <modelVersion>4.0.</modelVersion>

    <parent>

        <groupId>com.badao</groupId>

        <artifactId>hello-spring-cloud-dependencies</artifactId>

        <version>1.0.-SNAPSHOT</version>

        <relativePath>../hello-spring-cloud-dependencies/pom.xml</relativePath>

    </parent>

    <artifactId>hello-spring-cloud-service-admin</artifactId>

    <packaging>jar</packaging>

    <name>hello-spring-cloud-service-admin</name>

    <url>https://blog.csdn.net/badao_liumang_qizhi</url>

    <inceptionYear>-Now</inceptionYear>

    <dependencies>

        <!-- Spring Boot Begin -->

        <dependency>

            <groupId>org.springframework.boot</groupId>

            <artifactId>spring-boot-starter-test</artifactId>

            <scope>test</scope>

        </dependency>

        <!-- Spring Boot End -->

        <!-- Spring Cloud Begin -->

        <dependency>

            <groupId>org.springframework.cloud</groupId>

            <artifactId>spring-cloud-starter-netflix-eureka-server</artifactId>

        </dependency>

        <!-- Spring Cloud End -->

    </dependencies>

    <build>

        <plugins>

            <plugin>

                <groupId>org.springframework.boot</groupId>

                <artifactId>spring-boot-maven-plugin</artifactId>

                <configuration>

                    <mainClass>com.badao.hello.spring.cloud.service.admin.ServiceAdminApplication</mainClass>

                </configuration>

            </plugin>

        </plugins>

    </build>

</project>
注:
这里的parent标签要与上面的统一的依赖管理对应起来。
要修改指定的程序入口类为自己相应的路径。
然后应用启动类的代码:
package com.badao.hello.spring.cloud.service.admin;

import org.springframework.boot.SpringApplication;

import org.springframework.boot.autoconfigure.SpringBootApplication;

import org.springframework.cloud.netflix.eureka.EnableEurekaClient;

@SpringBootApplication

@EnableEurekaClient

public class ServiceAdminApplication {

    public static void main(String[] args) {

        SpringApplication.run(ServiceAdminApplication.class, args);

    }

}
注:
要使用@EnableEurekaClient注解声明这是一个Eureka Client,用来提供服务。
然后是配置文件代码:
spring:

  application:

    name: hello-spring-cloud-service-admin

server:

  port:

eureka:

  client:

    serviceUrl:

      defaultZone: http://localhost:8761/eureka/
注:
1.服务注册与发现是根据上面的name去寻找。
2.port表示端口号。
3.hostname表示eureka服务的地址,这里是本地所以是localhost。
4.serviceURL设置eureka的地址,与上面创建服务注册中心时的URL对应。
然后打开Maven面板,双击Install,不然会提示程序找不到启动类。
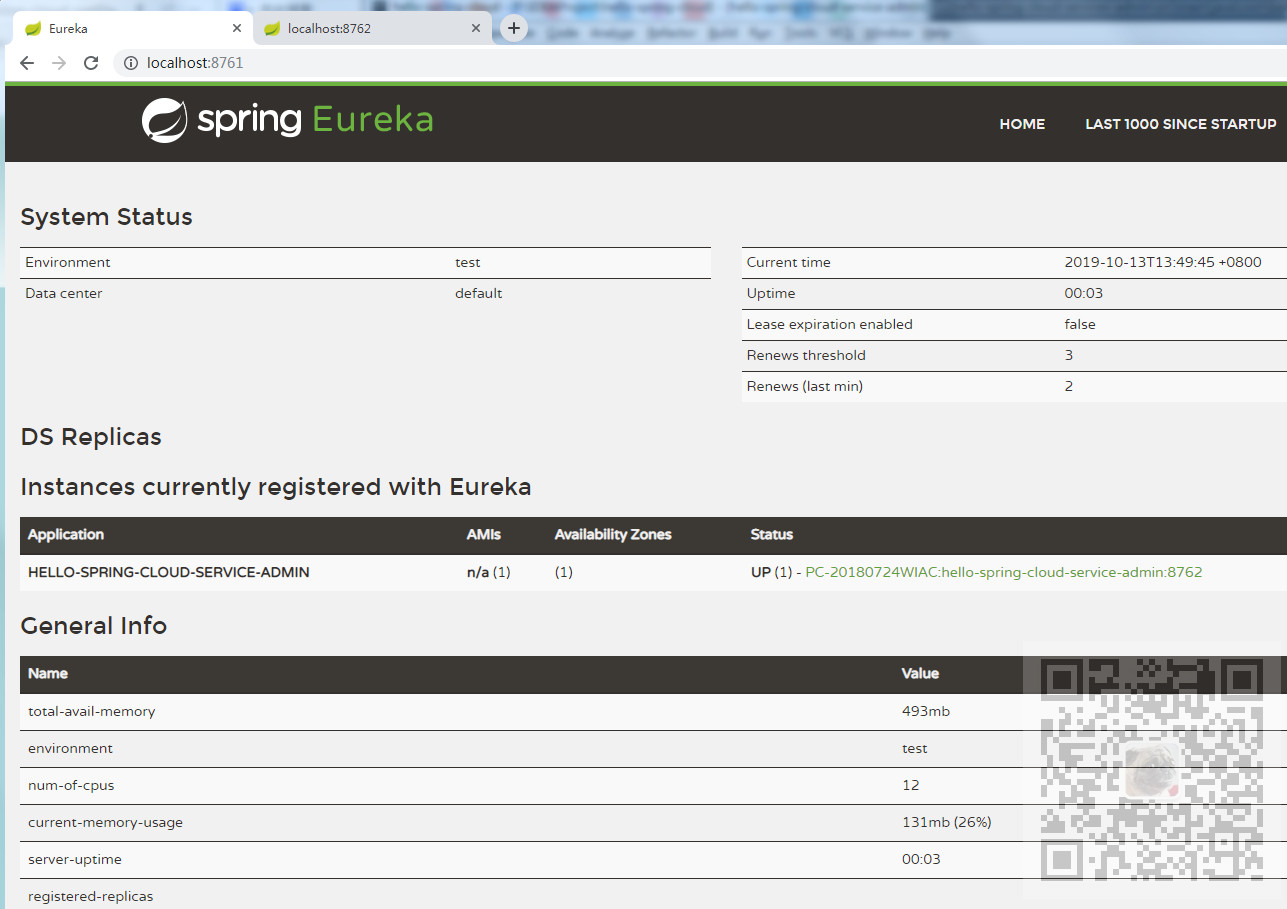
这时如果启动应用程序,访问8762什么也没有,因为没有提供具体的服务,但是访问8761能看到服务已经被注册和发现了。
接下来新建controller包,并在包下新建AdminController
package com.badao.hello.spring.cloud.service.admin.controller; import org.springframework.beans.factory.annotation.Value;
import org.springframework.web.bind.annotation.RequestMapping;
import org.springframework.web.bind.annotation.RequestMethod;
import org.springframework.web.bind.annotation.RequestParam;
import org.springframework.web.bind.annotation.RestController; @RestController
public class AdminController { @Value("${server.port}")
private String port; @RequestMapping(value = "hi", method = RequestMethod.GET)
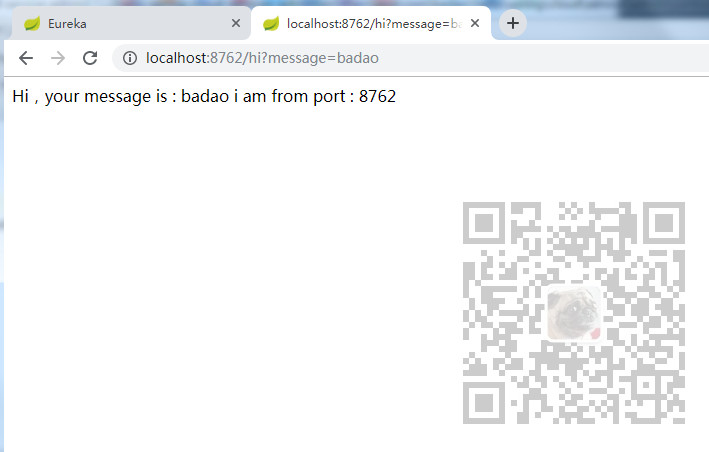
public String sayHi(@RequestParam(value = "message") String message) {
return String.format("Hi,your message is : %s i am from port : %s", message, port);
}
}
然后停止掉原来的启动程序,将项目重新install,然后将上面的服务与注册发现的eureka服务启动,然后再启动当前服务提供者主程序。
打开浏览器输入:
localhost:8762/hi?message=badao
源码下载
https://download.csdn.net/download/badao_liumang_qizhi/11859914
最新文章
- EasyUI中那些不容易被发现的坑——EasyUI重复请求2次的问题
- BZOJ3489: A simple rmq problem
- python爬取网易评论
- Linux内核分析——第八周学习笔记20135308
- Linux内核分析——第七周学习笔记20135308
- Centos7 PHP7 编译安装 开机自启动
- 面向对象的ExtJS场景开发
- [原创]Devexpress XtraReports 系列 3 创建主从报表
- [Java 7][msvcr100.dll] Error when load Eclipse
- php中getimagesize函数的用法
- Python的下划线_
- 国内各大支付平台的API地址
- 安装 Tensorflow
- 解决ajax跨域
- python 解方程
- eclipse 反编译
- 不一样的go语言-athens私仓安装
- Codeforces 839A Arya and Bran
- linux 安装多个版本JDK,指定tomcat的jdk版本
- 皕杰报表 javax.naming.NameNotFoundException: Name jdbc is not bound in this Context