使用jQuery.FileUpload插件和Backload组件裁剪上传图片
□ 思路
1、自定义控制器继承Backload的默认控制器BackloadController
2、自定义一个jQuery File Upload初始化js文件,使用自定义控制器的方法
3、在视图页面调用自定义jQuery File Upload初始化js文件
□ 安装Backload组件和jQuery File Upload插件
→在"程序包管理器控制台"输入:Install-Package Backload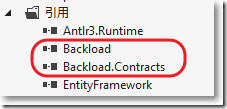
→在"程序包管理器控制台"输入: Install-Package JQuery_File_Upload_Plugin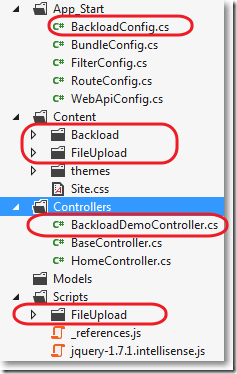
□ 自定义BaseController继承BackloadController
1: using System.Web.Mvc;
2:
3: namespace MvcApplication7.Controllers
4: {
5: public class BaseController : BackloadController
6: {
7: //public ActionResult Index()
8: //{
9: // return View();
10: //}
11:
12: public async Task<ActionResult> FileHandler()
13: {
14: ActionResult result = await base.HandleRequestAsync();
15: return result;
16: }
17: }
18: }
□ 自定义HomeController继承BaseController
1: using System.Web.Mvc;
2: namespace MvcApplication7.Controllers
3: {
4: public class HomeController : BaseController
5: {
6: public ActionResult Index()
7: {
8: return View();
9: }
10: }
11: }
□ 自定义用于初始化jQuery File Upload的js文件main.js
其中,还限制了上传文件的格式。
1: $(function () {
2: 'use strict';
3:
4: var url = '/Base/FileHandler';
5: // Initialize the jQuery File Upload widget:
6: $('#fileupload').fileupload({
7: // Uncomment the following to send cross-domain cookies:
8: //xhrFields: {withCredentials: true},
9: url: url,
10: acceptFileTypes: /(jpg)|(jpeg)|(png)|(gif)$/i // Allowed file types
11: });
12:
13: // Enable iframe cross-domain access via redirect option:
14: $('#fileupload').fileupload(
15: 'option',
16: 'redirect',
17: window.location.href.replace(
18: /\/[^\/]*$/,
19: '/cors/result.html?%s'
20: )
21: );
22:
23: // Load existing files by an initial ajax request to the server after page loads up
24: // This is done by a simple jQuery ajax call, not by the FIle Upload plugin.,
25: // but the results are passed to the plugin with the help of the context parameter:
26: // context: $('#fileupload')[0] and the $(this)... call in the done handler.
27: // With ajax.context you can pass a JQuery object to the event handler and use "this".
28: $('#fileupload').addClass('fileupload-processing');
29: $.ajax({
30: // Uncomment the following to send cross-domain cookies:
31: //xhrFields: {withCredentials: true},
32: url: url,
33: dataType: 'json',
34: context: $('#fileupload')[0]
35: }).always(function () {
36: $(this).removeClass('fileupload-processing');
37: }).done(function (result) {
38: $(this).fileupload('option', 'done')
39: .call(this, null, { result: result });
40: });
41: });
42:
43: $("document").ready(function () {
44: $('#fileupload')
45: .bind('fileuploaddestroy', function (e, data) {
46: // Event handler example. Do something if you need after file has been deleted on the server.
47: // (Refer to the client side documentatio).
48: });
49:
50: });
51:
□ _Layout.cshtml布局视图
1: <!DOCTYPE html>
2: <html>
3: <head>
4: <meta charset="utf-8" />
5: <meta name="viewport" content="width=device-width" />
6: <title>@ViewBag.Title</title>
7: @Styles.Render("~/Content/css")
8: @Styles.Render("~/Content/themes/base/css")
9: @Styles.Render("~/bundles/fileupload/bootstrap/BasicPlusUI/css")
10: @Scripts.Render("~/bundles/modernizr")
11: </head>
12: <body>
13: @RenderBody()
14:
15: @Scripts.Render("~/bundles/jquery")
16: @Scripts.Render("~/bundles/jqueryui")
17: @Scripts.Render("~/bundles/fileupload/bootstrap/BasicPlusUI/js")
18: @RenderSection("scripts", required: false)
19: </body>
20: </html>
21:
□ Home/Index.cshtml视图
@{
ViewBag.Title = "Index";
Layout = "~/Views/Shared/_Layout.cshtml";
}
<style type="text/css">
.table-striped {
width: 65%;
}
</style>
<div>
<!-- The file upload form used as target for the file upload widget -->
<form id="fileupload" action="/Backload/UploadHandler" method="POST" enctype="multipart/form-data">
<!-- Redirect browsers with JavaScript disabled to the origin page -->
<noscript><input type="hidden" name="redirect" value="/"></noscript>
<!-- The fileupload-buttonbar contains buttons to add/delete files and start/cancel the upload -->
<div class="row fileupload-buttonbar">
<div class="span7">
<!-- The fileinput-button span is used to style the file input field as button -->
<span class="btn btn-success fileinput-button">
<i class="icon-plus icon-white"></i>
<span>添加文件...</span>
<input type="file" name="files[]" multiple>
</span>
<button type="submit" class="btn btn-primary start">
<i class="icon-upload icon-white"></i>
<span>开始上传</span>
</button>
<button type="reset" class="btn btn-warning cancel">
<i class="icon-ban-circle icon-white"></i>
<span>取消上传</span>
</button>
<button type="button" class="btn btn-danger delete">
<i class="icon-trash icon-white"></i>
<span>删除</span>
</button>
<input type="checkbox" class="toggle">
<!-- The loading indicator is shown during file processing -->
<span class="fileupload-loading"></span>
</div>
<!-- The global progress information -->
<div class="span5 fileupload-progress fade">
<!-- The global progress bar -->
<div class="progress progress-success progress-striped active" role="progressbar" aria-valuemin="0" aria-valuemax="100">
<div class="bar" style="width:0%;"></div>
</div>
<!-- The extended global progress information -->
<div class="progress-extended"> </div>
</div>
</div>
<!-- The table listing the files available for upload/download -->
<table role="presentation" class="table table-striped"><tbody class="files" data-toggle="modal-gallery" data-target="#modal-gallery"></tbody></table>
</form>
<!-- The template to display files available for upload -->
<script id="template-upload" type="text/x-tmpl">
{% for (var i=0, file; file=o.files[i]; i++) { %}
<tr class="template-upload fade">
<td>
<span class="preview"></span>
</td>
<td>
<p class="name">{%=file.name%}</p>
{% if (file.error) { %}
<div><span class="label label-important">Error</span> {%=file.error%}</div>
{% } %}
</td>
<td>
<p class="size">{%=o.formatFileSize(file.size)%}</p>
{% if (!o.files.error) { %}
<div class="progress progress-success progress-striped active" role="progressbar" aria-valuemin="0" aria-valuemax="100" aria-valuenow="0"><div class="bar" style="width:0%;"></div></div>
{% } %}
</td>
<td>
{% if (!o.files.error && !i && !o.options.autoUpload) { %}
<button class="btn btn-primary start">
<i class="icon-upload icon-white"></i>
<span>Start</span>
</button>
{% } %}
{% if (!i) { %}
<button class="btn btn-warning cancel">
<i class="icon-ban-circle icon-white"></i>
<span>Cancel</span>
</button>
{% } %}
</td>
</tr>
{% } %}
</script>
<!-- The template to display files available for download -->
<script id="template-download" type="text/x-tmpl">
{% for (var i=0, file; file=o.files[i]; i++) { %}
<tr class="template-download fade">
<td>
<span class="preview">
{% if (file.thumbnail_url) { %}
<a href="{%=file.url%}" title="{%=file.name%}" data-gallery="gallery" download="{%=file.name%}"><img src="{%=file.thumbnail_url%}"></a>
{% } %}
</span>
</td>
<td>
<p class="name">
<a href="{%=file.url%}" title="{%=file.name%}" data-gallery="{%=file.thumbnail_url&&'gallery'%}" download="{%=file.name%}">{%=file.name%}</a>
</p>
{% if (file.error) { %}
<div><span class="label label-important">Error</span> {%=file.error%}</div>
{% } %}
</td>
<td>
<span class="size">{%=o.formatFileSize(file.size)%}</span>
</td>
<td>
<button class="btn btn-danger delete" data-type="{%=file.delete_type%}" data-url="{%=file.delete_url%}"{% if (file.delete_with_credentials) { %} data-xhr-fields='{"withCredentials":true}'{% } %}>
<i class="icon-trash icon-white"></i>
<span>Delete</span>
</button>
<input type="checkbox" name="delete" value="1" class="toggle">
</td>
</tr>
{% } %}
</script>
</div>
@section scripts
{
@* <script src="~/Scripts/FileUpload/backload.demo.js"></script>*@
<script src="~/Scripts/main.js"></script>
}
□ web.config
1: <configuration>
2: <configSections>
3: ...
4: <section name="backload" type="Backload.Configuration.BackloadSection, Backload, Version=1.9.3.1, Culture=neutral, PublicKeyToken=02eaf42ab375d363" requirePermission="false" /></configSections>
5: <configSections>
6: <backload configSource="Web.backload.config" />
7: </configuration>
□ 所有Backload的配置放在Web.backload.config中
1: <?xml version="1.0"?>
2:
3: <backload xsi:noNamespaceSchemaLocation="Web.Backload.xsd" xmlns:xsi="http://www.w3.org/2001/XMLSchema-instance" xmlns:name="urn:backload-schema" thumbsUrlPattern="{Backload}">
4:
5: <images width="200" height="200" dpi="96" resizeMode="ratio" />
6: <thumbnails path="" width="60" height="60" canvasColor="#00000000" resizeMode="place" imageType="image/png" />
7: <fileSystem filesRoot="~/Upload" />
8: <cacheManager lastModified="true" etag="true"/>
9: </backload>
● width和height实际上设置的是画布Canvas的大小。
● 没有resizeMode属性:保持上传图片的大小不变
● resizeMode="ration": 当图片的宽度大于画布的宽度,图片的宽度修剪为画布的宽度,图片的高度等比例缩放,画布背景不显示
● resizeMode="fit": 当图片的宽度大于画布的宽度,图片的宽度修剪为画布的宽度,图片的高度等比例缩放,画布背景显示
● resizeMode="place": 当图片的宽度小于画布的宽度,图片的宽度修剪为画布的宽度,图片的高度等比例缩放,画布背景显示
● resizeMode="crop": 图片的宽度或高度充满画布的宽度或高度,空白的画布区域裁剪掉。
□ 结果
上传界面:
由于设置了path="",所以没有了缩略图:
由于设置了resizeMode="ratio",上传图片宽度不变,高度按比例缩小:
□ 设置文件夹带缩略图文件夹path="_thumb"
1: <backload xsi:noNamespaceSchemaLocation="Web.Backload.xsd" xmlns:xsi="http://www.w3.org/2001/XMLSchema-instance" xmlns:name="urn:backload-schema" thumbsUrlPattern="{Backload}">
2:
3: <images width="200" height="200" dpi="96" resizeMode="ratio" />
4: <thumbnails path="_thumb" width="60" height="60" canvasColor="#00000000" resizeMode="place" imageType="image/png" />
5: <fileSystem filesRoot="~/Upload" />
6: <cacheManager lastModified="true" etag="true"/>
7: </backload>
增加一个图片: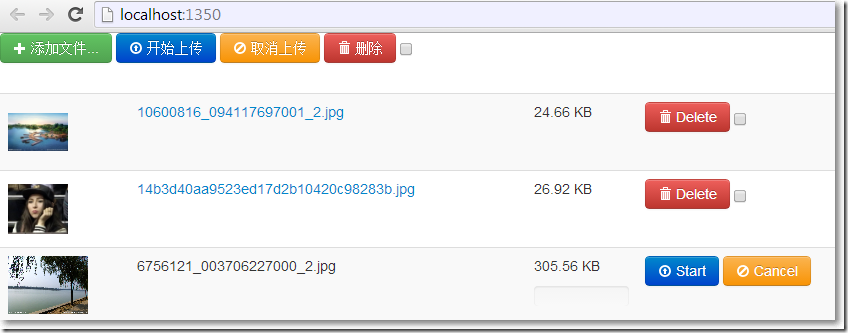
由于设置了path="_thumb",所以有了缩略图文件夹: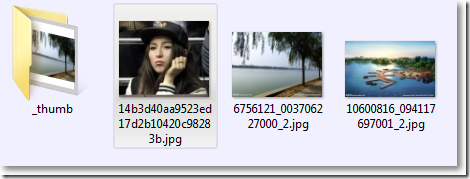
由于缩略图设置了resizeMode="place",图片宽度等于画布宽度,高度等比例缩放,显示背景: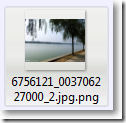
由于在main.js中设置了acceptFileTypes: /(jpg)|(jpeg)|(png)|(gif)$/i,pdf格式不允许: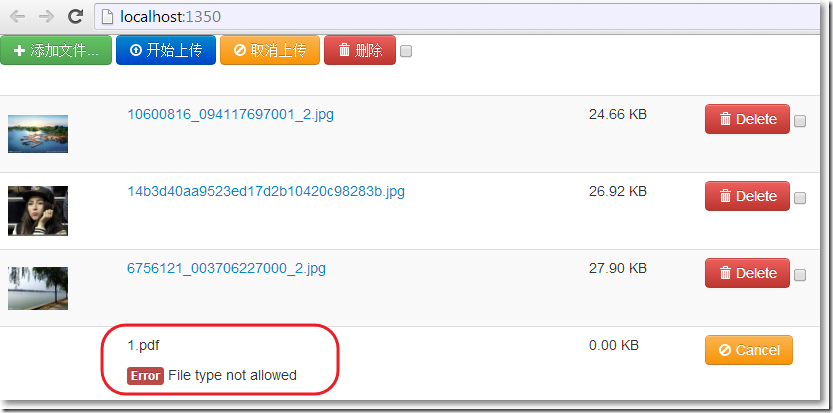
最新文章
- 全信号高清DVI编码器|上海视涛科技
- 使用NHibernate(3)-- 用代码代替配置文件
- SharePoint 2010 文档管理之文档推送
- 最新 DEDECMS SQL 注入 0day
- POJ 3660
- GITLAB的版本回退(非命令行)
- wordpress建站过程1
- Unity Shader 知识点总结(二)
- j2ee5.0开发中jstl标签失效
- 利用JS写一个计算平方的网页
- gitlab Api接口使用
- Alpha冲刺博客汇总(麻瓜制造者)
- Java 8 可重复注解与类型注解
- XE: Changing the default http port
- JUC同步器框架AbstractQueuedSynchronizer源码图文分析
- Windows中杀死某个端口对应的进程
- PHP | Uploading and reading of files and database 【PHP | 文件的上传和读取与数据库】
- [xdoj1029]求解某个数的最高位和最低位
- 反射机制与IOC容器
- fatal error C1003: error count exceeds number; stopping compilation解决方法