WCF的实现(方式二)
参考他人实现文件传输
【WCF】利用WCF实现上传下载文件服务
服务端:
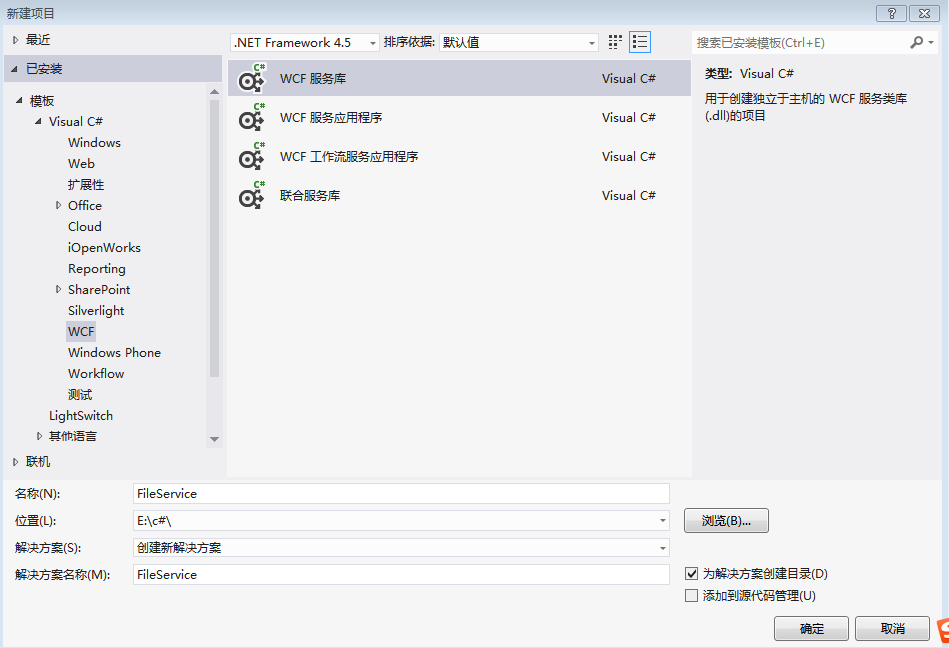
1.首先新建一个名为FileService的WCF服务库项目,如下图:
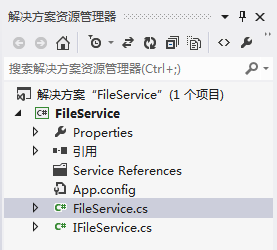
2.将Service,IService重命名为FileService,IFileService,如下图:
3.打开IFileService.cs,定义两个方法,如下:
 1 [ServiceContract]

 2     public interface IFileService

 3     {

 4

 5         //上传文件

 6         [OperationContract]

 7         bool UpLoadFile(Stream filestream);

 8

 9         //下载文件

10         [OperationContract]

11         Stream DownLoadFile(string downfile);

12

13     }
4.上面方法定义了输入参数和返回参数,但是实际项目中往往是不够的,我们需要增加其他参数,如文件名,文件大小之类。然而WCF中有限定,如下:
|
所以我们需要用Message契约特性包装一下参数,修改代码如下:
1 [ServiceContract]

 2     public interface IFileService

 3     {

 4         //上传文件

 5         [OperationContract]

 6         UpFileResult UpLoadFile(UpFile filestream);

 7

 8         //下载文件

 9         [OperationContract]

10         DownFileResult DownLoadFile(DownFile downfile);

11     }

12

13     [MessageContract]

14     public class DownFile

15     {

16         [MessageHeader]

17         public string FileName { get; set; }

18     }

19

20     [MessageContract]

21     public class UpFileResult

22     {

23         [MessageHeader]

24         public bool IsSuccess { get; set; }

25         [MessageHeader]

26         public string Message { get; set; }

27     }

28

29     [MessageContract]

30     public class UpFile

31     {

32         [MessageHeader]

33         public long FileSize { get; set; }

34         [MessageHeader]

35         public string FileName { get; set; }

36         [MessageBodyMember]

37         public Stream FileStream { get; set; }

38     }

39

40     [MessageContract]

41     public class DownFileResult

42     {

43         [MessageHeader]

44         public long   FileSize { get; set; }

45         [MessageHeader]

46         public bool IsSuccess { get; set; }

47         [MessageHeader]

48         public string Message { get; set; }

49         [MessageBodyMember]

50         public Stream FileStream { get; set; }

51     }
5.现在服务契约定义好了,接下来实现契约的接口。打开FileService.cs文件,编写代码,实现服务端的上传下载文件服务,代码如下:
 1 public class FileService : IFileService

 2     {

 3         public UpFileResult UpLoadFile(UpFile filedata)

 4         {

 5

 6             UpFileResult result = new UpFileResult();

 7

 8             string path = System.AppDomain.CurrentDomain.BaseDirectory +@"\service\";

 9

10             if (!Directory.Exists(path))

11             {

12                 Directory.CreateDirectory(path);

13             }

14

15             byte[] buffer = new byte[filedata.FileSize];

16

17             FileStream fs = new FileStream(path + filedata.FileName, FileMode.Create, FileAccess.Write);

18

19             int count = 0;

20             while ((count = filedata.FileStream.Read(buffer, 0, buffer.Length)) > 0)

21             {

22                 fs.Write(buffer, 0, count);

23             }

24             //清空缓冲区

25             fs.Flush();

26             //关闭流

27             fs.Close();

28

29             result.IsSuccess = true;

30

31             return result;

32

33         }

34

35         //下载文件

36         public DownFileResult DownLoadFile(DownFile filedata)

37         {

38

39             DownFileResult result = new DownFileResult();

40

41             string path = System.AppDomain.CurrentDomain.BaseDirectory + @"\service\" + filedata.FileName;

42

43             if (!File.Exists(path))

44             {

45                 result.IsSuccess = false;

46                 result.FileSize = 0;

47                 result.Message = "服务器不存在此文件";

48                 result.FileStream = new MemoryStream();

49                 return result;

50             }

51             Stream ms = new MemoryStream();

52             FileStream fs = new FileStream(path, FileMode.Open, FileAccess.Read);

53             fs.CopyTo(ms);

54             ms.Position = 0;  //重要,不为0的话,客户端读取有问题

55             result.IsSuccess = true;

56             result.FileSize = ms.Length;

57             result.FileStream = ms;

58

59             fs.Flush();

60             fs.Close();

61             return result;

62         }

63     }
6.至此,具体实现代码完成,但是我们还需要配置一下App.config,设置地址,契约和绑定。这里绑定采用NetTcpBinding,我们还需要为NetTcpBinding具体配置,如maxReceivedMessageSize(配置最大接收文件大小),transferMode(传输模式,这里是Streamed)等。最终代码如下:
 1 <?xml version="1.0" encoding="utf-8" ?>

 2 <configuration>

 3

 4   <appSettings>

 5     <add key="aspnet:UseTaskFriendlySynchronizationContext" value="true" />

 6   </appSettings>

 7   <system.web>

 8     <compilation debug="true" />

 9   </system.web>

10   <!-- 部署服务库项目时,必须将配置文件的内容添加到

11   主机的 app.config 文件中。System.Configuration 不支持库的配置文件。-->

12   <system.serviceModel>

13

14     <bindings>

15        <netTcpBinding>

16         <binding name="MyTcpBinding" maxBufferSize="2147483647" maxReceivedMessageSize="2147483647" sendTimeout="00:30:00" transferMode="Streamed"   >

17           <security mode="None"></security>

18         </binding>

19       </netTcpBinding>

20     </bindings>

21

22     <services>

23       <service name="WcfTest.FileService">

24         <endpoint address="" binding="netTcpBinding" bindingConfiguration="MyTcpBinding" contract="WcfTest.IFileService">

25           <identity>

26             <dns value="localhost" />

27           </identity>

28         </endpoint>

29         <endpoint address="mex" binding="mexHttpBinding" contract="IMetadataExchange" />

30         <host>

31           <baseAddresses>

32              <add baseAddress="http://localhost:8733/Design_Time_Addresses/WcfTest/Service1/" />

33             <add baseAddress="net.tcp://localhost:8734/Design_Time_Addresses/WcfTest/Service1/" />

34           </baseAddresses>

35         </host>

36       </service>

37     </services>

38     <behaviors>

39       <serviceBehaviors>

40         <behavior>

41           <!-- 为避免泄漏元数据信息,

42           请在部署前将以下值设置为 false -->

43           <serviceMetadata httpGetEnabled="True" httpsGetEnabled="True"/>

44           <!-- 要接收故障异常详细信息以进行调试,

45           请将以下值设置为 true。在部署前设置为 false

46             以避免泄漏异常信息-->

47           <serviceDebug includeExceptionDetailInFaults="False" />

48         </behavior>

49       </serviceBehaviors>

50     </behaviors>

51   </system.serviceModel>

52

53 </configuration>
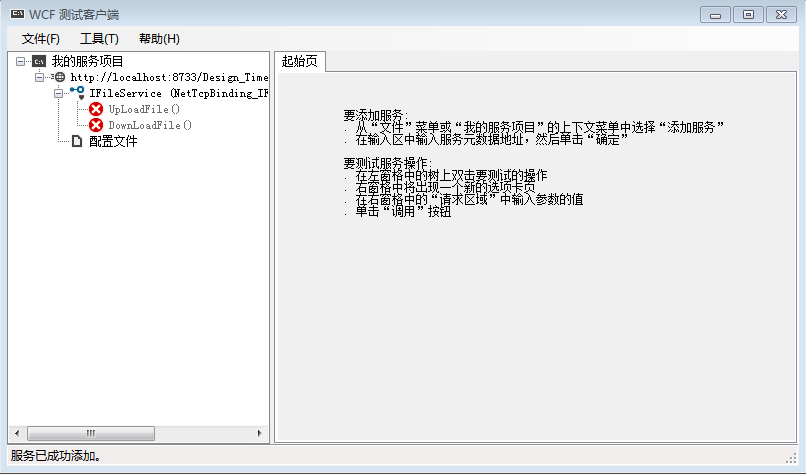
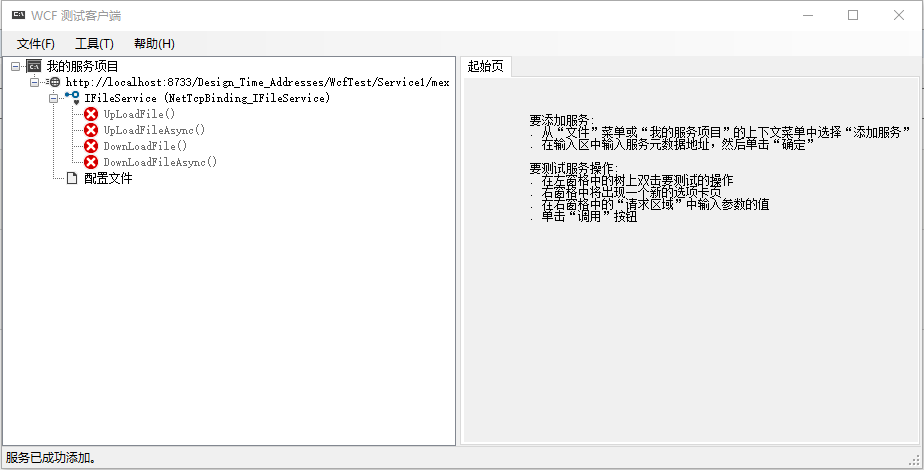
7.这时可以运行服务,如果没有问题的话,会看到如下截图。
第七步出问题了:
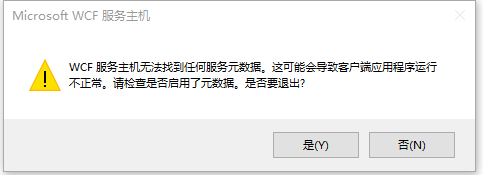
直接复制App.config的内容,并点击运行,会以下出错(哈哈,肯定的呀)
右键App.config,选择“编辑WCF配置”,
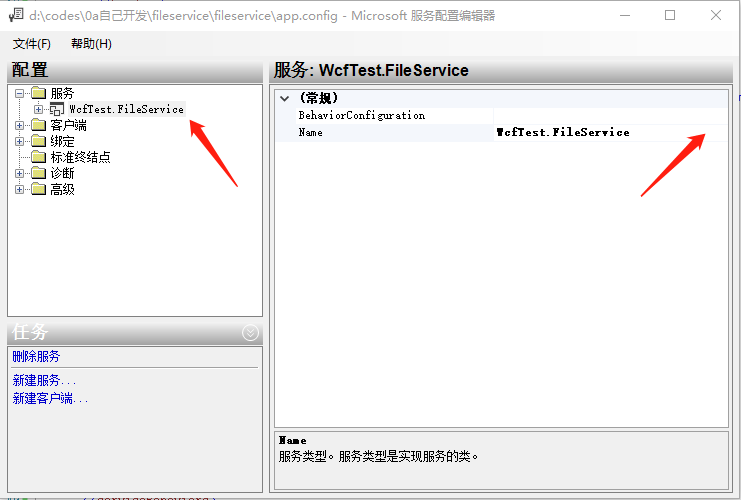
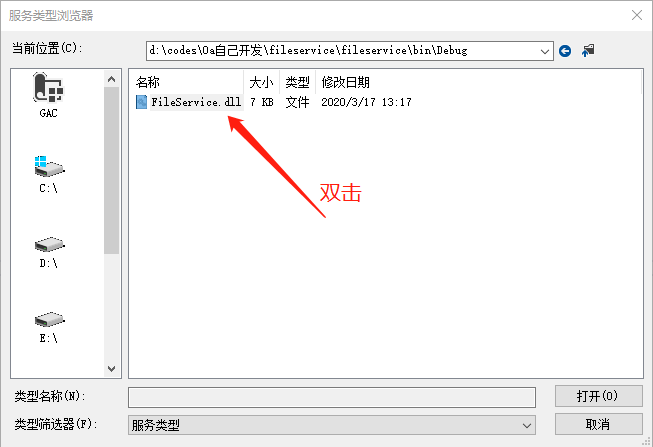
修改第一个终结点的Contract
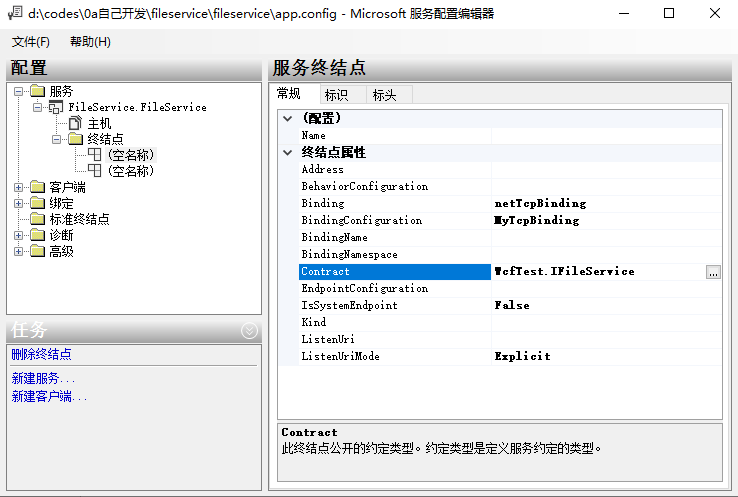

没有重复以上步骤,没有修改第二个终结点。
至此,App.config文件变成了:
 1 <?xml version="1.0" encoding="utf-8" ?>

 2 <configuration>

 3

 4   <appSettings>

 5     <add key="aspnet:UseTaskFriendlySynchronizationContext" value="true" />

 6   </appSettings>

 7   <system.web>

 8     <compilation debug="true" />

 9   </system.web>

10   <!-- 部署服务库项目时,必须将配置文件的内容添加到

11   主机的 app.config 文件中。System.Configuration 不支持库的配置文件。-->

12   <system.serviceModel>

13

14     <bindings>

15       <netTcpBinding>

16         <binding name="MyTcpBinding" maxBufferSize="2147483647" maxReceivedMessageSize="2147483647" sendTimeout="00:30:00" transferMode="Streamed"   >

17           <security mode="None"></security>

18         </binding>

19       </netTcpBinding>

20     </bindings>

21

22     <services>

23       <service name="FileService.FileService">

24         <endpoint address="" binding="netTcpBinding" bindingConfiguration="MyTcpBinding"

25           contract="FileService.IFileService">

26           <identity>

27             <dns value="localhost" />

28           </identity>

29         </endpoint>

30         <endpoint address="mex" binding="mexHttpBinding" contract="IMetadataExchange" />

31         <host>

32           <baseAddresses>

33             <add baseAddress="http://localhost:8733/Design_Time_Addresses/WcfTest/Service1/" />

34             <add baseAddress="net.tcp://localhost:8734/Design_Time_Addresses/WcfTest/Service1/" />

35           </baseAddresses>

36         </host>

37       </service>

38     </services>

39     <behaviors>

40       <serviceBehaviors>

41         <behavior>

42           <!-- 为避免泄漏元数据信息,

43           请在部署前将以下值设置为 false -->

44           <serviceMetadata httpGetEnabled="True" httpsGetEnabled="True"/>

45           <!-- 要接收故障异常详细信息以进行调试,

46           请将以下值设置为 true。在部署前设置为 false

47             以避免泄漏异常信息-->

48           <serviceDebug includeExceptionDetailInFaults="False" />

49         </behavior>

50       </serviceBehaviors>

51     </behaviors>

52   </system.serviceModel>

53

54 </configuration>
点击三角运行:
客户端:
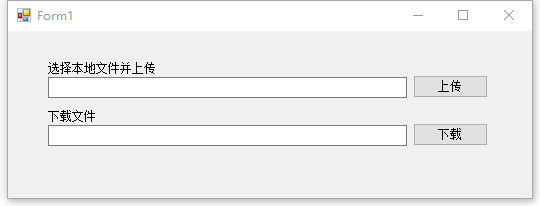
1.首先新建一个WinForm应用程序,添加控件,得到下图:
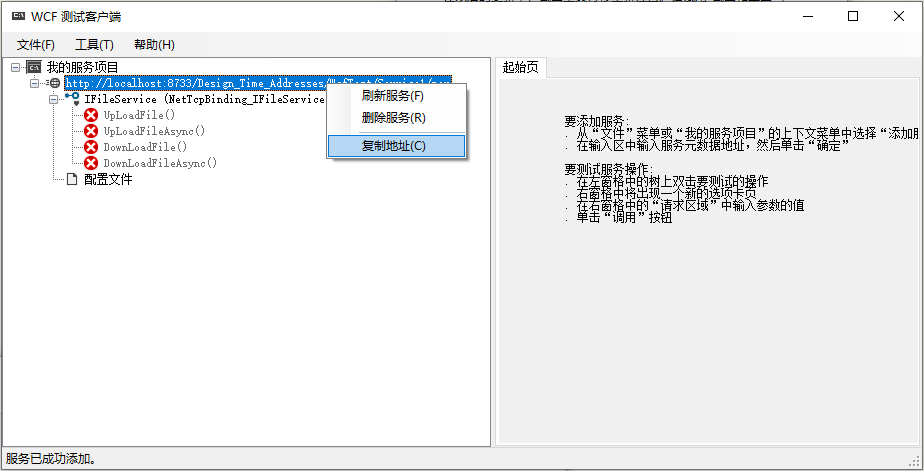
2.在引用中右击,选择添加服务引用,出现对话框,我们需要填上刚才打开的服务的地址(直接右键复制),然后按旁边的“转到”,会看到显示找到服务,接着更改命名空间为FileService,得到如下图。
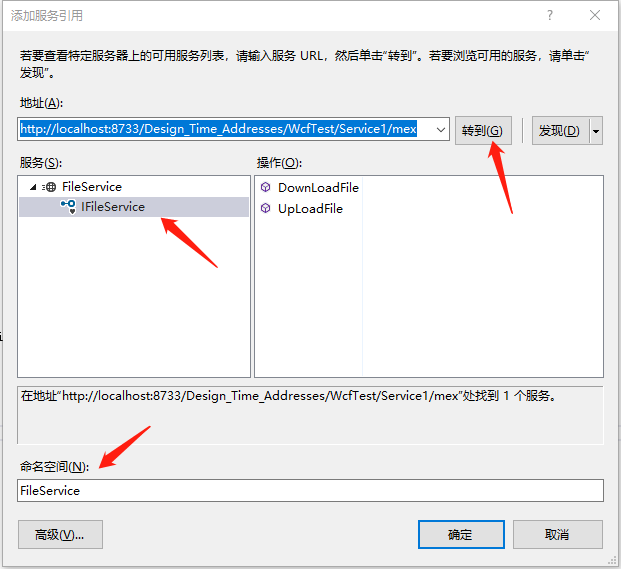
3.按确定之后,在资源管理器里的引用下面会多出一个FileService命名空间,里面包含我们的刚才写的FileServiceClient服务代理类 ,现在我们可以通过它调用服务了。编写代码如下:
 1 using System;

 2 using System.Collections.Generic;

 3 using System.ComponentModel;

 4 using System.Data;

 5 using System.Drawing;

 6 using System.IO;

 7 using System.Linq;

 8 using System.Text;

 9 using System.Windows.Forms;

10 using 客户端.FileService;

11

12 namespace 客户端

13 {

14     public partial class Form1 : Form

15     {

16         FileServiceClient client;

17         public Form1()

18         {

19             InitializeComponent();

20             client = new FileServiceClient();

21         }

22

23         private void button1_Click(object sender, EventArgs e)

24         {

25             OpenFileDialog Fdialog = new OpenFileDialog();

26

27             if (Fdialog.ShowDialog() == DialogResult.OK)

28             {

29

30                 using (Stream fs = new FileStream(Fdialog.FileName, FileMode.Open, FileAccess.Read))

31                 {

32                     string message;

33                     this.textBox1.Text = Fdialog.SafeFileName;

34                     bool result = client.UpLoadFile(Fdialog.SafeFileName, fs.Length, fs, out message);

35

36                     if (result == true)

37                     {

38                         MessageBox.Show("上传成功!");

39                     }

40                     else

41                     {

42                         MessageBox.Show(message);

43                     }

44                 }

45

46             }

47         }

48

49         private void button2_Click(object sender, EventArgs e)

50         {

51             string filename = this.textBox2.Text;

52             string path = System.AppDomain.CurrentDomain.BaseDirectory + @"\client\";

53             bool issuccess = false;

54             string message = "";

55             Stream filestream = new MemoryStream();

56             long filesize = client.DownLoadFile(filename, out issuccess, out message, out filestream);

57

58             if (issuccess)

59             {

60                 if (!Directory.Exists(path))

61                 {

62                     Directory.CreateDirectory(path);

63                 }

64

65                 byte[] buffer = new byte[filesize];

66                 FileStream fs = new FileStream(path + filename, FileMode.Create, FileAccess.Write);

67                 int count = 0;

68                 while ((count = filestream.Read(buffer, 0, buffer.Length)) > 0)

69                 {

70                     fs.Write(buffer, 0, count);

71                 }

72

73                 //清空缓冲区

74                 fs.Flush();

75                 //关闭流

76                 fs.Close();

77                 MessageBox.Show("下载成功!");

78

79             }

80             else

81             {

82                 MessageBox.Show(message);

83             }

84         }

85     }

86 }
在保证“WCF测试客户端”开启的情况下,即可实现上传下载文件。
上传保存路径:service文件夹下(wcf服务的debug目录下service文件目录)
若使用console启动wcf,则在console的debug目录下的service文件夹目录;
下载路径:“客户端”的debug目录下的client文件夹下。
附console启动wcf代码(添加App.config文件)
 1 using System;

 2 using System.Collections.Generic;

 3 using System.Linq;

 4 using System.ServiceModel;

 5 using System.Text;

 6

 7 namespace ConsoleApp1

 8 {

 9     class Program

10     {

11         static void Main(string[] args)

12         {

13             using (ServiceHost host = new ServiceHost(typeof(FileService.FileService )))

14             {

15                 host.Opened += delegate

16                 {

17                     Console.WriteLine("FileService.FileService已启动,按任意键停止服务");

18                 };

19                 host.Open();

20                 Console.Read();

21             }

22         }

23     }

24 }
参考:
感谢!
【WCF】利用WCF实现上传下载文件服务
https://www.cnblogs.com/caizl/p/4326016.html
https://www.cnblogs.com/wolf-sun/p/3277599.html
最新文章
- 应如何取B/S的B端的IP
- 动态引入Js文件
- [AngularJS] angular-schema-form -- 1
- vue+node+webpack搭建环境
- This package contains sshd, pcal, mysql-client on Ubuntu14:04
- Node.js:上传文件,服务端如何获取文件上传进度
- mysql 增删改查基础操作的语法
- Spring Batch(三) Job Launcher、ItemReader、ItemProcessor、ItemWriter各个实现类和用途
- 各种CSS样式设置细线边框
- js中布尔值为false的六种情况
- asp.net web api 权限验证的方法
- Word中带圈数字
- Android开发中遇到的问题(一)——Android模拟器端口被占用问题的解决办法
- NAT和Proxy的区别
- systemctl 命令
- Zoj 3529 A Game Between Alice and Bob 数论+博弈Nim 快速求数中有多少个素数因子
- 11 python shutil 模块
- sibling
- XCODE的演变及使用经验分享
- xapp1052之dma_test.v