CoreText学习笔记
CoreText是Apple系统的文字渲染引擎。
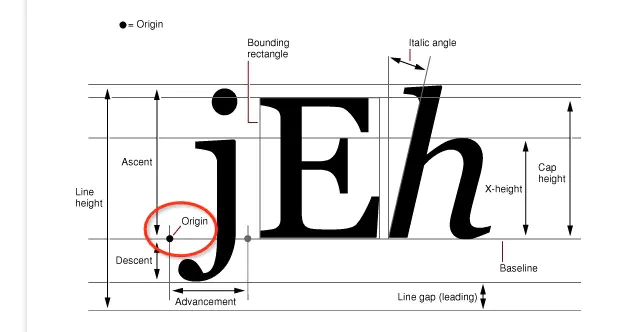
我们先看一个字符的字形图,了解一下一个字形包含的部分:
它的坐标系为窗口的左下角为视图的原点(跟Mac系统一样的坐标系),而iOS系统的坐标系为窗口的左上角为视图的原点。因此我们在使用CoreText进行绘制文字时,需要对其坐标系进行转换,转换方法如下:
CGContextTranslateCTM(context, 0, height);

CGContextScaleCTM(context, 1, -1);
未进行坐标系转换时绘制结果如下:

转换后如下:

CoreText绘制文本流程这里引用官方的截图:(点击查看官方文档)
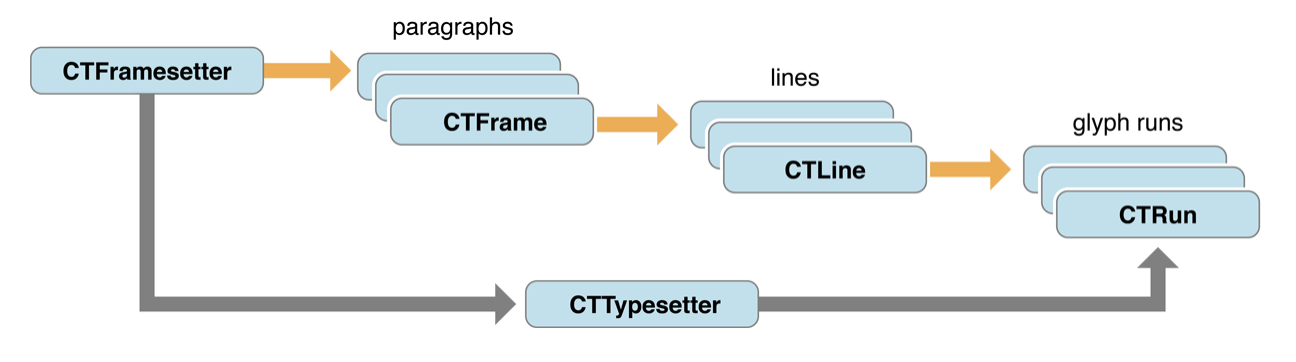
从图中可知,绘制文本总共涉及到以下几个类:
- CTFramesetter
- CTTypesetter
- CTFrame
- CTLine
- CTRun
以上这些类的操作都是线程安全的
CTFramesetter:就是用于绘制文本的总管。
CTFrame:一个文本段落,包括多行文本,多种样式的文字。
CTLine:一行文本,它不会折行,代表一个段落中的一行文本。
CTRun:一行文本中,相同样式的字符。
CTTypesetter:用于控制一行文本如何断行。
接下来我们先看看一个简单的文本绘制,代码如下:
override func draw(_ rect: CGRect) {

        guard let context = UIGraphicsGetCurrentContext() else { return }

        // 转换坐标系

        context.translateBy(x: 0, y: bounds.height)

        context.scaleBy(x: 1, y: -1)

        // 初始化文本矩阵

        context.textMatrix = .identity

        // 根据字符串,创建一个带有属性的字符串

        let strAttr: [NSAttributedString.Key : Any] = [

            .foregroundColor: color,

            .font: font

        ]

        let attrStr = NSAttributedString(string: text ?? "", attributes: strAttr)

        // 设置一个文本的绘制区域,CoreText只会在这个区域内进行绘制(超出部分的字符将不被绘制)。由于它是一个CGPath,因此我们可以指定一个不规则形状的区域

        // 这里我们指定一个矩形区域,该区域是相对当前视图bounds,拥有8pt内边距的一个矩形区域

        let path = CGPath(rect: bounds.insetBy(dx: 8, dy: 8), transform: nil)

        // 初始化一个CTFramesetter

        let frameSetter = CTFramesetterCreateWithAttributedString(attrStr)

        // 创建CTFrame

        let attr: CFDictionary = [

            kCTFrameProgressionAttributeName: CTFrameProgression.topToBottom.rawValue as CFNumber // 这是文字的绘制方向,这里是从上到下绘制(默认值)

        ] as CFDictionary

        // frameAttributes参数允许为nil, stringRange参数指定加载文本的区间,如果lenght=0,将会加载全部文本

        let textFrame = CTFramesetterCreateFrame(frameSetter, CFRange(location: 0, length: 0), path, attr)

        // 绘制文本

        CTFrameDraw(textFrame, context)

    }
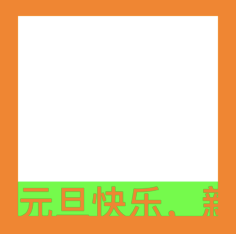
这里我们绘制的文字是:“元旦快乐,新年快了!祝大家心想事成,万事如意!”,实际显示的效果如下:

我们发现,“祝”后面的文字没有显示出来,这是因为我们设置的绘制区域只能显示这么多文字,其它部分文字被忽略了。
指定绘制区域是采用CGPath指定的,因此这样会更加灵活,我们可以绘制一个任何形状的区域用于显示文字。
创建CTFramesetter有两个方法,如下:
public func CTFramesetterCreateWithAttributedString(_ attrString: CFAttributedString) -> CTFramesetter

public func CTFramesetterCreateWithTypesetter(_ typesetter: CTTypesetter) -> CTFramesetter
这里我们采用的是第一种方法,另一种方法我们可以采用下面的方式来初始化:
// 创建一个CTTypesetter

let typesetter = CTTypesetterCreateWithAttributedString(attrStr)

// 初始化一个CTFramesetter

let frameSetter = CTFramesetterCreateWithTypesetter(typesetter)
根据CTFramesetter创建一个段落CTFrame方法如下:
func CTFramesetterCreateFrame(_ framesetter: CTFramesetter, _ stringRange: CFRange, _ path: CGPath, _ frameAttributes: CFDictionary?) -> CTFrame
stringRange:指定这个段落的字符区间,即:这个段落中的文本包括从attrStr字符串的location开始,length长度的字符串(实际上length如果超出了绘制区域,它依然是无法绘制出全部的文字)。当length=0时,CTFramesetter会连续不断的将字符串绘制成每一个行,直到字符串被耗尽,或者超出绘制范围为止。因此这里的length一般设置为0。它会自动管理我们的字符串。
path:指定绘制区间范围。
frameAttributes:初始化CTFrame的一些属性参数,如果传nil,CTFramesetter会初始化一个默认值。这些属性包括如下(在CTFrame文件中可以查到):
// 指定文字排版方向,它对应一个枚举值CTFrameProgression,包括:topToBottom(默认)、rightToLeft、leftToRight

kCTFrameProgressionAttributeName(value为CFNumberRef类型)

// 对应枚举:CTFramePathFillRule,包括:evenOdd(默认)、windingNumber

kCTFramePathFillRuleAttributeName(value为CFNumberRef类型)

// 指定绘制区域的宽度:默认0

kCTFramePathWidthAttributeName(value为CFNumberRef类型)

// 指定一个裁剪path数组

kCTFrameClippingPathsAttributeName(value为CFArrayRef,item为:CFDictionaryRefs or CGPathRef)

kCTFramePathClippingPathAttributeName(value为CGPathRef)
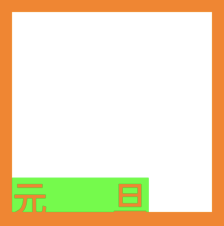
我们看一下kCTFrameProgressionAttributeName这个属性的效果(我们显示的内容为:“元旦快乐”):
topToBottom(默认):

rightToLeft:

leftToRight:

我们可以通过如下方法获取CTFrame相关属性和结果:
// 获取CTFrame的stringRange属性(该值在初始化CTFrame时有设置,如果初始化时stringRange的length=0,则这里返回的是attrStr的全部长度)

func CTFrameGetStringRange(_ frame: CTFrame) -> CFRange

// 获取可见区域内的字符串区间(我们可以通过该方法来获取指定区域内可以显示的文字个数)

func CTFrameGetVisibleStringRange(_ frame: CTFrame) -> CFRange

// 获取CTFrame的绘制区域

func CTFrameGetPath(_ frame: CTFrame) -> CGPath

// 获取CTFrame的属性字典

func CTFrameGetFrameAttributes(_ frame: CTFrame) -> CFDictionary?

// 获取CTFrame中包含的CTLine(即:一个段落中的全部的行文字,我们可以通过这个知道该段落包含多少行文字)

func CTFrameGetLines(_ frame: CTFrame) -> CFArray

// 获取每行的Origin坐标点

func CTFrameGetLineOrigins(_ frame: CTFrame, _ range: CFRange, _ origins: UnsafeMutablePointer<CGPoint>)

// 绘制段落

func CTFrameDraw(_ frame: CTFrame, _ context: CGContext)
获取段落中每行的原点(Origin)坐标方法(CTFrameGetLineOrigins)参数说明:
frame:段落CTFrame
range:这个是段落中的行的范围,指定哪些行,length=0,location=0表示所有行。
origins:返回原点坐标数组指针
这个原点坐标就是文章开始的那张图中的Origin,接下来我们看一个demo,我们获取一个段落中第1行(注意这里1指的是下标,从0开始)之后的所有行的原点坐标,并用绿色圆点标记出来。
// 获取段落中的总行数

let lineCount = CFArrayGetCount(CTFrameGetLines(textFrame))

// 获取第1行之后的所有行的原点坐标

let startIndex = 1

var pts: [CGPoint] = Array<CGPoint>.init(repeating: .zero, count: lineCount - startIndex)

CTFrameGetLineOrigins(textFrame, CFRange(location: startIndex, length: 0), &pts)

for pt in pts {

    let v = UIView()

    v.frame = CGRect(x: pt.x, y: pt.y, width: 4, height: 4)

    v.backgroundColor = .green.withAlphaComponent(0.5)

    v.layer.cornerRadius = 2

    addSubview(v)

}
第一行之后每行的原点坐标如下:

所有行的原点坐标如下:

从图中我们看到,每行的顺序是从下到上遍历的。(第一行是最下面的一行,这跟CoreText的坐标系有关)
但是CTFrameGetLines获取的CTLine数组顺序是从上到下的。
我们发现这个方法CTFrameGetVisibleStringRange很有用,它可以获取当前区域内显示的文字长度。这样一来我们在解决阅读器看小说的应用场景中的分页问题很有帮助,我们可以采用如下方式来对一个小说内容进行分页。
// 这里假设一篇文章的全部内容如下

let text = "随着北京冬奥会临近,作为冬奥主要赛区之一所在地的河北省,正全力做好冬奥会疫情防控工作。“要坚持举全省之力推进冬奥会、冬残奥会疫情防控,全程严管严防。要进一步完善组织领导体系,严格落实北京冬奥组委防控要求,不断优化完善张家口赛区疫情防控方案和应急预案。”相关负责人表示,要坚持人物同防,强化国内外涉赛人员和物品消毒、人员检测,筑牢外防输入、内防反弹坚固防线。要强化分区分类闭环管理,实行空间分区、人员分类、互不交叉,加强核酸采样、核酸检测、消毒消杀、流调溯源等人员力量,一旦发现阳性病例,高效快速应急处置。要加强赛事组织,完善交通、观赛等方案,确保运动员和观赛群众安全。"

var list = [String]() // 用于存储每页将显示的字符串

var index = 0

let queue = DispatchQueue(label: "queue") // 这里我们采用一个子线程来计算分页数据(因为这里会相对耗时)

let rect = CGRect(x: 0, y: 0, width: 100, height: 100) // 我们指定一页显示的区域范围

let path = CGPath(rect: rect, transform: nil)

queue.async {

    let attrStr = NSMutableAttributedString(string: text )

    attrStr.setAttributes([.font: UIFont.systemFont(ofSize: 15, weight: .bold)], range: NSRange(location: 0, length: text.count))

    // 初始化CTFramesetter

    let framesetter = CTFramesetterCreateWithAttributedString(attrStr)

    while index < text.count {

        // 这里的stringRange的length=0,让CoreText自己计算可以显示多少文字,

        let frame = CTFramesetterCreateFrame(framesetter, CFRange(location: index, length: 0), path, nil)

        // 获取当前区域内显示的文字范围

        let range = CTFrameGetVisibleStringRange(frame)

        index += range.length

        let str = text.string(NSRange(location: range.location, length: range.length))

        list.append(str)

    }

    print("total length: \(text.count)")

    for s in list {

        print("line: \(s), length: \(s.count)")

    }

}
其实我们还有另一个方法来计算,方法如下:
func CTFramesetterSuggestFrameSizeWithConstraints(_ framesetter: CTFramesetter,

                                                  _ stringRange: CFRange,

                                                  _ frameAttributes: CFDictionary?,

                                                  _ constraints: CGSize,

                                                  _ fitRange: UnsafeMutablePointer<CFRange>?) -> CGSize
stringRange:这个跟上面介绍的CTFramesetter的创建时的参数一样
frameAttributes:这个跟上面介绍的CTFramesetter的创建时的参数一样
constraints:指定当前显示区域尺寸,用于计算该区域内所显示的文字范围
fitRange:返回显示的文字范围
该方法返回值是CGSize,表示当前区域内,实际用来显示文字的区域尺寸
下面是代码demo:
// 这里假设一篇文章的全部内容如下

let text = "随着北京冬奥会临近,作为冬奥主要赛区之一所在地的河北省,正全力做好冬奥会疫情防控工作。“要坚持举全省之力推进冬奥会、冬残奥会疫情防控,全程严管严防。要进一步完善组织领导体系,严格落实北京冬奥组委防控要求,不断优化完善张家口赛区疫情防控方案和应急预案。”相关负责人表示,要坚持人物同防,强化国内外涉赛人员和物品消毒、人员检测,筑牢外防输入、内防反弹坚固防线。要强化分区分类闭环管理,实行空间分区、人员分类、互不交叉,加强核酸采样、核酸检测、消毒消杀、流调溯源等人员力量,一旦发现阳性病例,高效快速应急处置。要加强赛事组织,完善交通、观赛等方案,确保运动员和观赛群众安全。"

var list = [String]() // 用于存储每页将显示的字符串

var index = 0

let queue = DispatchQueue(label: "queue") // 这里我们采用一个子线程来计算分页数据(因为这里会相对耗时)

let rect = CGRect(x: 0, y: 0, width: 100, height: 100) // 我们指定一页显示的区域范围

let path = CGPath(rect: rect, transform: nil)

queue.async {

    let attrStr = NSMutableAttributedString(string: text )

    attrStr.setAttributes([.font: UIFont.systemFont(ofSize: 15, weight: .bold)], range: NSRange(location: 0, length: text.count))

    // 初始化CTFramesetter

    let framesetter = CTFramesetterCreateWithAttributedString(attrStr)

    while index < text.count {

        var range: CFRange = .init(location: 0, length: 0) // 可展示区域内的字符串范围

        let size = CTFramesetterSuggestFrameSizeWithConstraints(framesetter, CFRange(location: index, length: 0), nil, rect.size, &range)

        print("当前区域内可展示的内容实际大小: \(size)")

        let str = text.string(.init(location: range.location, length: range.length))

        list.append(str)

        index += range.length

    }

    print("total length: \(text.count)")

    for s in list {

        print("line: \(s), length: \(s.count)")

    }

}
以上输出结果如下:
total length: 284

line: 随着北京冬奥会临近,作为冬奥主要赛区之一所在地的河北省,正全, length: 30

line: 力做好冬奥会疫情防控工作。“要坚持举全省之力推进冬奥会、冬残, length: 30

line: 奥会疫情防控,全程严管严防。要进一步完善组织领导体系,严格, length: 29

line: 落实北京冬奥组委防控要求,不断优化完善张家口赛区疫情防控方, length: 29

line: 案和应急预案。”相关负责人表示,要坚持人物同防,强化国内外涉, length: 30

line: 赛人员和物品消毒、人员检测,筑牢外防输入、内防反弹坚固防线。, length: 30

line: 要强化分区分类闭环管理,实行空间分区、人员分类、互不交, length: 27

line: 叉,加强核酸采样、核酸检测、消毒消杀、流调溯源等人员力量,, length: 29

line: 一旦发现阳性病例,高效快速应急处置。要加强赛事组织,完善交, length: 29

line: 通、观赛等方案,确保运动员和观赛群众安全。, length: 21
除了绘制一整段的段落文字外,我们还可以绘制一个单行的无换行的文字。通过CTLine来绘制一个单行文字,提供以下三种方法来创建CTLine:
// 初始化CTLine

func CTLineCreateWithAttributedString(_ attrString: CFAttributedString) -> CTLine

// 设置CTLine的截断方式

// width:设置单行文本的显示宽度(超出部分截断)

// truncationType:(截断方式,start:文本开始处截断;middle:文本中间处截断;end:文本末尾处截断)

// truncationToken:截断处填充的字符(例如:超出width后,在结尾处显示“...”)

func CTLineCreateTruncatedLine(_ line: CTLine,

                               _ width: Double,

                               _ truncationType: CTLineTruncationType,

                               _ truncationToken: CTLine?) -> CTLine?

// 设置CTLine的排版方式

// justificationFactor:适配因子,<=0:不适配;>1:全面适配;0<x<1;部分适配

// justificationWidth:排版触发适配的宽度

func CTLineCreateJustifiedLine(_ line: CTLine,

                               _ justificationFactor: CGFloat,

                               _ justificationWidth: Double) -> CTLine?
我们先来看看第一种初始化方法:
override func draw(_ rect: CGRect) {

    guard let context = UIGraphicsGetCurrentContext() else { return }

    context.translateBy(x: 0, y: bounds.height)

    context.scaleBy(x: 1, y: -1)

    context.textMatrix = .identity

    let attrs: [NSAttributedString.Key : Any] = [

        .foregroundColor: color,

        .font: font,

        .backgroundColor: UIColor.green

    ]

    let attrStr = NSMutableAttributedString(string: text ?? "")

    attrStr.setAttributes(attrs, range: NSRange(location: 0, length: attrStr.length))

    // 创建CTLine

    let line = CTLineCreateWithAttributedString(attrStr)

    // 绘制CTLine

    CTLineDraw(line, context)

}
显示效果如下:
我们绘制的文字内容为:“元旦快乐,新年快了!祝大家心想事成,万事如意!”,我们看到文字显示在一行上,没有换行,但是超出部分没有被截断,依然被绘制出来了。
接下来采用第二个方法实现对CTLine文字截断设置(实现超出显示区域后截断,末尾显示“...”):
override func draw(_ rect: CGRect) {

    guard let context = UIGraphicsGetCurrentContext() else { return }

    context.translateBy(x: 0, y: bounds.height)

    context.scaleBy(x: 1, y: -1)

    context.textMatrix = .identity

    let attrs: [NSAttributedString.Key : Any] = [

        .foregroundColor: color,

        .font: font,

        .backgroundColor: UIColor.green

    ]

    let attrStr = NSMutableAttributedString(string: text ?? "")

    attrStr.setAttributes(attrs, range: NSRange(location: 0, length: attrStr.length))

    // 初始化CTLine

    let line = CTLineCreateWithAttributedString(attrStr)

    // 初始化截断填充字符串:”...“(Unicode表示方式)

    let tokenStr = NSAttributedString(string: "\u{2026}", attributes: attrs)

    let token = CTLineCreateWithAttributedString(tokenStr)

    // 设置截断方式,尾部截断,截断处显示”...“(设置失败,返回nil)

    if let ln = CTLineCreateTruncatedLine(line, bounds.width, .end, token) {

        CTLineDraw(ln, context)

    }

}
效果如下:

还有一种情况,就是我们的一行文字内容较少,就像下面这样:

有时我们需要文字始终均匀分布,就像下面这样:

如果想实现上面这样的排版,就需要使用第三种方法了:
override func draw(_ rect: CGRect) {

    guard let context = UIGraphicsGetCurrentContext() else { return }

    context.translateBy(x: 0, y: bounds.height)

    context.scaleBy(x: 1, y: -1)

    context.textMatrix = .identity

    let attrs: [NSAttributedString.Key : Any] = [

        .foregroundColor: color,

        .font: font,

        .backgroundColor: UIColor.green

    ]

    let attrStr = NSMutableAttributedString(string: text ?? "")

    attrStr.setAttributes(attrs, range: NSRange(location: 0, length: attrStr.length))

    // 初始化CTLine

    let line = CTLineCreateWithAttributedString(attrStr)

    // 设置文字排版的适配方式

    if let ln = CTLineCreateJustifiedLine(line, 1, bounds.width) {

        CTLineDraw(ln, context)

    }

}
我们再来调整一下justificationFactor参数,从1,改成0.5,效果如下:
关于CTLine的操作还有其它方法,如下:
// 获取CTLine上的字形个数(如果设置了截断,那么这个被截断的CTLine的字形个数为:当前截断后显示部分的字形个数)

func CTLineGetGlyphCount(_ line: CTLine) -> CFIndex

// 获取CTLine中的所有CTRun

func CTLineGetGlyphRuns(_ line: CTLine) -> CFArray

// 获取CTLine上包含的字符串范围(设置截断的CTLine的字符串范围,依然等于CTLine包含的全部字符串,即:被截断部分也算在内)

func CTLineGetStringRange(_ line: CTLine) -> CFRange

// 获取对齐文本的偏移量

// flushFactor:<=0:完全左对齐;0<x<0.5:左侧对齐;0.5:完全居中对齐:0.5<x<1:右侧对齐,>1:完全右对齐

func CTLineGetPenOffsetForFlush(_ line: CTLine, _ flushFactor: CGFloat, _ flushWidth: Double) -> Double

// 计算CTLine的字形边界值,ascent、descent、leading:分别对应文章开头部分的字形图中标注的内容

// return:CTLine的宽度

func CTLineGetTypographicBounds(_ line: CTLine,

                                _ ascent: UnsafeMutablePointer<CGFloat>?,

                                _ descent: UnsafeMutablePointer<CGFloat>?,

                                _ leading: UnsafeMutablePointer<CGFloat>?) -> Double

// 计算CTLine的边界矩形(注意坐标系:原点为左下角),options:计算参考条件

func CTLineGetBoundsWithOptions(_ line: CTLine, _ options: CTLineBoundsOptions) -> CGRect

// 计算CTLine的末尾空格或制表符部分宽度

func CTLineGetTrailingWhitespaceWidth(_ line: CTLine) -> Double

// 计算CTLine边界矩形(注意坐标系:原点为左下角),此函数纯粹是为了方便使用符号作为图像,不应用于排版目的。

func CTLineGetImageBounds(_ line: CTLine, _ context: CGContext?) -> CGRect

// 获取CTLine中,某个position位置的字符串索引,该值将不小于第一个字符索引,同时不大于最后一个字符的索引(调用失败返回kCFNotFound)

// 一般用于hit testing(确定点击位置的字符串索引)

func CTLineGetStringIndexForPosition(_ line: CTLine, _ position: CGPoint) -> CFIndex

// 获取CTLine中索引下标的字符的偏移量(secondaryOffset:次偏移量,return:主偏移量)

func CTLineGetOffsetForStringIndex(_ line: CTLine,

                                   _ charIndex: CFIndex,

                                   _ secondaryOffset: UnsafeMutablePointer<CGFloat>?) -> CGFloat

// 枚举CTLine中所有字符,在闭包中返回每个字符串的偏移量

// 闭包中参数:0:偏移量;1:字符索引;2:是否为起始偏移量,true(起始偏移量);3:(未知)

// 例如:枚举遍历字符串"元旦"每个字符的偏移量,block输出如下:

// 0、offset: 0.0,    idx: 0, flag: true,  ptr: false

// 1、offset: 18.342, idx: 0, flag: false, ptr: false

// 2、offset: 18.342, idx: 1, flag: true,  ptr: false

// 3、offset: 36.684, idx: 1, flag: false, ptr: false

// 因此,相同idx的flag=false的offset - flag=true的offset 就是当前idx字符的字形宽度

func CTLineEnumerateCaretOffsets(_ line: CTLine, _ block: @escaping (Double, CFIndex, Bool, UnsafeMutablePointer<Bool>) -> Void)
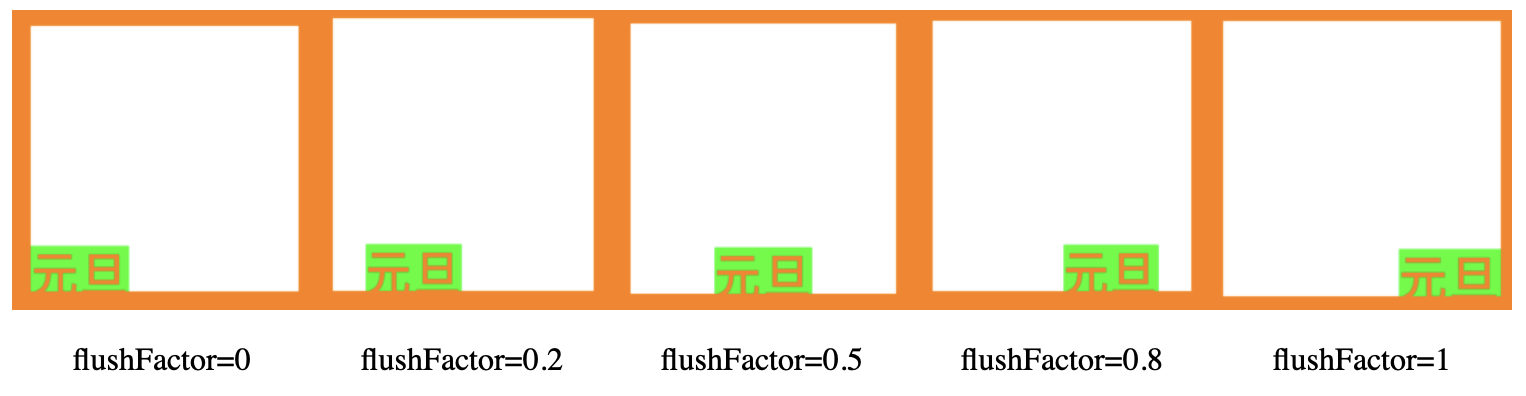
其中使用CTLineGetPenOffsetForFlush方法可以实现CTLine相对于context的水平对齐方式
例如:居中对齐、居右对齐。下面是flushFactor不同范围的值对应的效果:
一个实现完全居中对齐的代码如下:
override func draw(_ rect: CGRect) {

    guard let context = UIGraphicsGetCurrentContext() else { return }

    context.translateBy(x: 0, y: bounds.height)

    context.scaleBy(x: 1, y: -1)

    context.textMatrix = .identity

    let attrs: [NSAttributedString.Key : Any] = [

        .foregroundColor: color,

        .font: font,

        .backgroundColor: UIColor.green

    ]

    let attrStr = NSMutableAttributedString(string: text ?? "")

    attrStr.setAttributes(attrs, range: NSRange(location: 0, length: attrStr.length))

    // 初始化CTLine

    let line = CTLineCreateWithAttributedString(attrStr)

    // 获取对齐文本的偏移量

    // flushFactor:<=0:完全左对齐;0<x<0.5:左侧对齐;0.5:完全居中对齐:0.5<x<1:右侧对齐,>1:完全右对齐

    let offset = CTLineGetPenOffsetForFlush(line, 0.5, bounds.width)

    // 设置文本的起始位置坐标

    context.textPosition = CGPoint(x: offset, y: 0)

    CTLineDraw(line, context)

}
另外我们还可以实现垂直居中,这里我们需要计算出CTLine的字形高度,我们通过CTLineGetTypographicBounds方法计算字形高度,具体实现代码如下:
// 初始化CTLine

let line = CTLineCreateWithAttributedString(attrStr)

// 获取对齐文本的偏移量

// flushFactor:<=0:完全左对齐;0<x<0.5:左侧对齐;0.5:完全居中对齐:0.5<x<1:右侧对齐,>1:完全右对齐

let offset = CTLineGetPenOffsetForFlush(line, 0.5, bounds.width)

var ascent: CGFloat = 0, descent: CGFloat = 0, leading: CGFloat = 0

CTLineGetTypographicBounds(line, &ascent, &descent, &leading)

let lineHeight = ascent + descent + leading

// 设置文本的起始位置坐标

context.textPosition = CGPoint(x: offset, y: (bounds.height - lineHeight)/2.0)

CTLineDraw(line, context)
这里的ascent、descent、leading对应文章开头的字形图中标记的位置。最终实现效果如下:

实现列排版,先看效果:

实现代码如下:
override func draw(_ rect: CGRect) {

    guard let context = UIGraphicsGetCurrentContext() else { return }

    context.translateBy(x: 0, y: bounds.height)

    context.scaleBy(x: 1, y: -1)

    context.textMatrix = .identity

    let attrs: [NSAttributedString.Key : Any] = [

        .foregroundColor: color,

        .font: font,

        .backgroundColor: UIColor.green

    ]

    let attrStr = NSMutableAttributedString(string: text ?? "")

    attrStr.setAttributes(attrs, range: NSRange(location: 0, length: attrStr.length))

    let frameSetter = CTFramesetterCreateWithAttributedString(attrStr)

    let paths = paths(column: 4) // 计算4列的区域路径

    var index = 0

    for path in paths {

        // 分别绘制每列的文字

        let textFrame = CTFramesetterCreateFrame(frameSetter, CFRange(location: index, length: 0), path, nil)

        let range = CTFrameGetVisibleStringRange(textFrame) // 获取path区域内可见的文本范围

        index += range.length

        CTFrameDraw(textFrame, context)

    }

}

// 计算每列绘制区域

private func paths(column: Int) -> [CGPath] {

    let columnWidth = bounds.width / CGFloat(column)

    var list = [CGRect]()

    var temRect = bounds

    for _ in 0..<column {

        // 利用divided函数将temRect矩形按指定距离切割,返回值为元祖,slice:切割指定距离的矩形;remainder:剩余部分的矩形

        let res = temRect.divided(atDistance: columnWidth, from: .minXEdge)

        list.append(res.slice)

        temRect = res.remainder // 剩余部分继续切割

    }

    return list.map({ (rec) -> CGPath in

        let path = CGMutablePath()

        path.addRect(rec.insetBy(dx: 8, dy: 10)) // 每列矩形增加内边距

        return path

    })

}
实际上就是利用CTFramesetter进行的布局,只是分别对每列的矩形区域内渲染文字。
因此利用CTFramesetter我们可以实现不同样式的排版,只要定义我们需要的path即可。
使用CTFramesetter遍历CTLine和CTRun,我们先看下面的字符串效果:

第一行文字包括两种样式的字形,因此它的CTLine->CTRun为两个
let textFrame = CTFramesetterCreateFrame(frameSetter, CFRange(location: 0, length: 0), path, attr)

let lines = CTFrameGetLines(textFrame)

let lineCount = CFArrayGetCount(lines)

for i in 0..<lineCount {

    let line = unsafeBitCast(CFArrayGetValueAtIndex(lines, i), to: CTLine.self)

    let runs = CTLineGetGlyphRuns(line)

    let runCount = CFArrayGetCount(runs)

    for j in 0..<runCount {

        let aRun = unsafeBitCast(CFArrayGetValueAtIndex(runs, j), to: CTRun.self)

        let count = CTRunGetGlyphCount(aRun)

        print("[i: \(i), j: \(j)]:glyphCount: \(count)")

    }

}
打印结果如下:
[i: 0, j: 0]:glyphCount: 2

[i: 0, j: 1]:glyphCount: 1

[i: 1, j: 0]:glyphCount: 4

[i: 2, j: 0]:glyphCount: 3
我们可以通过CTRun相关如下函数获取该CTRun内字形的属性,包括:颜色、字体等
// 获取CTRun的文本属性(颜色、字体...)

func CTRunGetAttributes(_ run: CTRun) -> CFDictionary
最新文章
- 【转】WPF防止界面卡死并显示加载中效果
- web工程关于500错误
- Win7下同时使用有线和无线时的优先级设置
- ubuntu14.04安装chrome
- HIVE 的MAP/REDUCE
- ASP.NET-FineUI开发实践-13(二)
- 关于Python2字符编码的体会
- iOS热更新技术被苹果官方警告?涉及到RN、Weex、JSPatch!!!
- jquery事件与绑定事件
- Linux 下安装jetty服务器
- htm,css,javascript及其他的注释方式
- pandas操作行集锦
- Confluence 6 Cron 表达式
- [实战]MVC5+EF6+MySql企业网盘实战(4)——上传头像
- [BZOJ3173]最长上升子序列
- Redis(二)持久化
- oracle 查看删除重复数据
- BZOJ.4571.[SCOI2016]美味(主席树 贪心)
- C#把数组中的某个元素取出来放到第一个位置
- verilog语法实例学习(8)