lvs-nat 模式-piranha
系统: redhat 6.5 mini
|
机器名 |
ip |
vip |
gw |
|
lvs01(主lvs) |
192.168.10.10(外网) 192.168.20.10(内网) |
192.168.10.254 |
|
|
lvs02(备lvs) |
192.168.20.10(外网) 192.168.20.20(内网) |
192.168.10.254 |
|
|
rs01 (web) |
192.168.20.100 |
192.168.20.254 |
192.168.20.254 |
|
rs02 (web) |
192.168.20.200 |
192.168.20.254 |
192.168.20.254 |
1、 在各个机器上配置ip地址,机器名,关闭selinux,同步时间
[root@lvs01 ~]# hostname
lvs01
[root@lvs01 ~]# getenforce
Disabled
[root@lvs02 ~]# hostname
lvs02
[root@lvs02 ~]# getenforce
Disabled
[root@rs01 ~]# hostname
rs01
[root@rs01 ~]# getenforce
Disabled
[root@rs02 ~]# hostname
rs02
[root@rs02 ~]# getenforce
Disabled
[root@lvs01 yum.repos.d]# cat /etc/hosts
192.168.20.10 lvs01
192.168.20.20 lvs02
192.168.20.100 rs01
192.168.20.200 rs02
[root@lvs01 yum.repos.d]# ntpdate 0.rhel.pool.ntp.org
[root@lvs02 yum.repos.d]# ntpdate 0.rhel.pool.ntp.org
[root@rs01 yum.repos.d]# ntpdate 0.rhel.pool.ntp.org
[root@rs02 yum.repos.d]# ntpdate 0.rhel.pool.ntp.org
2、 在各个机器关闭防火墙,配置yum源
[root@lvs01 yum.repos.d]# service iptables stop
[root@lvs01 yum.repos.d]# chkconfig iptables off
[root@lvs02 ~]# service iptables stop
[root@lvs02 ~]# chkconfig iptables off
[root@rs01 ~]# service iptables stop
[root@rs01 ~]# chkconfig iptables off
[root@rs02 ~]# service iptables stop
[root@rs02 ~]# chkconfig iptables off
[root@lvs01 yum.repos.d]# service iptables stop
[root@lvs01 yum.repos.d]# chkconfig iptables off
[root@lvs01 yum.repos.d]# cat rhel-source.repo
[base]
name=base
baseurl=file:///mnt
enabled=1
gpgcheck=0
[LB]
name=LB
baseurl=file:///mnt/LoadBalancer
enabled=1
gpgcheck=0
[HA]
name=HA
baseurl=file:///mnt/HighAvailability
enabled=1
gpgcheck=0
[RS]
name=RS
baseurl=file:///mnt/ResilientStorage
enabled=1
gpgcheck=0
[root@lvs01 yum.repos.d]# scp rhel-source.repo lvs02:/etc/yum.repos.d/rhel-source.repo
3、 在rs01.rs02上部署web服务
[root@rs01 ~]# yum install -y httpd
[root@rs01 ~]# echo "rs01">/var/www/html/index.html
[root@rs01 ~]# service httpd restart
[root@rs01 ~]# chkconfig httpd on
[root@rs02 ~]# yum install -y httpd
[root@rs02 ~]# echo "rs02">/var/www/html/index.html
[root@rs02 ~]# service httpd restart
[root@rs02 ~]# chkconfig httpd on
4、 在lvs01,lvs02安装LB,开启路由转发功能,在lvs01上配置lvs集群登录用户和密码
[root@lvs01 yum.repos.d]# yum groupinstall "Load Balancer"
[root@lvs02 yum.repos.d]# yum groupinstall "Load Balancer"
[root@lvs01 yum.repos.d]# vi /etc/sysctl.conf
net.ipv4.ip_forward = 1
[root@lvs01 yum.repos.d]# sysctl –p
[root@lvs02 yum.repos.d]# vi /etc/sysctl.conf
net.ipv4.ip_forward = 1
[root@lvs02 yum.repos.d]# sysctl –p
[root@lvs01 yum.repos.d]# piranha-passwd
New Password:
Verify:
Adding password for user piranha
[root@lvs01 yum.repos.d]# /etc/init.d/piranha-gui start
[root@lvs01 yum.repos.d]# chkconfig piranha-gui on
5、 通过浏览器来配置lvs集群
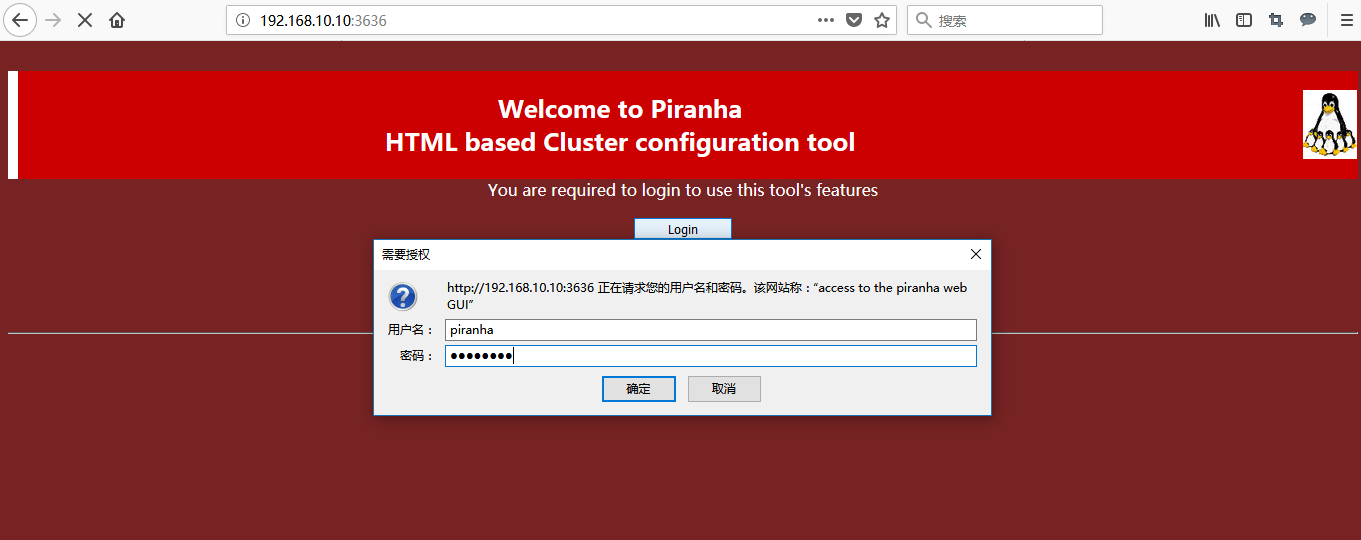
5.1 在浏览器输入http://192.168.10.10:3636,点击login,输入用户名和密码
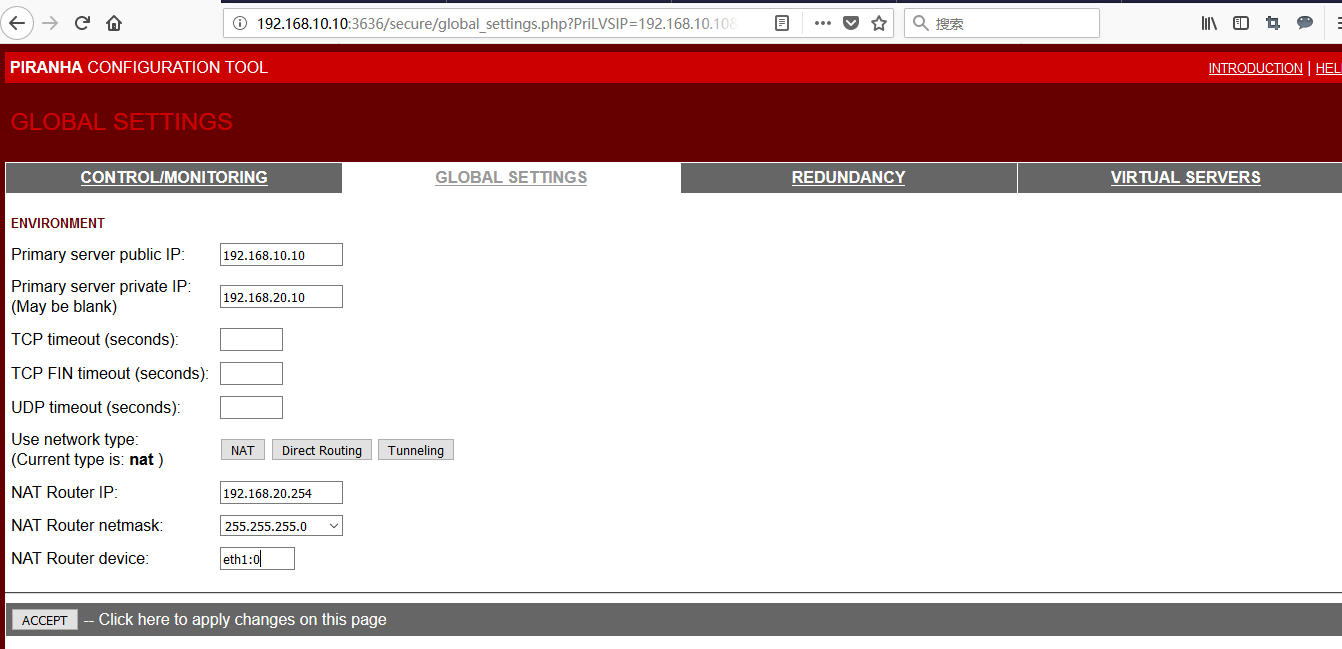
5.2 配置lvs01,选择nat 模式,最后点击accept
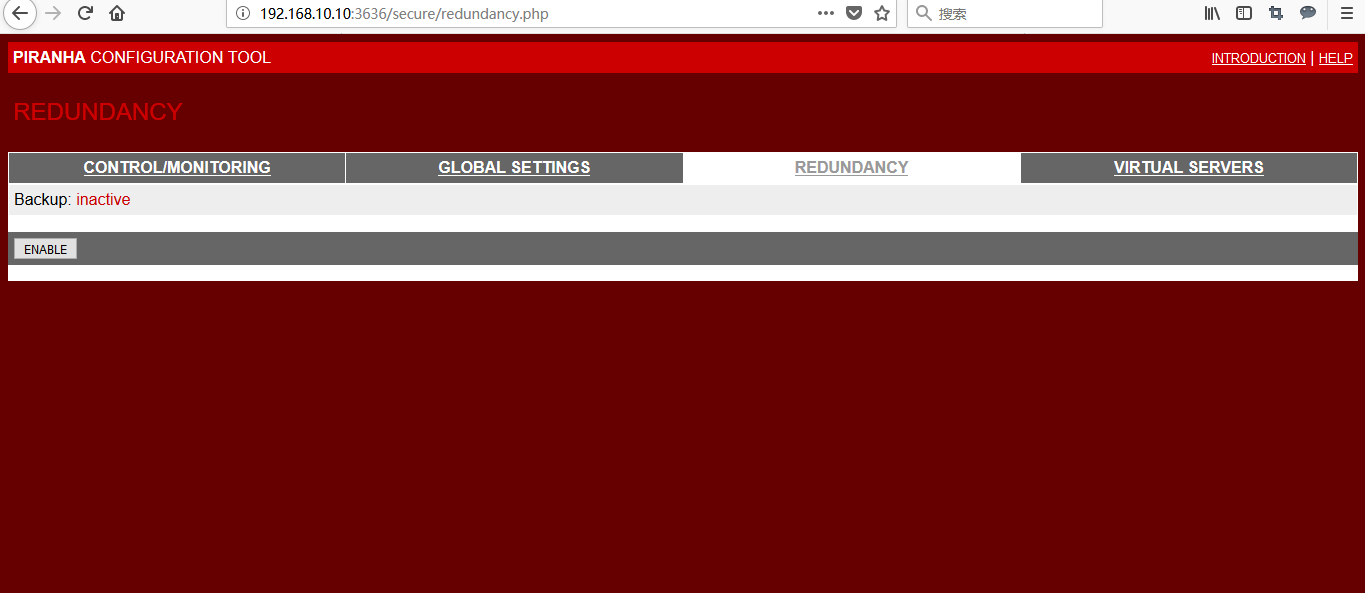
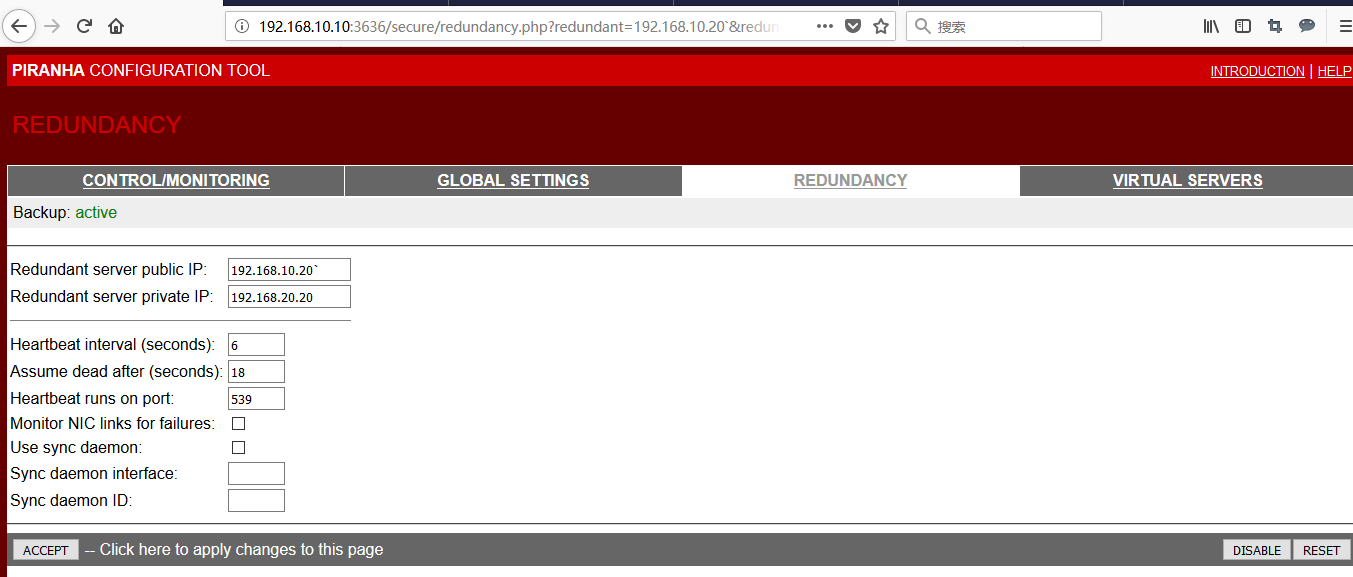
5.3 配置lvs02的ip,先点击ENABLE,配置ip 后,最后点击accept确定
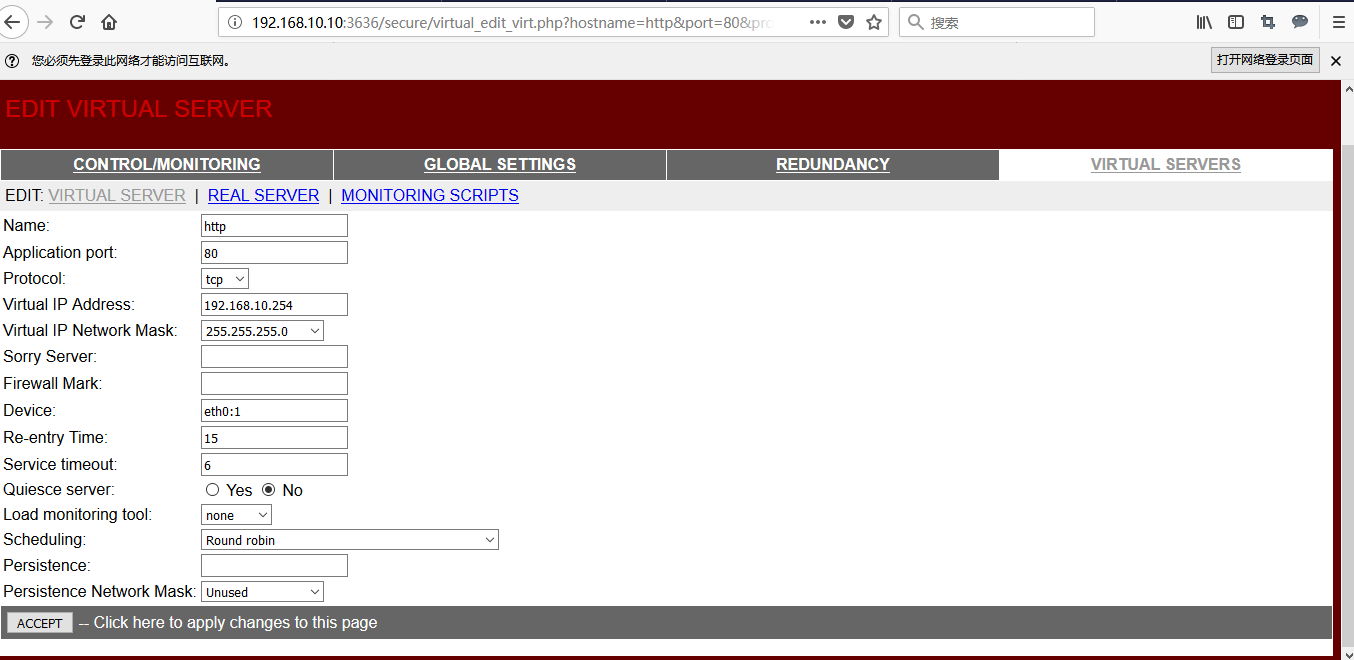
5.4 配置对外的服务,点击add->edit->accept
5.5 配置真实服务器(rs01和rs02)步骤add->edit->accept->active


5.6 up对外服务的vip

5.7 将在lvs01 上的配置文件复制到lvs02 上,
[root@lvs01 ~]# scp /etc/sysconfig/ha/lvs.cf lvs02:/etc/sysconfig/ha/lvs.cf
root@lvs02's password:
lvs.cf 100% 865 0.8KB/s 00:00
[root@lvs01 ~]# cat /etc/sysconfig/ha/lvs.cf
serial_no = 17
primary = 192.168.10.10
primary_private = 192.168.20.10
service = lvs
backup_active = 1
backup = 192.168.10.20
backup_private = 192.168.20.20
heartbeat = 1
heartbeat_port = 539
keepalive = 6
deadtime = 18
network = nat
nat_router = 192.168.20.254 eth1:0
nat_nmask = 255.255.255.0
debug_level = NONE
monitor_links = 0
syncdaemon = 0
virtual http {
active = 1
address = 192.168.10.254 eth0:1
vip_nmask = 255.255.255.0
port = 80
send = "GET / HTTP/1.0\r\n\r\n"
expect = "HTTP"
use_regex = 0
load_monitor = none
scheduler = rr
protocol = tcp
timeout = 6
reentry = 15
quiesce_server = 0
server rs01 {
address = 192.168.20.100
active = 1
weight = 1
}
server rs02 {
address = 192.168.20.200
active = 1
weight = 2
}
}
5.8 在lvs01,lvs02 上启动负载均衡的监控进程
[root@lvs01 ~]# /etc/init.d/pulse restart
Shutting down pulse: [失败]
Starting pulse: [确定]
[root@lvs01 ~]# chkconfig pulse on
[root@lvs02 ~]# /etc/init.d/pulse restart
Shutting down pulse: [失败]
Starting pulse: [确定]
[root@lvs02 ~]# chkconfig pulse on
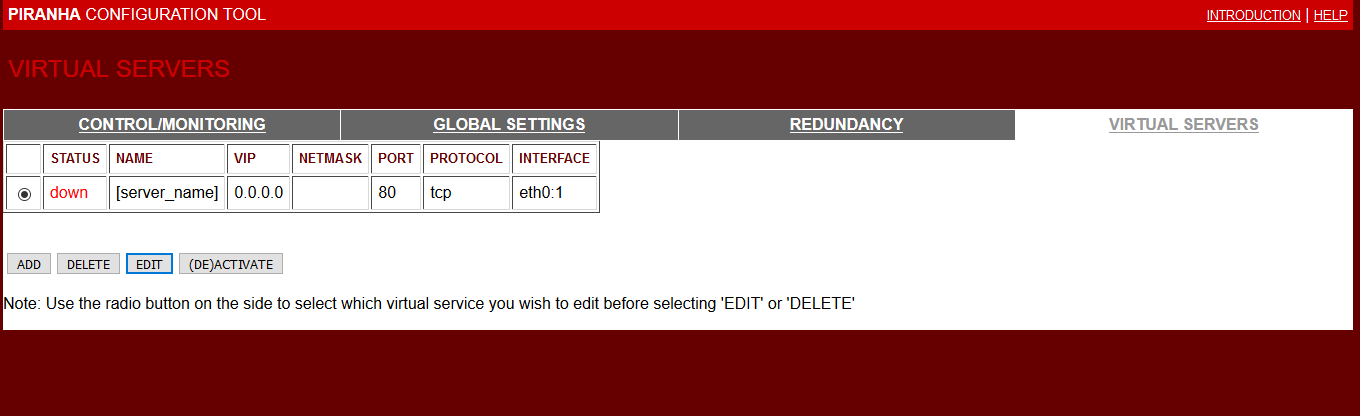
5.9 查看lvs的正常运行状态

6、 测试
6.1 访问vip,web的内容是后台两台真实服务器网页内容,轮替提供服务
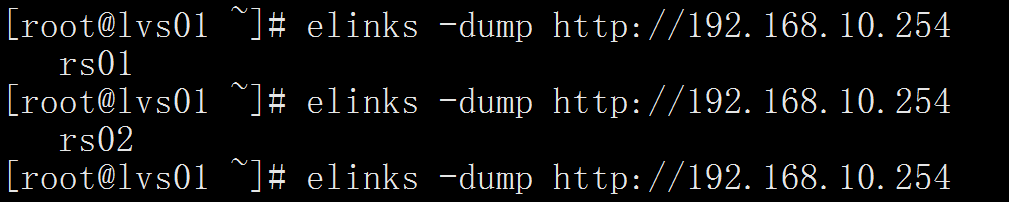
6.2 lvs01失效的情况下服务依然可用(我直接把lvs01关机了)
[root@lvs02 ~]# elinks -dump http://192.168.10.254
rs01
最新文章
- OpenCV Haartraining
- What technical details should a programmer of a web application consider before making the site public?
- 200、301、302、304、404等HTTP状态码
- kvm 网桥
- mysql与oracle的存储过程有什么区别?
- IOS添加控件
- C#中读取二维数组每位的长度
- I/O复用-select模型
- OC可变參数的函数实现va_start、va_end、va_list的使用
- File类常用方法
- 在MVC应用程序中动态加载PartialView
- 如何快速的理解JavaScript闭包?
- 一张图讲清楚TCP流量控制
- Codebase Refactoring (with help from Go)
- 乞丐版servlet容器第1篇
- js判断对象是否为空
- arale-cookie 使用
- es6下 vue实例属性template不能使用
- CMD运行JAVA出现编码GBK的不可映射字符处理方法?
- 一、linux 内核介绍