Converting a fisheye image into a panoramic, spherical or perspective projection [转]
Converting a fisheye image into a panoramic, spherical or perspective projection
Written by Paul Bourke
November 2004
The source code implementing the projections
below is only availableon request for a small fee. It includes a demo
application and an invitation toconvert an image of your choice to
verify the code does what you seek. For more information
please contact the author.
The following documents various transformations from
fisheye into other projectiontypes, specifically standard perspective as
per a pinhole camera, panorama andspherical projections.Fisheye images
capture a wide field of view, traditionally
one thinks of 180degrees but the mathematical definition extends past
that and indeed there aremany physical fisheye lenses that extend past
180 degrees. The two main applicationsfor the following are: the
inspection of images/video from security cameras wherepanorama
or perspective views may be more natural to view, creating panorama
orspherical images that are blended together to form even wider field of
view images.
The general options for the software include the
dimensions of the output image as wellas the aperture of the output
panoramic or perspective frustum. Some otherrequirements arise from
imperfect fisheye capture such as the fisheye notbeing
centered on the input image, the fisheye not be aligned with
theintended axis, and the fisheye being of any angle.Another
characteristic of real fisheye images is their lack of linearitywith
radius on the image, while this is not addressed here as it requiresa
lens calibration, it is a straightforward correction to make.
The usual approach for such image transformations is
to perform the inverse mapping. Thatis, one needs to consider each pixel
in the output image and map backwards tofind the closest pixel in the
input image (fisheye). In this way every pixelin
the output image is found (compared to a forward mapping), it also
meansthat the performance is governed by the resolution of the output
image(and supersampling) irrespective of the size of the input image.A
key aspect of these mappings is also to perform
some sort of antialiasing, thesolutions here use a simple supersampling
approach.
The code here are all plain vanilla C tested on Unix
style gcc systems (specifically Mac and Linux),but the algorithms/code
can readily be modified for otheroperating systems and programming
languages.This is not meant to be a final application
but rather something you integrate into your code base. Having said
that it is wrapped up in a simple TGA image reader/writer for the
purposes of algorithm testing, the intent is that one would be
implementing the function into ones own code base. They all
operate on a RGB buffer (fisheye image) in memory.For each test utility
the usage message is provided. The source images for the
examplesprovided are provided along with the command line that generated
them.
Fisheye to perspective transformation
Software: fish2persp
Usage: fish2persp [options] fisheyeimage

Options

   -w n     perspective image width, default = 800

   -h n     perspective image height, default = 600

   -t n     aperture of perspective (degrees), default = 100

            maximum is 170 degrees

   -s n     aperture of fisheye (degrees), default = 180

   -c x y   offset of the center of the fisheye image,

            default is fisheye image center

   -r n     fisheye radius, default is half height of fisheye image

   -x n     tilt angle (degrees), default: 0

   -y n     roll angle (degrees), default: 0

   -z n     pan angle (degrees), default: 0

   -a n     antialiasing level, default = 1 (no antialising)

            sensible maximum 3
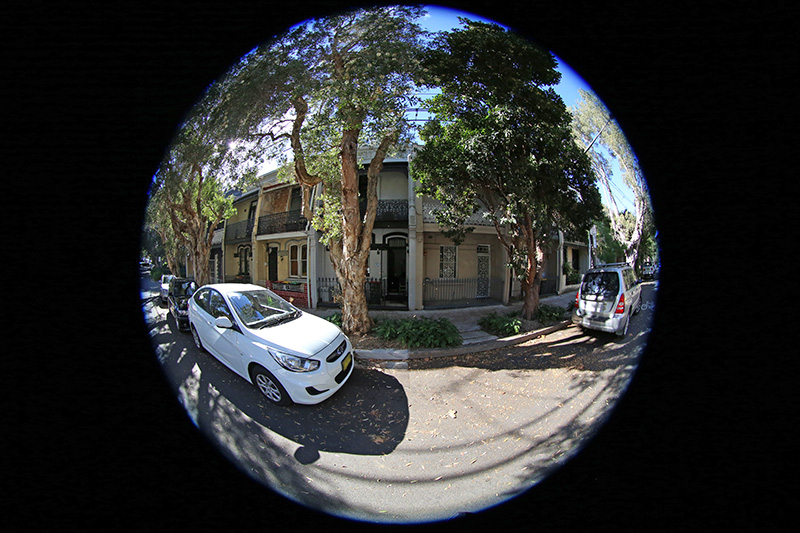
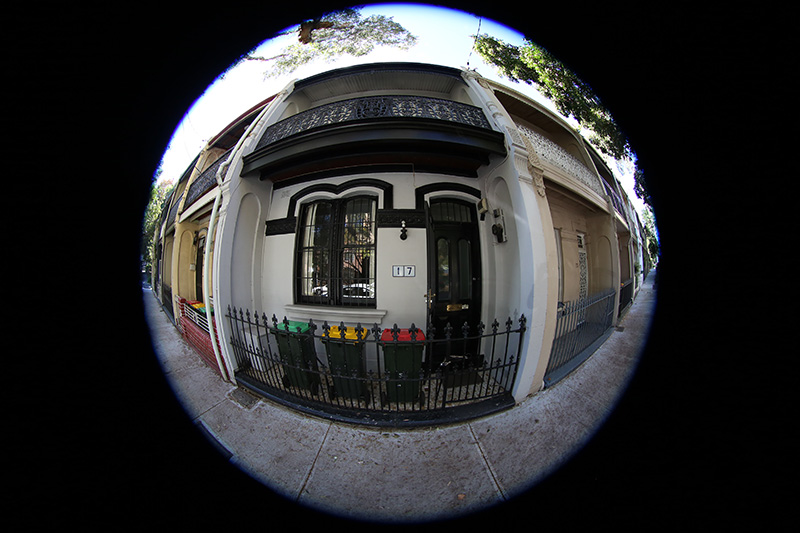
It should be noted at the outset that a fisheye projection is not a "distorted" image, and the process isn’t a “dewarping”. A fisheye like other projections is one of many ways of mapping a 3D world onto a 2D plane, it is no more or less "distorted" than other projections including a rectangular perspective projection ... it is what it is.
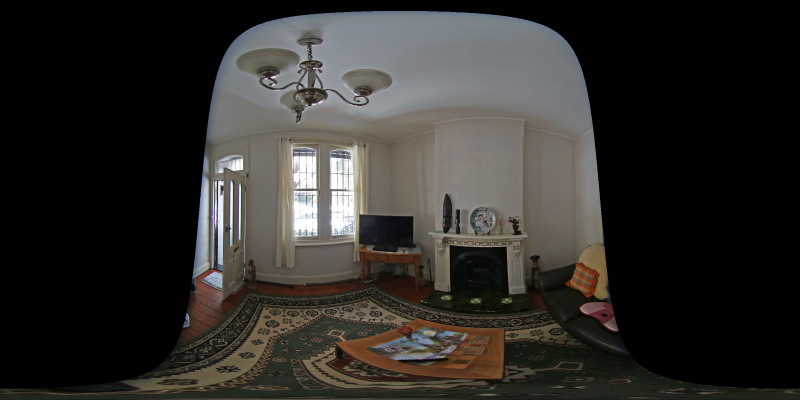
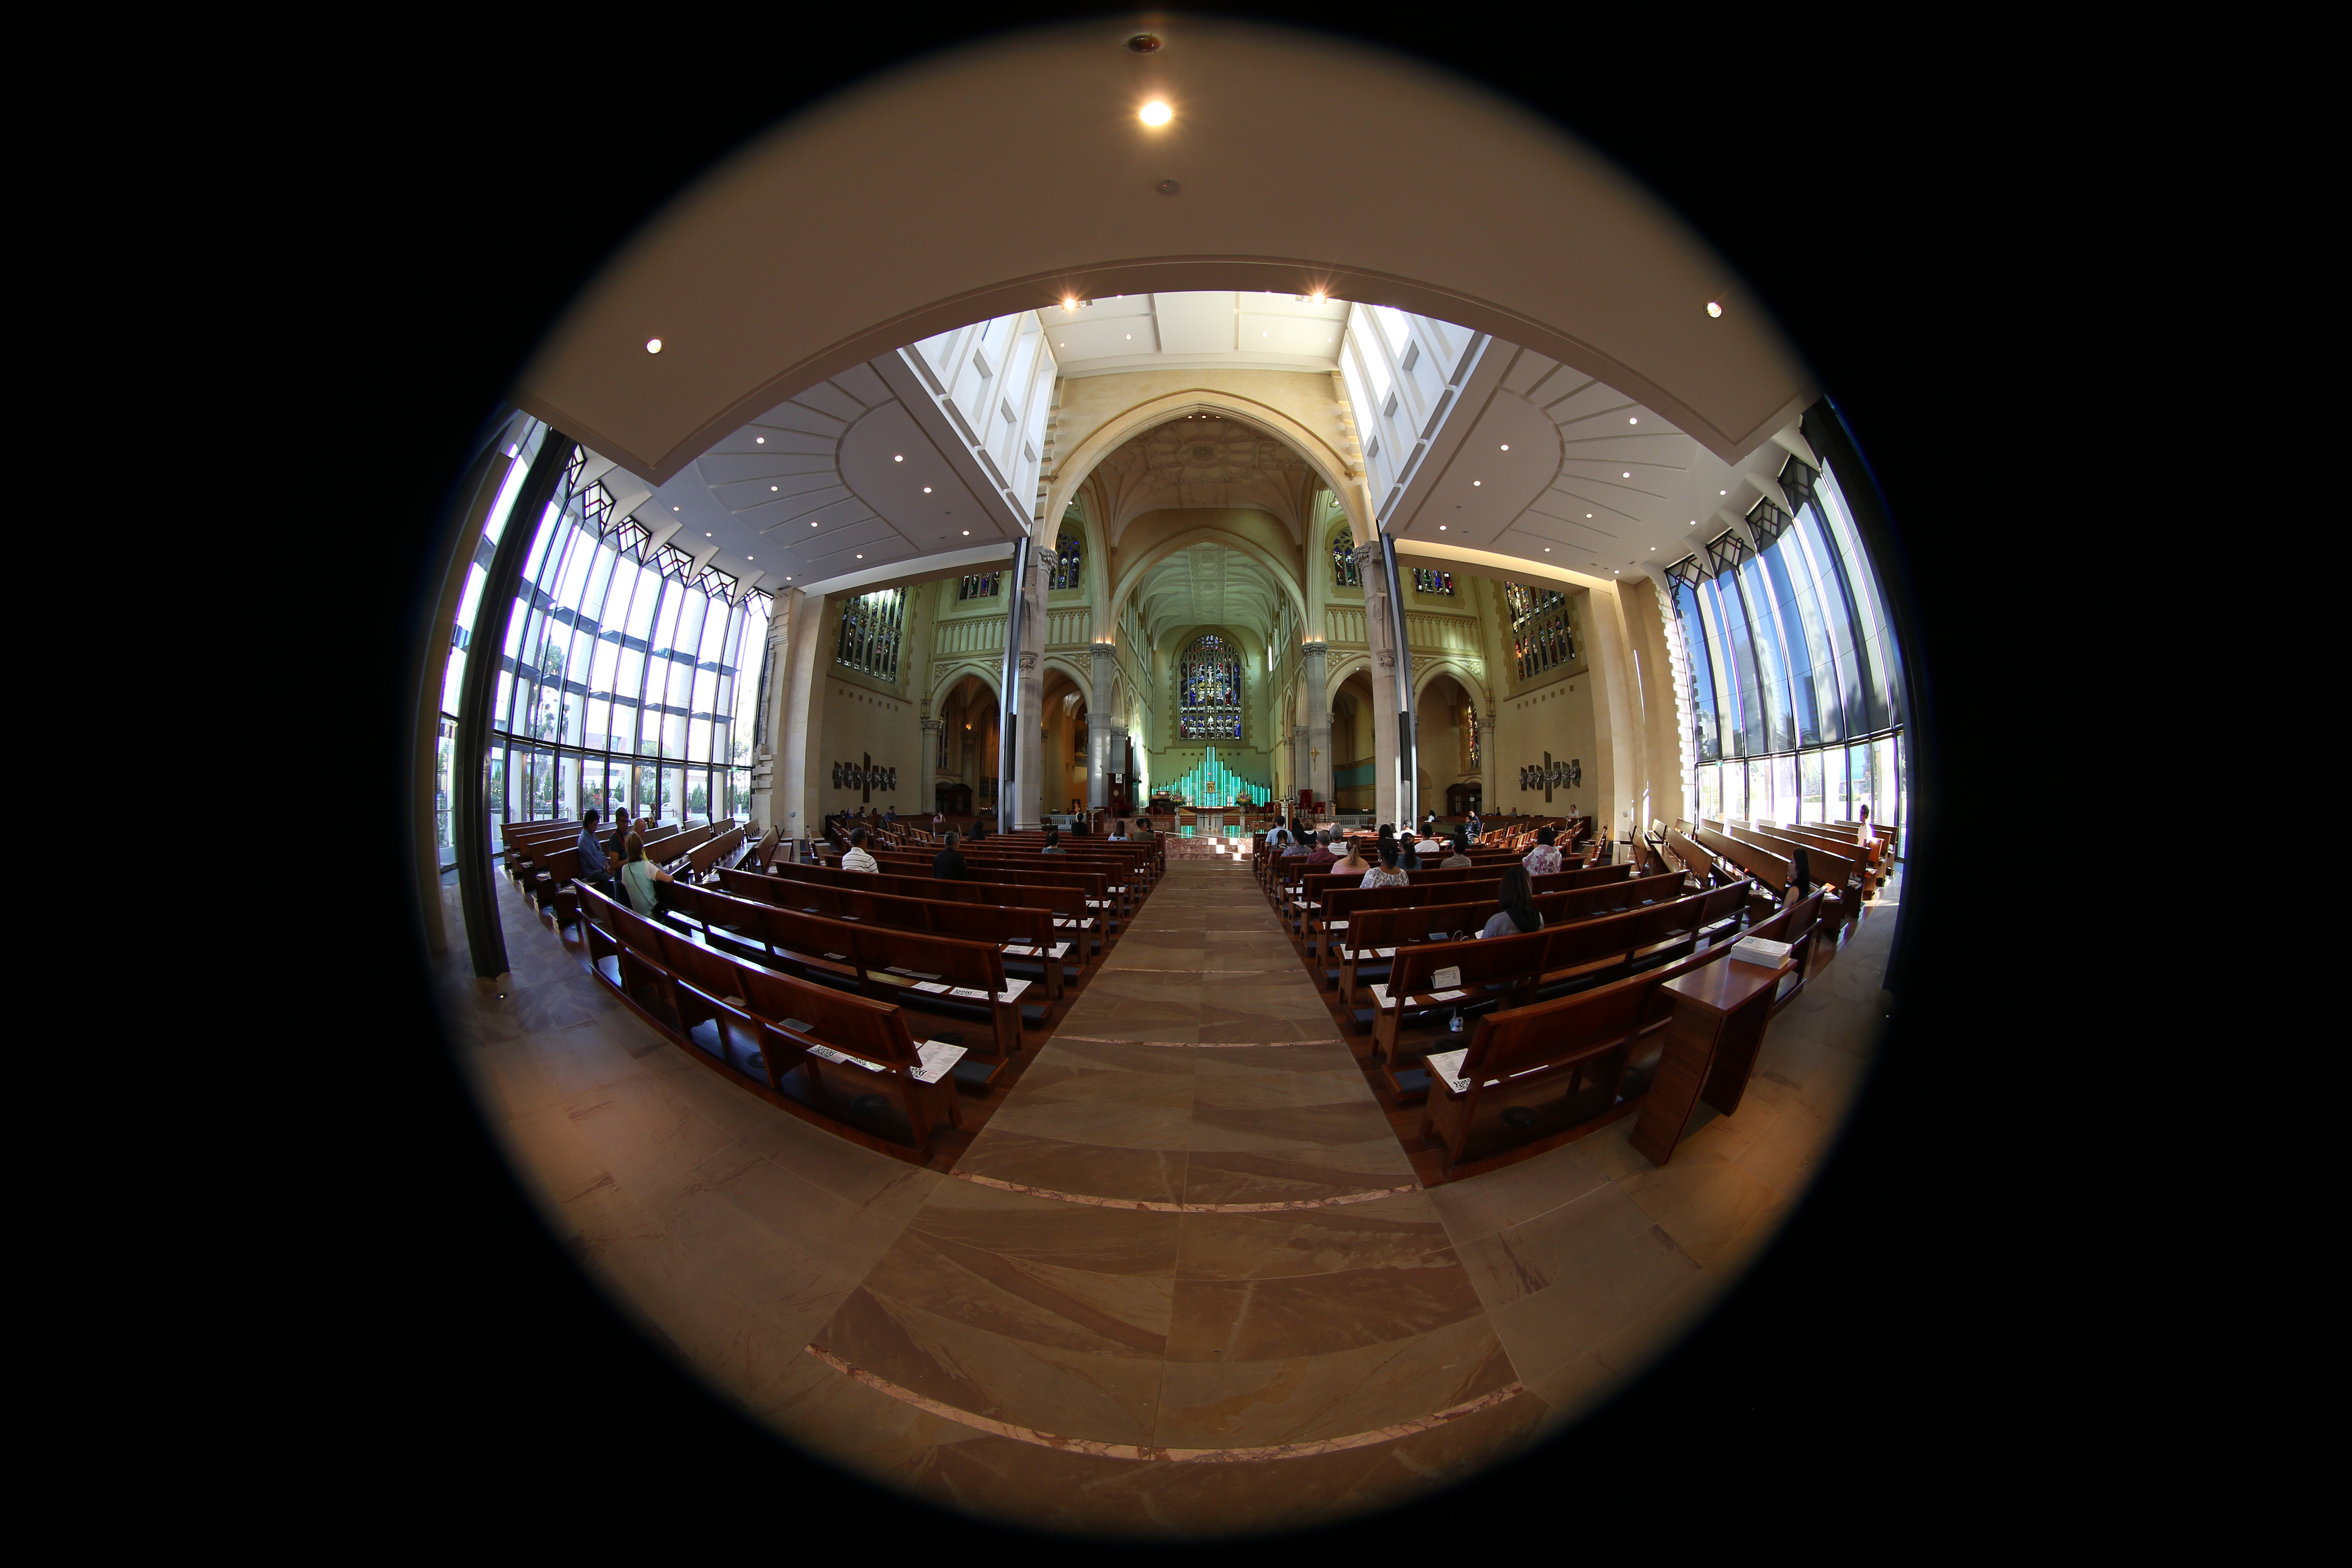
Example source fisheye image.
A critical consideration is antialiasing, required when sampling any discrete signal. The approach here is a simple supersampling antialiasing, that is,each pixel in the output image is subdivided into a 2x2, 3x3....grid andthe inverse mapping applied to the subsamples. The final value for the outputpixel is the weighted average of the inverse mapped subsamples.There is a sense in which the image plane is considered to be a continuousfunction. Since the number of samples that are inverse mapped is the principle determinant ofperformance, high levels of antialiasing can be very expensive, typically2x2 or 3x3 are sufficient especially for images captured from video in whichneighbouring pixels are not independent in the first place.For example a 3x3 antialiasing is 9 times slower than no antialiasing.In general the jagged edges are more noticeable in featureswith a sharp colour/intensity boundary.
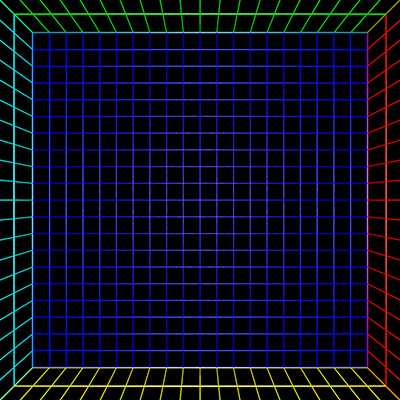
Default perspective view looking forwards, 100 degrees horizontal field of view.
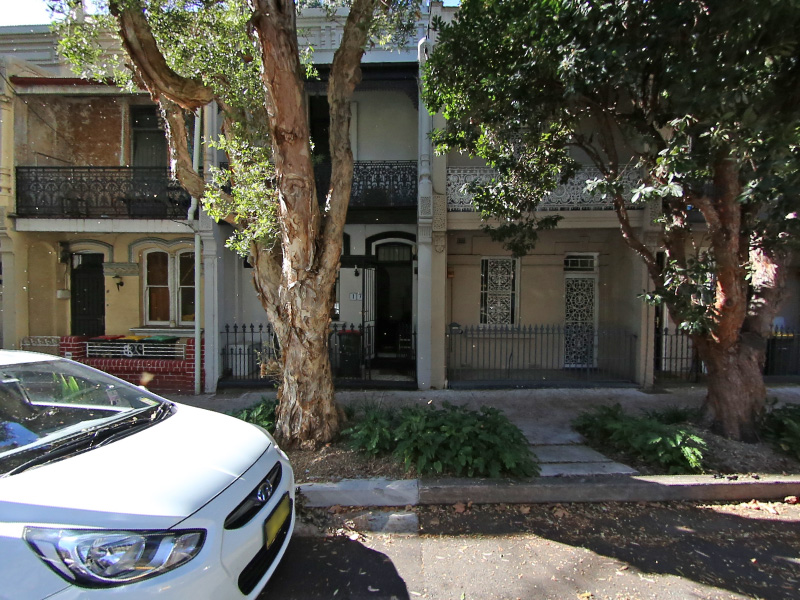
fish2persp -w 800 -a 3
The vertical aperture is automatically adjusted to
match the width and height.Controls are provided for any angle fisheye
as well as fisheyes that are notlevel or tilted, noting that the exact
order of the correction rotations mayneed to
be considered for particular cases.Note that a perspective projection
is not defined for greater than 180 degrees,indeed it gets increasingly
inefficient past around 140 degrees.The field of view can be adjusted as
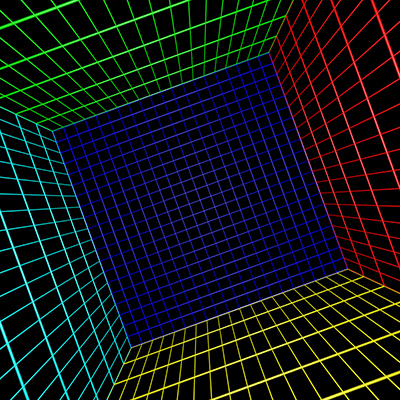
well as the viewing direction.The following
example is a 120 degrees horizontal field of view and looking upwards
by 30 degrees.
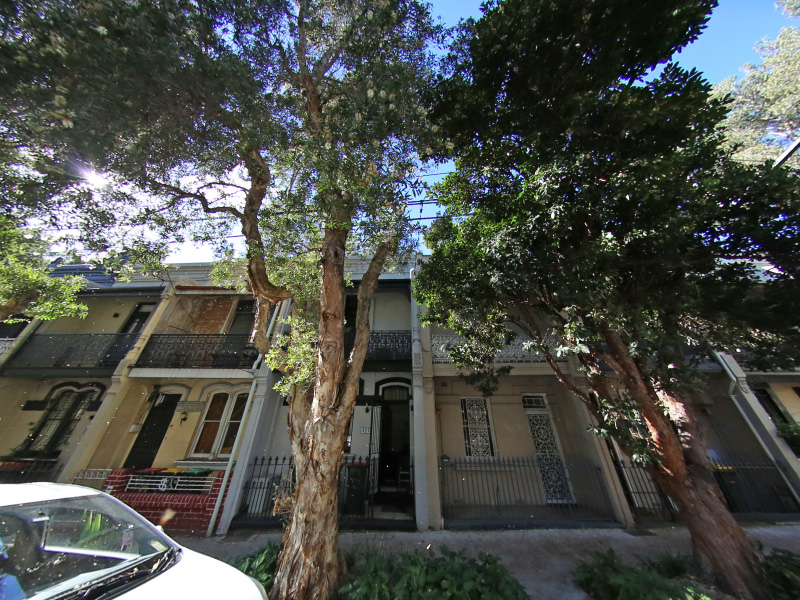
fish2persp -w 800 -a 3 -x 30 -t 120
If "straight" lines are not straight that normally
means the fisheye center or radius are not specified correctly or the
angle is not defined correctly.Curvature in what should be straight
lines near the rim of the fisheye normally meansthe
fisheye lens has non-linearities near the rim (a deviation from the
mathematically purefisheye projection) and corrections need to be
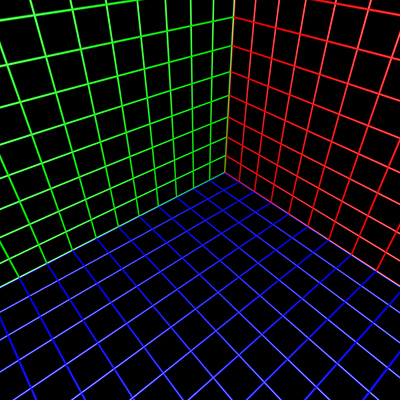
applied.The following is looking right by 40 degrees and a narrower
field of view of 80 degrees.
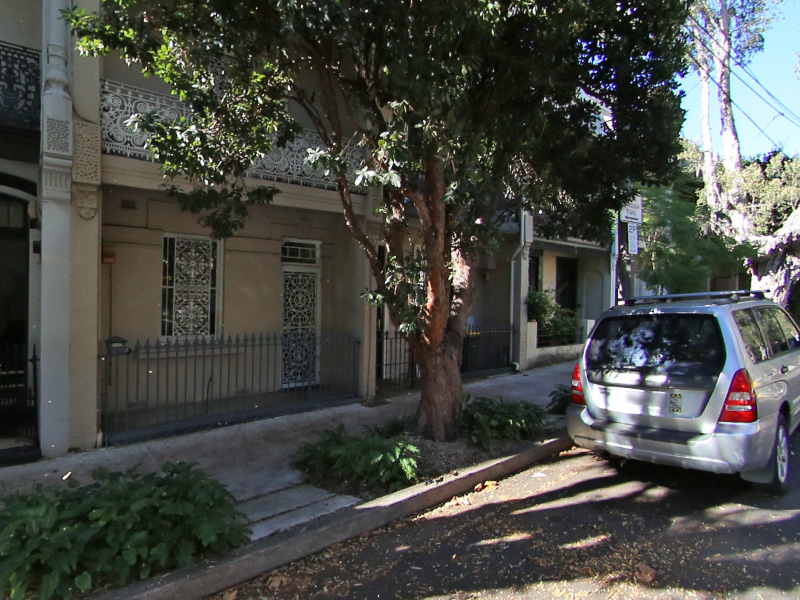
fish2persp -w 800 -a 3 -z 40 -t 80
The center of the fisheye on the input image can be
found by projectinglines along vertical structure in the scene. Where
these lines intersectis a close approximation to the center of the
fisheye, assuming thecamera is mounted vertically.
Alternatively, and perhaps easier, is to identify the edges of
thefisheye and assume a perfect circular inscribed circle. Note that for
the example utilities providedhere the origin is assumed to be the
bottom left corner, unlike the more common top right
thatimage editing programs use.
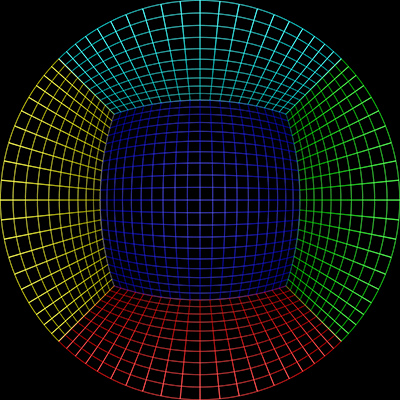
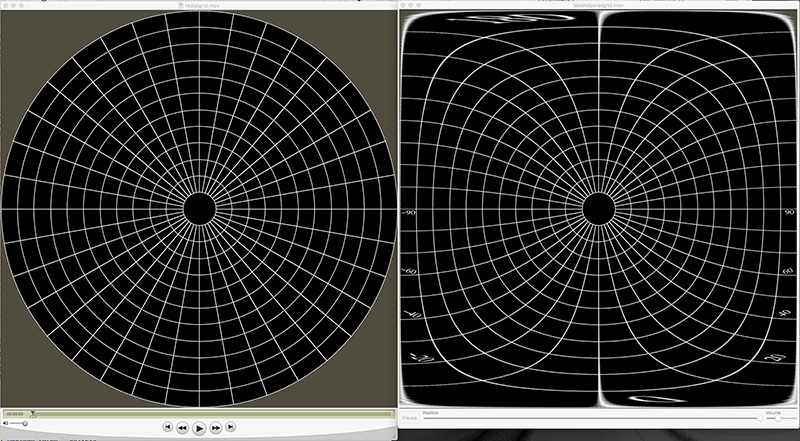
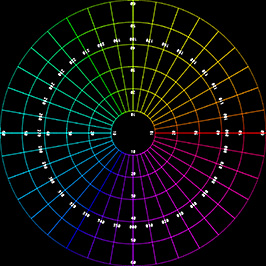
To test the algorithm a fisheye rendering inside a
gridded cube is a good example,see image on left below. Any correct
perspective projection should result in straight lines.
 Sample input image |
 |
 |
 |
Front pointing fisheye to panorama
Software: frontfish2pano
This case is developed mainly for "front
pointing" fisheyes although it does have applicationfor other
orientations. The projection is more correctly called a cylindrical
panorama.
Usage: frontfish2pano [options] fisheyeimage

Options

   -w n     panoramic image width, default = 800

   -h n     panoramic image height, default = -1

  -ap n     vertical aperture of panoramic, default = 100

  -af n     aperture of fisheye (degrees), default = 180

  -cf x y   center of the fisheye image, default is image center

   -r n     radius of the fisheye image, default is half the image width

  -fa n     angle for tilted fisheye, default = 0

  -fb n     angle for rotated fisheye, default = 0

   -a n     antialiasing level, default = 1 (no antialising)
Source fisheye image.
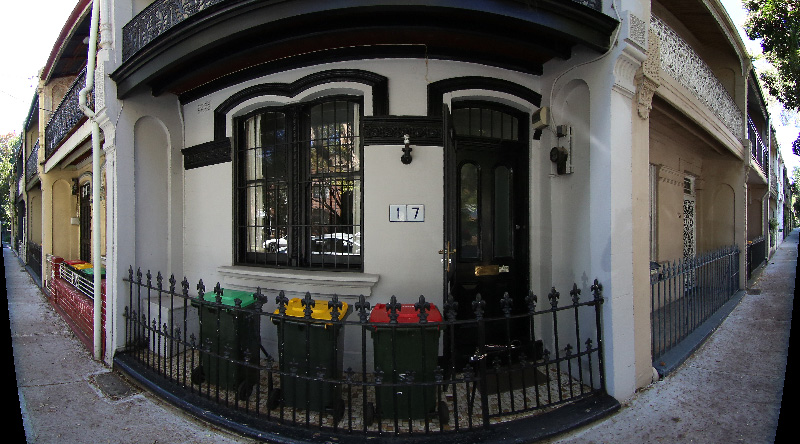
Transformation with the default settings is shown below.

frontfish2pano -a 3 -w 800
Correct for the fact that the camera is not quite
horizontal, this is thereason the vertical structure doesn't appear
vertical in the panoramic projection.Of course nothing is for free, one
looses a bit of the image in the bottomleft and
right corners.
frontfish2pano -a 3 -w 800 -fa -20
Set the vertical field of view of the panorama, in
the following cases narrowed fromthe default of 100 degrees to 80
degrees. As with perspective projections there is a limit, in this case,
to the vertical field of view, a hard limit at 180
degrees but increasingly inefficientpast 140 degrees.

frontfish2pano -a 3 -w 800 -fa -20 -ap 80
Fisheye to (partial) spherical projection
Software: fish2sphere
Usage: fish2sphere [options] imagefile

Options

   -w n     sets the output image size, default: 4 fisheye image width

   -a n     sets antialiasing level, default: 2

  -fa n     fisheye aperture (degrees), default: 180

   -c x y   fisheye center, default: center of image

   -r n     fisheye radius, default: half the fisheye image width

   -v n     rotate fisheye in latitude, default: 0

   -z n     roll fisheye, default: 0

   -d       debug mode
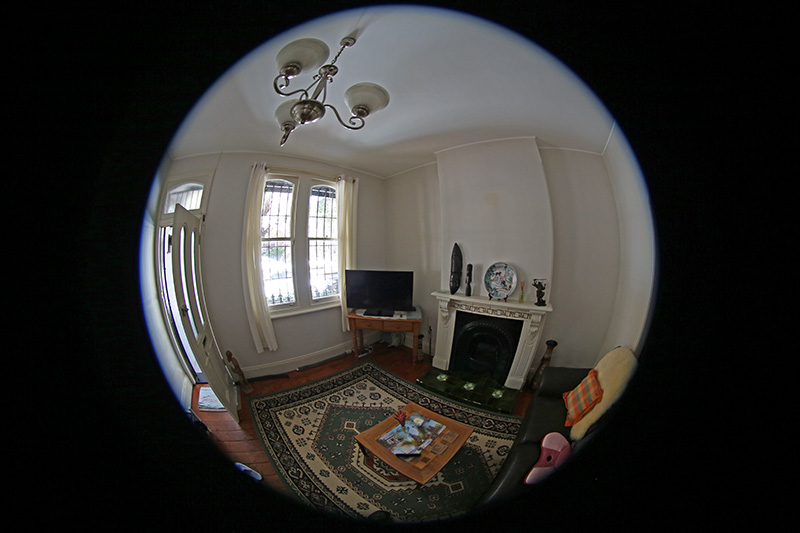
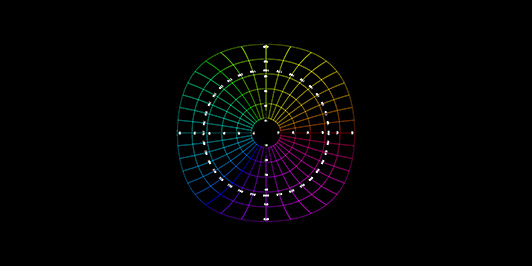
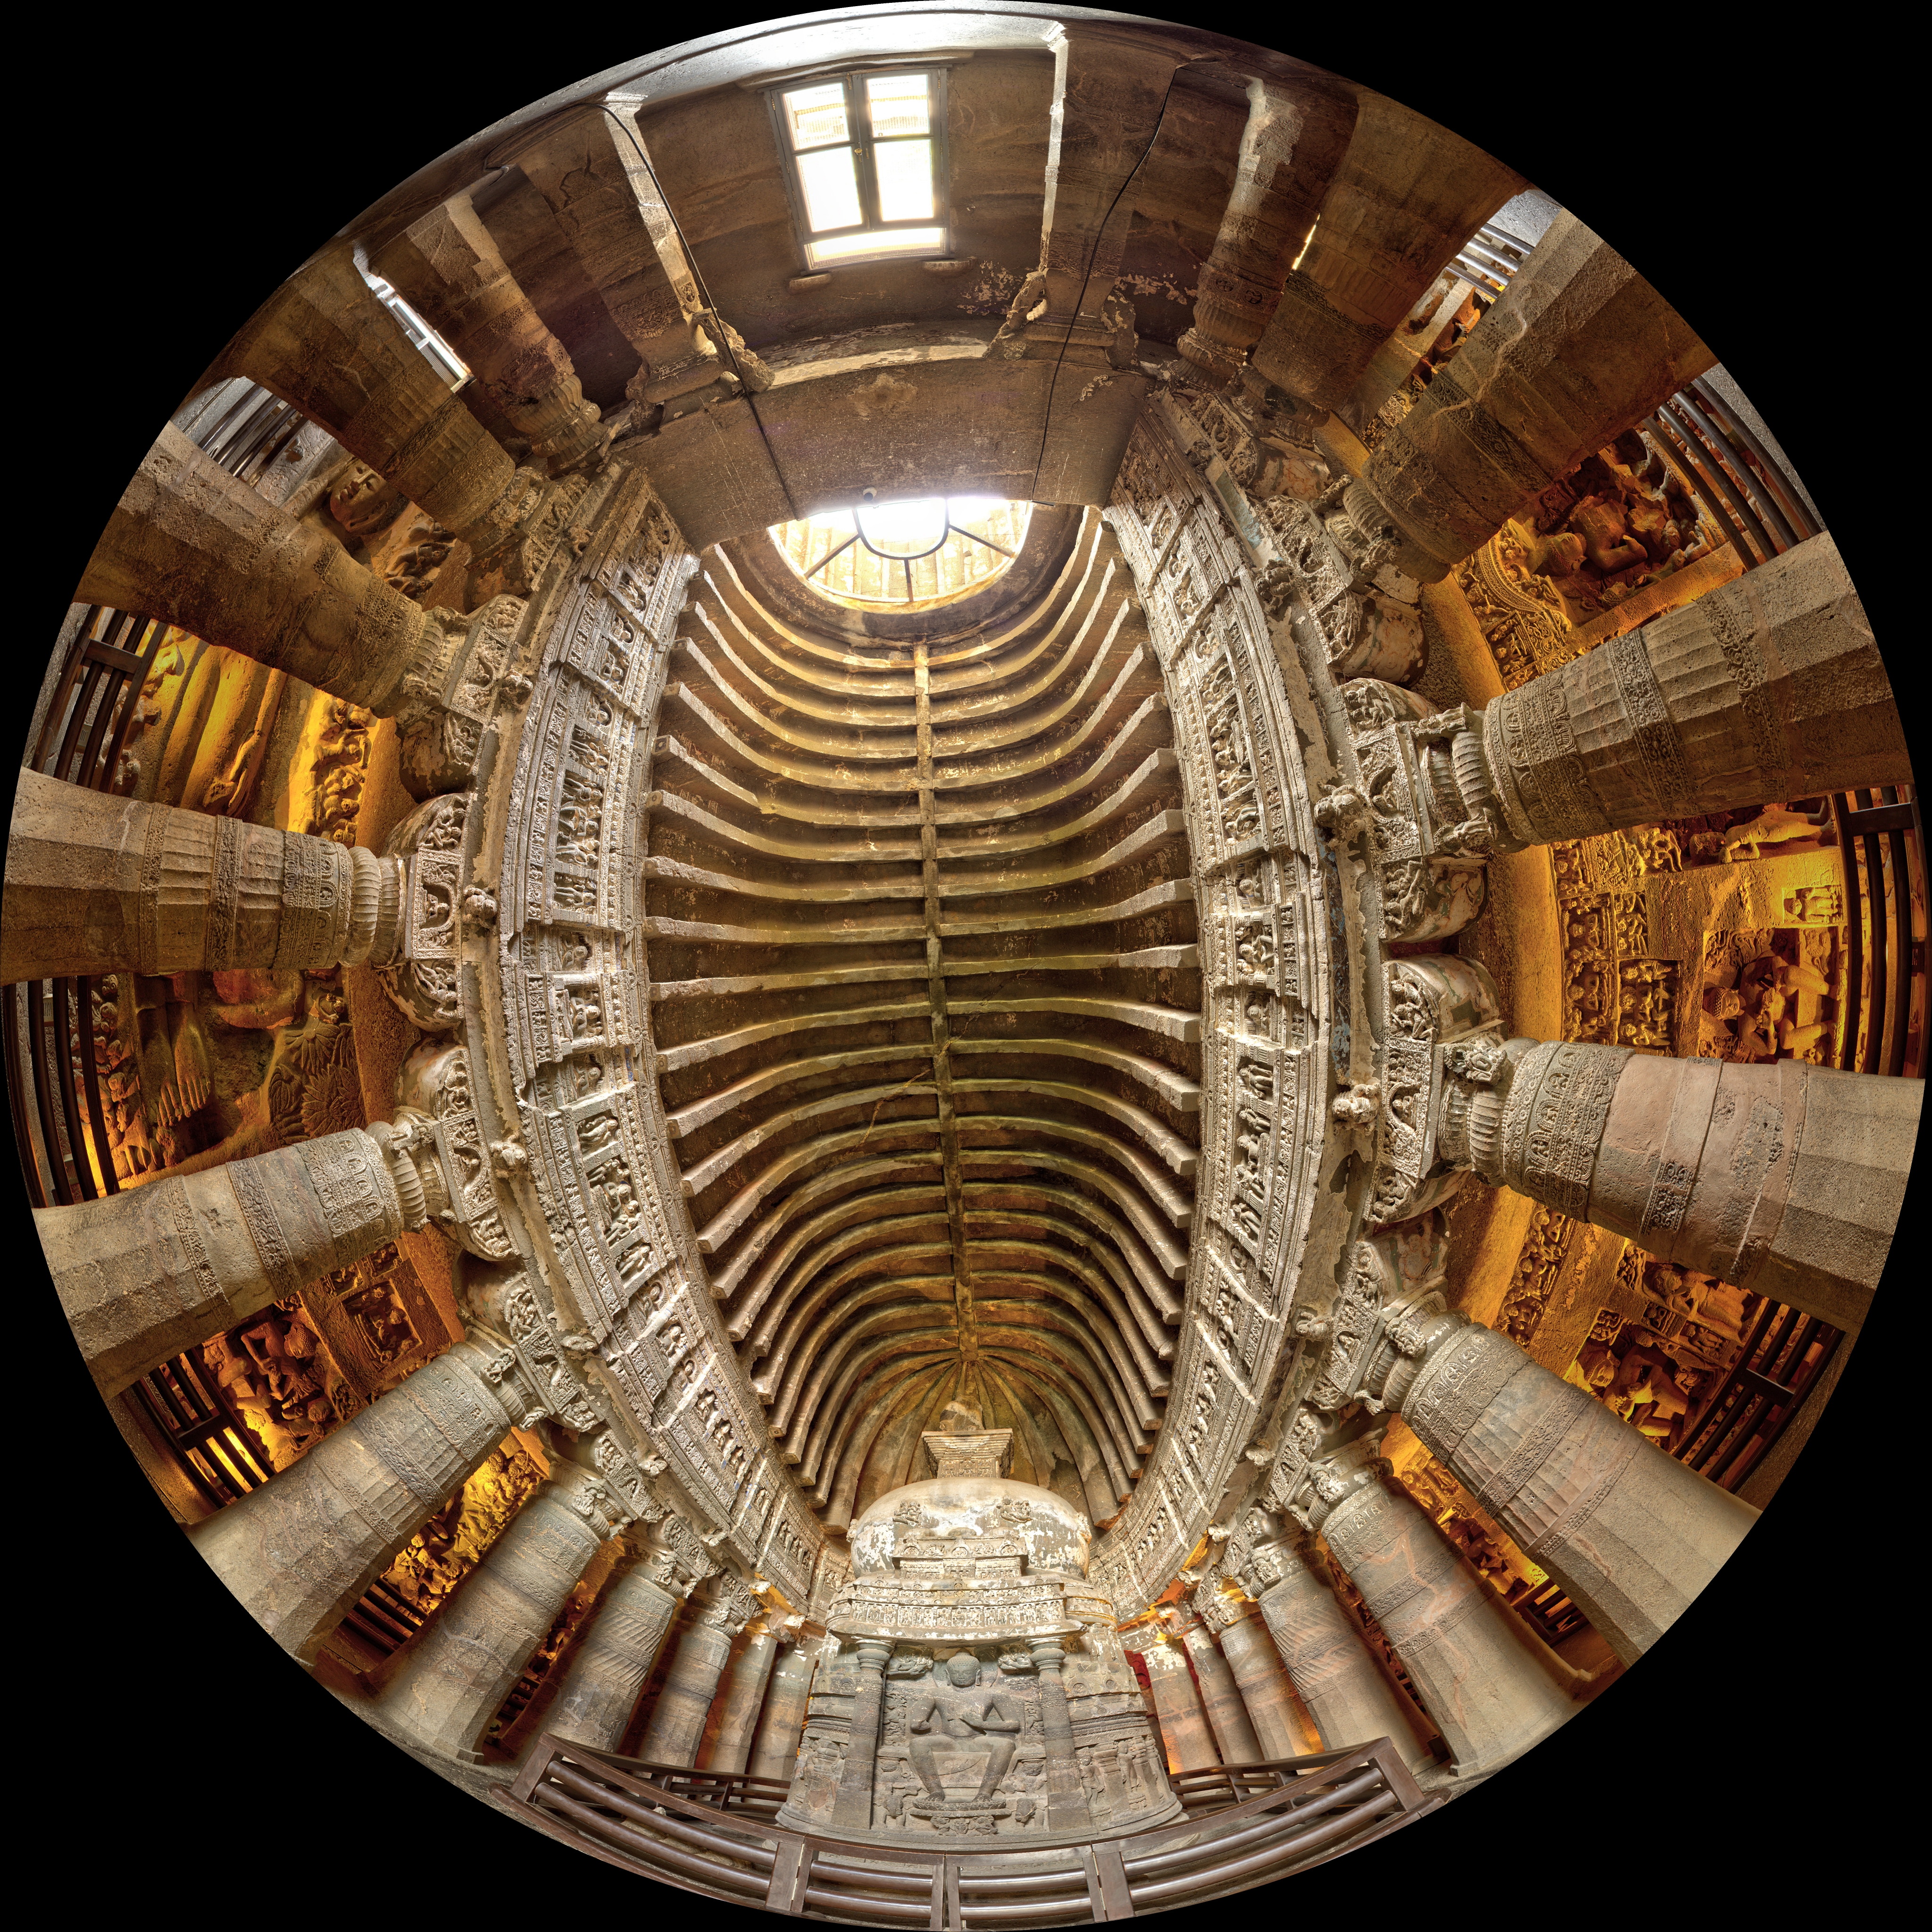
Source fisheye image.
Transformation using the default settings. Since a 180 degree (in this case) fisheyecaptures half the visible universe from a single position, so it makes sense that it occupieshalf of a spherical (equirectangular) projection, which captures the entire visibleuniverse from a single position.
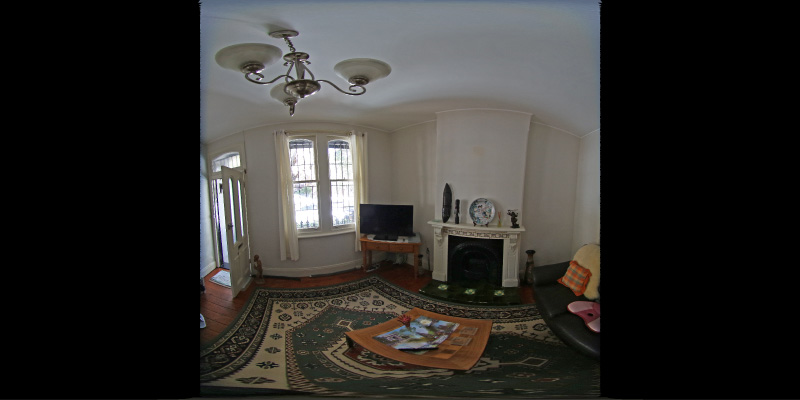
In this case the camera is not perfectly horizontal, this and other adjustmentscan be made. In the example here the lens was pointing downwards slightly, thecorrection results in more of the south pole being visible and less of the northpole.
Note that the fisheye angle is not limited to 180 degrees, indeed one applicationfor this is in the pipeline to create 360 spherical panoramas from 2 cameras, eachwith a fisheye lens with a field of view greater than 180 to provide a blend zone.
This can be readily implemented in the OpenGL Shader Language, the followingexample was created in theQuartz Composer Core Image Filter.
- // Fisheye to spherical conversion
- // Assumes the fisheye image is square, centered, and the circle fills the image.
- // Output (spherical) image should have 2:1 aspect.
- // Strange (but helpful) that atan() == atan2(), normally they are different.
- kernel vec4 fish2sphere(sampler src)
- {
- vec2 pfish;
- float theta,phi,r;
- vec3 psph;
- float FOV = 3.141592654; // FOV of the fisheye, eg: 180 degrees
- float width = samplerSize(src).x;
- float height = samplerSize(src).y;
- // Polar angles
- theta = 2.0 * 3.14159265 * (destCoord().x / width - 0.5); // -pi to pi
- phi = 3.14159265 * (destCoord().y / height - 0.5); // -pi/2 to pi/2
- // Vector in 3D space
- psph.x = cos(phi) * sin(theta);
- psph.y = cos(phi) * cos(theta);
- psph.z = sin(phi);
- // Calculate fisheye angle and radius
- theta = atan(psph.z,psph.x);
- phi = atan(sqrt(psph.x*psph.x+psph.z*psph.z),psph.y);
- r = width * phi / FOV;
- // Pixel in fisheye space
- pfish.x = 0.5 * width + r * cos(theta);
- pfish.y = 0.5 * width + r * sin(theta);
- return sample(src, pfish);
- }
The transformation can be performed in realtime using warp mesh files forsoftware such aswarpplayer or the VLC equivalentVLCwarp.
A sample mesh file is givenhere:fish2sph.data. Showing the result in actionis below.
| Test cases for various fisheye apertures. | |
| 180 degree fisheye | |
 |
 |
| 120 degree fisheye | |
 |
 |
| 220 degree fisheye | |
 |
 |
| 220 degree fisheye and 90 degree latitude rotation | |

|
|
| 220 degree fisheye and 60 degree latitude rotation | |
|
|
Fisheye to (full) panorama
Software: fish2pano
The following is a slightly more general version of
conversion to a panoramic projection.It supports both spherical and
cylindrical projections, handles different fisheyeorientations but the
main difference is it is designed to image into
a full 360 projection obviously withparts not covered because of the
limited field of view of a fisheye compared to a fullspherical
projection.
Usage: fish2pano [options] fisheyeimage

Options

   -w n     panoramic image width, default = 1024

   -h n     panoramic image height, default = derived

  -af n     aperture of fisheye (degrees), default = 180

  -cf x y   center of the fisheye image, default is image center

   -x n     tilt fisheye about x (right) axis, default = 0

   -z n     rotate fisheye about lens axis, default = 0

   -r n     radius of the fisheye image, default is half the image width

   -a n     antialiasing level, default = 1 (no antialising)

   -c       cylindrical pano, default is spherical

   -v n     vertical aperture for cylindrical pano, default: 60
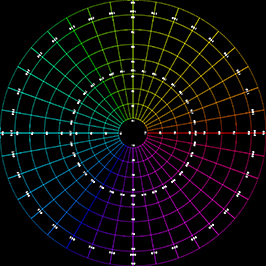
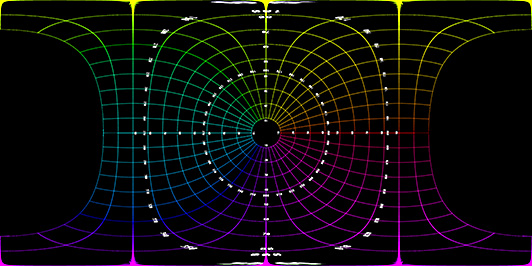
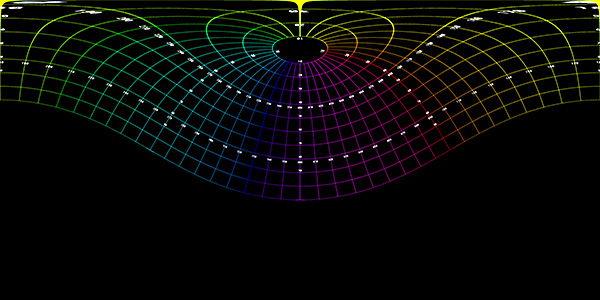
Example 1: Source fisheye image.
Black refers to the corners of the fisheye image and the grey to the unavailable data,that is, data outside the fisheye rectangle in which the circular fisheye is inscribed.Note that for a wider than 180 degree fisheye the black and grey regions will be correspondingly smaller. The "x" axis is to the right, the 90 degree rotation heregives the desired result for a forward pointing fisheye. A fisheye pointing straightup or straight down would more normally be transformed with "-x 0".

fish2pano -a 3 -w 800 -x 90
Cylindrical projection, vertical field 60 degrees and
100 degrees respectively.The vertical extent of the image is, normally,
determined correctly given the vertical field of view requested but
that can be overruled if desired.

fish2pano -a 3 -w 800 -x 90 -c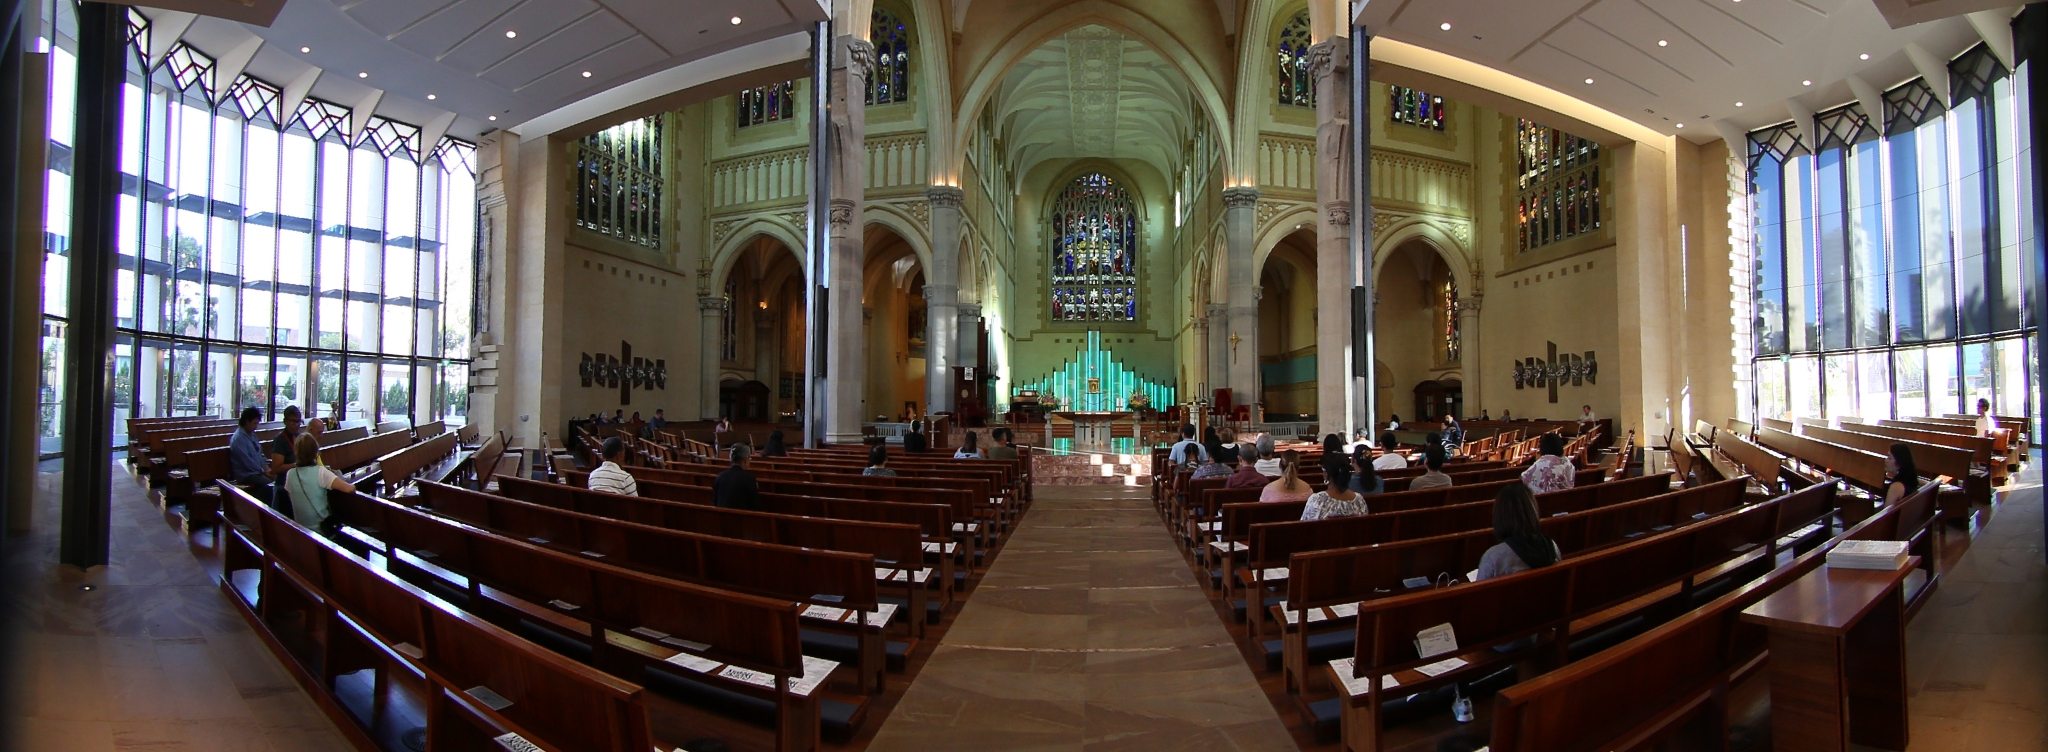
fish2pano -a 3 -w 800 -x 90 -c -v 100
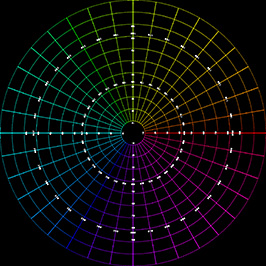
Example 2: Source fisheye image
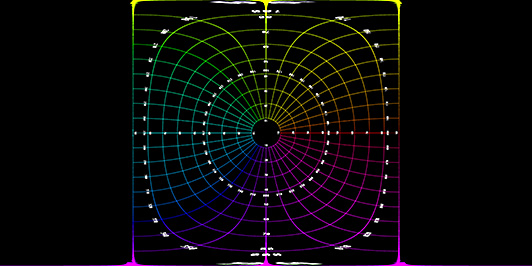
The default settings (no x axis rotation) provide
what one expects for an upper hemisphereas per a standard Earth map.
Note the apparent distortion towards the north pole, which againis not a
strictly distortion but a natural consequence
of the mathematics behind the projection.

fish2pano -a 3 -w 800
Cylindrical panorama with a 100 degree vertical field
of view, that is, from the equator (0 degreeslatitude) to 100 degrees
latitude.

fish2pano -a 3 -w 800 -c -v 100
最新文章
- String字符串类课后作业
- gdutcode 1195: 相信我这是水题 GDUT中有个风云人物pigofzhou,是冰点奇迹队的主代码手,
- 【如何快速的开发一个完整的iOS直播app】(采集篇)
- SAP 中的用户类型
- mongodb与mysql相比的优缺点
- js:深闭包(范围:上)
- BZOJ 2179FFT快速傅立叶
- 更改pandas dataframe 列的顺序
- FTP主动模式和被动模式的区别
- 60行python代码分析2018互联网大事件
- 除非你是BAT,前端开发中最好少造轮子
- nginx与php-fpm通信的两种方式
- 为RecyclerView打造通用Adapter
- MyBatis中resultType和resultMap的区别
- C. Primes or Palindromes?
- Bat相关的项目应用
- span标签 宽度无效解决方案
- Asp.net core 2.0.1 Razor 的使用学习笔记(六)
- Visual Studio 2017 简体中文企业正式版全量离线安装包下载地址
- 以上帝模式管理Windows系统