jQuery操作标签--样式、文本、属性操作, 文档处理
2024-08-27 09:00:04
1.样式
2.文本
3.属性操作 全选,反选效果
4.文档处理
操作标签
一、样式操作
样式类:
    addClass();  // 添加指定的css类名

    removeClass();  //移除指定的css类名

    hasClass(); //判断样式是否存在

    toggleClass(); //切换css类名,如果有就移除,如果没有就添加
通过jQuery对象修改css样式:
$("tagname").css({"color","red"}) //DOM操作:tag.style.color="red"
样式操作示例1:
$("p").css("color", "red"); //将所有p标签的字体设置为红色
二、位置操作
    offset()// 获取匹配元素在当前窗口的相对偏移或设置元素位置

    position()// 获取匹配元素相对父元素的偏移,不能设置位置

    $(window).scrollTop()  //滚轮向下移动的距离

    $(window).scrollLeft() //滚轮向左移动的距离
.offset()方法允许我们检索一个元素相对于文档(document)的当前位置。
.position()获取相对于它最近的具有相对位置(position:relative或position:absolute)的父级元素的距离,如果找不到这样的元素,则返回相对于浏览器的距离。
尺寸:
   height() // 盒子模型content的大小, 就是我们设置的标签的高度和宽度

    width()

    innerHeight() // 内容content高度 + 两个padding的高度

    innerWidth()

    outerHeight()  //内容高度+两个padding的高度+两个border的高度,不包括margin的高度,因为margin不是标签的,是标签和标签之间的距离

    outerWidth()
返回顶部示例代码:
<button id="b2" class="btn btn-default c2 hide">返回顶部</button>

<script src="jquery-3.2.1.min.js"></script>

<script>

  //$("#b1").on("click", function () {

  //  $(".c1").offset({left: 200, top:200});

  //});

  // $(window),window对象是还记得吗?是不是全局的一个对象啊,整个页面窗口对象,通过$符号包裹起来就变成了一个jQuery对象了

  $(window).scroll(function () {

    if ($(window).scrollTop() > 100) { //当滚动条相对顶部位置的滚动距离大于100的时候才显示那个返回顶部的按钮,这个100你可以理解为窗口和整个页面文档的距离,鼠标向下滑动的距离

      $("#b2").removeClass("hide");

    }else {

      $("#b2").addClass("hide");

    }

  });

  $("#b2").on("click", function () { //jQuery绑定事件第二天我们在学,先作为了解

    $(window).scrollTop(0);

  })

</script>
三、文本操作
HTML代码:
     html()    // 取得第一个匹配元素的html内容,包含标签内容

     html(val)  // 设置所有匹配元素的html内容,识别标签,能够表现出标签的效果
文本值:
     text()// 取得所有匹配元素的内容,只有文本内容,没有标签

     text(val)// 设置所有匹配元素的内容,不识别标签,将标签作为文本插入进去
值:
        val() // 取得第一个匹配元素的当前值

        val(val) // 设置所有匹配元素的值

        val([val1,val2]) // 设置多选的checkbox,多选select的值
自定义登陆校验示例:
<!DOCTYPE html>
<html lang="zh-CN">
<head>
<meta charset="UTF-8">
<meta http-equiv="x-ua-compatible" content="IE=edge">
<meta name="viewport" content="width=device-width, initial-scale=1">
<title>文本操作之登录验证</title>
<style>
.error {
color: red;
}
</style>
</head>
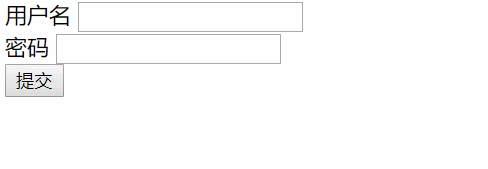
<body> <form action="">
<div>
<label for="input-name">用户名</label>
<input type="text" id="input-name" name="name">
<span class="error"></span>
</div>
<div>
<label for="input-password">密码</label>
<input type="password" id="input-password" name="password">
<span class="error"></span>
</div>
<div>
<input type="button" id="btn" value="提交">
</div>
</form>
<script src="https://cdn.bootcss.com/jquery/3.2.1/jquery.min.js"></script>
<script>
$("#btn").click(function () {
var username = $("#input-name").val();
var password = $("#input-password").val(); if (username.length === 0) {
$("#input-name").siblings(".error").text("用户名不能为空");
}
if (password.length === 0) {
$("#input-password").siblings(".error").text("密码不能为空");
}
})
</script>
</body>
</html>
四、属性操作
用与ID自带属性等或自定义属性:
    attr(attrName)// 返回第一个匹配元素的属性值

    attr(attrName, attrValue)// 为所有匹配元素设置一个属性值

    attr({k1: v1, k2:v2})// 为所有匹配元素设置多个属性值

    removeAttr()// 从每一个匹配的元素中删除一个属性
用于checkbox和radio
        prop() // 获取属性

        removeProp() // 移除属性
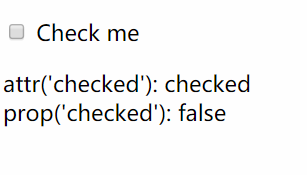
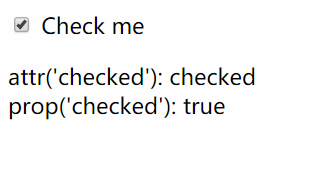
   注意:
      在1.x及2.x版本的jQuery中使用attr对checkbox进行赋值操作时会出bug,在3.x版本的jQuery中则没有这个问题。为了兼容性,我们在处理checkbox和radio的时候尽量使用特定的prop(),不要使用attr("checked", "checked")。
<input type="checkbox" value="1">

<input type="radio" value="2">

<script>

  $(":checkbox[value='1']").prop("checked", true);  //设置让其选中,设置选中或不选中的时候要注意传的参数那个true和false不能写成字符串形式'true'\'false' .prop('checked','true')是不对的

  $(":radio[value='2']").prop("checked", true);

</script>
    prop和attr的区别
    prop检索的是DOM属性,attr检索的是HTML属性
    1.对于标签上有的能看到的属性和自定义属性都用attr

    2.对于返回布尔值的比如checkbox、radio和option的是否被选中或者设置其被选中与取消选中都用prop。
具有 true 和 false 两个属性的属性,如 checked, selected 或者 disabled 使用prop(),其他的使用 attr()
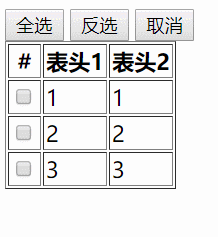
示例:全选,反选,取消
<!DOCTYPE html>

<html lang="en">

<head>

    <meta charset="UTF-8">

    <title>Title</title>

</head>

<body>

<button id="all">全选</button>

<button id="reverse">反选</button>

<button id="cancel">取消</button>

<table border="1">

   <thead>

    <tr>

        <th>#</th>

        <th>表头1</th>

        <th>表头2</th>

    </tr>

   </thead>

    <tbody>

    <tr>

        <td><input type="checkbox"></td>

        <td>1</td>

        <td>1</td>

    </tr>

    <tr>

        <td><input type="checkbox"></td>

        <td>2</td>

        <td>2</td>

    </tr>

    <tr>

        <td><input type="checkbox"></td>

        <td>3</td>

        <td>3</td>

    </tr>

    </tbody>

</table>

<script src="https://cdn.bootcss.com/jquery/3.2.1/jquery.min.js"></script>

<script>

    // 点击全选按钮 选中所有的checkbox

    // DOM绑定事件方法

    // $("#all")[0].onclick = function(){}

    // jQuery绑定事件方法

    $("#all").click(function () {

        $(":checkbox").prop('checked', true);

    });

    // 取消

    $("#cancel").on("click", function () {

         $(":checkbox").prop('checked', false);

    });

    // 反选

    $("#reverse").click(function () {

        // 1. 找到所有选中的checkbox取消选中

        // $("input:checked").prop('checked', false);

        // // 2. 找到没有选中的checkbox选中

        // $("input:not(:checked)").prop('checked', true);

        //你会发现上面这么写,不行,为什么呢?因为你做了第一步操作之后,再做第二步操作的时候,所有标签就已经全部取消选中了,所以第二步就把所有标签选中了

        // 方法1. for循环所有的checkbox,挨个判断原来选中就取消选中,原来没选中就选中

        var $checkbox = $(":checkbox");

        for (var i=0;i<$checkbox.length;i++){

            // 获取原来的选中与否的状态

            var status = $($checkbox[i]).prop('checked');

            $($checkbox[i]).prop('checked', !status);

        }

        // 方法2. 先用变量把标签原来的状态保存下来

    //     var $unchecked =  $("input:not(:checked)");

    //     var $checked = $("input:checked");

    //

    //     $unchecked.prop('checked', true);

    //     $checked.prop('checked', false);

    })

</script>

</body>

</html>
五、文档处理
添加到指定元素内部的后面
    $(A).append(B)// 把B追加到A

    $(A).appendTo(B)// 把A追加到B
添加到指定元素内部的前面
    $(A).prepend(B)// 把B前置到A

    $(A).prependTo(B)// 把A前置到B
添加到指定元素外部的后面
    $(A).after(B)// 把B放到A的后面

    $(A).insertAfter(B)// 把A放到B的后面
添加到指定元素外部的前面
    $(A).before(B)// 把B放到A的前面

    $(A).insertBefore(B)// 把A放到B的前面
移除和清空元素
    remove()// 从DOM中删除所有匹配的元素。

    empty()// 删除匹配的元素集合中所有的子节点,包括文本被全部删除,但是匹配的元素还在
替换
       replaceWith()

       replaceAll()
克隆:
clone() // 参数为ture
克隆示例:
<!DOCTYPE html>
<html lang="zh-CN">
<head>
<meta charset="UTF-8">
<meta http-equiv="x-ua-compatible" content="IE=edge">
<meta name="viewport" content="width=device-width, initial-scale=1">
<title>克隆</title>
<style>
#b1 {
background-color: deeppink;
padding: 5px;
color: white;
margin: 5px;
}
#b2 {
background-color: dodgerblue;
padding: 5px;
color: white;
margin: 5px;
}
</style>
</head>
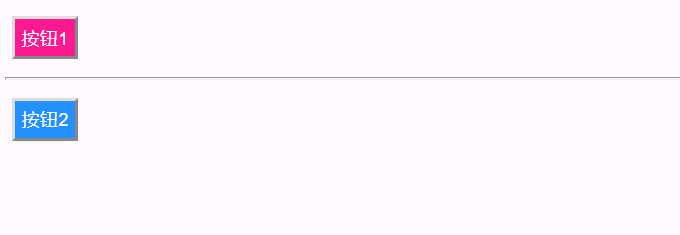
<body> <button id="b1">按钮1</button>
<hr>
<button id="b2">按钮2</button> <script src="jquery-3.2.1.min.js"></script>
<script>
// clone方法不加参数true,克隆标签但不克隆标签带的事件
$("#b1").on("click", function () {
$(this).clone().insertAfter(this);
});
// clone方法加参数true,克隆标签并且克隆标签带的事件
$("#b2").on("click", function () {
$(this).clone(true).insertAfter(this);
});
</script>
</body>
</html>
最新文章
- mysql事务
- centos7.0 安装字体库
- CSS应用内容补充及小实例
- 【CentOS】安装配置vncserver
- Ansible的条件语句
- Objective-C ,ios,iphone开发基础:picker控件详解与使用,(实现省市的二级联动)
- 2016年9月3日 文成小盆友python-num18 - django进阶一
- nyoj 592 spiral grid(广搜)
- Linux CentOS 安装 httpd
- poj 3662 Telephone Lines
- win10下安装mysql5.7.25版本
- 设计模式六: 模板方法(Template Method)
- spark-sql自定义函数UDF和UDAF
- Python学习:经典编程例题
- SegmentedControlIOS使用
- Java基础语法 第4节 常见软件安装-Mysql和SQLyog
- Codeforces821C Okabe and Boxes 2017-06-28 15:24 35人阅读 评论(0) 收藏
- 嵌入式系统WinCE下应用程序GUI界面开发【转】
- Navicat 同步数据库中数据
- 20145316许心远《网络对抗》EXP8 Web基础