大型运输行业实战_day08_1_memcache缓存生产应用
2024-09-26 11:20:38
1.memcache使用环境搭建
1.安装memcached服务器

安装方法 以管理员身份打开cmd,在cmd中执行如下命令:

注意:在执行该命令时必须在memcached.exe文件下执行.
2.开启服务
注意:要重新打开cmd控制台,再执行开启服务命令

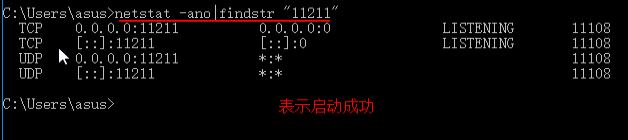
3.查看是否启动成功
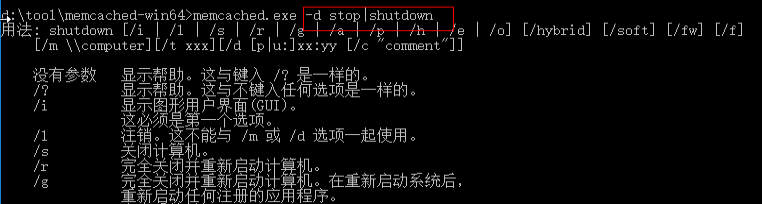
4.关闭memcache缓存服务器
到此安装\启动\查看是否启动成功\关闭服务完成!
2.memcached与spring整合并使用
1.拷贝jar包

注意:如果项目中没有日志包必须拷贝日志包
2.编写与spring整合的配置文件: spring-memcached.xml
 <?xml version="1.0" encoding="UTF-8"?>

 <beans xmlns="http://www.springframework.org/schema/beans"

        xmlns:xsi="http://www.w3.org/2001/XMLSchema-instance"

        xsi:schemaLocation="http://www.springframework.org/schema/beans

         http://www.springframework.org/schema/beans/spring-beans.xsd">

     <!-- XMemcachedClientFactoryBean工厂配置-->

     <bean id="memcachedClient" class="net.rubyeye.xmemcached.utils.XMemcachedClientFactoryBean">

         <property name="servers" value="${memcache.servers}"/>

         <property name="weights" value="${memcache.servers.weight}"/>

         <property name="sessionLocator">

             <bean class="net.rubyeye.xmemcached.impl.KetamaMemcachedSessionLocator"/>

         </property>

         <property name="transcoder">

             <bean class="net.rubyeye.xmemcached.transcoders.SerializingTranscoder"/>

         </property>

         <property name="bufferAllocator">

             <bean class="net.rubyeye.xmemcached.buffer.SimpleBufferAllocator"/>

         </property>

     </bean>

     <!--自己封装的api类-->

     <bean class="com.day02.sation.map.MemcachedAccess">

         <property name="memcachedClient" ref="memcachedClient"/>

     </bean>

 </beans>
使用到的服务器参数配置:
memcache.servers=127.0.0.1:11211
memcache.servers.weight=
3.编写封装的API类 MemcachedAccess.java
 package com.day02.sation.map;

 import net.rubyeye.xmemcached.MemcachedClient;

 import net.rubyeye.xmemcached.exception.MemcachedException;

 import java.util.concurrent.TimeoutException;

 /**

  * Created by Administrator on 1/4.

  */

 public class MemcachedAccess {

     private MemcachedClient memcachedClient;

     /**

      * 缓存时间

      * @param key

      * @param time

      * @param value

      * @return

      */

     public boolean put(String key,Integer time,String value){

         try {

             boolean add = memcachedClient.add(key, time, value);

             return add;

         } catch (TimeoutException e) {

             e.printStackTrace();

         } catch (InterruptedException e) {

             e.printStackTrace();

         } catch (MemcachedException e) {

             e.printStackTrace();

         }

         return false;

     }

     /**

      *添加

      * @param key

      * @param value

      * @return

      */

     public boolean put(String key,String value){

         try {

             boolean add = memcachedClient.add(key, 1*24*60, value);

             return add;

         } catch (TimeoutException e) {

             e.printStackTrace();

         } catch (InterruptedException e) {

             e.printStackTrace();

         } catch (MemcachedException e) {

             e.printStackTrace();

         }

         return false;

     }

     /**

      * 获取

      * @param key

      * @return

      */

     public String get(String key){

         try {

             String value= (String)memcachedClient.get(key);

             return value;

         } catch (TimeoutException e) {

             e.printStackTrace();

         } catch (InterruptedException e) {

             e.printStackTrace();

         } catch (MemcachedException e) {

             e.printStackTrace();

         }

         return null;

     }

     /**

      * 清除缓存

      */

     public void flushAll(){

         try {

             memcachedClient.flushAll();

         } catch (TimeoutException e) {

             e.printStackTrace();

         } catch (InterruptedException e) {

             e.printStackTrace();

         } catch (MemcachedException e) {

             e.printStackTrace();

         }

     }

     public MemcachedClient getMemcachedClient() {

         return memcachedClient;

     }

     public void setMemcachedClient(MemcachedClient memcachedClient) {

         this.memcachedClient = memcachedClient;

     }

 }
4.将spring-memcached.xml于spring主配置文件进行关联
<!--引入memcached.xml文件-->
<import resource="classpath:spring/spring-memcached.xml"/>
5..测试MemcachedAccess.java是否可用
 package com.day02.sation.test;

 import com.day02.sation.map.MemcachedAccess;

 import org.junit.Test;

 import org.junit.runner.RunWith;

 import org.springframework.beans.factory.annotation.Autowired;

 import org.springframework.test.context.ContextConfiguration;

 import org.springframework.test.context.junit4.SpringJUnit4ClassRunner;

 /**

  * Created by Administrator on 12/27.

  */

 @RunWith(SpringJUnit4ClassRunner.class)

 @ContextConfiguration("classpath:spring-config.xml")

 public class TestMemcache {

     @Autowired

     private MemcachedAccess memcachedAccess;

     @Test

     public void testGetList() {

         //添加一对值

         memcachedAccess.put("name", "wuji");

         //取出缓存中的值

         String name = memcachedAccess.get("name");

         System.out.println("name=  " + name);

         //清除所有缓存

         memcachedAccess.flushAll();

         //再次获取值,检查是否已经清除

         String name2 = memcachedAccess.get("name");

         System.out.println("name2=  " + name2);

     }

 }
6.memcache在实际生产中做数据字典缓存使用案例
 package com.day02.sation.map;

 import com.day02.sation.dao.IDicDao;

 import com.day02.sation.model.Dic;

 import org.springframework.context.ApplicationContext;

 import org.springframework.context.support.ClassPathXmlApplicationContext;

 import java.util.List;

 /**

  * Created by Administrator on 1/3.

  */

 public class DicMemcache {

     private static IDicDao dicDao;

     private static MemcachedAccess memcachedAccess;

     static {

         //获取应用上下文对象

         ApplicationContext ctx = new ClassPathXmlApplicationContext("spring-config.xml");

         //获取dicDao实例

         dicDao = ctx.getBean(IDicDao.class);

         //获取MemcachedAccess实例

         memcachedAccess = ctx.getBean(MemcachedAccess.class);

         //调用方法初始化字典

         addMapValue();

     }

     public static String getFieldDetail(String tableName, String fieldName, String filedValue) {

         String key = tableName + "_" + fieldName + "_" + filedValue;

         String value = memcachedAccess.get(key);

         if (value == null) { //如果 value 为空 重新查询数据库

             Dic dicQuery = new Dic();

             dicQuery.setTableName(tableName);

             dicQuery.setFieldName(fieldName);

             dicQuery.setFieldValue(filedValue);

             Dic dic = dicDao.getDic(dicQuery);

             if (dic != null) {//数据有该值

                 String fieldDescribe = dic.getFieldDescribe();

                 memcachedAccess.put(key, fieldDescribe);

                 return fieldDescribe;

             }

             value = "暂无";

         }

         return value;

     }

     /**

      * 初始化字典数据

      */

     private static void addMapValue() {

         List<Dic> list = dicDao.getList();

         for (int i = 0; i < list.size(); i++) {

             Dic dic = list.get(i);

             String tableName = dic.getTableName();

             String fieldName = dic.getFieldName();

             String fieldValue = dic.getFieldValue();

             String key = tableName + "_" + fieldName + "_" + fieldValue;

             String fieldDescribe = dic.getFieldDescribe();

             memcachedAccess.put(key, fieldDescribe);

         }

     }

 }
7.调用获取值
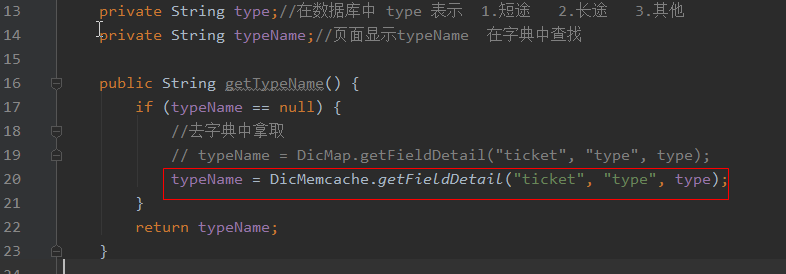
到此memcache的使用到此结束!
最新文章
- JavaScript的chapterIII
- Mac下体验Hexo与Github Pages搭建
- DirectoryHelper
- 【原】javascript数组操作
- mysql存储过程之异常处理篇
- HDU 4507 吉哥系列故事——恨7不成妻
- 关于Mac下的SSH客户端iterm2等配置
- 理解RxJava:(三)RxJava的优点
- URAL 1218 Episode N-th: The Jedi Tournament(强连通分量)(缩点)
- Sublime Text 3配置与vim模式(待完整)
- sdut 2819 比赛排名(边表 拓扑排序)
- SSL交互过程
- Struts2学习第一天——struts2基本流程与配置
- [js高手之路]html5 canvas动画教程 - 自己动手做一个类似windows的画图软件
- uva10003 - Cutting Sticks(简单动规)
- 在javaScript中检测数据类型的几种方式
- OpenGL编程指南(第九版) Tiangles 学习笔记
- css 优化
- Python3.7版本unittest框架添加用例的方法
- python六十八课——网络编程之UDP协议