Zabbix学习之路(九)之低级自动发现以及MySQL多实例
2024-10-18 23:19:34
1、概述
Zabbix的网络发现是指zabbix server通过配置好的规则,自动添加host,group,template
Zabbix的主动注册刚好和网络发现是相反的,功能基本一致。zabbix agent主动联系zabbix server,server自动添加host,group,template
以上两种方式都是发现host,添加host,而low-level discovery(低级自动发现)更加底层,用于发现item,trigger,graph等等。
2、MySQL多实例的低级自动发现
(1)配置3307、3308的实例

[root@linux-node2 ~]# mkdir /data/{,} -p

[root@linux-node2 ~]# chown -R mysql.mysql /data

[root@linux-node2 ~]# cp /etc/my.cnf /etc/my3307.cnf

[root@linux-node2 ~]# vim /etc/my3307.cnf

[mysqld]

datadir=/data/

socket=/data//mysql.sock

# Disabling symbolic-links is recommended to prevent assorted security risks

symbolic-links=

port=

# Settings user and group are ignored when systemd is used.

# If you need to run mysqld under a different user or group,

# customize your systemd unit file for mariadb according to the

# instructions in http://fedoraproject.org/wiki/Systemd

[mysqld_safe]

log-error=/data//mariadb.log

pid-file=/data//mariadb.pid

#

# include all files from the config directory

#

!includedir /etc/my.cnf.d

[root@linux-node2 ~]# cp /etc/my3307.cnf /etc/my3308.cnf

[root@linux-node2 ~]# vim /etc/my3308.cnf

[mysqld]

datadir=/data/

socket=/data//mysql.sock

# Disabling symbolic-links is recommended to prevent assorted security risks

symbolic-links=

port=

# Settings user and group are ignored when systemd is used.

# If you need to run mysqld under a different user or group,

# customize your systemd unit file for mariadb according to the

# instructions in http://fedoraproject.org/wiki/Systemd

[mysqld_safe]

log-error=/data//mariadb.log

pid-file=/data//mariadb.pid

#

# include all files from the config directory

#

!includedir /etc/my.cnf.d

(2)初始化数据库

[root@linux-node2 ~]# mysql_install_db --user=mysql --defaults-file=/etc/my3307.cnf

Installing MariaDB/MySQL system tables in '/data/3307' ...

 :: [Note] /usr/libexec/mysqld (mysqld 5.5.-MariaDB) starting as process  ...

OK

Filling help tables...

 :: [Note] /usr/libexec/mysqld (mysqld 5.5.-MariaDB) starting as process  ...

OK

To start mysqld at boot time you have to copy

support-files/mysql.server to the right place for your system

PLEASE REMEMBER TO SET A PASSWORD FOR THE MariaDB root USER !

To do so, start the server, then issue the following commands:

'/usr/bin/mysqladmin' -u root password 'new-password'

'/usr/bin/mysqladmin' -u root -h linux-node2 password 'new-password'

Alternatively you can run:

'/usr/bin/mysql_secure_installation'

which will also give you the option of removing the test

databases and anonymous user created by default.  This is

strongly recommended for production servers.

See the MariaDB Knowledgebase at http://mariadb.com/kb or the

MySQL manual for more instructions.

You can start the MariaDB daemon with:

cd '/usr' ; /usr/bin/mysqld_safe --datadir='/data/3307'

You can test the MariaDB daemon with mysql-test-run.pl

cd '/usr/mysql-test' ; perl mysql-test-run.pl

Please report any problems at http://mariadb.org/jira

The latest information about MariaDB is available at http://mariadb.org/.

You can find additional information about the MySQL part at:

http://dev.mysql.com

Consider joining MariaDB's strong and vibrant community:

https://mariadb.org/get-involved/

[root@linux-node2 ~]# mysqld_safe --defaults-file=/etc/my3307.cnf &

[]

[root@linux-node2 ~]#  :: mysqld_safe Logging to '/data/3307/mariadb.log'.

 :: mysqld_safe Starting mysqld daemon with databases from /data/

[root@linux-node2 ~]# mysql_install_db --user=mysql --defaults-file=/etc/my3308.cnf

Installing MariaDB/MySQL system tables in '/data/3308' ...

 :: [Note] /usr/libexec/mysqld (mysqld 5.5.-MariaDB) starting as process  ...

OK

Filling help tables...

 :: [Note] /usr/libexec/mysqld (mysqld 5.5.-MariaDB) starting as process  ...

OK

To start mysqld at boot time you have to copy

support-files/mysql.server to the right place for your system

PLEASE REMEMBER TO SET A PASSWORD FOR THE MariaDB root USER !

To do so, start the server, then issue the following commands:

'/usr/bin/mysqladmin' -u root password 'new-password'

'/usr/bin/mysqladmin' -u root -h linux-node2 password 'new-password'

Alternatively you can run:

'/usr/bin/mysql_secure_installation'

which will also give you the option of removing the test

databases and anonymous user created by default.  This is

strongly recommended for production servers.

See the MariaDB Knowledgebase at http://mariadb.com/kb or the

MySQL manual for more instructions.

You can start the MariaDB daemon with:

cd '/usr' ; /usr/bin/mysqld_safe --datadir='/data/3308'

You can test the MariaDB daemon with mysql-test-run.pl

cd '/usr/mysql-test' ; perl mysql-test-run.pl

Please report any problems at http://mariadb.org/jira

The latest information about MariaDB is available at http://mariadb.org/.

You can find additional information about the MySQL part at:

http://dev.mysql.com

Consider joining MariaDB's strong and vibrant community:

https://mariadb.org/get-involved/

[root@linux-node2 ~]# mysqld_safe --defaults-file=/etc/my3308.cnf &

[]

[root@linux-node2 ~]#  :: mysqld_safe Logging to '/data/3308/mariadb.log'.

 :: mysqld_safe Starting mysqld daemon with databases from /data/

[root@linux-node2 ~]# netstat -tulnp

Active Internet connections (only servers)

Proto Recv-Q Send-Q Local Address           Foreign Address         State       PID/Program name

tcp               0.0.0.0:            0.0.0.0:*               LISTEN      /mysqld

tcp               0.0.0.0:            0.0.0.0:*               LISTEN      /mysqld

tcp               0.0.0.0:              0.0.0.0:*               LISTEN      /nginx: master

tcp               0.0.0.0:              0.0.0.0:*               LISTEN      /sshd

tcp               127.0.0.1:            0.0.0.0:*               LISTEN      /master

tcp               0.0.0.0:           0.0.0.0:*               LISTEN      /zabbix_agentd

tcp               0.0.0.0:            0.0.0.0:*               LISTEN      /mysqld

tcp6              :::                   :::*                    LISTEN      /sshd

tcp6              :::                  :::*                    LISTEN      /master

tcp6              :::                :::*                    LISTEN      /zabbix_agentd

[root@linux-node2 ~]# netstat -tulnp |grep mysql|awk -F "[ :]+" '{print $5}'

3306


(3)编写获取端口号的shell脚本

[root@linux-node2 scripts]# vim discovery_mysql.sh

#!/bin/bash

#mysql low-lever discovery

res=`netstat -lntp|grep mysql |awk -F "[ :]+" '{print $5}'`

port=($res)

printf '{'

printf '"data":['

for key in ${!port[@]}

do

        if [[ "${#port[@]}" -gt  && "${key}"  -ne "$((${#port[@]}-1))" ]];then

                printf '{'

                printf "\"{#MYSQLPORT}\":\"${port[${key}]}\"},"

        else [[ "${key}" -eq "((${#port[@]}-1))" ]]

                printf '{'

                printf "\"{#MYSQLPORT}\":\"${port[${key}]}\"}"

        fi

done

printf ']'

printf '}'

[root@linux-node2 scripts]# sh discovery_mysql.sh |python -m json.tool    #采用json格式显示

{

    "data": [

        {

            "{#MYSQLPORT}": ""

        },

        {

            "{#MYSQLPORT}": ""

        },

        {

            "{#MYSQLPORT}": ""

        }

    ]

}

[root@linux-node2 zabbix_agentd.d]# vim discovery_mysql.conf    #编辑自定义key

UserParameter=discovery_mysql,/bin/bash /etc/zabbix/zabbix_agentd.d/scripts/discovery_mysql.sh

[root@linux-node1 ~]# zabbix_get -s linux-node2 -k discovery_mysql    #测试server端获取数据

(Not all processes could be identified, non-owned process info

 will not be shown, you would have to be root to see it all.)

{"data":[]}

#这里报错是因为netstat -tulnp的参数-p在执行时需要root的权限,这里使用suid的方式进行授权

[root@linux-node2 ~]# chmod u+s `which netstat`

[root@linux-node2 ~]# ll `which netstat`

-rwsr-xr-x.  root root  8月    : /usr/bin/netstat

[root@linux-node1 ~]# zabbix_get -s linux-node2 -k discovery_mysql

{"data":[{"{#MYSQLPORT}":""},{"{#MYSQLPORT}":""},{"{#MYSQLPORT}":""}]}

(4)编辑自定义key,获取每个端口的状态数据

[root@linux-node2 zabbix_agentd.d]# cat userparameter_mysql.conf

UserParameter=mysql.status[*],echo "show global status where Variable_name='$2';" | HOME=/var/lib/zabbix mysql -uroot -p123456 -h 127.0.0.1 -P $ -N | awk '{print $$2}'

修改不同端口的mysql密码:

[root@linux-node2 zabbix_agentd.d]# mysqladmin -h 127.0.0.1 -uroot password '' -P3306

[root@linux-node2 zabbix_agentd.d]# mysqladmin -h 127.0.0.1 -uroot password '' -P3307

[root@linux-node2 zabbix_agentd.d]# mysqladmin -h 127.0.0.1 -uroot password '' -P3308

测试是否正常

[root@linux-node2 zabbix_agentd.d]# mysql -uroot -p123456 -h 127.0.0.1 -P3306 -e "use mysql;show GLOBAL VARIABLES like 'port';"

+---------------+-------+

| Variable_name | Value |

+---------------+-------+

| port          |   |

+---------------+-------+

[root@linux-node2 zabbix_agentd.d]# mysql -uroot -p123456 -h 127.0.0.1 -P3307 -e "use mysql;show GLOBAL VARIABLES like 'port';"

+---------------+-------+

| Variable_name | Value |

+---------------+-------+

| port          |   |

+---------------+-------+

[root@linux-node2 zabbix_agentd.d]# mysql -uroot -p123456 -h 127.0.0.1 -P3308 -e "use mysql;show GLOBAL VARIABLES like 'port';"

+---------------+-------+

| Variable_name | Value |

+---------------+-------+

| port          |   |

+---------------+-------+

zabbix_get测试是否能正常获取数据:

[root@linux-node1 ~]# zabbix_get -s linux-node2 -k mysql.status[,Bytes_sent]
3、创建发现规则
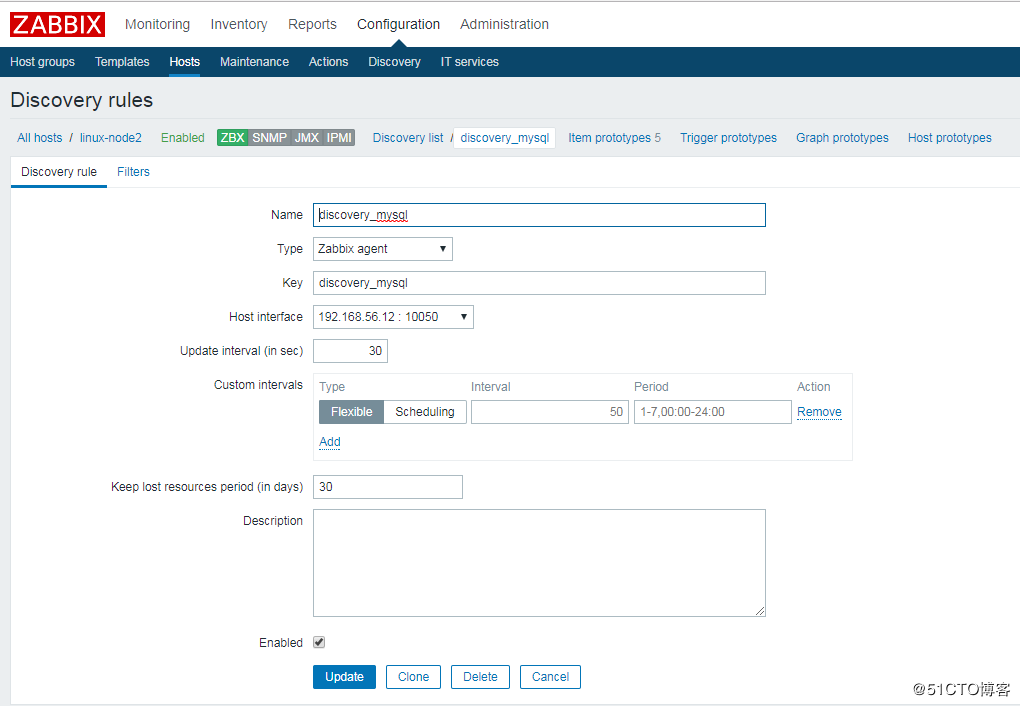
这里直接在linux-node2上进行创建
"Configuration"-->"Host"-->"linux-node2"-->"Discovery"-->"Create discovery rule"-->"Add"
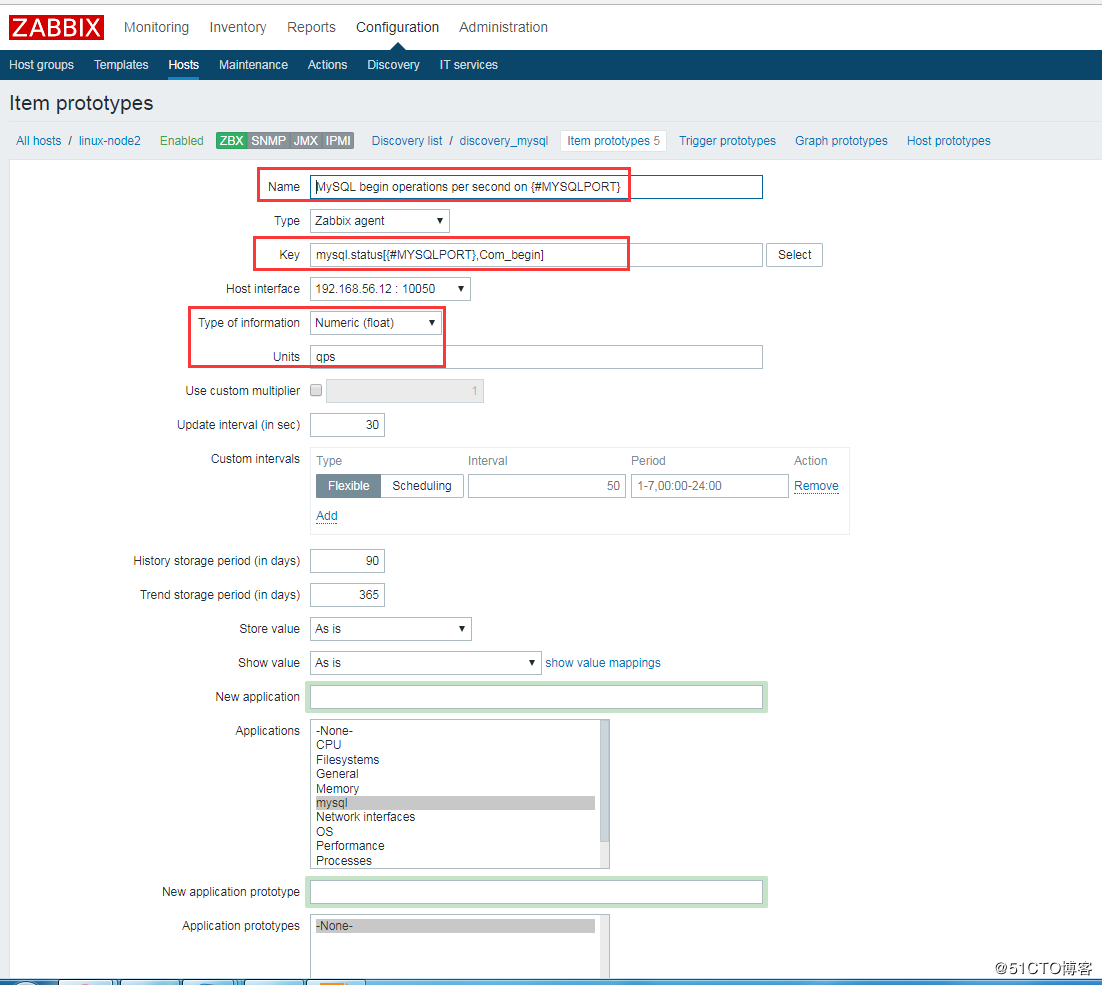
创建 Item prototypes,其实就是一个创建一个 item
Item prototypes (0)>>create Item prototypes,按照官方模板来配置。这里配5个展示

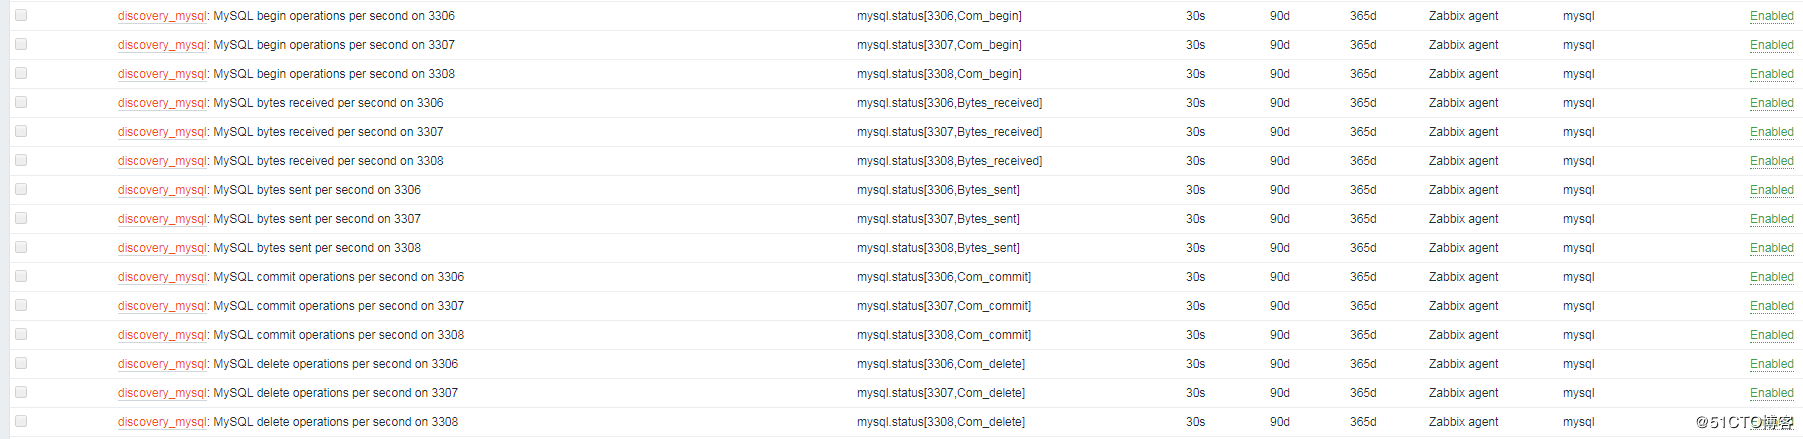
再查看Host中的item项,会多出以下监控项:
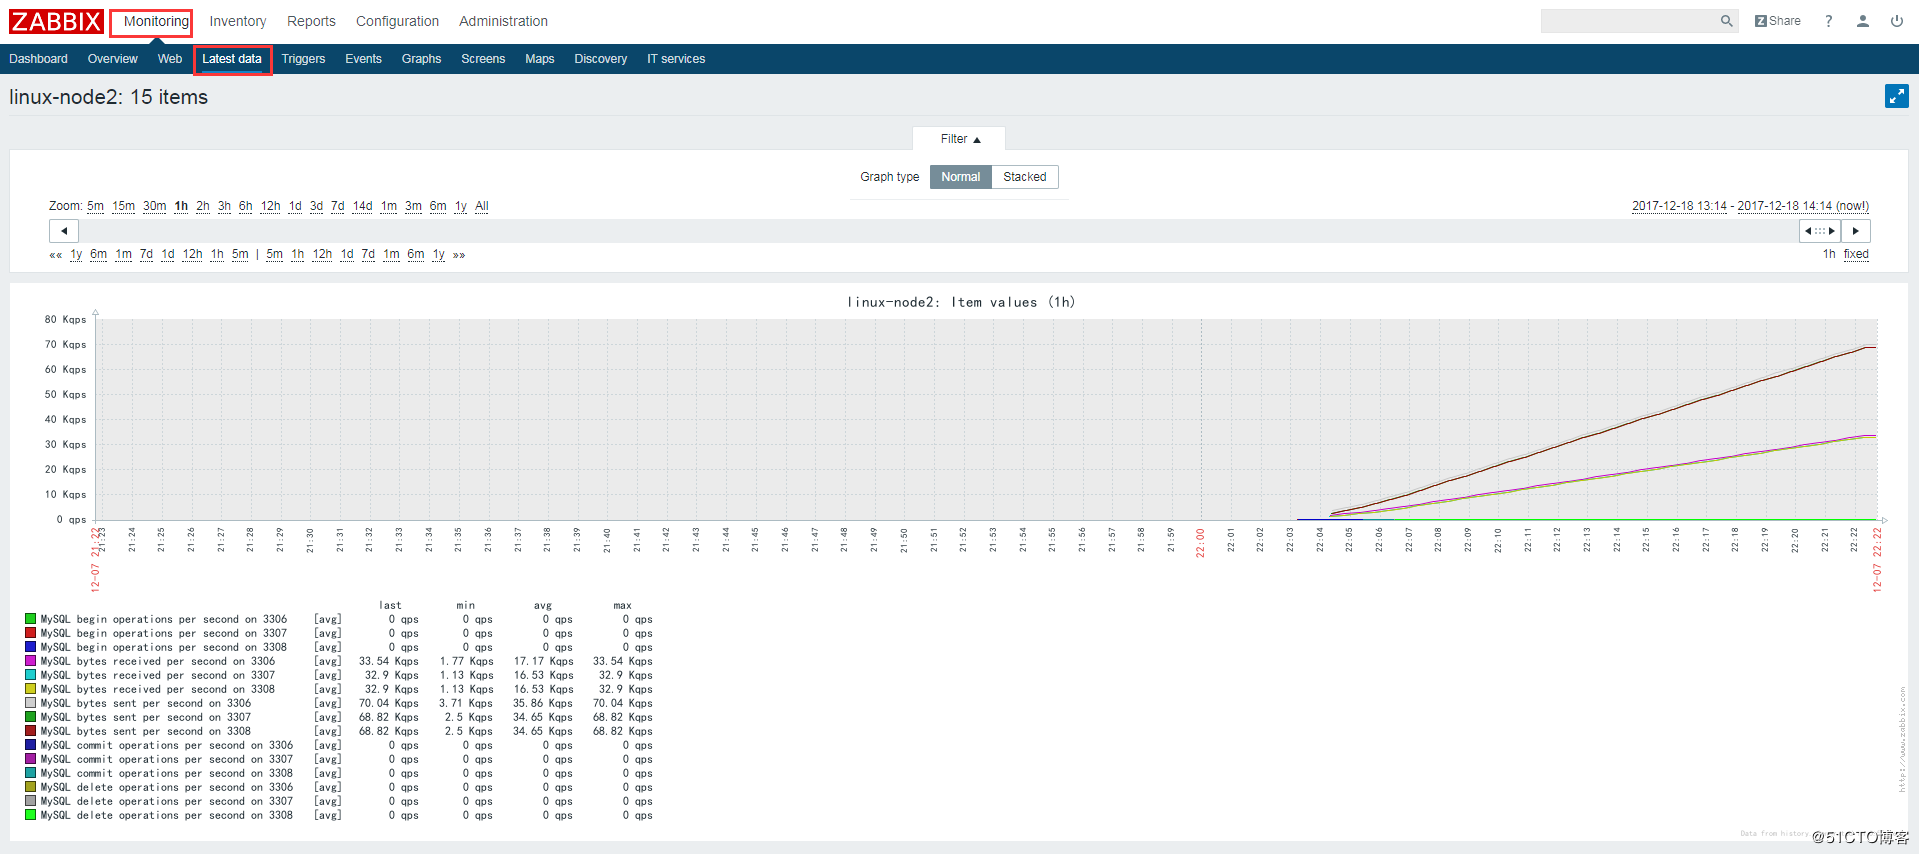
查看监控最新数据图表,即可看到3306、3307、3308的数据库状态信息:
最新文章
- 【BZOJ-2453&2120】维护队列&数颜色 分块 + 带修莫队算法
- TCP的三次握手与四次分手
- android-解决EditText的inputType为Password时, 字体不一致的问题
- oracle数据库安装
- ComponentOne Xuni助力Xamarin开发者突破百万,快速开发Android、IOS Apps
- WEB安全--CSRF剖析
- win10安装软件被阻止后
- UVA 10564 - Paths through the Hourglass (dp)
- 5.CentOS6.6安装git
- Web应用的组件化(二)
- python--------------常用模块之正则
- java web 之 listen 与 filter
- 2018-2019-2 20165235 《网络对抗技术》 Exp6 信息搜集与漏洞扫描
- 锁定表头和固定列(Fixed table head and columns)
- ubuntu Error fetching https://gems.ruby-china.org/: Errno::ECONNREFUSED: Connection refused
- WiFi-ESP8266入门http(2-1)文件系统-复杂结构的网页
- 转STM32官方固件库简介
- 知识点6: v-for列表循环
- 【翻唱】Keep On Fighting
- 什么是adb命令?以及如果高效使用他们?
热门文章
- Input and Output-The input is all the sources of action for your app
- BZOJ3208:花神的秒题计划Ⅰ(记忆化搜索DP)
- ctf经典好题复习
- 2018 HNUCM ACM集训队选拔第一场
- LWIP network interface 网卡 初始化 以 STM32 为例子 后面会有 用 2G 或者4G 模块 用 PPP拨号的 形式 虚拟出网卡 所以先以 这个为 前提
- windows设置控制台编码格式为UTF-8
- 京东7Fresh新零售架构设计分析
- SSM衍生的配置文件
- spring 包的依赖关系
- React Native获取组件位置和大小