探索颜色渐变绘制算法(基于Processing语言) 第一部分
突然间意识到连续变化的颜色在程序中是如何实现的这一问题。没错,就想有事找事,我会分好几部分慢慢探寻,其实笔者也不会,咱一起研究。ok,我们开始!
第一部分
初始部分就从官方案例来入手学习。官方给了三个相似问题的解决方案:
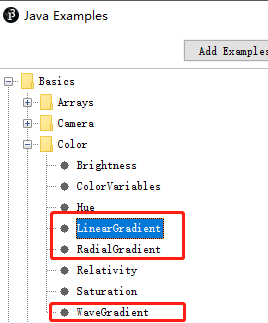
其中LinearGradient是线性渐变,即两点渐变,RadialGradient是基于圆心渐变,WaveGradient是基于sin函数来绘制渐变色。我们从第一个入手,从两点开始【拉渐变】。
开始
官方示例很明确是采用绘制多条Line来达成效果,即每根线都紧挨着,在宏观上看呈现连续的色块,即:
/**

 * Simple Linear Gradient

 *

 * The lerpColor() function is useful for interpolating

 * between two colors.

 */

// Constants

int Y_AXIS = 1;

int X_AXIS = 2;		//设立横纵两轴拉渐变的方法

color b1, b2, c1, c2;

void setup() {

  size(640, 360);

  // Define colors

  b1 = color(255);

  b2 = color(0);

  c1 = color(204, 102, 0);

  c2 = color(0, 102, 153);

  noLoop();

}

void draw() {

  // Background

  setGradient(0, 0, width/2, height, b1, b2, X_AXIS);

  setGradient(width/2, 0, width/2, height, b2, b1, X_AXIS);

  // Foreground

  setGradient(50, 90, 540, 80, c1, c2, Y_AXIS);

  setGradient(50, 190, 540, 80, c2, c1, X_AXIS);

}

void setGradient(int x, int y, float w, float h, color c1, color c2, int axis ) {

  noFill();

  if (axis == Y_AXIS) {  // Top to bottom gradient

    for (int i = y; i <= y+h; i++) {

      float inter = map(i, y, y+h, 0, 1);

      color c = lerpColor(c1, c2, inter);

      stroke(c);

      line(x, i, x+w, i);

    }

  }

  else if (axis == X_AXIS) {  // Left to right gradient

    for (int i = x; i <= x+w; i++) {

      float inter = map(i, x, x+w, 0, 1);

      color c = lerpColor(c1, c2, inter);   //取两色之间的差值

      stroke(c);        			//每次划线都采取相邻的颜色值

      line(i, y, i, y+h);			//绘制连续的直线

    }

  }

}
代码中设定了横纵两轴方向性,然后新建了自己的函数setGradient()。参数有起始位置以及宽高数值,还有两个颜色极值参考,使用lerpColor()算出介于两颜色间的中间值并定义划线颜色,然后统一在for循环中画出:

那么我们可以借它的思想来修改。setGradient()重新编写:
void setGradient(int x, int y, float w, float h, color c1, color c2) {   //方向性选择去掉

  noFill();

  for (int i = y; i <= y+h; i++) {

    float inter = map(i, y, y+h, 0, 1);

    color c = lerpColor(c1, c2, inter);

    stroke(c);

    line(x, i, x+w, i);

  }

}
然后可以用该方法绘制出特定方向[横纵两方向]的渐变色,并且可以实时绘制。如:
setGradient(50, 0, width, mouseY, c1, c2);
接着
如果想不定方向地绘制渐变呢?现在的思路是,随意的拖拽鼠标,记录两点,一点为起始点击位置,一点为终点拖拽位置,基于这两点的长度和方向来绘制line线,其中线的颜色基于两个颜色值进行lerpColor()计算得来。先上代码:
PVector p1;

PVector p2;

PVector p3;

PVector p4;

PVector p5, p6;

float len;

color  c1, c2;

int index = 0;

boolean showUI = true;

void setup()

{

  size(800, 600);

  //fullScreen();

  c1 = color(204, 102, 0);

  c2 = color(0, 102, 153);

}

void draw()

{

  background(0);

  //setGradient(50, 0, width, mouseY, c1, c2);

  if (showUI)

  {

    push();

    noFill();

    stroke(250);

    if (p1 != null)

      circle(p1.x, p1.y, 30);

    if (p2 != null)

      circle(p2.x, p2.y, 30);

    if (p2 != null && p1 != null)

    {

      line(p2.x, p2.y, p1.x, p1.y);

      p3 = PVector.sub(p2, p1).normalize().rotate(HALF_PI);

      p3.mult(60).add(p1);

      p4 = PVector.sub(p2, p1).normalize().rotate(-HALF_PI);

      p4.mult(60).add(p1);

      line(p4.x, p4.y, p3.x, p3.y);

      p5 = PVector.sub(p2, p1).normalize().rotate(HALF_PI);

      p5.mult(60).add(p2);

      p6 = PVector.sub(p2, p1).normalize().rotate(-HALF_PI);

      p6.mult(60).add(p2);

      line(p6.x, p6.y, p5.x, p5.y);

      len = PVector.sub(p1,p2).mag();

      for (float i = 0; i <= len; i+=1.0) {

        float x = lerp(p3.x, p5.x, i/len);   //使用lerp函数求得两点之间的中间差值点位置,下同

        float y = lerp(p3.y, p5.y, i/len);

        point(x, y);

        float x2 = lerp(p4.x, p6.x, i/len);

        float y2 = lerp(p4.y, p6.y, i/len);

        point(x2, y2);

          float inter = map(i, 0, len, 0.0, 1.0);

          color c = lerpColor(c1, c2, inter);

          stroke(c);

          line(x, y, x2, y2);

      }

    }

    pop();

  }

}

void setGradient(int x, int y, float w, float h, color c1, color c2) {

  noFill();

  for (int i = y; i <= y+h; i++) {

    float inter = map(i, y, y+h, 0, 1);

    color c = lerpColor(c1, c2, inter);

    stroke(c);

    line(x, i, x+w, i);

  }

}

void mousePressed() {

    p1 = null;    //复位

    p2 = null;

    p1 = new PVector(mouseX, mouseY);

}

void mouseDragged(){

    p2 = new PVector(mouseX, mouseY);      //实时更新第二个点位置

}

void mouseReleased(){

    //p2 = new PVector(mouseX, mouseY);

    println(len);    //将两点距离打印出来

}

void keyPressed() {

  showUI = !showUI;

}
其中鼠标的操作通过mousePressed() mouseDragged() mouseReleased()等事件达成。至于渐变方块的方向计算,具体大小确定,都基于基本的矢量运算得来,详情请参考源代码。效果如下:
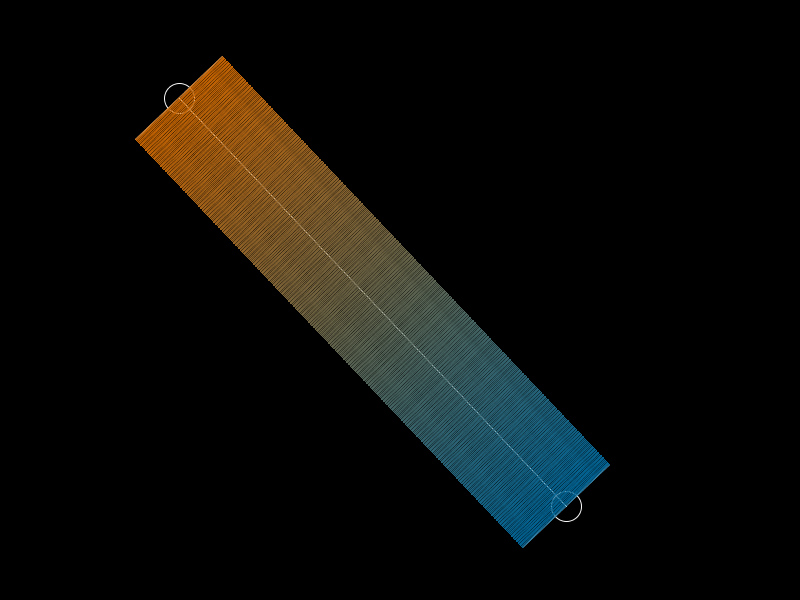

说一下不足。很明显,这样拉出来的渐变带有空隙,不能完美的填充所有像素点,和理想状态差很多,但至少已经达成了初步的想法,在Processing中【拉渐变】!
改进
我们能不能沿用这个思路来改进一下?借用讨巧的方法---矩阵变换。我们先拉出横平竖直的渐变,然后旋转它,最后呈现出来。在P5中默认是画在了一个PGraphics g的图层上,所以渐变让其绘制在单独的一层上方便旋转等变换操作,修改上文代码:
PVector p1;

PVector p2;

PVector p3;

PVector p4;

PVector p5, p6;

PGraphics pg;

float len;

color  c1, c2;

int index = 0;

boolean showUI = true;

void setup()

{

  size(800, 600);

  //fullScreen();

  c1 = color(204, 102, 0);

  c2 = color(0, 102, 153);

  float pgsize = sqrt(sq(width)+sq(height));

  pg = createGraphics(120, (int)pgsize);

}

void draw()

{

  background(0);

  if (showUI)

  {

    push();

    noFill();

    stroke(250);

    if (p1 != null)

      circle(p1.x, p1.y, 30);

    if (p2 != null)

      circle(p2.x, p2.y, 30);

    if (p2 != null && p1 != null)

    {

      line(p2.x, p2.y, p1.x, p1.y);

      p3 = PVector.sub(p2, p1).normalize().rotate(HALF_PI);

      p3.mult(60).add(p1);

      p4 = PVector.sub(p2, p1).normalize().rotate(-HALF_PI);

      p4.mult(60).add(p1);

      line(p4.x, p4.y, p3.x, p3.y);

      p5 = PVector.sub(p2, p1).normalize().rotate(HALF_PI);

      p5.mult(60).add(p2);

      p6 = PVector.sub(p2, p1).normalize().rotate(-HALF_PI);

      p6.mult(60).add(p2);

      line(p6.x, p6.y, p5.x, p5.y);

      len = PVector.sub(p1, p2).mag();

      setGradient(0,0, 60+60, len, c1, c2);   //在新图层上绘制渐变   注意这里宽度设为120,默认基于原点开始画

      push();

      translate(p3.x, p3.y);

      rotate(PVector.sub(p2, p1).heading()-HALF_PI);  //作旋转矩阵变换

      push();

      //translate(-p3.x, -p3.y);

      image(pg, 0, 0);   //渲染新图层

      pop();

      pop();

    }

    pop();

  }

}

void setGradient(float x, float y, float w, float h, color c1, color c2) {

  pg.beginDraw();

  pg.background(0, 0);

  pg.noFill();

  for (float i = y; i <= y+h; i++) {

    float inter = map(i, y, y+h, 0, 1.0);

    color c = lerpColor(c1, c2, inter);

    pg.stroke(c);

    pg.line(x, i, x+w, i);

  }

  pg.endDraw();

}

void mousePressed() {

  p1 = null;

  p2 = null;

  p1 = new PVector(mouseX, mouseY);

}

void mouseDragged() {

  p2 = new PVector(mouseX, mouseY);

}

void mouseReleased() {

  //p2 = new PVector(mouseX, mouseY);

  println(len);

}

void keyPressed() {

  showUI = !showUI;

}
新建PGraphics pg,然后绘制函数改成:
void setGradient(float x, float y, float w, float h, color c1, color c2) {

  pg.beginDraw();

  pg.background(0, 0);

  pg.noFill();

  for (float i = y; i <= y+h; i++) {

    float inter = map(i, y, y+h, 0, 1.0);

    color c = lerpColor(c1, c2, inter);

    pg.stroke(c);

    pg.line(x, i, x+w, i);

  }

  pg.endDraw();

}
将渐变线绘制在新的图层上,这样调用rotate():
push();

  translate(p3.x, p3.y);

  rotate(PVector.sub(p2, p1).heading()-HALF_PI);

  image(pg, 0, 0);

pop();
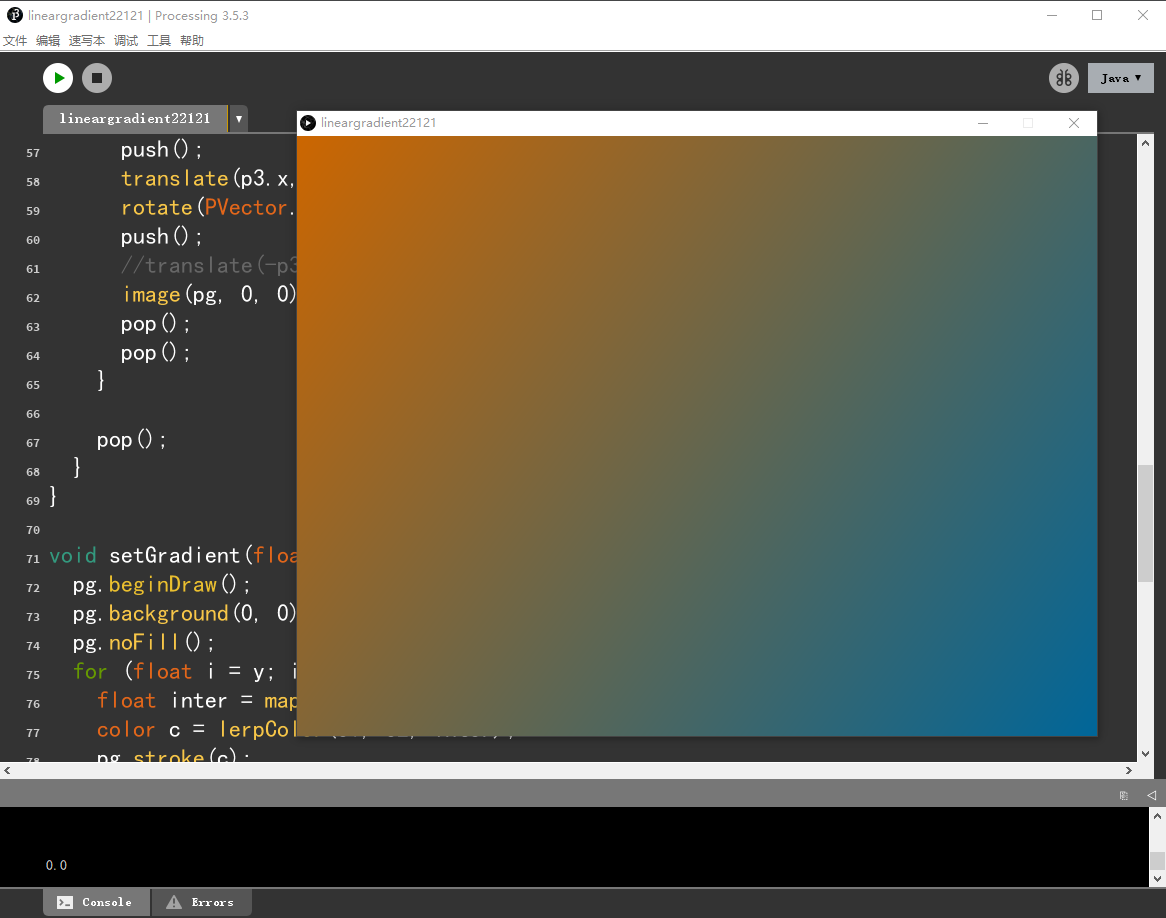
效果如下图:
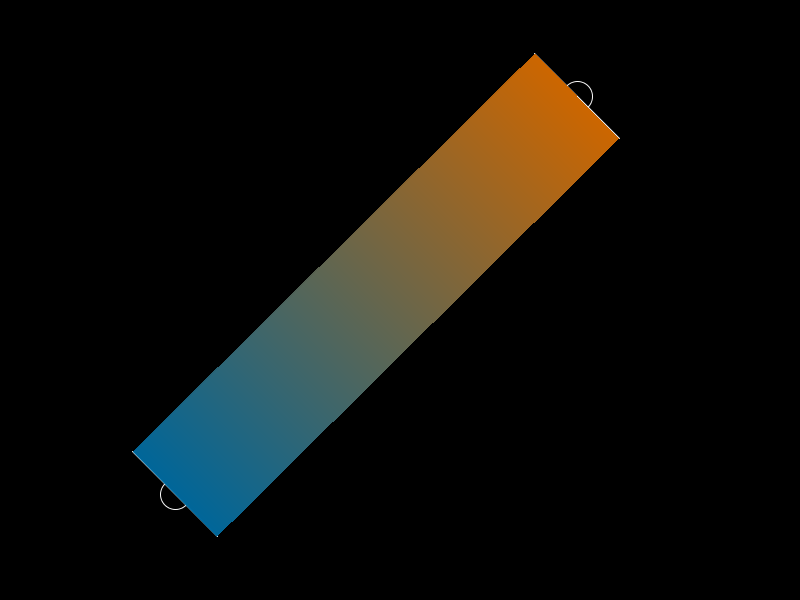

很显然,这种方法虽然讨巧,不通用,但是效果很理想,没有之前的细缝问题,而且效率很高,如果宽度调大,可以看成是全幅性的PS【拉渐变】了 ~
(下图为Processing全幅两点渐变效果以及P5制作环境)
尾声
最初的预想效果正是两点线性渐变,那么接下来要在此基础上进行拓展,比如可视化取点,像ps中的编辑器一样,其次渐变风格可以切换,如圆型渐变、菱形渐变等,再次是非线性渐变算法等,好吧,是有难度的,慢慢来吧 ~ 希望可以借这篇文章给读者一些参考和借鉴,感谢阅读!!!
最新文章
- jQuery校验
- .net core Entity Framework Core Code First 框架 分层开发
- 工具fiddler学习
- Render OpenCascade Geometry Surfaces in OpenSceneGraph
- Web大文件下载控件更新-Xproer.HttpDownloader
- windows下redis 开机自启动
- C51函数的递归调用
- Android 汉字转拼音之JNI篇
- 猎八哥FLY——将数据库中的某一表中的某一列或者多列添加到另一张表的某一列中
- vscode使用shell
- python崩溃到现在居然还没有放弃的Day07
- CentOS 7系统初始化
- python实现满二叉树递归循环
- Tarjan求强连通分量 缩点
- Android 读写权限,已经授权情况下,仍然(Permission denied)
- [LintCode] Max Points on a Line 共线点个数
- Codeforces Round #297 (Div. 2)B. Pasha and String 前缀和
- ubuntu桌面安装常用软件&及常见问题
- libubox组件(1)——usock
- 聊聊、Spring WebApplicationInitializer
热门文章
- [刷题] PTA 02-线性结构1 两个有序链表序列的合并
- [c++] 基本概念
- 上,打开SSH服务的配置文件:/etc/ssh/sshd_config 加上如下两行: ClientAliveInterval 120 ClientAliveCountMax 720 第一行,表示每隔120秒向客户端
- [转载]屏幕PPI、分辨率到底需要多大才能满足?
- git OpenSSL SSL_connect问题
- Kubernetes-3.3:ETCD集群搭建及使用(https认证+数据备份恢复)
- SQLZOO
- nmap扫描端口导致线上大量Java服务FullGC甚至OOM
- cuDNN概述
- CVPR2020:点云分类的自动放大框架PointAugment