日志服务化&可视化&统计化
概述:
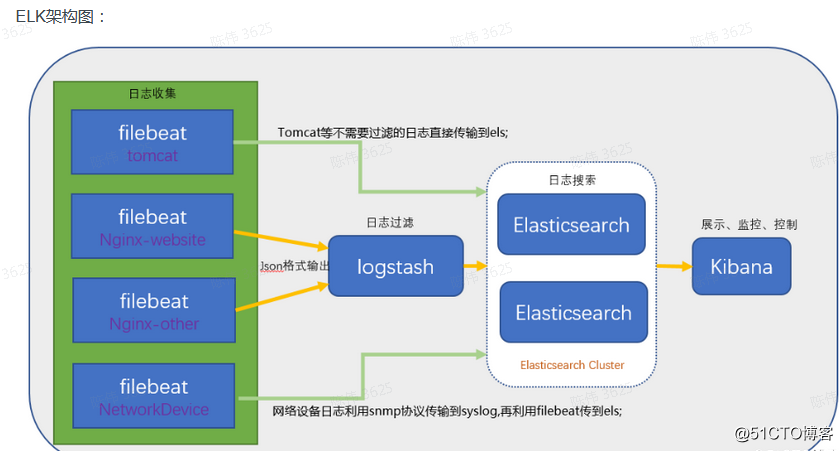
ELK是Elasticsearch(简称es)、Logstash、Kibana的简称,这三者是核心套件,但并非全部。
Filebeat 日志采集工具 Logstash数据处理引擎 elasticsearch数据的存储,并作权威的检索 kibana从 elasticsearch数据库读取并展示
结构图:
备注:
也可通过python把日志传到Elasticsearch,Kibana再展示数据
我目前就是python+Elasticsearch+Kibana
语法案例:
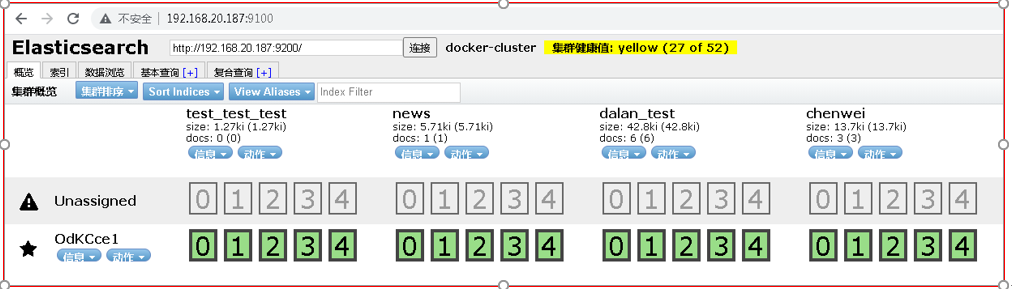
Elasticsearch-head 语法:
################################################API查询篇#######################################################################
1.bool 查询
bool 查询可以把任意多个简单的查询组合在一起,使用 must、should、must_not、filter 选项来表示简单查询之间的逻辑。
(1) must: 文档必须匹配must选项下的从查询条件,相当于逻辑运算的 AND。
(2) should: 文档可以匹配也可以不匹配should选项下的查询条件,相当于逻辑运算的 OR。
(3) must_not: 与must相反。
(4) filter: 与must一样,只不过filter不参与评分,只起到过滤功能。 #post/GET-查询chen索引下, title等于小明123(http://192.168.20.187:9200/chen/_search)
#post/GET-查询所有索引下,title等于小明123(http://192.168.20.187:9200/_search)
{
"query": {
"bool": {
"must": [
{
"term": {
"title.keyword": "小明123"
}
}
],
"must_not": [],
"should": []
}
},
"from": 0,
"size": 10,
"sort": [],
"aggs": {}
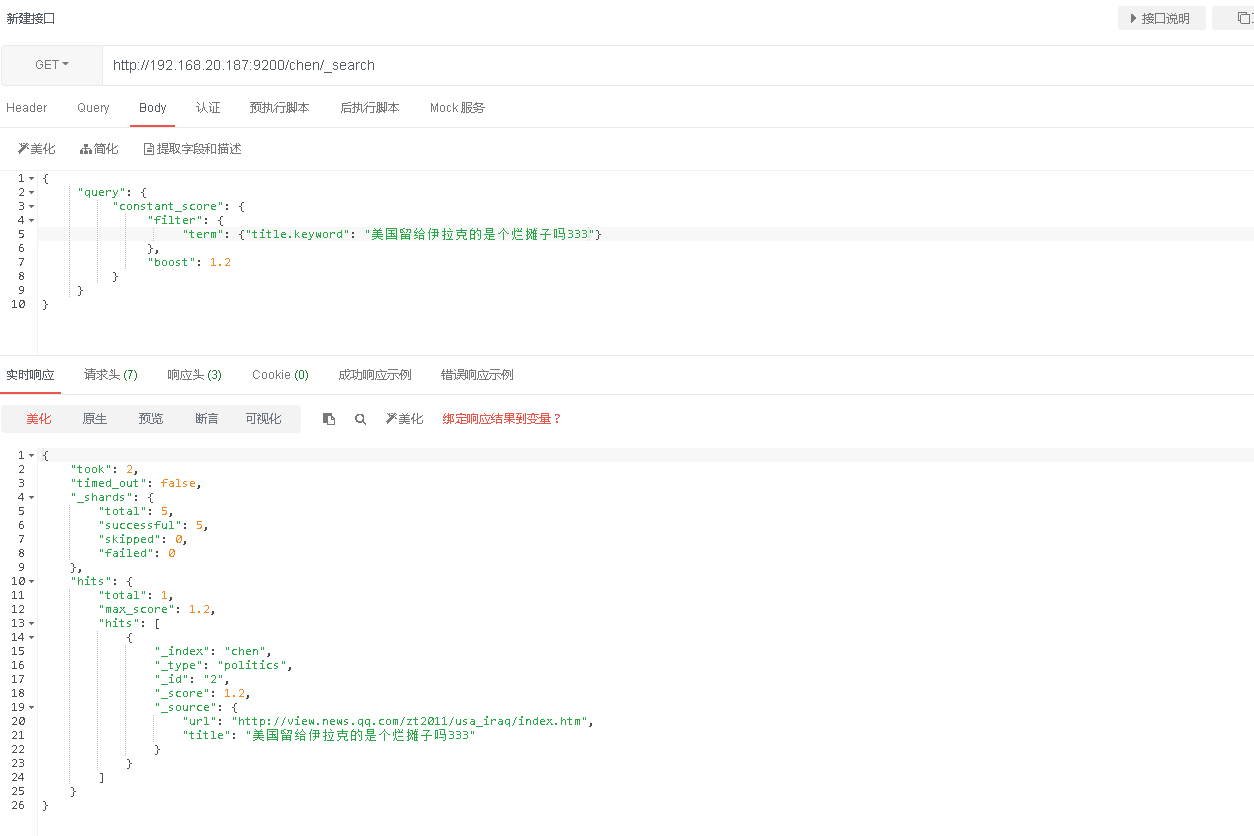
} 2.constant_score查询
constant_score 查询可以包装一个其他类型的查询
#POST/GET-查询chen索引下, title等于小明(http://192.168.20.187:9200/chen/_search)
{
"query": {
"constant_score": {
"filter": {
"term": {"title.keyword": "美国留给伊拉克的是个烂摊子吗33366666666666"}
},
"boost": 1.2
}
}
} 3.wildcard-模糊匹配-字符串
#GET/POST-查询chen索引下, title包含 小明(http://192.168.20.187:9200/chen/_search)
{
"query": {
"bool": {
"must": [
{
"wildcard": {
"title.keyword": "*小明*"
}
}
],
"must_not": [],
"should": []
}
}
} 4.prefix-匹配开头-字符串
#POST/GET-查询chen索引下, title以'小明123'开头的内容(http://192.168.20.187:9200/chen/_search)
{
"query": {
"prefix" : { "title.keyword" : "小明123" }
}
} 5.regexp-正则匹配
#POST/GET-查询chen索引下, title包含数字记录(http://192.168.20.187:9200/chen/_search)
{
"query": {
"regexp": {
"title": "[0-9]{2,10}"
}
}
} 6.匹配汉字、数字
{
"query": {
"regexp": {
"title": "[0-9\u4e00-\u9fa5]+"
}
}
} 7.获取age包含小明,title不包含666的记录
{
"query": {
"bool": {
"must": [
{
"term": {
"age.keyword": "小明"
}
}
],
"must_not": [{
"term": {
"title.keyword": "666"
}
}],
"should": []
}
} } 8.should-满足title或age任意一个即可
{
"query": {
"bool": {
"should": [
{"term": {"title.keyword": "美国留给伊拉克的是个烂摊子吗333"}},
{"term": {"age.keyword": "66666666666666666666"}}
]
}
}
} 9.must-同时满足title和age才查询
{
"query": {
"bool": {
"must": [
{"term": {"title.keyword": "999955522222"}},
{"term": {"age.keyword": "66666666666666666666"}} ]
}
}
} 10.查询索引下所有数据
方法一:
GET或者POST 索引名/类型/_search
{
"query": {
"match_all": {}
}
} 方法二(无需参数):
GET 索引名/类型/_search #######################################################API新增篇(类型默认为_doc)###########################################################################
###指定id插入数据
###PUT-http://192.168.20.187:9200/索引名/类型/自定义id
{
"name":"瓦力",
"country":"China",
"age":300,
"date":"1987-3-7"
} ###输入自动生成id
###post-http://192.168.20.187:9200/索引名/类型/
{
"name":"瓦力",
"country":"China",
"age":300,
"date":"1987-3-7"
} ####################################################################API更新数据#############################################################
#########更新数据
###post-http://192.168.20.187:9200索引名/类型/_update
{
"name": "瓦力2333333333333333333"
} ##也可以这样写(detect_noop默认为true)
{
"doc" : {
"name" : "new_name"
},
"detect_noop": false
}
'''
默认情况下只有原来的source和新的source存在不同的字段情况下才会重建索引,如果一模一样是不会触发重建索引的,如果将detect_noop=false不管内容有没有变化都会重建索引,这一点可以通过version的值的变化来发现更新的文档,必须提前存在.
''' ######有就覆盖、没有则新增
###post-http://192.168.20.187:9200索引名/类型/_update
##方式一:
{
"doc": {
"address": "北京朝阳2"
},
"doc_as_upsert": true
} ##方式二:
{
"address": "北京朝阳23"
} ###############################################################################API删除篇######################################################################################
######################################################post-http://192.168.20.187:9200/索引名/类型/_delete_by_query
###通过id删除
{
"query":{
"term":{
"_id":"10"
}
}
}
###普通条件删除,age=300的数据
{
"query":{
"term":{
"age":"300"
}
}
} ###删除所有数据:(注意请求方式是Post,只删除数据,不删除表结构)
###post-http://192.168.20.187:9200/索引名/类型/_delete_by_query?pretty
{
"query": {
"match_all": {
}
}
}
########__________________________________结构操作-API篇______________________________________________________

####删除索引库(使用Delete方法)

#Delete-http://192.168.20.187:9200/索引名

##新增索引库

#PUT-http://192.168.20.187:9200/索引名

##查看索引结构

GET /dalan_index/_mapping?pretty

##创建带有类型、映射的索引(Index)

#PUT-http://192.168.20.187:9200/索引名?pretty

#入参json:

{

    "settings": {

        "number_of_shards": 3,

        "number_of_replicas": 2

    },

    "mapping": {

        "_doc": {

            "properties": {

                "commodity_id": {

                    "type": "long"

                },

                "commodity_name": {

                    "type": "text"

                },

                "picture_url": {

                    "type": "keyword"

                },

                "price": {

                    "type": "double"

                }

            }

        }

    }

}
备注:可直接使用postman等工具查询,例如:
python3对接elasticsearch(es)
#!/usr/bin/env python

# -*- coding: utf-8 -*-

from elasticsearch import Elasticsearch

import datetime

import json

######____________________________连接es创建索引库______________________________________________________________

###连接es

es = Elasticsearch(host="192.168.20.187", port=9200)

#创建dalan_test索引库(相当于创建一个表)

result = es.indices.create(index='dalan_test', ignore=400)

print(result)

### ignore标记成400  的意思是我们忽略状态码为400的错误

### acknowledged字段显示True  表示索引创建成功

###___________________________#插入数据(需要先有索引库)____________________________________________________________

data = {"name": "小美", "age": "18", "gender": "女"}

#####方式一:index

# ####插入数据,不传id默认自动生成

# res = es.index(index='chen', doc_type='_doc', body=data)

# print(res)

#####方式二:create

#####create方式插入需要指定id且不能重复

# result = es.create(index='dalan_test', doc_type='_doc',id=10, body=data)

# print(result)

##########################批量插入数据

####连接es

# es_client = Elasticsearch(["192.168.20.187:9200"], timeout=20)

# #创建索引

# es_client.indices.create(index='test_test_test', ignore=400)

# #需要插入的数据

# body1 = {"func_info":"删除日志", "error_info":"333", "write_date":datetime.datetime.now()}

# body2 = {"func_info":"删除日志", "error_info":"id为空22233", "write_date":datetime.datetime.now()}

# #组装数据

# #两条数据({'index': {'_index': 'log_index', '_type': 'log_index'}}...................描述)

# result = [{'index': {'_index': 'test_test_test', '_type': 'log_index'}}, body1,{'index': {'_index': 'test_test_test', '_type': 'log_index'}}, body2]

# #提交数据

# es_result = es_client.bulk(index="test_test_test",doc_type="log_index", body= result)

# es_client.indices.flush()

###_________________________________________________查询所有数据________________________________________________________________

###方式一:

# data = es.search(index='chen')

# print(data)

#

# ###方式二:推荐

# body = {

#         'query':{

#         'match_all':{}

#          }

#     }

# data = es.search(index='chen', body=body)

# print(json.dumps(data))

################################## term: 根据某个字段的值进行查询数据

##es 官方文档: term 和 terms 是 包含(contains) 操作,而非 等值(equals) (判断)

# body2 =  {

#          "query":{

#            "term":{

#               "age": "66666666666666666666"}

#                   }

#                 }

# data_list = es.search(index='chen', body=body2)

# print(data_list)

###terms: 根据某个字段的多个值进行查询数据

# body3 =  {

#          "query":{

#            "terms":{

#               "title": ["6662222222222222222222222","美国留给伊拉克的是个烂摊子吗"]}

#                   }

#                 }

# age_list = es.search(index='chen', body=body3)

# print(age_list)

###查询tilte字段以xxx结尾的数据

# body = {

#     "query":

#         {

#         "wildcard":

#             {

#             "title.keyword": "*吗333"

#         }

#     }

# }

# # 查询name字段以红结尾的数据

# aa=es.search(index="chen",body=body)

# print(aa)

###__________________________________________________删除数据________________________________________________

###指定id删除

# result = es.delete(index='chen', doc_type='politics', id=3)

# print(result)

###根据id删除

# name = {"query":{"match":{"_id":"2"}}}

# result = es.delete_by_query(index="索引名", body=name, doc_type="_doc")

# print(result)

###删除索引

# res = es.indices.delete('索引名')

# print(res)

###删除索引的所有数据(清空索引-保留结构)

# delete_name = {"query":{"match_all":{}}}

# result = es.delete_by_query(index="test_test_test", body=delete_name, doc_type="log_index")

# print(result)

####______________________________________________更新数据__________________________________________________________

updateBody = {

            'doc': {

                "title":"我这是2021-10-29后面修改的数据"

            }

        }

res = es.update(index='chen', doc_type='politics', id='yMS4y3wBK5zUkjFjYOFQ', body=updateBody)

print(res)
es自动添加时间戳:
需求:根据时间提取es数据
解决:为es的记录添加时间戳
es5.0后采用的是pipeline的方式来自动添加时间戳:
1.配置时间戳pipeline
PUT _ingest/pipeline/my_timestamp_pipeline

{

  "description": "Adds a field to a document with the time of ingestion",

  "processors": [

    {

      "set": {

        "field": "ingest_timestamp",

        "value": "{{_ingest.timestamp}}"

      }

    }

  ]

}
2.创建索引时使用时间戳pipeline
PUT my_index

{

  "settings": {

    "default_pipeline": "my_timestamp_pipeline"

  }

}
3.创建数据验证:
备注:可以不指定id,由系统自动生成,也可以使用post方法
POST-http://192.168.20.187:9200/dalan_api/_doc
PUT my_index/_doc/1

{

  "content": "it is cool!"

}
相关连接:
https://www.cnblogs.com/struggle-1216/p/12502928.html .....................................ELK+logstash结合filebeat将日志存储到redis,再由logstash转存到elasticsearch
https://blog.csdn.net/shawroad88/article/details/107337086..................................ElasticSearch, Kibana整套安装以及和python的对接,并给出部分操作案例
https://blog.csdn.net/qq_42490050/article/details/106341580 .......................聊聊redis和Elasticsearch
https://www.cnblogs.com/chong-zuo3322/p/13699008.html ...........................Elasticsearch数据类型介绍(_doc 只是一个默认类型)
https://blog.csdn.net/TreeCode/article/details/114678821 ....................ES添加自动添加时间戳(配置后查询数据自带时间,,在kibana可以自动筛选日期时间)
https://www.tizi365.com/archives/796.html...................................使用kibana查询es数据
https://www.cnblogs.com/jianxuanbing/p/9410800.html .......................Docker 简单部署 ElasticSearch(部署1),,https://blog.csdn.net/shykevin/article/details/108272260 ..........docker安装kibana(部署2)(如果没有权限可以在创建容器时加 --privileged=true )
https://www.cnblogs.com/cheyunhua/p/11238489.html ......................................................................................................................快速搭建ELK日志分析系统
https://blog.csdn.net/tanqian351/article/details/83827583 ................................................................................................................搭建ELK-全过程
https://blog.csdn.net/xxy_yang/article/details/96995547 ...................................................................................................................python对接elasticsearch的用法
https://www.cnblogs.com/xiohao/p/12970224.html.............................................................................................................................ES基本查询语句API
https://www.jianshu.com/p/c9f73f72c4ac.......................................................................................................................................索引字段删除(索引不支持某个字段删除,需要备份后重新创建新索引,在新索引加上原来索引字段即可)
教程相关:
https://www.cnblogs.com/chenqionghe/p/12503181.html .........................Kibana使用教程
https://www.tizi365.com/archives/845.html ...............................................kibana开发工具及汇总
https://blog.csdn.net/qq_41594146/article/details/88233663 .........kibana数据图形统计
https://www.cnblogs.com/xuwenjin/p/8792919.html .................................elasticsearch-head的使用(elasticsearch-head是一个可视化页面可查看elasticsearch数据等相关信息)
https://blog.csdn.net/weixin_42830314/article/details/108316045............Elasticsearch-head 数据浏览无显示解决办法
https://www.cnblogs.com/yjf512/p/4897294.html,.Elasticsearch查询语句,,https://blog.csdn.net/qq_21383435/article/details/108808041 ................Elasticsearch匹配查询
https://www.cnblogs.com/liubaihui/p/11725832.html ...............................软件版本对照表
备注:1.使用elasticsearch+Kibana可以完成日志收集web展示等;
2.使用ELK+Filebeat也可以完成日志收集web展示等;
两种不同的是:1只能等客户端主动上报(对server来说是被动),2是Filebeat主动获取日志文件(对server来说可以被动也可主动)
最新文章
- html5 localStorage实现表单本地存储
- SVN 远程无法联通
- http://www.cnbeta.com/articles/306769.htm
- LeetCode 65 Valid Number
- django-查询语句(一)
- Spark SQL笔记——技术点汇总
- OpenCascade Ruled Surface
- 一对一关联模型,HAS_ONE
- eclipse中出现An internal error occurred during: "Initializing Java Tooling"
- Apache XBean相关说明,待补充
- Java中CountDownLatch和CyclicBarrier
- React对比Vue(04 父子组件的通信 )
- 18-10-16 IE 快捷键的组合方式
- ajax的跨域解决方案(java+ajax)
- 查看Redis集群所有节点内存工具
- 主席树初步学习笔记(可持久化数组?静态区间第k大?)
- idea及webstorm破解方法(转)
- 什么是 SSO 与 CAS?
- arduino空调遥控器
- 20145226 《Java程序设计》第3周学习总结