Spring Security 自定义认证逻辑
Spring Security 自定义认证逻辑
这篇文章的内容基于对Spring Security 认证流程的理解,如果你不了解,可以读一下这篇文章:Spring Security 认证流程 。
分析问题
以下是 Spring Security 内置的用户名/密码认证的流程图,我们可以从这里入手:
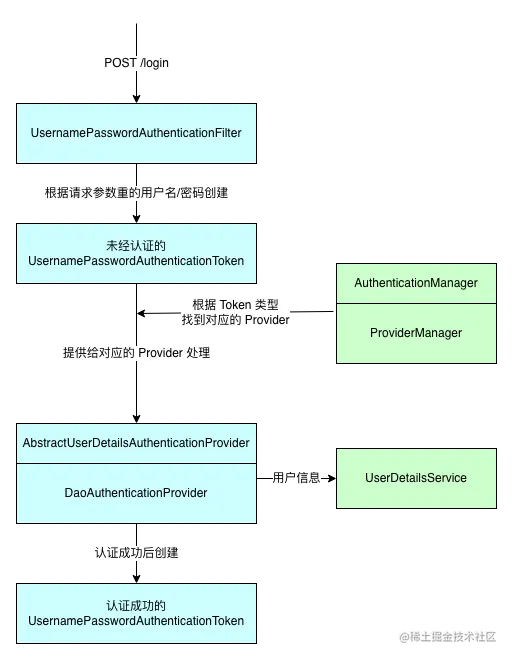
根据上图,我们可以照猫画虎,自定义一个认证流程,比如手机短信码认证。在图中,我已经把流程中涉及到的主要环节标记了不同的颜色,其中蓝色块的部分,是用户名/密码认证对应的部分,绿色块标记的部分,则是与具体认证方式无关的逻辑。
因此,我们可以按照蓝色部分的类,开发我们自定义的逻辑,主要包括以下内容:
- 一个自定义的
Authentication实现类,与UsernamePasswordAuthenticationToken类似,用来保存认证信息。 - 一个自定义的过滤器,与
UsernamePasswordAuthenticationFilter类似,针对特定的请求,封装认证信息,调用认证逻辑。 - 一个
AuthenticationProvider的实现类,提供认证逻辑,与DaoAuthenticationProvider类似。
接下来,以手机验证码认证为例,一一完成。
自定义 Authentication
先给代码,后面进行说明:
public class SmsCodeAuthenticationToken extends AbstractAuthenticationToken {

    private final Object principal;

    private Object credentials;

    public SmsCodeAuthenticationToken(Object principal, Object credentials) {

        super(null);

        this.principal = principal;

        this.credentials = credentials;

        setAuthenticated(false);

    }

    public SmsCodeAuthenticationToken(Object principal, Object credentials,

                                      Collection<? extends GrantedAuthority> authorities) {

        super(authorities);

        this.principal = principal;

        this.credentials = credentials;

        super.setAuthenticated(true);

    }

    @Override

    public Object getCredentials() {

        return this.credentials;

    }

    @Override

    public Object getPrincipal() {

        return this.principal;

    }

    @Override

    public void setAuthenticated(boolean isAuthenticated) throws IllegalArgumentException {

        Assert.isTrue(!isAuthenticated,

                "Cannot set this token to trusted - use constructor which takes a GrantedAuthority list instead");

        super.setAuthenticated(false);

    }

    @Override

    public void eraseCredentials() {

        super.eraseCredentials();

        this.credentials = null;

    }

}
和 UsernamePasswordAuthenticationToken 一样,继承 AbstractAuthenticationToken 抽象类,需要实现 getPrincipal 和 getCredentials 两个方法。在用户名/密码认证中,principal 表示用户名,credentials 表示密码,在此,我们可以让它们指代手机号和验证码,因此,我们增加这两个属性,然后实现方法。
除此之外,我们需要写两个构造方法,分别用来创建未认证的和已经成功认证的认证信息。
自定义 Filter
这一部分,可以参考 UsernamePasswordAuthenticationFilter 来写。还是线上代码:
public class SmsCodeAuthenticationProcessingFilter extends AbstractAuthenticationProcessingFilter {

    public static final String FORM_MOBILE_KEY = "mobile";

    public static final String FORM_SMS_CODE_KEY = "smsCode";

    private static final AntPathRequestMatcher DEFAULT_ANT_PATH_REQUEST_MATCHER = new AntPathRequestMatcher("/sms/login",

            "POST");

    private boolean postOnly = true;

    protected SmsCodeAuthenticationProcessingFilter() {

        super(DEFAULT_ANT_PATH_REQUEST_MATCHER);

    }

    @Override

    public Authentication attemptAuthentication(HttpServletRequest request, HttpServletResponse response) throws AuthenticationException, IOException, ServletException {

        if (this.postOnly && !request.getMethod().equals("POST")) {

            throw new AuthenticationServiceException("Authentication method not supported: " + request.getMethod());

        }

        String mobile = obtainMobile(request);

        mobile = (mobile != null) ? mobile : "";

        mobile = mobile.trim();

        String smsCode = obtainSmsCode(request);

        smsCode = (smsCode != null) ? smsCode : "";

        SmsCodeAuthenticationToken authRequest = new SmsCodeAuthenticationToken(mobile, smsCode);

        // Allow subclasses to set the "details" property

        setDetails(request, authRequest);

        return this.getAuthenticationManager().authenticate(authRequest);

    }

    private String obtainMobile(HttpServletRequest request) {

        return request.getParameter(FORM_MOBILE_KEY);

    }

    private String obtainSmsCode(HttpServletRequest request) {

        return request.getParameter(FORM_SMS_CODE_KEY);

    }

    protected void setDetails(HttpServletRequest request, SmsCodeAuthenticationToken authRequest) {

        authRequest.setDetails(this.authenticationDetailsSource.buildDetails(request));

    }

}
这部分比较简单,关键点如下:
- 首先,默认的构造方法中制定了过滤器匹配那些请求,这里匹配的是
/sms/login的 POST 请求。 - 在
attemptAuthentication方法中,首先从request中获取表单输入的手机号和验证码,创建未经认证的 Token 信息。 - 将 Token 信息交给
this.getAuthenticationManager().authenticate(authRequest)方法。
自定义 Provider
这里是完成认证的主要逻辑,这里的代码只有最基本的校验逻辑,没有写比较严谨的校验,比如校验用户是否禁用等,因为这部分比较繁琐但是简单。
public class SmsCodeAuthenticationProvider implements AuthenticationProvider {

    public static final String SESSION_MOBILE_KEY = "mobile";

    public static final String SESSION_SMS_CODE_KEY = "smsCode";

    public static final String FORM_MOBILE_KEY = "mobile";

    public static final String FORM_SMS_CODE_KEY = "smsCode";

    private UserDetailsService userDetailsService;

    @Override

    public Authentication authenticate(Authentication authentication) throws AuthenticationException {

        authenticationChecks(authentication);

        String mobile = authentication.getName();

        UserDetails userDetails = userDetailsService.loadUserByUsername(mobile);

        SmsCodeAuthenticationToken authResult = new SmsCodeAuthenticationToken(userDetails, userDetails.getAuthorities());

        return authResult;

    }

    /**

     * 认证信息校验

     * @param authentication

     */

    private void authenticationChecks(Authentication authentication) {

        HttpServletRequest request = ((ServletRequestAttributes) RequestContextHolder.getRequestAttributes()).getRequest();

        // 表单提交的手机号和验证码

        String formMobile = request.getParameter(FORM_MOBILE_KEY);

        String formSmsCode = request.getParameter(FORM_SMS_CODE_KEY);

        // 会话中保存的手机号和验证码

        String sessionMobile = (String) request.getSession().getAttribute(SESSION_MOBILE_KEY);

        String sessionSmsCode = (String) request.getSession().getAttribute(SESSION_SMS_CODE_KEY);

        if (StringUtils.isEmpty(sessionMobile) || StringUtils.isEmpty(sessionSmsCode)) {

            throw new BadCredentialsException("为发送手机验证码");

        }

        if (!formMobile.equals(sessionMobile)) {

            throw new BadCredentialsException("手机号码不一致");

        }

        if (!formSmsCode.equals(sessionSmsCode)) {

            throw new BadCredentialsException("验证码不一致");

        }

    }

    @Override

    public boolean supports(Class<?> authentication) {

        return (SmsCodeAuthenticationToken.class.isAssignableFrom(authentication));

    }

    public void setUserDetailsService(UserDetailsService userDetailsService) {

        this.userDetailsService = userDetailsService;

    }

}
这段代码的重点有以下几个:
supports方法用来判断这个 Provider 支持的 AuthenticationToken 的类型,这里对应我们之前创建的SmsCodeAuthenticationToken。- 在
authenticate方法中,我们将 Token 中的手机号和验证码与 Session 中保存的手机号和验证码进行对比。(向 Session 中保存手机号和验证码的部分在下文中实现)对比无误后,从 UserDetailsService 中获取对应的用户,并依此创建通过认证的 Token,并返回,最终到达 Filter 中。
自定义认证成功/失败后的 Handler
之前,我们通过分析源码知道,Filter 中的 doFilter 方法,其实是在它的父类
AbstractAuthenticationProcessingFilter 中的,attemptAuthentication 方法也是在 doFilter 中被调用的。
当我们进行完之前的自定义逻辑,无论是否认证成功,attemptAuthentication 方法会返回认证成功的结果或者抛出认证失败的异常。doFilter 方法中会根据认证的结果(成功/失败),调用不同的处理逻辑,这两个处理逻辑,我们也可以进行自定义。
我直接在下面贴代码:
public class SmsCodeAuthenticationSuccessHandler implements AuthenticationSuccessHandler {

    @Override

    public void onAuthenticationSuccess(HttpServletRequest request, HttpServletResponse response, Authentication authentication) throws IOException, ServletException {

        response.setContentType("text/plain;charset=UTF-8");

        response.getWriter().write(authentication.getName());

    }

}
public class SmsCodeAuthenticationFailureHandler implements AuthenticationFailureHandler {

    @Override

    public void onAuthenticationFailure(HttpServletRequest request, HttpServletResponse response, AuthenticationException exception) throws IOException, ServletException {

        response.setContentType("text/plain;charset=UTF-8");

        response.getWriter().write("认证失败");

    }

}
以上是成功和失败后的处理逻辑,需要分别实现对应的接口,并实现方法。注意,这里只是为了测试,写了最简单的逻辑,以便测试的时候能够区分两种情况。真实的项目中,要根据具体的业务执行相应的逻辑,比如保存当前登录用户的信息等。
配置自定义认证的逻辑
为了使我们的自定义认证生效,需要将 Filter 和 Provider 添加到 Spring Security 的配置当中,我们可以把这一部分配置先单独放到一个配置类中:
@Component

@RequiredArgsConstructor

public class SmsCodeAuthenticationSecurityConfig extends SecurityConfigurerAdapter<DefaultSecurityFilterChain, HttpSecurity> {

    private final UserDetailsService userDetailsService;

    @Override

    public void configure(HttpSecurity http) {

        SmsCodeAuthenticationProcessingFilter smsCodeAuthenticationFilter = new SmsCodeAuthenticationProcessingFilter();

        smsCodeAuthenticationFilter.setAuthenticationManager(http.getSharedObject(AuthenticationManager.class));

        smsCodeAuthenticationFilter.setAuthenticationSuccessHandler(new SmsCodeAuthenticationSuccessHandler());

        smsCodeAuthenticationFilter.setAuthenticationFailureHandler(new SmsCodeAuthenticationFailureHandler());

        SmsCodeAuthenticationProvider smsCodeAuthenticationProvider = new SmsCodeAuthenticationProvider();

        smsCodeAuthenticationProvider.setUserDetailsService(userDetailsService);

        http.authenticationProvider(smsCodeAuthenticationProvider)

                .addFilterAfter(smsCodeAuthenticationFilter, UsernamePasswordAuthenticationFilter.class);

    }

}
其中,有以下需要注意的地方:
- 一定记得把 AuthenticationManager 提供给 Filter,回顾之前讲到的认证逻辑,如果没有这一步,在 Filter 中完成认证信息的封装后,就没办法去找对应的 Provider。
- 要把成功/失败后的处理逻辑的两个类提供给 Filter,否则不会进入这两个逻辑,而是会进入默认的处理逻辑。
- Provider 中用到了 UserDetailsService,也要记得提供。
- 最后,将两者添加到 HttpSecurity 对象中。
接下来,需要在 Spring Security 的主配置中添加如下内容。
- 首先,注入
SmsCodeAuthenticationSecurityConfig配置。 - 然后,在
configure(HttpSecurity http)方法中,引入配置:http.apply`` ( ``smsCodeAuthenticationSecurityConfig`` ) ``;。 - 最后,由于在认证前,需要请求和校验验证码,因此,对
/sms/**路径进行放行。
测试
大功告成,我们测试一下,首先需要提供一个发送验证码的接口,由于是测试,我们直接将验证码返回。接口代码如下:
链接:https://juejin.cn/post/7054844113882972191
最新文章
- js打开新的链接2
- [Head First Python]4.读取文件datafile.txt, 去除两边空格, 存储到列表,从列表格式化(nester.py)后输出到文件man.out,other.out
- 201521123072《java程序设计》第七周总结
- linux的tomcat服务器上部署项目的方法
- Linux常用命令大全(非常全!!!)(转)
- Appium(二)---启动App+模拟滑动
- 封装qq分享静态库到cocopod
- [JavaScript] promise概述
- Cocos2dx制作帧动画
- Java:Hashtable
- maven本地库与私服比对,查找缺失jar包
- python------软件目录结构规范
- linux安装oracle的官方文档
- Series转成list
- apache +PHP多版本 切换的问题
- Django settings.py添加静态文件夹
- SpringBoot - Starter
- PowerShell交互下的热键
- jetty 服务器配置无项目名
- HUAS 1477 经营与开发(贪心)