Android自定义ViewGroup-入门
2024-10-18 19:44:47
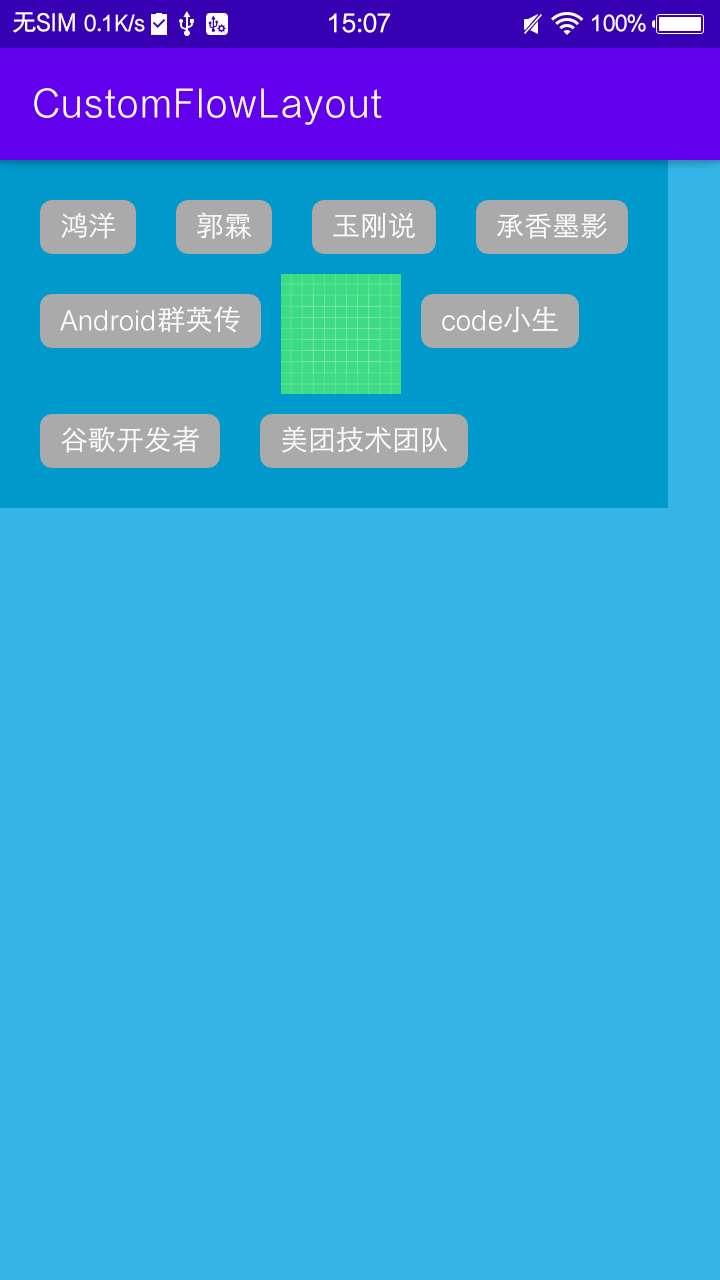
1.效果
2步骤
自定义ViewGroup的步骤是
1.1测量onMeasure
 /**

     * 获取子view的个数

     * 逐个测量其宽高 得到整个ViewGroup的宽高

     *

     * @param widthMeasureSpec

     * @param heightMeasureSpec

     */

    @Override

    protected void onMeasure(int widthMeasureSpec, int heightMeasureSpec) {

        super.onMeasure(widthMeasureSpec, heightMeasureSpec);

        //获取流式布局的宽度和模式

        int widthSize = MeasureSpec.getSize(widthMeasureSpec);

        int widthMode = MeasureSpec.getMode(widthMeasureSpec);

        //获取流式布局的高度和模式

        int heightSize = MeasureSpec.getSize(heightMeasureSpec);

        int heightMode = MeasureSpec.getMode(heightMeasureSpec);

        //使用wrap_content的流式布局的最终宽度和高度

        int width = 0, height = 0;

        //记录每一行的宽度和高度

        int lineWidth = 0, lineHeight = 0;

        //得到内部元素的个数

        int count = getChildCount();

        mChildPos.clear();

        for (int i = 0; i < count; i++) {

            //获取对应索引的view

            View child = getChildAt(i);

            //测量子view的宽和高

            measureChild(child, widthMeasureSpec, heightMeasureSpec);

            MarginLayoutParams lp = (MarginLayoutParams) child.getLayoutParams();

            //子view占据的宽度

            int childWidth = child.getMeasuredWidth() + lp.leftMargin + lp.rightMargin;

            //子view占据的高度

            int childHeight = child.getMeasuredHeight() + lp.topMargin + lp.bottomMargin;

            //换行

            if (lineWidth + childWidth > widthSize - getPaddingLeft() - getPaddingRight()) {

                //取最大的行宽为流式布局宽度

                width = Math.max(width, lineWidth);

                //叠加行高得到流式布局高度

                height += lineHeight;

                //重置行宽度为第一个View的宽度

                lineWidth = childWidth;

                //重置行高度为第一个View的高度

                lineHeight = childHeight;

                //记录位置

                mChildPos.add(new ChildPos(

                        getPaddingLeft() + lp.leftMargin,

                        getPaddingTop() + height + lp.topMargin,

                        getPaddingLeft() + childWidth - lp.rightMargin,

                        getPaddingTop() + height + childHeight - lp.bottomMargin));

            } else {  //不换行

                //记录位置

                mChildPos.add(new ChildPos(

                        getPaddingLeft() + lineWidth + lp.leftMargin,

                        getPaddingTop() + height + lp.topMargin,

                        getPaddingLeft() + lineWidth + childWidth - lp.rightMargin,

                        getPaddingTop() + height + childHeight - lp.bottomMargin));

                //叠加子View宽度得到新行宽度

                lineWidth += childWidth;

                //取当前行子View最大高度作为行高度

                lineHeight = Math.max(lineHeight, childHeight);

            }

            //最后一个控件

            if (i == count - 1) {

                width = Math.max(lineWidth, width);

                height += lineHeight;

            }

        }

        // 得到最终的宽高

        // 宽度:如果是AT_MOST模式,则使用我们计算得到的宽度值,否则遵循测量值

        // 高度:只要布局中内容的高度大于测量高度,就使用内容高度(无视测量模式);否则才使用测量高度

        int flowLayoutWidth = widthMode == MeasureSpec.AT_MOST ? width + getPaddingLeft() + getPaddingRight() : widthSize;

        int flowLayoutHeight = heightMode == MeasureSpec.AT_MOST ? height + getPaddingTop() + getPaddingBottom() : heightSize;

        //真实高度

        realHeight = height + getPaddingTop() + getPaddingBottom();

        //测量高度

        measuredHeight = heightSize;

        if (heightMode == MeasureSpec.EXACTLY) {

            realHeight = Math.max(measuredHeight, realHeight);

        }

        // 设置最终的宽高

        setMeasuredDimension(flowLayoutWidth, flowLayoutHeight);

    }
在测量的过程中就可以获取到每一个子控件的位置,直接缓存,在onLayout中可以直接遍历摆放。
  private class ChildPos {

        int left, top, right, bottom;

        public ChildPos(int left, int top, int right, int bottom) {

            this.left = left;

            this.top = top;

            this.right = right;

            this.bottom = bottom;

        }

    }
1.2.摆放onLayout
   @Override

    protected void onLayout(boolean changed, int l, int t, int r, int b) {

        int count = getChildCount();

        for (int i = 0; i < count; i++) {

            View child = getChildAt(i);

            ChildPos pos = mChildPos.get(i);

            //设置View的左边、上边、右边底边位置

            child.layout(pos.left, pos.top, pos.right, pos.bottom);

        }

    }
注意:
需要重写generateLayoutParams 返回MarginLayoutParams才可以在onMeasure中获取到控件的Margin值
  @Override

    public LayoutParams generateLayoutParams(AttributeSet attrs) {

        return new MarginLayoutParams(getContext(), attrs);

    }
最新文章
- vs2013 控制台程序exe图标
- 問題排查:行動裝置網頁前端 UI 設計 (2)
- struts2 jsp 传参 NullPointerException问题解决
- PHP常用函数和常见疑难问题解答
- Plupload文件上传组件使用API
- Python 网页爬虫
- 李洪强iOS开发之【零基础学习iOS开发】【01-前言】01-开篇
- Javascript异步请求你能捕获到异常吗?
- 在Ubuntu下配置Apache多域名服务器
- C#界面设计疑问
- 字符串转换为float<1>
- 碎碎念,浅饮-------Day30
- NetBeans+Xdebug调试php代码
- github+hexo搭建自己的博客网站(四)主题之外的一些基本配置(统计配置,网站访问量显示)
- 记一次Struts2 内核问题分析解决
- 马凯军201771010116《面向对象程序设计(java)》第六周学习总结
- SQLserver 新用户的创建以及权限的给与
- 通过css 实现“瀑布流”
- LCA的一些算法
- 添加sqljdbc4的maven依赖