IOS开发-UI学习-UITabBarController的使用
2024-08-24 08:33:39
UITabBarController具体实例如下图
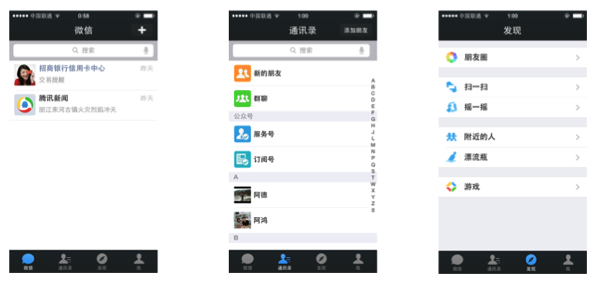
我们最常见的就是微信最下面的四个按钮,通过这四个按钮可以导航到不同的界面。
UITabBarController是一个容器,以下的例程中给UITabBarController这个容器中装了四个UINavigationController,具体代码如下:
1、AppDelegate.m:
#import "AppDelegate.h"

#import "FirstViewController.h"

#import "SecondViewController.h"

#import "ThirdViewController.h"

#import "ForthViewController.h"

@interface AppDelegate (){

    UITabBarController *mytabbar;

}

@end

@implementation AppDelegate

- (BOOL)application:(UIApplication *)application didFinishLaunchingWithOptions:(NSDictionary *)launchOptions {

//    firstVC

    FirstViewController *firstVC = [[FirstViewController alloc]init];

    UINavigationController *firstNC = [[UINavigationController alloc]initWithRootViewController:firstVC];

//    secondVC

    SecondViewController *secondVC = [[SecondViewController alloc]init];

    UINavigationController *secondNC = [[UINavigationController alloc]initWithRootViewController:secondVC];

//    thirdVC

    ThirdViewController *thirdVC = [[ThirdViewController alloc]init];

    UINavigationController *thirdNC = [[UINavigationController alloc]initWithRootViewController:thirdVC];

//    forthVC

    ForthViewController *forthVC = [[ForthViewController alloc]init];

    UINavigationController *forthNC = [[UINavigationController alloc]initWithRootViewController:forthVC];

    NSArray *arr = @[firstNC,secondNC,thirdNC,forthNC];

    mytabbar = [[UITabBarController alloc]init];

    mytabbar.viewControllers = arr;

    self.window.rootViewController =mytabbar;

    [self.window makeKeyAndVisible];

    mytabbar .delegate = self;

    return YES;

}
2、FirstViewController.m:
#import "FirstViewController.h"

@interface FirstViewController (){

    UIImageView *imgV;

    NSMutableArray *imgArray;

    UIButton *myBtn;

}

@end

@implementation FirstViewController

-(instancetype)init{

    if (self = [super init]) {

//        初始化设置

        self.title = @"动画";

        [self.tabBarItem setImage:[UIImage imageNamed:@"movie_projector_filled"]];

    }

//    返回self

    return self;

}

- (void)viewDidLoad {

    [super viewDidLoad];

    imgV = [[UIImageView alloc]initWithFrame:CGRectMake(0, 0, self.view.frame.size.width, self.view.frame.size.height-100)];

    imgV.image = [UIImage imageNamed:@"cat_eat0000.jpg"];

    [self.view addSubview:imgV];

    imgArray = [[NSMutableArray alloc]initWithCapacity:40];

    for (int i = 0; i<40; i++) {

        NSString *pictString = [NSString stringWithFormat:@"cat_eat00%.2d.jpg",i];

        UIImage *img = [UIImage imageNamed:pictString];

        [imgArray addObject:img];

    }

    imgV.animationImages = imgArray;

    imgV.animationDuration = 2;

    imgV.animationRepeatCount =1;

    myBtn  = [[UIButton alloc]initWithFrame:CGRectMake(100, self.view.frame.size.height-100, 214, 51)];

    myBtn.backgroundColor = [UIColor orangeColor];

    myBtn.layer.cornerRadius = 20;

    myBtn.layer.masksToBounds = YES;

    myBtn.enabled = YES;

    [myBtn setTitle:@"开始按钮" forState:UIControlStateNormal];

    [myBtn addTarget:self action:@selector(myBtnAction:) forControlEvents:UIControlEventTouchUpInside];

    [self.view addSubview:myBtn];

}

-(void)myBtnAction :(UIButton*)sender{

    [imgV startAnimating];

}

@end
3、SecondViewController.m:
#import "SecondViewController.h"

@interface SecondViewController (){

    NSMutableArray *btnArray;

}

@end

@implementation SecondViewController

-(instancetype)init{

    if (self = [super init]) {

        self.title = @"灭灯";

        [self.tabBarItem setImage:[UIImage imageNamed:@"paint_palette_filled"]];

    }

    return self;

}

- (void)viewDidLoad {

    [super viewDidLoad];

    for (int i=0; i<3; i++) {

        for (int j=0; j<3; j++) {

            UIButton *btn = [[UIButton alloc]initWithFrame:CGRectMake(j*self.view.frame.size.width/3+20, i*((self.view.frame.size.height-100)/3)+80, self.view.frame.size.width/3-100/3.0, self.view.frame.size.height/3-80)];

            btn.tag = i*3+j+1;

            btn.layer.cornerRadius = 20;

            btn.layer.masksToBounds = YES;

            btn.backgroundColor = [UIColor orangeColor];

            [btn addTarget:self action:@selector(dceAlpha:) forControlEvents:UIControlEventTouchUpInside];

            [self.view addSubview:btn];

            [btnArray addObject:btn];

        }

    }

}

-(void)dceAlpha:(UIButton*)sender{

  [UIView animateWithDuration:0.5 animations:^{

      sender.alpha = 0;

  } completion:^(BOOL finished) {

      ;

  }];

}

@end
4、ThirdViewController.m
#import "ThirdViewController.h"
#import "ThirdtwoViewController.h"

@interface ThirdViewController (){

    UITextField *nameField;

    UITextField *passwordField;

    UIButton *loginBtn;

    UIButton *resignBtn;

    ThirdtwoViewController *thirdtwoVC;

}

@end

@implementation ThirdViewController

-(instancetype)init{

    if (self = [super init]) {

        self.title = @"登陆";

        self.view.backgroundColor = [UIColor colorWithPatternImage:[UIImage imageNamed:@"22.jpg"]];

        [self.tabBarItem setImage:[UIImage imageNamed:@"lock_filled"]];

    }

    return self;

}

- (void)viewDidLoad {

    [super viewDidLoad];

    nameField = [[UITextField alloc]initWithFrame:CGRectMake(100, 100, 264, 50)];

    nameField.backgroundColor = [UIColor lightGrayColor];

    nameField.layer.cornerRadius = 10;

    nameField.layer.masksToBounds = YES;

    nameField.placeholder = @"请输入用户名:";

    nameField.font = [UIFont fontWithName: @"Helvetica-Light" size:18];

    nameField.autocorrectionType = UITextAutocorrectionTypeNo;

    nameField.keyboardType = UIKeyboardTypeDefault;

    nameField.returnKeyType = UIReturnKeyDone;

    nameField.clearButtonMode = UITextFieldViewModeWhileEditing;

    [self.view addSubview:nameField];

    UILabel *namelabel = [[UILabel alloc]initWithFrame:CGRectMake(50, 100, 100, 50)];

    namelabel.text = @"帐号:";

    [self.view addSubview:namelabel];

    passwordField = [[UITextField alloc]initWithFrame:CGRectMake(100, 180, 264, 50)];

    passwordField.backgroundColor = [UIColor lightGrayColor];

    passwordField.layer.cornerRadius = 10;

    passwordField.layer.masksToBounds = YES;

    passwordField.placeholder = @"请输入六位数字密码:";

    passwordField.secureTextEntry = YES;

    passwordField.font = [UIFont fontWithName: @"Helvetica-Light" size:18];

    passwordField.keyboardType = UIKeyboardTypeNumberPad;

    passwordField.returnKeyType = UIReturnKeyDone;

    passwordField.clearButtonMode = UITextFieldViewModeWhileEditing;

    [self.view addSubview:passwordField];

    UILabel *psdlabel = [[UILabel alloc]initWithFrame:CGRectMake(50, 180, 100, 50)];

    psdlabel.text = @"密码:";

    [self.view addSubview:psdlabel];

    resignBtn = [[UIButton alloc]initWithFrame:CGRectMake(100, 280, 80, 50)];

    resignBtn.backgroundColor = [UIColor orangeColor];

    resignBtn.layer.cornerRadius = 20;

    resignBtn.layer.masksToBounds = YES;

    resignBtn.enabled = YES;

    [resignBtn setTitle:@"注册" forState:UIControlStateNormal];

    [resignBtn addTarget:self action:@selector(myBtnAction:) forControlEvents:UIControlEventTouchUpInside];

    [self.view addSubview:resignBtn];

    loginBtn = [[UIButton alloc]initWithFrame:CGRectMake(234, 280, 80, 50)];

    loginBtn.backgroundColor = [UIColor orangeColor];

    loginBtn.layer.cornerRadius = 20;

    loginBtn.layer.masksToBounds = YES;

    loginBtn.enabled = YES;

    [loginBtn setTitle:@"登陆" forState:UIControlStateNormal];

    [loginBtn addTarget:self action:@selector(myBtnAction:) forControlEvents:UIControlEventTouchUpInside];

    [self.view addSubview:loginBtn];

}

-(void)myBtnAction :(UIButton*)sender{

    if (sender== loginBtn){

        if ([nameField.text isEqualToString:@"Mazhongwei"]&&[passwordField.text isEqualToString:@"123456"]) {

            thirdtwoVC =[[ThirdtwoViewController alloc]init];

            [self.navigationController pushViewController: thirdtwoVC animated:YES];

        }else{

            UIAlertController *alt = [UIAlertController alertControllerWithTitle:@"错误信息" message:@"账户名或密码错误" preferredStyle:UIAlertControllerStyleAlert];

            [alt addAction:[UIAlertAction actionWithTitle:@"取消" style:UIAlertActionStyleDefault handler:^(UIAlertAction * _Nonnull action) {

            }]];

            [self presentViewController:alt animated:YES completion:nil];

        }

    }

}

-(void)touchesBegan:(NSSet *)touches withEvent:(UIEvent *)event{

    [nameField resignFirstResponder];

    [passwordField resignFirstResponder];

}

@end
5、ForthViewController.h:
#import "ForthViewController.h"

@interface ForthViewController ()

@end

@implementation ForthViewController

-(instancetype)init{

    if (self = [super init]) {

        self.title = @"文字展示";

        self.view.backgroundColor = [UIColor grayColor];

        [self.tabBarItem setImage:[UIImage imageNamed:@"pin_2_filled"]];

//        self.view.backgroundColor = [UIColor colorWithPatternImage:[UIImage imageNamed:@"4845745_195609329636_2.jpg"]];

    }

    return self;

}

- (void)viewDidLoad {

    [super viewDidLoad];

    UILabel *lab = [[UILabel alloc]initWithFrame:CGRectMake(0, 66, 414, 500)];

    lab.text = @"iOS7风格扁平化之后,圆角和圆形控件也随之被设计到APP中。最常见的是QQ应用中的用户头像,淘宝、天猫、京东应用的圆角和圆形按钮。APP使用圆角和圆形控件会让界面简介,也让用户视觉上有更好的感观。个人觉得圆角相比于正方形、长方形有棱角的界面美观。效果图说明:外面红色边框一个UIView的边框,其内紫色的圆是图片UIImageView,橙色的为一个标签UILabel。iOS7风格扁平化之后,圆角和圆形控件也随之被设计到APP中。最常见的是QQ应用中的用户头像,淘宝、天猫、京东应用的圆角和圆形按钮。APP使用圆角和圆形控件会让界面简介,也让用户视觉上有更好的感观。个人觉得圆角相比于正方形、长方形有棱角的界面美观。效果图说明:外面红色边框一个UIView的边框,其内紫色的圆是图片UIImageView,橙色的为一个标签UILabel。";

    lab.numberOfLines = 0;

    lab.lineBreakMode = NSLineBreakByClipping;

    [self.view addSubview:lab];

}

- (void)didReceiveMemoryWarning {

    [super didReceiveMemoryWarning];

}

/*

#pragma mark - Navigation

// In a storyboard-based application, you will often want to do a little preparation before navigation

- (void)prepareForSegue:(UIStoryboardSegue *)segue sender:(id)sender {

    // Get the new view controller using [segue destinationViewController].

    // Pass the selected object to the new view controller.

}

*/

@end
5、ForthViewController.m
 #import "ForthViewController.h"

 @interface ForthViewController ()

 @end

 @implementation ForthViewController

 -(instancetype)init{

     if (self = [super init]) {

         self.title = @"文字展示";

         self.view.backgroundColor = [UIColor grayColor];

         [self.tabBarItem setImage:[UIImage imageNamed:@"pin_2_filled"]];

 //        self.view.backgroundColor = [UIColor colorWithPatternImage:[UIImage imageNamed:@"4845745_195609329636_2.jpg"]];

     }

     return self;

 }

 - (void)viewDidLoad {

     [super viewDidLoad];

     UILabel *lab = [[UILabel alloc]initWithFrame:CGRectMake(, , , )];

     lab.text = @"iOS7风格扁平化之后,圆角和圆形控件也随之被设计到APP中。最常见的是QQ应用中的用户头像,淘宝、天猫、京东应用的圆角和圆形按钮。APP使用圆角和圆形控件会让界面简介,也让用户视觉上有更好的感观。个人觉得圆角相比于正方形、长方形有棱角的界面美观。效果图说明:外面红色边框一个UIView的边框,其内紫色的圆是图片UIImageView,橙色的为一个标签UILabel。iOS7风格扁平化之后,圆角和圆形控件也随之被设计到APP中。最常见的是QQ应用中的用户头像,淘宝、天猫、京东应用的圆角和圆形按钮。APP使用圆角和圆形控件会让界面简介,也让用户视觉上有更好的感观。个人觉得圆角相比于正方形、长方形有棱角的界面美观。效果图说明:外面红色边框一个UIView的边框,其内紫色的圆是图片UIImageView,橙色的为一个标签UILabel。";

     lab.numberOfLines = ;

     lab.lineBreakMode = NSLineBreakByClipping;

     [self.view addSubview:lab];

 }

 - (void)didReceiveMemoryWarning {

     [super didReceiveMemoryWarning];

 }

 /*

 #pragma mark - Navigation

 // In a storyboard-based application, you will often want to do a little preparation before navigation

 - (void)prepareForSegue:(UIStoryboardSegue *)segue sender:(id)sender {

     // Get the new view controller using [segue destinationViewController].

     // Pass the selected object to the new view controller.

 }

 */

 @end
最新文章
- 2016 华南师大ACM校赛 SCNUCPC 非官方题解
- SpringMVC源码分析系列
- pycharm的快捷方式
- malloc/free和new/delete的区别
- Office 2010 KMS激活原理和案例分享 - Your Office Solution Here - Site Home - TechNet Blogs
- 【ZZ】 移位贴图 Displacement Mapping
- C#中怎么在EXCEL中的单元格中画斜线啊 ??
- 在外国网站上看到一个用artoolKit做的demo,学习了用gcd创建单列
- VHDL学习之TEXTIO在仿真中的应用
- a^b的前n位数
- Element DOM Tree jQuery plugin – Firebug like functionality | RockingCode
- JS面向对象笔记二
- kotlin web开发教程【一】从零搭建kotlin与spring boot开发环境
- python 定时服务模块
- compact_op.go
- Java实现AES加密,异常java.security.InvalidKeyException: Illegal key size 的解决
- nodejs 利用zip-local模块压缩文件夹
- Web开发——JavaScript基础(JSON教程)
- 办公室的远程传文件 的命令三种方式linux
- C# Winform 按回车键查找下一个可设置焦点的组件