AppBar中自定义顶部导航
2024-09-29 11:30:26
在上一篇里总结AppBar的一些简单用法,但是AppBar除了有前面那些样式属性外,还能实现类似底部的Tab切换。
首先下载并运行前面的项目:
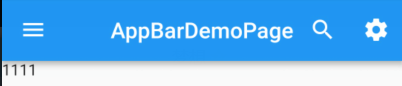
然后在此基础上实现Tab切换。
常见属性
TabBar有一下常见的属性:
- tabs :显示的标签内容,一般使用 Tab 对象,也可以是其他的 Widget
- controller :TabController 对象
- isScrollable :是否可滚动
- indicatorColor :指示器颜色
- indicatorWeight :指示器高度
- indicatorPadding :底部指示器的 Padding
- indicator :指示器 decoration,例如边框等
- indicatorSize :指示器大小计算方式,TabBarIndicatorSize.label 跟文字等宽,TabBarIndicatorSize.tab 跟每个 tab 等宽
- labelColor :选中 label 颜色
- labelStyle :选中 label 的 Style
- labelPadding :每个 label 的 padding 值
- unselectedLabelColor :未选中 label 颜色
- unselectedLabelStyle :未选中 label 的 Style
基本实现
为了实现顶部的Tabs切换,首先需要在Scaffold的外层定义一个DefaultTabController组件,然后组件里面定义tab的个数,最后将TabBar定义在AppBar里面的bottom属性中。根据这些,我们来修改前面的
AppBarDemo.dart页面。
import 'package:flutter/material.dart';
class AppBarDemoPage extends StatelessWidget {
const AppBarDemoPage({Key key}) : super(key: key);
@override
Widget build(BuildContext context) {
return DefaultTabController(
length:2 ,
child: Scaffold(
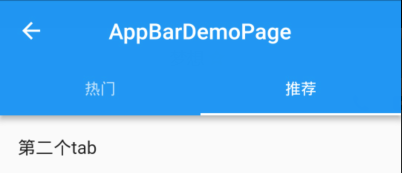
appBar: AppBar(
title:Text("AppBarDemoPage"),
// backgroundColor: Colors.red,
centerTitle:true,
leading: IconButton(
icon: Icon(Icons.menu),
onPressed: (){
print('menu');
},
),
actions: <Widget>[
IconButton(
icon: Icon(Icons.search),
onPressed: (){
print('search');
},
),
IconButton(
icon: Icon(Icons.settings),
onPressed: (){
print('settings');
},
)
],
bottom: TabBar(
tabs: <Widget>[
Tab(text: "热门"),
Tab(text: "推荐")
],
),
),
body: Text('1111'),
),
);
}
}
为了简化代码,删掉前面关于AppBar的属性设置:
AppBarDemo.dart
import 'package:flutter/material.dart';

class AppBarDemoPage extends StatelessWidget {

  const AppBarDemoPage({Key key}) : super(key: key);

  @override

  Widget build(BuildContext context) {

    return DefaultTabController(

      length:2 ,

      child: Scaffold(

        appBar: AppBar(

          title:Text("AppBarDemoPage"),

          centerTitle:true,

          bottom: TabBar(

            tabs: <Widget>[

              Tab(text: "热门"),

              Tab(text: "推荐")

            ],

          ),

        ),

        body: Text('1111'),

      ),

    );

  }

}
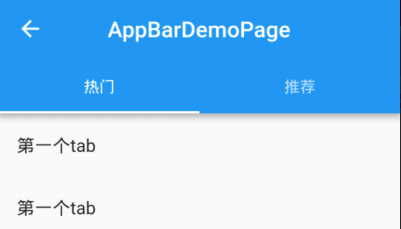
现在,只有跳转的按钮,却没有对应的页面组件,所以,还需要在body里面添加tabs切换的页面。
目前,是在一个新的页面添加了顶部Tabs切换,那么,如果需要在底部TabBar页面基础上添加Tabs切换,又该如何操作呢?
TabBar中添加顶部Tab切换
按照前面说的,在Scaffold的外层定义一个DefaultTabController组件,先这样修改Category.dart页面:
import 'package:flutter/material.dart';
class CategoryPage extends StatefulWidget {
CategoryPage({Key key}) : super(key: key);
_CategoryPageState createState() => _CategoryPageState();
}
class _CategoryPageState extends State<CategoryPage> {
@override
Widget build(BuildContext context) {
return DefaultTabController(
length: 4,
child: Scaffold(
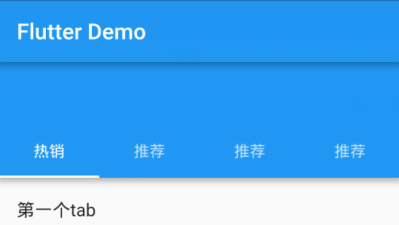
appBar: AppBar(
bottom:TabBar(
tabs: <Widget>[
Tab(text: "热销"),
Tab(text: "推荐"),
Tab(text: "推荐"),
Tab(text: "推荐")
],
) ,
),
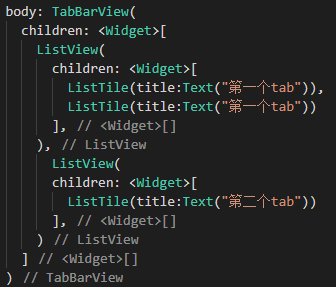
body:TabBarView(
children: <Widget>[
ListView(
children: <Widget>[
ListTile(title:Text("第一个tab")),
],
),
ListView(
children: <Widget>[
ListTile(title:Text("第二个tab")),
],
),
ListView(
children: <Widget>[
ListTile(title:Text("第三个tab")),
],
),
ListView(
children: <Widget>[
ListTile(title:Text("第四个tab")),
],
)
],
)
),
);
}
}
因为Category.dart是挂载到Tabs.dart中的,而在Tabs.dart中,已经有一个Scaffold组件和AppBar组件了,所以,继续添加顶部Tabs以后,就会有两个Scaffold组件和AppBar组件。

为了解决上面的问题,只需要将Tabs切换换个位置,移动到title所在的位置就可以了:
import 'package:flutter/material.dart';

class CategoryPage extends StatefulWidget {

  CategoryPage({Key key}) : super(key: key);

  _CategoryPageState createState() => _CategoryPageState();

}

class _CategoryPageState extends State<CategoryPage> {

  @override

  Widget build(BuildContext context) {

    return DefaultTabController(

      length: 4,

      child: Scaffold(

        appBar: AppBar(

          backgroundColor: Colors.black26,

          title: Row(

            mainAxisAlignment: MainAxisAlignment.center,

            children: <Widget>[

              Expanded(

                child:TabBar(
isScrollable: true, //多个Tab的时候,可以实现滑动和联动
                  indicatorColor:Colors.blue,

                  labelColor:Colors.blue,

                  unselectedLabelColor: Colors.white,

                  indicatorSize:TabBarIndicatorSize.label ,

                  tabs: <Widget>[

                    Tab(text: "热销"),

                    Tab(text: "推荐"),

                    Tab(text: "推荐"),

                    Tab(text: "推荐")

                  ],

                ) ,

              )

            ],

          ),

        ),

        body:TabBarView(

          children: <Widget>[

            ListView(

                children: <Widget>[

                  ListTile(title:Text("第一个tab")),

                ],

              ),

            ListView(

                children: <Widget>[

                  ListTile(title:Text("第二个tab")),

                ],

              ),

              ListView(

                children: <Widget>[

                  ListTile(title:Text("第三个tab")),

                ],

              ),

            ListView(

                children: <Widget>[

                  ListTile(title:Text("第四个tab")),

                ],

              )

          ],

        )

      ),

    );

  }

}

代码下载:点这里(提取码:vcb5)
最新文章
- C#设计模式之工厂方法
- jquery点击元素之外触发事件
- mongkeyrunner实现循环随机输入值的方法
- 基于Metronic的Bootstrap开发框架经验总结(8)--框架功能总体界面介绍
- poj1637 Sightseeing tour
- Sublime text插件使用技巧
- Java 入门基础
- VS调试Ajax
- [转载] ubuntu Authentication failure
- cer证书签名验证
- 快速用Markdown排版一篇文章
- 【linux】之查看磁盘占用情况
- docker 搭建简易仓库registry
- UEditor上传自定义文件夹
- 两个1/x类的广义函数
- SyntaxHighlighter行号显示错误问题解决方案
- nRF52832-GPIOTE部分
- FastJson遇见的问题或项目实战中优化的问题,看源码都可以解决
- MongoDB之集合管理一
- systemd启动多实例