iOS边练边学--自定义等高的cell
一、storyboard自定义cell
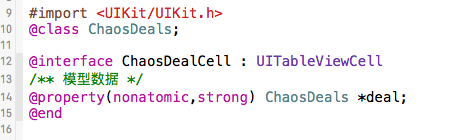
<1>创建一个继承自UITableViewCell的子类,比如ChaosDealCell

<2>在storyboard中
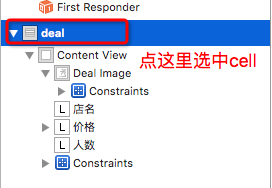
<2.1>往cell里面增加需要用到的子控件

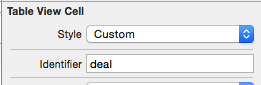
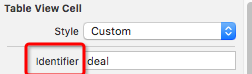
<2.2>设置cell的重用标识
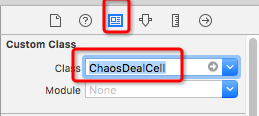
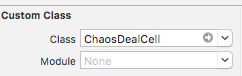
<2.3>设置cell的class为ChaosDealCell
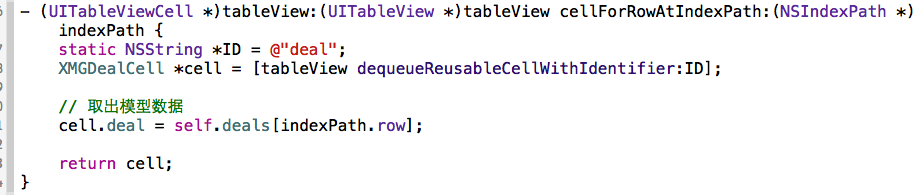
<3>在控制器中
<3.1>利用重用标识找到cell并且给cell传递模型数据
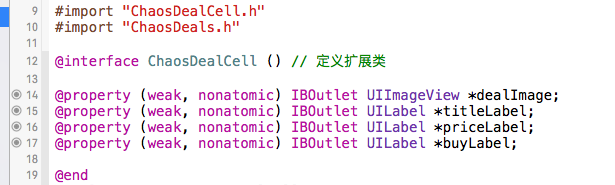
<4>在ChaosDealCell中
<4.1>将storyboard中的子控件连线到类扩展中
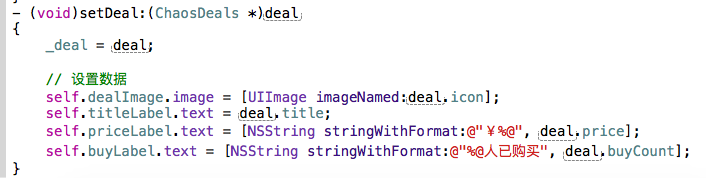
<4.2>需要提供一个模型属性,重写模型的set方法,在这个方法中设置模型数据到子控件上
二、Xib自定义cell
<1>创建一个继承自UITableViewCell的子类,比如ChaosDealCell
<2>创建一个xib文件(文件名建议跟cell的类名一样),比如ChaosDealCell.xib
<2.1>拖拽一个UITableViewCell出来
<2.2>修改cell的class为ChaosDealCell,,设置cell的重用标识
<2.3>往cell中添加需要用到的子控件
<3>在控制器中,别忘了给cell传递模型数数据
<方法一:>利用registerNib...方法注册xib文件
 - (void)viewDidLoad {

     [super viewDidLoad];

 //    [self.tableView registerNib:[UINib nibWithNibName:NSStringFromClass([ChaosDealCell class]) bundle:nil] forCellReuseIdentifier:@"deal"];

     // 分成两步写

     // 1.加载Nib

     UINib *nib = [UINib nibWithNibName:NSStringFromClass([ChaosDealCell class]) bundle:[NSBundle mainBundle]];

     // 注册cell

     [self.tableView registerNib:nib forCellReuseIdentifier:@"deal"];

 }
<方法二:>利用重用标识找到cell(如果没有注册xib文件,就需要手动加载xib文件)
 // 告诉tableView返回什么样的cell

 - (UITableViewCell *)tableView:(UITableView *)tableView cellForRowAtIndexPath:(NSIndexPath *)indexPath

 {

     // 获取对应行的数据

 //    ChaosDeals *deal = self.deals[indexPath.row];

     // 根据tableView从缓存池中拿cell

     ChaosDealCell *cell = [tableView dequeueReusableCellWithIdentifier:@"deal"];

     if (cell == nil) {

         cell = [[[NSBundle mainBundle] loadNibNamed:NSStringFromClass([ChaosDealCell class]) owner:nil options:nil] lastObject];

     }

     cell.deal = self.deals[indexPath.row];

     return cell;

 }
<4>在ChaosDealCell中
<4.1>将xib中的子控件连线到类扩展中
<4.2>需要提供一个模型属性,重写模型的set方法,在这个方法中设置模型数据到子控件上
<4.3>也可以将创建获得cell的代码封装起来(比如cellWithTableView:方法)
 + (instancetype)cellWithTableView:(UITableView *)tableView

 {

     ChaosDealCell *cell = [tableView dequeueReusableCellWithIdentifier:@"deal"];

     if (cell == nil) {

         cell = [[[NSBundle mainBundle] loadNibNamed:NSStringFromClass([ChaosDealCell class]) owner:nil options:nil] lastObject];

     }

     return cell;

 }
三、代码自定义cell(使用frame)
<1>创建一个集成自UITableViewCell的子类,比如ChaosDealCell
<1.1>在initWithStyle:reuseIdentifier:方法中
*添加子控件
*设置子空间的初始化属性(比如文字颜色、字体)
<1.2>在layoutSubviews方法中设置子控件的frame
<1.3>需要提供一个模型属性,重写模型的set方法,在这个方法中设置模型数据到子控件
<2>在控制器中
<2.1>利用registerClass...方法注册ChaosDealCell类
<2.2>利用重用标识找到cell(如果没有注册类,就需要手动创建cell)
<2.3>给cell传递模型数据
<2.4>也可以将创建获得cell的代码封装起来(比如cellWithTableView:方法)
 #import "XMGDealCell.h"

 #import "XMGDeal.h"

 @interface XMGDealCell()

 @property (weak, nonatomic) UIImageView *iconView;

 @property (weak, nonatomic) UILabel *titleLabel;

 @property (weak, nonatomic) UILabel *priceLabel;

 @property (weak, nonatomic) UILabel *buyCountLabel;

 @end

 @implementation XMGDealCell

 + (instancetype)cellWithTableView:(UITableView *)tableView

 {

     static NSString *ID = @"deal";

     // 创建cell

     XMGDealCell *cell = [tableView dequeueReusableCellWithIdentifier:ID];

 //    if (cell == nil) {

 //        cell = [[XMGDealCell alloc] initWithStyle:UITableViewCellStyleDefault reuseIdentifier:ID];

 //    }

     return cell;

 }

 // 1.在initWithStyle:reuseIdentifier:方法中添加子控件

 - (instancetype)initWithStyle:(UITableViewCellStyle)style reuseIdentifier:(NSString *)reuseIdentifier

 {

     if (self = [super initWithStyle:style reuseIdentifier:reuseIdentifier]) {

         UIImageView *iconView = [[UIImageView alloc] init];

         [self.contentView addSubview:iconView];

         self.iconView = iconView;

         UILabel *titleLabel = [[UILabel alloc] init];

         [self.contentView addSubview:titleLabel];

         self.titleLabel = titleLabel;

         UILabel *priceLabel = [[UILabel alloc] init];

         priceLabel.textColor = [UIColor orangeColor];

         [self.contentView addSubview:priceLabel];

         self.priceLabel = priceLabel;

         UILabel *buyCountLabel = [[UILabel alloc] init];

         buyCountLabel.textAlignment = NSTextAlignmentRight;

         buyCountLabel.font = [UIFont systemFontOfSize:];

         buyCountLabel.textColor = [UIColor lightGrayColor];

         [self.contentView addSubview:buyCountLabel];

         self.buyCountLabel = buyCountLabel;

     }

     return self;

 }

 // 2.在layoutSubviews方法中设置子控件的frame

 - (void)layoutSubviews

 {

     [super layoutSubviews];

     CGFloat contentH = self.contentView.frame.size.height;

     CGFloat contentW = self.contentView.frame.size.width;

     CGFloat margin = ;

     CGFloat iconX = margin;

     CGFloat iconY = margin;

     CGFloat iconW = ;

     CGFloat iconH = contentH -  * iconY;

     self.iconView.frame = CGRectMake(iconX, iconY, iconW, iconH);

     // titleLabel

     CGFloat titleX = CGRectGetMaxX(self.iconView.frame) + margin;

     CGFloat titleY = iconY;

     CGFloat titleW = contentW - titleX - margin;

     CGFloat titleH = ;

     self.titleLabel.frame = CGRectMake(titleX, titleY, titleW, titleH);

 //    CGRectMake(titleX, titleY, titleW, titleH);

     // priceLabel

     CGFloat priceX = titleX;

     CGFloat priceH = ;

     CGFloat priceY = contentH - margin - priceH;

     CGFloat priceW = ;

     self.priceLabel.frame = CGRectMake(priceX, priceY, priceW, priceH);

     // buyCountLabel

     CGFloat buyCountH = priceH;

     CGFloat buyCountY = priceY;

     CGFloat buyCountX = CGRectGetMaxX(self.priceLabel.frame) + margin;

     CGFloat buyCountW = contentW - buyCountX - margin;

     self.buyCountLabel.frame = CGRectMake(buyCountX, buyCountY, buyCountW, buyCountH);

 }

 // 3.重写模型的set方法

 - (void)setDeal:(XMGDeal *)deal

 {

     _deal = deal;

     // 设置数据

     self.iconView.image = [UIImage imageNamed:deal.icon];

     self.titleLabel.text = deal.title;

     self.priceLabel.text = [NSString stringWithFormat:@"¥%@", deal.price];

     self.buyCountLabel.text = [NSString stringWithFormat:@"%@人已购买", deal.buyCount];

 }

 @end
四、代码自定义cell(使用autolayout)
<1>创建一个集成自UITableViewCell的子类,比如ChaosDealCell
<1.1>在initWithStyle:reuseIdentifier:方法中
*添加子控件
*添加子控件的约束(建议使用Masonry)
*设置子空间的初始化属性(比如文字颜色、字体)
<1.2>在layoutSubviews方法中设置子控件的frame
<1.3>需要提供一个模型属性,重写模型的set方法,在这个方法中设置模型数据到子控件
<2>在控制器中
<2.1>利用registerClass...方法注册ChaosDealCell类
<2.2>利用重用标识找到cell(如果没有注册类,就需要手动创建cell)
<2.3>给cell传递模型数据
<2.4>也可以将创建获得cell的代码封装起来(比如cellWithTableView:方法)
 // 1.在initWithStyle:reuseIdentifier:方法中添加子控件

 - (instancetype)initWithStyle:(UITableViewCellStyle)style reuseIdentifier:(NSString *)reuseIdentifier

 {

     if (self = [super initWithStyle:style reuseIdentifier:reuseIdentifier]) {

         CGFloat margin = ;

         UIImageView *iconView = [[UIImageView alloc] init];

         [self.contentView addSubview:iconView];

         self.iconView = iconView;

         [iconView makeConstraints:^(MASConstraintMaker *make) {

             make.width.equalTo();

             make.left.top.offset(margin);

             make.bottom.offset(-margin);

         }];

         UILabel *titleLabel = [[UILabel alloc] init];

         [self.contentView addSubview:titleLabel];

         self.titleLabel = titleLabel;

         [titleLabel makeConstraints:^(MASConstraintMaker *make) {

             make.top.equalTo(iconView);

             make.left.equalTo(iconView.right).offset(margin);

             make.right.offset(-margin);

         }];

         UILabel *priceLabel = [[UILabel alloc] init];

         priceLabel.textColor = [UIColor orangeColor];

         [self.contentView addSubview:priceLabel];

         self.priceLabel = priceLabel;

         [priceLabel makeConstraints:^(MASConstraintMaker *make) {

             make.left.equalTo(titleLabel);

             make.bottom.equalTo(iconView);

             make.width.equalTo();

         }];

         UILabel *buyCountLabel = [[UILabel alloc] init];

         buyCountLabel.textAlignment = NSTextAlignmentRight;

         buyCountLabel.font = [UIFont systemFontOfSize:];

         buyCountLabel.textColor = [UIColor lightGrayColor];

         [self.contentView addSubview:buyCountLabel];

         self.buyCountLabel = buyCountLabel;

         [buyCountLabel makeConstraints:^(MASConstraintMaker *make) {

             make.bottom.equalTo(priceLabel);

             make.right.equalTo(titleLabel);

             make.left.equalTo(priceLabel.right).offset(margin);

         }];

     }

     return self;

 }
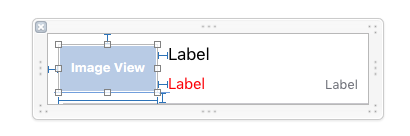
练习效果图

最新文章
- Linux系统负载排查
- jQuery1.9.1源码分析--Events模块
- hdu4427Math Magic
- SQL中VARCHAR与NVARCHAR存储区别
- LeetCode: JumpGame 1 and 2
- 转(HP大中华区总裁孙振耀退休感言)
- NGUI系列教程四(自定义Atlas,Font)
- 什么是TimeTunnel
- Android获取设备採用的时间制式(12小时制式或24小时制式)
- 聊一聊JQ中delegate事件委托的好处
- 【转载】小tips: PC端传统网页试试使用Zepto.js进行开发
- 二、VueJs 填坑日记之基础项目构建
- js判断一个图片是否已经存在于缓存
- [UE4]从零开始构建VR角色
- jzoj4313 电话线铺设(最小生成树+最近公共祖先)
- Jenkins 忘记admin用户名以及密码
- 关于dict的formkeys方法注意
- html10
- 微信小程序——3、逻辑js文件
- supervisord部署