【Ray Tracing The Next Week 超详解】 光线追踪2-6 Cornell box
Chapter 6:Rectangles and Lights
今天,我们来学习长方形区域光照
先看效果
light
首先我们需要设计一个发光的材质
/// light.hpp

// -----------------------------------------------------

// [author]        lv

// [begin ]        2019.1

// [brief ]        the areaLight-class for the ray-tracing project

//                from the 《ray tracing the next week》

// -----------------------------------------------------

#pragma once

namespace rt

{

//the statement of areaLight class

class areaLight :public material

    {

public:

    areaLight() {  }

    areaLight(texture* mat) :_emit(mat) {  }

    virtual bool scatter(const ray& InRay, const hitInfo& info, rtvec& attenuation, ray& scattered)const { return false; }

    virtual rtvec emitted(rtvar u, rtvar v, const rtvec& p)const { return _emit->value(u, v, p); }

private:

    texture* _emit;

    };

} // rt namespace
关于设计方面,我们需要把发光函数设为可继承虚函数,基类也要添加,但是不是所有的材质都需要发光,所以,基类中的发光函数并不需要设置为纯虚
/// material.hpp

// -----------------------------------------------------

// [author]        lv

// [begin ]        2018.12

// [brief ]        the material-class for the ray-tracing project

//                from the 《ray tracing in one week》

// -----------------------------------------------------

#pragma once

namespace rt

{

// the statement of material class

class material

    {

public:

    /*

    @brief: produce a scattered ray

    @param: InRay -> Incident light

            info -> the information of intersect-point(hit-point)

            attenuation -> when scattered, how much the ray should be attenuated by tis reflectance R

            scattered -> as we talk, it is a new sight; or

                         it is the scattered ray with the intersect-point

    @retur: the function calculate a scattered ray or not

    */

    virtual bool scatter(const ray& InRay, const hitInfo& info, rtvec& attenuation, ray& scattered)const = ;

    /*

    @brief: 自发光

    @param: 纹理所需信息

    @retur: 纹理像素值

    */

    virtual rtvec emitted(rtvar u, rtvar v, const rtvec& p)const { return rtvec(); }

    };

}
这样的话,一般的材质继承之后,发光为黑色即不发光,较为合理
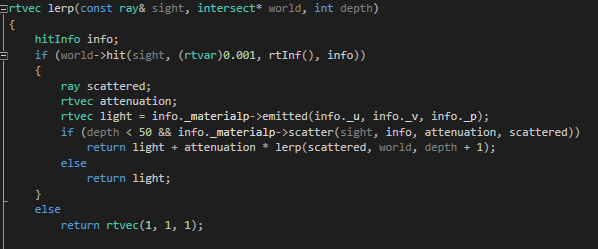
我们既然添加了光照,那么计算插值函数时候也要将它加进去
到此,我们的发光材质就设置妥当了
rectangle
我们定义的长方形均为平行于轴的
(引用书上一张图)
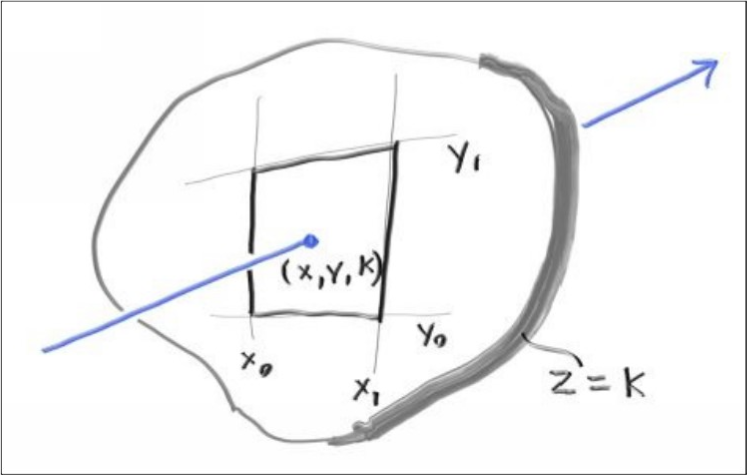
假设长方形位于 z = k 平面,x和y边界如上,交点为P(x,y,k)
我们如何确定光线参数t?
已知:
光线:p(t) = eye + t * direction
则,z方向的方程为:z(t) = eye.z + t * direction.z
那么,若满足z = k,则
t = (k - eye.z) / direction.z
同理可得x和y的等式
如果,得到的x坐标或者y坐标不在边界之内,那么就没有相交,反之则光线和长方形相交
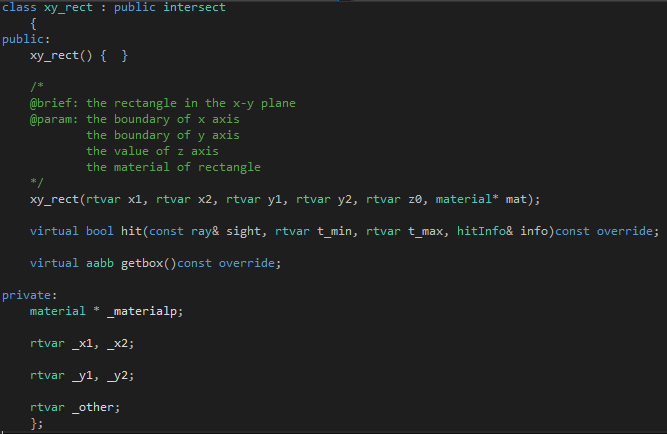

上面的代码都比较简单,那个 hit 呢,就是,根据已知的一个分量求出t,然后,把这个解带入求出对应的其他两个分量,如果其他两个分量不在边界内,那么返回false
反之,我们求取该点的纹理坐标,以及其他碰撞点信息记录之
获取包围盒嘛,理论上面无厚薄,线无粗细,但是实际中面有厚薄,我们可以将厚度设置为0.0002,以此模拟理论厚度
同理写出其他两个平面类即可。
这个没什么问题,我们就往下进行
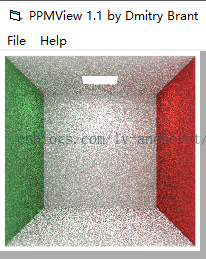
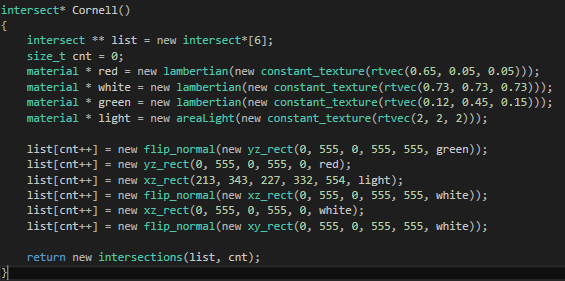
我们来做Cornell box

相机参数设置:

得到的图如下:
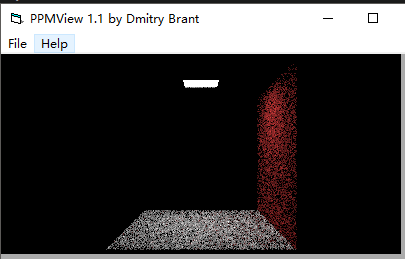
有几个面是黑色的??也就是根本没画出来
我们细细看一下,发现,长方形的法向量是关键
比如画出来的红墙,对面与之平行的面的法线是朝左边的,展现在我们视线中的是背面
所以,我们有时候需要反转一下法向量
/// flip_normal.hpp

// -----------------------------------------------------

// [author]        lv

// [begin ]        2019.1

// [brief ]        the flip_normal-class for the ray-tracing project

//                from the 《ray tracing the next week》

// -----------------------------------------------------

#pragma once

namespace rt

{

class flip_normal: public intersect

    {

public:

    flip_normal(intersect * p) :_p(p) {  }

    virtual bool hit(const ray& sight, rtvar t_min, rtvar t_max, hitInfo& info)const override

        {

        if (_p->hit(sight, t_min, t_max, info))

            {

            info._n = -info._n;

            return true;

            }

        return false;

        }

    virtual aabb getbox()const override

        {

        return _p->getbox();

        }

private:

    intersect* _p;

    };

} // rt namespace
这样就可以了,我们改一下场景
如下:

此外,我们还需要注意的是,light对应的纹理中的数值越大光强越强
我们可以试一下
material * light = new areaLight(new constant_texture(rtvec(, , )));
如下:
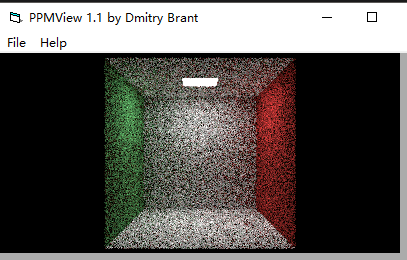
可以看出来两张图对比之下,第二张亮多了
但是我们依旧看着很不舒服,好多黑点点,太难受了
我想啊想,为什么这么多黑点??可能是因为背景是黑色的,毕竟是漫反射,如果随机反射失败那就是黑色,所以随机反射点可能产生好多黑色小点,你千万别想着换成镜面材质,那个更无语
所以啊,我想了下,把背景改为白色,那样更好,毕竟色彩中掺杂一点白色,无伤大雅
如是,我改了下,效果可观
此法只适用于Cornell box本身,具体场景下的画面优化请见下一篇

感谢您的阅读,生活愉快~
最新文章
- dataset 修改小数点位数
- oracle中merge方法
- 5.String
- poi批量导入excel文件
- mysql 常用查询
- mvc model 传值两种方式区别
- GridView 和ListView中自适应高度
- 51nod1089最长回文子串V2
- 【设计模式 - 2】之单例模式(Singleton)
- nodejs之简介及安装(一)
- 怎么在Ubuntu Scope中获取location地址信息
- SQL Server基础之表级触发器
- Gogs 部署安装(Linux)
- 【C语言】 重拾
- webpack4升级extract-text-webpack-plugin和UglifyJsPlugin问题
- es_5.4.4 reinstall log and upgrade to V6.5.4--APM
- POJ - 1474 :Video Surveillance (半平面交-求核)
- .NET本质论 方法
- Python 模块EasyGui详细介绍
- 2、let 和 const 命令