软件光栅器实现(四、OBJ文件加载)
本节介绍软件光栅器的OBJ和MTL文件加载,转载请注明出处。
在管线的应用程序阶段,我们需要设置光栅器所渲染的模型数据。这些模型数据包括模型顶点的坐标、纹理、法线和材质等等,可以由我们手动编写,也可以通过文件读取。OBJ文件就是一种常用的存储模型数据的文件格式,它内部包含有所有渲染所需的信息。
比如:
mtllib myteapot.mtl 表示模型的材质文件名
v 7.0000 12.0000 -0.0000 顶点位置
vn 0.9667 -0.2557 0.0105 法线向量
vt 0.5000 1.9000 0.0000 纹理坐标
f 1/1/1 2/2/2 3/3/3 f开头的行,表示一个三角面的三个顶点信息索引值,比如1/1/1表示顶点索引1的点,法线信息取vn的第1个,纹理信息取vt的第1个。
在模型加载时调用相关方法,从设定的路径读取obj文件即可:
    GeometryGenerator::GetInstance()->LoadOBJModel(m_box, "Models/myteapot.obj");

//从obj文件加载茶壶模型 Models/myteapot.obj Models/probeColor.obj
其中m_box为自定义的网格数据结构GeometryGenerator::MeshData* :
class GeometryGenerator

{

private:

    GeometryGenerator() {}

public:

    static GeometryGenerator* GetInstance()//饿汉

    {

        static GeometryGenerator instance;

        return &instance;

    }

    //基本网络结构:顶点集合+索引集合

    struct MeshData

    {

        std::vector<VertexIn>    vertices;

        std::vector<UINT>    indices;

    };

    //创建一个立方体:指定宽(X方向)、高(Y方向)、深(Z方向)

    void CreateBox(float width, float height, float depth, MeshData &mesh);

    void LoadOBJModel(MeshData &mesh, char* filename);

};
LoadOBJModel()方法就是用于加载OBJ文件的核心方法:
void GeometryGenerator::LoadOBJModel(MeshData &mesh,char* filename){

    //载入obj文件,获取顶点纹理法线数据

    ObjParser* pObjParser = new ObjParser();

    pObjParser->SetFileName(filename);//myteapot.obj probeColor

    pObjParser->ReadFileCounts();//统计顶点纹理和法线数mVertexCount、mTexcoordCount等等

    //将数据传入顶点、纹理、法线和面数组

    // After get enough memory, clear these counts to 0, use it as index

    VertexType* vertices = new VertexType[pObjParser->mVertexCount];

    VertexType* texcoords = new VertexType[pObjParser->mTexcoordCount];

    VertexType* normals = new VertexType[pObjParser->mNormalCount];

    FaceType* faces = new FaceType[pObjParser->mFaceCount];

    std::ifstream fin;

    fin.open(pObjParser->mInFile);

    if (fin.fail())

    {

        pObjParser->mErr << "Open input file : Failed." << std::endl;

        return;

    }

    char input;

    char ignore;

    int iver = , itex = , inor = , ifac = ;

    fin.get(input);

    while (!fin.eof())

    {

        if (input == 'v')

        {

            fin.get(input);

            switch (input)

            {

            case ' ':

            {

                fin >> vertices[iver].x >> vertices[iver].y >> vertices[iver].z;//写入顶点数组

                //vertices[iver].z *= -1.0f;  // RH->LH

                iver++;

                break;

            }

            case 't':

            {

                fin >> texcoords[itex].x >> texcoords[itex].y >>texcoords[itex].z;//写入纹理数组

                //texcoords[itex].y = 1.0f - texcoords[itex].y;  // RH->LH

                itex++;

                break;

            }

            case 'n':

            {

                fin >> normals[inor].x >> normals[inor].y >> normals[inor].z;//写入法线数组

                //normals[inor].z *= -1.0f; // RH->LH

                inor++;

                break;

            }

            }

        }

        if (input == 'f')

        {

            fin.get(input);

            if (input == ' ')

            {//写入三角面的数组,换个旋转方向,要不然会被背面剔除

                fin >> faces[ifac].vIndex1 >> ignore >> faces[ifac].tIndex1 >> ignore >> faces[ifac].nIndex1;

                fin >> faces[ifac].vIndex2 >> ignore >> faces[ifac].tIndex2 >> ignore >> faces[ifac].nIndex2;

                fin >> faces[ifac].vIndex3 >> ignore >> faces[ifac].tIndex3 >> ignore >> faces[ifac].nIndex3;

                ifac++;

            }

        }

        while (input != '\n')

            fin.get(input);

        fin.get(input);

    }

    fin.close();

    //以上代码将数据读取到vertices、texcoords、normals和faces数组中

    mesh.vertices.clear();

    mesh.indices.clear();

    mesh.vertices.resize(pObjParser->mFaceCount * );

    //一共36个索引(每面6个)

    mesh.indices.resize(pObjParser->mFaceCount * );

    int i = , j = ;

    for (; i < pObjParser->mFaceCount * ;){

        mesh.indices[i] = i;

        mesh.indices[i + ] = i + ;

        mesh.indices[i + ] = i + ;

        mesh.vertices[i].pos.x = vertices[faces[j].vIndex1 - ].x;//绑定顶点坐标

        mesh.vertices[i].pos.y = vertices[faces[j].vIndex1 - ].y;

        mesh.vertices[i].pos.z = vertices[faces[j].vIndex1 - ].z;

        mesh.vertices[i].pos.w = ;

        ZCVector tmp1 = mesh.vertices[i].pos;

        mesh.vertices[i].tex.u = texcoords[faces[j].tIndex1 - ].x;//绑定纹理坐标

        mesh.vertices[i].tex.v = texcoords[faces[j].tIndex1 - ].y;

        mesh.vertices[i].normal.x = normals[faces[j].nIndex1 - ].x;//绑定法线

        mesh.vertices[i].normal.y = normals[faces[j].nIndex1 - ].y;

        mesh.vertices[i].normal.z = normals[faces[j].nIndex1 - ].z;

        mesh.vertices[i].normal.w = ;

        mesh.vertices[i].color = ZCVector(.f, .f, .f, .f);//绑定颜色

        mesh.vertices[i].color = ZCVector(.f, .f, .f, .f);

        mesh.vertices[i].color = ZCVector(.f, .f, .f, .f);

        mesh.vertices[i + ].pos.x = vertices[faces[j].vIndex2 - ].x;

        mesh.vertices[i + ].pos.y = vertices[faces[j].vIndex2 - ].y;

        mesh.vertices[i + ].pos.z = vertices[faces[j].vIndex2 - ].z;

        mesh.vertices[i + ].pos.w = ;

        ZCVector tmp2 = mesh.vertices[i+].pos;

        mesh.vertices[i + ].tex.u = texcoords[faces[j].tIndex2 - ].x;

        mesh.vertices[i + ].tex.v = texcoords[faces[j].tIndex2 - ].y;

        mesh.vertices[i + ].normal.x = normals[faces[j].nIndex2 - ].x;

        mesh.vertices[i + ].normal.y = normals[faces[j].nIndex2 - ].y;

        mesh.vertices[i + ].normal.z = normals[faces[j].nIndex2 - ].z;

        mesh.vertices[i + ].normal.w = ;

        mesh.vertices[i + ].color = ZCVector(.f, .f, .f, .f);

        mesh.vertices[i + ].color = ZCVector(.f, .f, .f, .f);

        mesh.vertices[i + ].color = ZCVector(.f, .f, .f, .f);

        mesh.vertices[i + ].pos.x = vertices[faces[j].vIndex3 - ].x;

        mesh.vertices[i + ].pos.y = vertices[faces[j].vIndex3 - ].y;

        mesh.vertices[i + ].pos.z = vertices[faces[j].vIndex3 - ].z;

        mesh.vertices[i + ].pos.w = ;

        ZCVector tmp3 = mesh.vertices[i+].pos;

        mesh.vertices[i + ].tex.u = texcoords[faces[j].tIndex3 - ].x;

        mesh.vertices[i + ].tex.v = texcoords[faces[j].tIndex3 - ].y;

        mesh.vertices[i + ].normal.x = normals[faces[j].nIndex3 - ].x;

        mesh.vertices[i + ].normal.y = normals[faces[j].nIndex3 - ].y;

        mesh.vertices[i + ].normal.z = normals[faces[j].nIndex3 - ].z;

        mesh.vertices[i + ].normal.w = ;

        mesh.vertices[i + ].color = ZCVector(.f, .f, .f, .f);

        mesh.vertices[i + ].color = ZCVector(.f, .f, .f, .f);

        mesh.vertices[i + ].color = ZCVector(.f, .f, .f, .f);

        i += ;

        j++;

    }

}
以上代码,先遍历一遍,将该obj文件的顶点数量、纹理数量等等计算出来,确定各属性数组的大小;然后再遍历一遍obj文件的索引,将将数据读取到vertices、texcoords、normals和faces数组中;然后第三次遍历时,根据f开头的行表示的索引,将顶点信息组装成mesh网格信息。
其中ReadFileCounts()方法用于遍历一遍顶点,记录下该obj文件的顶点数量、纹理数量等等:
bool ObjParser::ReadFileCounts()

{

    char input;

    std::ifstream fin;

    fin.open(mInFile);

    if (fin.fail())

    {

        mErr << "Open input file : Failed." << std::endl;

        return false;

    }

    fin.get(input);

    while (!fin.eof())

    {

        if (input == 'v')

        {

            fin.get(input);

            switch (input)

            {

                case ' ':

                {

                    mVertexCount++;

                    break;

                }

                case 't':

                {

                    mTexcoordCount++;

                    break;

                }

                case 'n':

                {

                    mNormalCount++;

                    break;

                }

            }

        }

        if (input == 'f')

        {

            fin.get(input);

            if (input == ' ')

                mFaceCount++;

        }

        // otherwise read in the remainder of the line.

        while (input != '\n')

            fin.get(input);

        // start reading the beginning of the next line.

        fin.get(input);

    }

    fin.close();

    return true;

}
在导入OBJ模型后,还可以导入mtl材质文件,mtl文件一般可以通过3dsMax生成模型时设置附带生成,记录了模型的材质信息。光栅器中通过该方法导入:
LoadMaterial("Models/myteapot.mtl");//从mtl文件获得bmp纹理贴图的位置,获取模型的材质 3dsmax导出myteapot.mtl
LoadMaterial()方法的实现:
void BoxDemo::LoadMaterial(char* fileName){

    std::stringstream ss;

    string mtlfile;

    ss << fileName;

    ss >> mtlfile;

    std::ifstream fin;

    std::ofstream mErr;

    fin.open(mtlfile);

    if (fin.fail())

    {

        mErr << "Open input file : Failed." << std::endl;

    }

    char input;

    fin.get(input);

    while (!fin.eof())

    {

        if (input == '\t'){

            fin.get(input);

        }

        if (input == 'K')

        {

            fin.get(input);

            switch (input)

            {

            case 'a':

            {

                //fin >> vertices[mVertexCount].x >> vertices[mVertexCount].y >> vertices[mVertexCount].z;

                fin >> m_material.ambient.x >> m_material.ambient.y >> m_material.ambient.z;

                break;

            }

            case 'd':

            {

                fin >> m_material.diffuse.x >> m_material.diffuse.y >> m_material.diffuse.z;

                break;

            }

            case 's':

            {

                fin >> m_material.specular.x >> m_material.specular.y >> m_material.specular.z;

                m_material.specular.w = .f;

                break;

            }

            }

        }

        if (input == 'm'){

            fin.get(input); fin.get(input); fin.get(input); fin.get(input); fin.get(input);

            if (input == 'd'){//获得漫反射贴图

                fin.get(input); fin.get(input);

                stringstream ss2;

                while (input != '\n'){

                    ss2 << input;

                    fin.get(input);

                }

                ss2 >> bmplocation;

            }

        }

        // otherwise read in the remainder of the line.

        while (input != '\n')

            fin.get(input);

        // start reading the beginning of the next line.

        fin.get(input);

    }

}
以上代码通过遍历mtl材质文件,将指向该模型的环境光系数、漫反射系数、镜面反射系数、高光系数和纹理、法线贴图等路径加载到光栅器维护的数据容器中,供之后的PS像素着色器阶段使用。
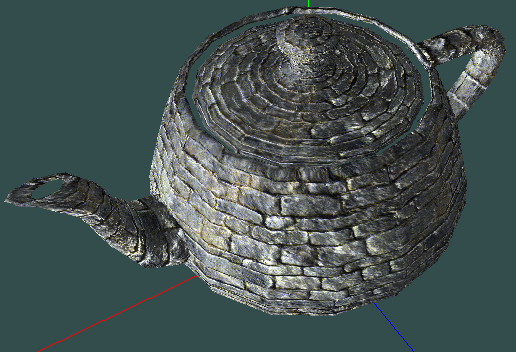
myteapot.obj和myteapot.mtl文件最终的渲染效果:
(完)
最新文章
- Java获取用户ip
- 使用 nvm 管理不同版本的 node 与 npm
- 用javascript简单封装AJAX
- JavaWeb学习总结(二)—http协议
- ASP isPostBack
- soapUI的使用
- (转载)Jvm工作原理学习笔记
- Spring AOP实现声明式事务代码分析
- 在实际项目中使用LiteDB NoSQL数据库
- Mac下安装Homebrew并升级subversion
- (NO.00001)iOS游戏SpeedBoy Lite成形记(七)
- CentOS 7更改yum源与更新系统
- 【原创】分布式之elk日志架构的演进
- 课程四(Convolutional Neural Networks),第一周(Foundations of Convolutional Neural Networks) —— 3.Programming assignments:Convolutional Model: application
- 实现图片旋转木马3D浏览效果
- Codechef MGCHGYM Misha and Gym 容斥、背包、Splay
- Eclipse的配置
- java 读取clob
- MD5验签同一字符串得到不同的MD5签名值可能问题之一
- WebApi Owin SelfHost OAuth2 - client_credentials