Spring Boot进阶系列一
笔者最近在总结一个 Spring Boot实战系列,以方便将来查找和公司内部培训用途。
1.Springboot从哪里来
SpringBoot是由Pivotal团队在2013年开始研发、2014年4月发布第一个版本的全新开源的轻量级框架。它基于Spring4.0设计,不仅继承了Spring框架原有的优秀特性,而且还通过简化配置来进一步简化了Spring应用的整个搭建和开发过程。另外SpringBoot通过集成大量的框架使得依赖包的版本冲突,以及引用的不稳定性等问题得到了很好的解决。
其主要的优势如下:
- 创建独立的Spring Web应用程序
- 嵌入的Tomcat,Jetty或者Undertow,无须部署WAR文件就可以直接运行。
- 简化Maven或Gradle配置
- 自动配置Spring
- 开箱即用,没有代码生成,也无需XML配置. 通过在MAVEN项目的pom.xml文件中添加相关依赖包,然后使用对应注解来代替繁琐的XML配置文件以管理对象的生命周期.
- 约定优于配置(Convention over configuration) 是一种由SpringBoot本身来配置目标结构,由开发者在结构中添加信息的软件设计范式. 减少了开发人员需要做出决定的数量,同时减少了大量的XML配置,并且可以将代码编译、测试和打包等工作自动化。
Springboot官网目前推荐的版本是2.1.7. 如果是刚开始使用Springboot,那么从2.X开始无疑是最好的选择。
当下大多数公司的生产环境的版本应该是1.X系列。官方最后的1.X版本落在1.5.22.
https://spring.io/blog/2019/08/06/it-is-time-goodbye-spring-boot-1-x
2.开发环境
- Eclipse Java EE IDE for Web Developers.Version: 2018-09 (4.9.0)
- Java version: 1.8.0_192
- apache-maven-3.6.0
- apache-tomcat-9.0.12
- MySQL Server 8.0.17.0 + MySQL Workbench 8.0 CE
3.Springboot项目结构
Eclipse里面新建项目,选择Spring Starter Project模板,通过向导点击下一步,项目命名为ProductApp0最后选择2.1.7版本。
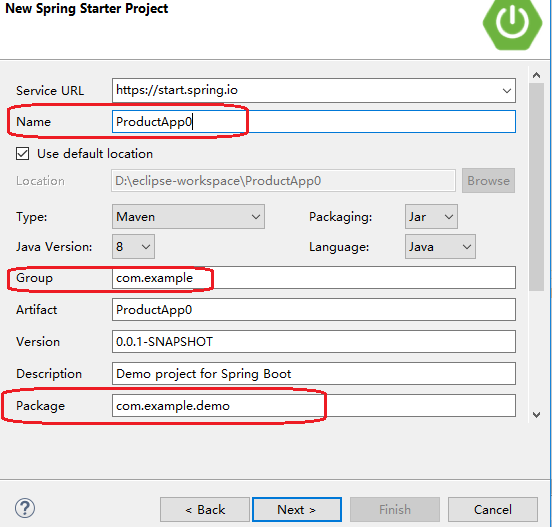
在resources文件夹里面创建static,templates,public/error的文件夹。
application.properties:自动生成,用于配置项目运行所需的配置数据。
static:用于存放静态资源,里面继续创建子文件夹js,css,image。
public/error: 用于存放类似404.html,5xx.html等文件
templates:用于存放模板文件,使用官方推荐的Thymeleaf
demo下面创建该项目用到的几个文件夹,config,store,model,controller
项目文件夹分布架构大致如下:
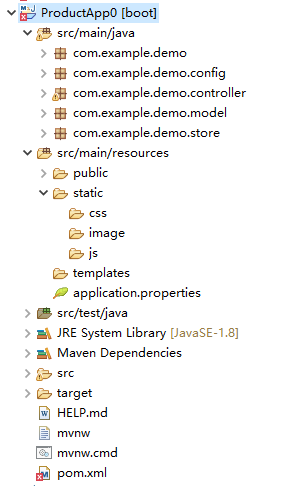
该项目具有三个功能,分别向前端返回一个字符串,一个对象,以及一个集合。
4.项目分析
4.1 Pom.xml里面主要添加的包是web, jdbc,jpa, mysql driver,fastjson.结构如下:
     <dependency>

            <groupId>org.springframework.boot</groupId>

            <artifactId>spring-boot-starter-web</artifactId>

        </dependency>

        <!-- jdbc -->

        <dependency>

            <groupId>org.springframework.boot</groupId>

            <artifactId>spring-boot-starter-jdbc</artifactId>

        </dependency>

        <!-- springboot,jpa 整合包 -->

        <dependency>

            <groupId>org.springframework.boot</groupId>

            <artifactId>spring-boot-starter-data-jpa</artifactId>

        </dependency>

        <!-- mysql 驱动包 -->

        <dependency>

            <groupId>mysql</groupId>

            <artifactId>mysql-connector-java</artifactId>

            <!--根据MySQL server 版本实际情况变动 -->

            <version>8.0.</version><!--$NO-MVN-MAN-VER$ -->

        </dependency>

        <!-- 引入FastJSON -->

        <dependency>

            <groupId>com.alibaba</groupId>

            <artifactId>fastjson</artifactId>

            <version>1.2.</version>

        </dependency>
4.2 该示例需要用到一张表,结构如下:
CREATE TABLE `book` (

  `Id` int(11) NOT NULL AUTO_INCREMENT,

  `Name` varchar(50) CHARACTER SET utf8 COLLATE utf8_general_ci NOT NULL,

  `Category` varchar(32) CHARACTER SET utf8 COLLATE utf8_general_ci NOT NULL,

  `Price` decimal(18,2) NOT NULL,

  `Publish_Date` date NOT NULL,

  `Poster` varchar(45) NOT NULL,

  PRIMARY KEY (`Id`)

) ENGINE=InnoDB AUTO_INCREMENT=25 DEFAULT CHARSET=utf8
4.3 使用Spring-data-jpa访问数据库,分别在model,store文件夹里面里面创建Book 类,BookRepository接口。
@Entity

public class Book implements Serializable {

    private static final long serialVersionUID = -3123479062966697145L;

    @Id

    @Column

    private Integer id;

    @Column

    private String name;

    @Column

    private String category;

    @Column

    private Double price;

    @Column

    @JSONField(format="yyyy-MM-dd")

    private Date publish_date;

    @Column

    private String poster;

    } //省略getter,setter方法

public interface BookRepository extends JpaRepository<Book,Integer> {

}
4.4. 引入fastjson,需要添加一个配置类
@Configuration

public class JSONWebConfig {

         @Bean

        public HttpMessageConverters fastJsonHttpMessageConverters() {

            FastJsonHttpMessageConverter fastJsonHttpMessageConverter = new FastJsonHttpMessageConverter();

            FastJsonConfig fastJsonConfig = new FastJsonConfig();

            fastJsonConfig.setSerializerFeatures(SerializerFeature.PrettyFormat);

            fastJsonHttpMessageConverter.setFastJsonConfig(fastJsonConfig);

            HttpMessageConverter<?> converter = fastJsonHttpMessageConverter;

            return new HttpMessageConverters(converter);

        }

}
4.5 在controller文件夹里面创建HelloController class如下,
@RestController

@RequestMapping("/hello")

public class HelloController {

    @Autowired

    private BookRepository bookRepository;

    @GetMapping("/test")

    public String test() {

        return "My first springboot web application!";

    }

    @GetMapping("/findOne")

    public Book findOne() throws NotFoundException {

        int id=1;

        Optional<Book> book = this.bookRepository.findById(id);

        if(book.isPresent()) {

            return book.get();

        }

        else {

            throw new NotFoundException("Not found...");

        }

    }

    @GetMapping("/findAll")

    public List<Book> findAll()

    {

        List<Book> books = this.bookRepository.findAll();

        return books;

    }

}
说明:
- @Autowired:自动导入依赖的bean.
- @Configuration:相当于xml配置文件
- @Bean:用@Bean标注方法等价于XML中配置的bean。
- @Entity:@Table(name=”“):表明这是一个实体类, 一般用于JPA。这两个注解一般一块使用,但是如果表名和实体类名相同的话,@Table可以省略
- @Controller:用于定义控制器类,在spring项目中由控制器负责将用户发来的URL请求转发到对应的服务接口(service层),注解在类上面,方法需要配合注解@RequestMapping
- @RestController注解是@Controller和@ResponseBody的合集,表示这是个控制器bean,并且是将函数的返回值直接填入HTTP响应体中,是REST风格的控制器。
- @RequestMapping:提供路由信息,负责URL到Controller中的具体函数的映射, 返回值通常解析为跳转路径
- @ResponseBody:表示该方法的返回结果直接写入HTTP response body中,一般在异步获取数据时使用,用于构建RESTful的WEB API。比如异步获取json数据,加上@Responsebody后,会直接返回json数据。该注解一般会配合@RequestMapping使用。
- @GetMapping 组合注解,是@RequestMapping(method = RequestMethod.GET)的缩写
4.6 application.properties文件内容如下:
# DB connection configuration

spring.datasource.url=jdbc:mysql://localhost:3306/demo?useUnicode=true&characterEncoding=utf8&serverTimezone=UTC

spring.datasource.username=***

spring.datasource.password=******

# JPA configuration

spring.jpa.hibernate.ddl-auto=update

spring.jpa.show-sql=true
4.7 程序入口点在main函数
@SpringBootApplication

public class ProductApp0Application {

    public static void main(String[] args) {

        SpringApplication.run(ProductApp0Application.class, args);

    }

}
@SpringBootApplication是Spring Boot的核心注解,是一个组合注解,用于启动类上。包含了@ComponentScan、@Configuration和@EnableAutoConfiguration注解。其中@ComponentScan让spring Boot扫描到Configuration类并把它加入到程序上下文。
选中项目,右键选择Debug As或Run As菜单,先点击Maven clean,后点击Maven install。
编译无错误后,点击Spring Boot App运行项目。
浏览器输入以下地址,查看结果。
http://localhost:8080/hello/test
http://localhost:8080/hello/findOne
http://localhost:8080/hello/findAll
5.打包部署
5.1一般来说打成jar或者war包,eclipse默认生成jar包。在项目里面的target文件夹里面。 运行程序则用下面的命令,
java -jar ProductApp0-0.0.1-SNAPSHOT.jar

5.2.1 SpringbootApplication 类继承 SpringBootServletInitializer 并重写 configure 方法,如下:
@SpringBootApplication

public class ProductApp0Application extends SpringBootServletInitializer {

    @Override

    protected SpringApplicationBuilder configure(SpringApplicationBuilder builder) {

        return builder.sources(ProductApp0Application.class);

    }

    public static void main(String[] args) {

        SpringApplication.run(ProductApp0Application.class, args);

    }

}
5.2.2 在pom.xml里面添加一行,跟在<description>标签后面,
    <groupId>com.example</groupId>

    <artifactId>ProductApp0</artifactId>

    <version>0.0.1-SNAPSHOT</version>

    <name>ProductApp0</name>

    <description>Demo project for Spring Boot</description>

    <packaging>war</packaging>
Eclipse里面点击Maven clean, Maven install,最终在target文件夹里面生成如下:

复制 war包到tomcat/webapps文件夹,建议重名为home.war. 然后启动tomcat/bin文件夹里面的startup.bat
浏览器里面输入如下地址,查看结果
http://localhost:8080/home/hello/test
http://localhost:8080/home/hello/findOne
http://localhost:8080/home/hello/findAll
最新文章
- IoC组件~Autofac将多实现一次注入,根据别名Resove实例
- Kafka、RabbitMQ、RocketMQ消息中间件的对比 —— 消息发送性能-转自阿里中间件
- iOS地图
- oracle 11g express 快速入门
- Array subscript is not an integer
- Ubuntu虚机中SVN连接出错,虚机本机可正常CO,CIN,解决方法
- error C2143: 语法错误 : 缺少“;”(在“using”的前面)
- go mode
- 面试(1)-java-se-字符串
- 201521123037 《Java程序设计》第8周学习总结
- 多个JDK使用批处理命令切换JDK版本
- 使用kafka connect,将数据批量写到hdfs完整过程
- 关于条件语句和 a && b
- linux之特殊字符
- 小A买彩票-(组合数)
- CSS VISUAL RULES
- docker cp 和docker exec 查看docker 运行的容器信息
- My new English
- 常用软件安装及VS插件工具
- Hystrix使用详解
热门文章
- QT Graphics-View图元组使用
- windows mysql服务器
- springboot使用阿里fastjson来解析数据
- MongoDB配置文件及添加用户
- 【使用DIV+CSS重写网站首页案例】步骤分析与代码实现
- iView学习笔记(四):Form表单操作
- version GLIBCXX_3.4.21 not defined in file libstdc++.so.6 with link time reference
- POJ 3322 Bloxorz
- 在 iTunes Connect 中,无法找到“My Apps”选项
- 31、Python程序中的协程操作(greenlet\gevent模块)