Kafka(一) —— 基本概念及使用
一、安装&启动
安装Kafka(使用内置Zookeeper)
在Kafka官网下载安装包kafka_2.11-1.0.0.tgz
### 解压

tar zxvf kafka_2.11-1.0.0.tgz

#### 启动内置的zookeeper

.bin/zookeeper-server-start.sh ../config/zookeeper.properties

#### 启动kafka

./bin/kafka-server-start.sh ../config/server.properties

#### 启动kafka,在后台运行

./bin/kafka-server-start.sh -daemon ../config/server.properties
不使用内置的Zookeeper
Zk官方文档
https://zookeeper.apache.org/doc/current/index.html
二、终端命令
创建主题
./kafka-topics.sh --create --zookeeper localhost:2181 --topic test --partitions 1 --replication-factor 1
查看主题
./kafka-topics.sh --describe --zookeeper localhost:2181 --topic test
生产消息
./kafka-console-producer.sh --broker-list localhost:9092 --topic test
消费消息
./kafka-console-consumer.sh --bootstrap-server localhost:9092 --topic test --from-beginning
三、生产
引入依赖
        <!-- https://mvnrepository.com/artifact/org.apache.kafka/kafka-clients -->

        <dependency>

            <groupId>org.apache.kafka</groupId>

            <artifactId>kafka-clients</artifactId>

            <version>1.0.0</version>

        </dependency>
生产消息
public class KafkaProducerDemo {

    public static void main(String[] args) {

        Properties props = new Properties();

        props.put("bootstrap.servers", "localhost:9092");

        // ack = 0 producer不理睬broker的处理结果

        // ack = all or -1 broker将消息写入本地日志,且ISR中副本也全部同步完,返回响应结果

        // ack = 1 默认参数值,broker写入本地日志,无需等待ISR

        props.put("acks", "-1");

        props.put("retries", 3);

        //单位byte,当batch满了,producer会发送batch中的消息,还要参考linger.ms参数

        props.put("batch.size", 16384);

        //控制消息发送的延时行为,让batch即使没满,也可以发送batch中的消息

        props.put("linger.ms", 10);

        //producer端缓存消息缓冲区的大小

        props.put("buffer.memory", 33554432);

        props.put("key.serializer", "org.apache.kafka.common.serialization.StringSerializer");

        props.put("value.serializer", "org.apache.kafka.common.serialization.StringSerializer");

        props.put("max.blocks.ms", "3000");

        Producer<String, String> producer = new KafkaProducer<String, String>(props);

        for (int i = 0; i < 100; i++) {

            try {

                producer.send(new ProducerRecord<String, String>("testfzj", Integer.toString(i), Integer.toString(i))).get();

            } catch (InterruptedException e) {

                e.printStackTrace();

            } catch (ExecutionException e) {

                e.printStackTrace();

            }

        }

        producer.close();

        System.out.println("发送完成");

    }

}
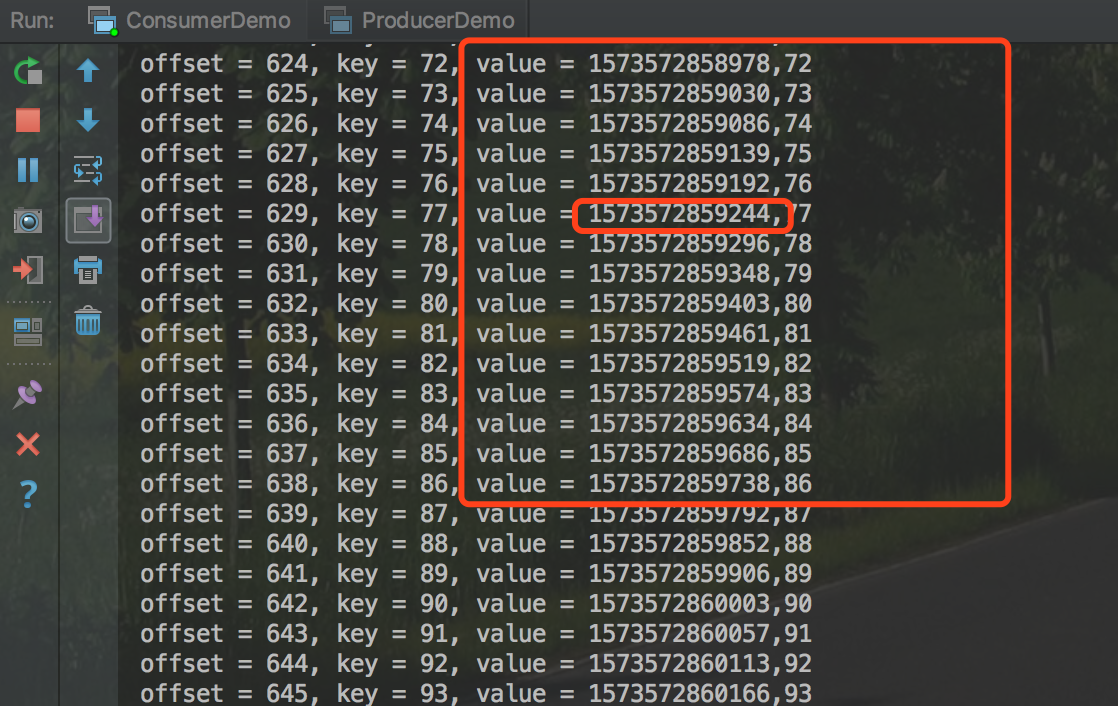
使用自定义拦截器
(1)发送的value前统一加一个时间戳
/**

 * 增加时间戳 拦截器

 * @author Michael Fang

 * @since 2019-11-12

 */

public class TimeStampPrependerInterceptor implements ProducerInterceptor<String, String> {

    /**

     * 会创建一个新的Record

     *

     * @param producerRecord

     * @return

     */

    @Override

    public ProducerRecord<String, String> onSend(ProducerRecord<String, String> producerRecord) {

        return new ProducerRecord<String, String>(

                producerRecord.topic(),

                producerRecord.partition(),

                producerRecord.timestamp(), producerRecord.key(),

                System.currentTimeMillis() + "," + producerRecord.value().toString());

    }

    @Override

    public void onAcknowledgement(RecordMetadata recordMetadata, Exception e) {

    }

    @Override

    public void close() {

    }

    @Override

    public void configure(Map<String, ?> map) {

    }

}
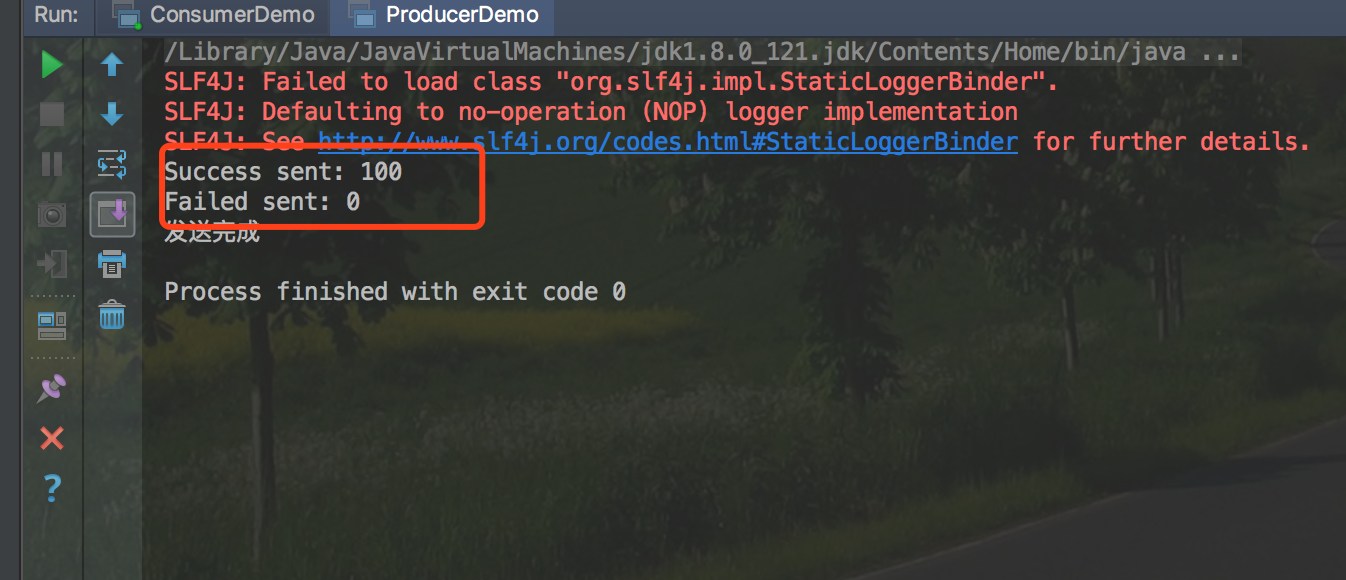
(2)发送完成后进行成功统计
/**

 * 发送后成功统计 拦截器

 * @author Michael Fang

 * @since 2019-11-12

 */

public class CounterInterceptor implements ProducerInterceptor {

    private int errorCounter = 0;

    private int successCounter = 0;

    @Override

    public ProducerRecord onSend(ProducerRecord producerRecord) {

        return producerRecord;

    }

    /**

     * 这两个参数不可能同时为空

     * e = null 说明发送成功

     * recordMetadata = null 说明发送失败

     *

     * @param recordMetadata

     * @param e

     */

    @Override

    public void onAcknowledgement(RecordMetadata recordMetadata, Exception e) {

        if (e == null) {

            successCounter++;

        } else {

            errorCounter++;

        }

    }

    @Override

    public void close() {

        //打印结果

        System.out.println("Success sent: " + successCounter);

        System.out.println("Failed sent: " + errorCounter);

    }

    @Override

    public void configure(Map<String, ?> map) {

    }

}
(3)Producer代码中增加属性配置,使其拦截器生效
        Properties props = new Properties();

        List<String> interceptors = new ArrayList<>();

        interceptors.add("com.fonxian.kafka.TimeStampPrependerInterceptor");

        interceptors.add("com.fonxian.kafka.CounterInterceptor");

        props.put(ProducerConfig.INTERCEPTOR_CLASSES_CONFIG, interceptors);
效果
使用自定义分区器
创建一个4个分区的主题
./kafka-topics.sh --create --zookeeper localhost:2181 --topic test-partition-1 --partitions 4 --replication-factor 1
产生的消息的key为(0-99),消息的key能被10整除的全部放到最后一个分区
/**

 * 自定义分区器

 *

 * @author Michael Fang

 * @since 2019-11-13

 */

public class GetServenPartitioner implements Partitioner {

    private Random random;

    @Override

    public int partition(String topic, Object keyObj, byte[] keyBytes, Object valueObj, byte[] valueBytes1, Cluster cluster) {

        String key = (String) keyObj;

        //获取分区数

        List<PartitionInfo> partitionInfoList = cluster.availablePartitionsForTopic(topic);

        int partitionCount = partitionInfoList.size();

        //最后一个分区的分区号

        int lastPartition = partitionCount - 1;

        //将能被10整除的key-value,发送到最后一个分区

        if(Integer.valueOf(key) % 10 == 0){

            return lastPartition;

        }else{

            return random.nextInt(lastPartition);

        }

    }

    @Override

    public void close() {

    }

    @Override

    public void configure(Map<String, ?> map) {

        random = new Random();

    }

}
结果
在broker上执行命令
./kafka-run-class.sh kafka.tools.GetOffsetShell --broker-list localhost:9092 --topic test-partition-1
得到结果

四、消费
消费消息
public class KafkaConsumerDemo {

    public static void main(String[] args) {

        String topicName = "testfzj";

        String gorupId = "test-group";

        Properties props = new Properties();

        props.put("bootstrap.servers", "localhost:9092");

        props.put("group.id", gorupId);

        //是否自动提交

        props.put("enable.auto.commit", "true");

        // 自动提交的间隔

        props.put("auto.commit.interval.ms", "1000");

        props.put("key.deserializer", "org.apache.kafka.common.serialization.StringDeserializer");

        props.put("value.deserializer", "org.apache.kafka.common.serialization.StringDeserializer");

        KafkaConsumer<String, String> consumer = new KafkaConsumer<>(props);

        consumer.subscribe(Arrays.asList(topicName));

        try {

            while (true) {

                ConsumerRecords<String, String> records = consumer.poll(100);

                for (ConsumerRecord<String, String> record : records) {

                    System.out.printf("offset = %d, key = %s, value = %s%n", record.offset(), record.key(), record.value());

                }

            }

        } catch (Exception e) {

            e.printStackTrace();

        } finally {

            consumer.close();

        }

    }

}
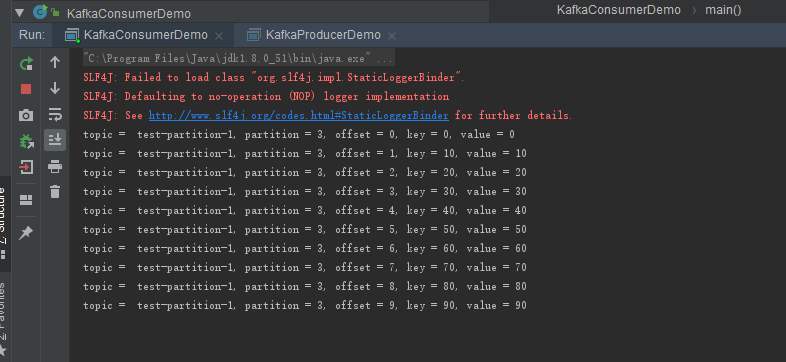
指定分区消费消息
        // 见上面分区器的部分,定义4个分区的topic

        // 使用分区器将能被10整除的key,放到最后一个分区

        String topicName = "test-partition-1";

        Properties props = new Properties();

        //配置成从头开始消费

        //earliest 从最早的位移开始消费

        //latest 从最新处位移开始消费

        props.put(ConsumerConfig.AUTO_OFFSET_RESET_CONFIG, "earliest");

        //是否自动提交位移

        //默认是true,自动提交

        //设置成false,适合有“精确处理一次”语义的需求,用户自行处理位移。

        props.put("enable.auto.commit", "true");

        //获取最后一个分区

        List<PartitionInfo> partitionInfoList = consumer.partitionsFor(topicName);

        //指定最后一个分区

        consumer.assign(Arrays.asList(new TopicPartition(topicName, partitionInfoList.size() - 1)));

        try {

            while (true) {

                ConsumerRecords<String, String> records = consumer.poll(100);

                for (ConsumerRecord<String, String> record : records) {

                    System.out.printf("topic =  %s, partition = %d, offset = %d, key = %s, value = %s%n",record.topic(),record.partition(), record.offset(), record.key(), record.value());

                }

            }

        } catch (Exception e) {

            e.printStackTrace();

        } finally {

            consumer.close();

        }
运行结果
__consumer_offsets


Rebalance
rebalance规定一个consumer group如何分配订阅topic所有分区,分配的这个过程就叫rebalance。
(1)谁来执行rebalance
组协调者coordinator执行rebalance操作,负责促成组内所有成员达成新的分区分配方案。
(2)何时触发
- 当组成员发生变化,新的consumer加入或consumer退出
- 订阅的topic数发生变更,例如使用正则匹配topic,突然加入新的topic
- 订阅的topic分区数发生变更
(3)分配策略
以8个partition(p1-p8),4个consumer(c1 - c4)举例。
- range策略
- 将分区划分成固定大小的分区段,依次分配给每个分区。例如将p1、p2分配给c1。
- round-robin策略
- 将分区按顺序排开,依次分配给各个consumer。例如将p1、p5分配给c1。
- sticky策略
(4)rebalance generation
为了隔离每次rebalance的数据,防止无效的offset提交。引入rebalance generation(届)的概念。
每次rebalance完成后,consumer都会升一届。当新的届的consumer产生,则consumer group不会接受旧的届提交的offset。
例如上一届的consumer因为网络延时等原因延时提交了offset,新的一届consumer已经产生,这时,上一届consume提交的offset,将会被consumer group拒绝,会出现ILLEGAL_GENERATION异常。
(5)调优案例:频繁rebalance
线上频繁进行rebalance,会降低consumer端的吞吐量。
原因是,consumer的处理逻辑过重,导致处理时间波动大,coordinator会经常认为某个consumer挂掉,进行rebalance操作。同时consumer又会重新申请加入group,又会引发rebalance操作。
调整request.timeout.ms、max.poll.records、max.poll.interval.ms来避免不必要的rebalance。
五、SpringBoot整合kafka
文档:https://docs.spring.io/spring-kafka/docs/2.3.3.RELEASE/reference/html/
引入依赖、配置
依赖
 <!-- Inherit defaults from Spring Boot -->

    <parent>

        <groupId>org.springframework.boot</groupId>

        <artifactId>spring-boot-starter-parent</artifactId>

        <version>2.2.1.RELEASE</version>

    </parent>

    <dependencies>

        <!-- https://mvnrepository.com/artifact/com.alibaba/fastjson -->

        <dependency>

            <groupId>com.alibaba</groupId>

            <artifactId>fastjson</artifactId>

            <version>1.2.59</version>

        </dependency>

        <!-- Add typical dependencies for a web application -->

        <dependency>

            <groupId>org.springframework.boot</groupId>

            <artifactId>spring-boot-starter-web</artifactId>

        </dependency>

        <!-- https://mvnrepository.com/artifact/org.springframework.kafka/spring-kafka -->

        <dependency>

            <groupId>org.springframework.kafka</groupId>

            <artifactId>spring-kafka</artifactId>

            <version>2.3.3.RELEASE</version>

        </dependency>

    </dependencies>

    <build>

        <plugins>

            <plugin>

                <groupId>org.springframework.boot</groupId>

                <artifactId>spring-boot-maven-plugin</artifactId>

            </plugin>

            <plugin>

                <groupId>org.apache.maven.plugins</groupId>

                <artifactId>maven-compiler-plugin</artifactId>

                <version>3.6.1</version>

                <configuration>

                    <source>1.8</source>

                    <target>1.8</target>

                </configuration>

            </plugin>

        </plugins>

    </build>
配置
application.properties
server.port=9001

spring.application.name=kafka-demo

#============== kafka ===================

# 指定kafka 代理地址,可以多个

spring.kafka.bootstrap-servers=127.0.0.1:9092

#=============== provider  =======================

spring.kafka.producer.retries=0

# 每次批量发送消息的数量

spring.kafka.producer.batch-size=16384

spring.kafka.producer.buffer-memory=33554432

# 指定消息key和消息体的编解码方式

spring.kafka.producer.key-serializer=org.apache.kafka.common.serialization.StringSerializer

spring.kafka.producer.value-serializer=org.apache.kafka.common.serialization.StringSerializer

#=============== consumer  =======================

# 指定默认消费者group id

spring.kafka.consumer.group-id=user-log-group

spring.kafka.consumer.auto-offset-reset=earliest

spring.kafka.consumer.enable-auto-commit=true

spring.kafka.consumer.auto-commit-interval=100

# 指定消息key和消息体的编解码方式

spring.kafka.consumer.key-deserializer=org.apache.kafka.common.serialization.StringDeserializer

spring.kafka.consumer.value-deserializer=org.apache.kafka.common.serialization.StringDeserializer
生产者
@SpringBootApplication

public class Application {

    @Autowired

    private KafkaTemplate kafkaTemplate;

    private static final String TOPIC = "test-partition-1";

    @PostConstruct

    public void init() {

        for (int i = 0; i < 10; i++) {

            kafkaTemplate.send(TOPIC, "key:" + i, "value:" + i);

        }

    }

    public static void main(String[] args) {

        SpringApplication.run(Application.class, args);

    }

}
消费者
@Component

public class Consume {

    @KafkaListener(topics = "test-partition-1")

    public void consumer(ConsumerRecord consumerRecord){

        Optional<Object> kafkaMassage = Optional.ofNullable(consumerRecord);

        if(kafkaMassage.isPresent()){

            ConsumerRecord record = (ConsumerRecord)kafkaMassage.get();

            System.out.printf("offset = %d, key = %s, value = %s%n", record.offset(), record.key(), record.value());

        }

    }

}
结果

六、常见问题
org.apache.kafka.common.errors.TimeoutException
使用Java客户端生产消息,出现此异常提示。
原因:外网访问,需要修改server.properties参数,将IP地址改为公网的IP地址,然后重启服务
advertised.listeners=PLAINTEXT://59.11.11.11:9092
可参考 https://www.cnblogs.com/snifferhu/p/5102629.html
参考文档
《Apache Kafka实战》
《深入理解Kafka:核心设计与实践原理》
springboot集成Kafka
Spring for Apache Kafka
最新文章
- 非正规方法处理AngulurJS模块管理问题
- 关于ThinkPHP3.2框架接收不到json数据的解决办法
- appserv中php升级问题
- 黑马程序员——JAVA基础之构造函数,构造代码块
- angularjs $swipe调用方法
- 将java项目打包成jar文件并在cmd运行
- 练习题之Wait/Notify
- ng-class css样式
- My.Ioc 代码示例——实现自动注册/解析
- Splay入门题目 [HNOI2002]营业额统计
- Android-----------打开手机上的应用
- 乐在其中设计模式(C#) - 代理模式(Proxy Pattern)
- hosts.deny 和hosts.allow 配置不生效
- 部署Asp.net Core 项目发生502.5 或者500 没有其他提示信息
- 理解Spring中的IOC和AOP
- 桌面远程连接阿里云服务器(windows)后丧失了双向文件复制粘贴功能的解决方案(第一条博客!)
- js实现带上传进度的文件上传
- C++拷贝构造函数(深拷贝&浅拷贝)
- C# 给主程序签名及第三方dll强签名操作
- python如何序列化json数据