利用python+tkinter做一个简单的智能电视遥控器
2024-10-21 03:28:17
要通过python实现遥控器功能分两步:
第一步:开发图形化界面,以暴风TV的遥控器按钮为例
第二步:使PC端给电视发送相应指令(此步骤需要打开电视的adb开关)
现在就开始第一步操作实现遥控器功能,python2输入以下代码
注意:python3需要将代码中的from Tkinter import *
替换为from tkinter import *
将from SimpleDialog import *
替换为import tkinter.simpledialog
#coding=utf-8
from Tkinter import *

from SimpleDialog import *

'''
from tkinter import *
import tkinter.simpledialog
'''

root = Tk()
#设置图形的宽高
root.geometry('120x200')
#设置图形为不可拉升

root.resizable(0, 0)
#设置图形的标题

root.title('遥控器')
#添加组件布局

Button(root,text="电源",command="").place(x=45,y=0,)

Button(root,text="左键",command="").place(x=0,y=60,height=30)

Button(root,text="右键",command="").place(x=90,y=60,height=30)

Button(root,text="上键",command="").place(x=45,y=30,height=30)

Button(root,text="下键",command="").place(x=45,y=90,height=30)

Button(root,text="OK",command="").place(x=40,y=60,height=30,width=45)

Button(root,text="主页",command="").place(x=0,y=130,height=30,width=30)

Button(root,text="返回",command="").place(x=45,y=130,height=30,width=30)

Button(root,text="菜单",command="").place(x=90,y=130,height=30,width=30)

Button(root,text="音+",command="").place(x=0,y=170,height=30,width=30)

Button(root,text="音-",command="").place(x=45,y=170,height=30,width=30)

Button(root,text="BIU",command="").place(x=90,y=170,height=30,width=30)

mainloop()
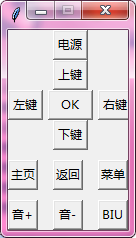
运行成功后,Python2界面显示如左图,Python3界面显示如右图

第二步,在command中加入相应的键值对应的方法,可以先定义好各个方法,举个例子,比如电视的确定键对应的键值是23,那么我们先定义一个ok键对应的方法
def ok():

    subprocess.call('adb shell input keyevent 23', shell=True)
同时,考虑到按ok键还没执行完毕,我们又按了其它键,这样就需要加入多线程,方法如下
def ok_1():

    subprocess.call('adb shell input keyevent 23', shell=True)

def ok():

    t=threading.Thread(target=ok_1)

    t.start()
这样,简单的遥控器功能,我们就做完了:
#coding=utf-8

from Tkinter import *

from SimpleDialog import *

import subprocess

import threading

'''

from tkinter import *

import tkinter.simpledialog

'''

def up_1():

    subprocess.call('adb shell input keyevent 19', shell=True)

def up():

    t=threading.Thread(target=up_1)

    t.start()

def down_1():

    subprocess.call('adb shell input keyevent 20', shell=True)

def down():

    t=threading.Thread(target=down_1)

    t.start()

def left_1():

    subprocess.call('adb shell input keyevent 21', shell=True)

def left():

    t=threading.Thread(target=left_1)

    t.start()

def right_1():

    subprocess.call('adb shell input keyevent 22', shell=True)

def right():

    t=threading.Thread(target=right_1)

    t.start()

def home_1():

    subprocess.call('adb shell input keyevent 3', shell=True)

def home():

    t=threading.Thread(target=home_1)

    t.start()

def back_1():

    subprocess.call('adb shell input keyevent 4', shell=True)

def back():

    t=threading.Thread(target=back_1)

    t.start()

def ok_1():

    subprocess.call('adb shell input keyevent 23', shell=True)

def ok():

    t=threading.Thread(target=ok_1)

    t.start()

def voice_1():

    subprocess.call('adb shell input keyevent 24', shell=True)

def voice1():

    t=threading.Thread(target=voice_1)

    t.start()

def voice_2():

    subprocess.call('adb shell input keyevent 25', shell=True)

def voice2():

    t=threading.Thread(target=voice_2)

    t.start()

def menu_1():

    subprocess.call('adb shell input keyevent 82', shell=True)

def menu():

    t=threading.Thread(target=menu_1)

    t.start()

def power_1():

    subprocess.call('adb shell input keyevent 754', shell=True)

def power():

    t=threading.Thread(target=power)

    t.start()

def biu_1():

    subprocess.call('adb shell input keyevent 733', shell=True)

def biu():

    t=threading.Thread(target=biu_1)

    t.start()

root = Tk()

#设置图形的宽高

root.geometry('120x200')

#设置图形为不可拉升

root.resizable(0, 0)

#设置图形的标题

root.title('遥控器')

#添加组件布局

Button(root,text="电源",command=power).place(x=45,y=0,)

Button(root,text="左键",command=left).place(x=0,y=60,height=30)

Button(root,text="右键",command=right).place(x=90,y=60,height=30)

Button(root,text="上键",command=up).place(x=45,y=30,height=30)

Button(root,text="下键",command=down).place(x=45,y=90,height=30)

Button(root,text="OK",command=ok).place(x=40,y=60,height=30,width=45)

Button(root,text="主页",command=home).place(x=0,y=130,height=30,width=30)

Button(root,text="返回",command=back).place(x=45,y=130,height=30,width=30)

Button(root,text="菜单",command=menu).place(x=90,y=130,height=30,width=30)

Button(root,text="音+",command=voice1).place(x=0,y=170,height=30,width=30)

Button(root,text="音-",command=voice2).place(x=45,y=170,height=30,width=30)

Button(root,text="BIU",command=biu).place(x=90,y=170,height=30,width=30)

mainloop()

mainloop()
如何使其能操控电视,需要我们先使用adb命令连接电视ip,在cmd下,输入格式为:adb connect 192.168.XX.XXX

若连接成功后,输入adb devices显示 192.168.XX.XXX devices,表示连接成功,之后就可以用电脑上的遥控器控制电视了

最新文章
- 路由的Resolve机制(需要了解promise)
- Silverlight类百度文库在线文档阅读器
- mybatis+MySQL--CRUD
- SpringMVC4 + Spring + MyBatis3 基于注解的最简配置
- Feature Scaling
- EAPOL 协议
- js一些题目
- [转载]java NIO详解
- HDU2829
- 8款替代Dreamweaver的开源网页开发工具
- Nginx模块开发入门
- Mac QQ 怎么清除聊天记录
- c#枚举 获取枚举键值对、描述等
- Lytro 光场相机重对焦C++实现以及CUDA实现
- JDBC工具类完整版!
- android开机动画(bootanimation)
- java 异常 throw
- 使用Ocelot构建GateWay
- Ubuntu系统python3版本设置问题
- 数据仓库与BI面试常见题目