Spring MVC-集成(Integration)-生成XML示例(转载实践)
2024-08-31 03:15:21
以下内容翻译自:https://www.tutorialspoint.com/springmvc/springmvc_xml.htm
说明:示例基于Spring MVC 4.1.6。
以下示例说明如何使用Spring Web MVC框架生成XML。首先,让我们使用Eclipse IDE,并按照以下步骤使用Spring Web Framework开发基于动态窗体的Web应用程序:
| 步骤 | 描述 |
|---|---|
| 1 | 创建一个名为TestWeb的项目,在一个包com.tutorialspoint下,如Spring MVC - Hello World Example章节所述。 |
| 2 | 在com.tutorialspoint包下创建一个Java类User,UserController。 |
| 3 | 最后一步是创建所有源和配置文件的内容并导出应用程序,如下所述。 |
User.java
package com.tutorialspoint;

import javax.xml.bind.annotation.XmlElement;

import javax.xml.bind.annotation.XmlRootElement;

@XmlRootElement(name = "user")

public class User {

   private String name;

   private int id;

   public String getName() {

      return name;

   }

   @XmlElement

   public void setName(String name) {

      this.name = name;

   }

   public int getId() {

      return id;

   }

   @XmlElement

   public void setId(int id) {

      this.id = id;

   }

}
UserController.java
package com.tutorialspoint;

import org.springframework.stereotype.Controller;

import org.springframework.web.bind.annotation.PathVariable;

import org.springframework.web.bind.annotation.RequestMapping;

import org.springframework.web.bind.annotation.RequestMethod;

import org.springframework.web.bind.annotation.ResponseBody;

@Controller

@RequestMapping("/user")

public class UserController {

   @RequestMapping(value="{name}", method = RequestMethod.GET)

   public @ResponseBody User getUser(@PathVariable String name) {

      User user = new User();

      user.setName(name);

      user.setId(1);

      return user;

   }

}
TestWeb-servlet.xml
<beans xmlns="http://www.springframework.org/schema/beans"

   xmlns:context="http://www.springframework.org/schema/context"

   xmlns:xsi="http://www.w3.org/2001/XMLSchema-instance"

   xmlns:mvc="http://www.springframework.org/schema/mvc"

   xsi:schemaLocation="

   http://www.springframework.org/schema/beans

   http://www.springframework.org/schema/beans/spring-beans-3.0.xsd

   http://www.springframework.org/schema/context

   http://www.springframework.org/schema/context/spring-context-3.0.xsd

   http://www.springframework.org/schema/mvc

   http://www.springframework.org/schema/mvc/spring-mvc-3.0.xsd">

   <context:component-scan base-package="com.tutorialspoint" />

   <mvc:annotation-driven />

</beans>
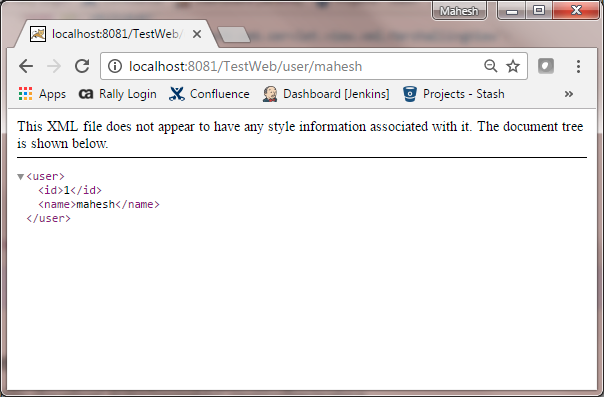
在这里,我们创建了一个XML映射的POJO用户,并在UserController中,我们返回了用户。Spring自动处理基于RequestMapping的XML转换
完成创建源文件和配置文件后,导出应用程序。右键单击应用程序并使用Export > WAR File选项,并将您的TestWeb.war文件保存在Tomcat的webapps文件夹中。
现在启动您的Tomcat服务器,并确保您可以使用标准浏览器从webapps文件夹访问其他网页。现在尝试URL http://localhost:8080/TestWeb/mahesh,您应该看到以下结果。

Maven示例:
https://github.com/easonjim/5_java_example/tree/master/springmvc/tutorialspoint/test28
最新文章
- 适配ios10(iTunes找不到构建版本)
- weblogic忘记登陆密码
- Python图片处理
- Dual Number
- 搭建C语言开发环境
- centos6关闭ipv6
- android中的DatePicker与TimePicker
- 【Java多线程】互斥
- android 打包签名
- The 2014 ACM-ICPC Asia Mudanjiang Regional
- Diary of Codeforces Round #402 (Div. 2)
- Chapter 2 User Authentication, Authorization, and Security(6):服务器权限授予粒度
- HTTPS 站点的性能优化
- [USACO09JAN]Total Flow
- mongodb安全权限设定
- cordova开发跨平台应用问题随笔记
- 【Spark】RDD操作具体解释3——键值型Transformation算子
- TensorFlow人脸识别
- 配置centos7 网卡
- Leetcode 938. Range Sum of BST