CapsuleAO实现的学习
正是一个炎夏,又到了整活的好时候。最近抽些时间研究下CapsuleAO,记述实践体会。
1.简介
这是一个通过在角色骨骼上绑定虚拟胶囊体并以数学方法实现胶囊近似的AO环境光遮蔽效果的方法,
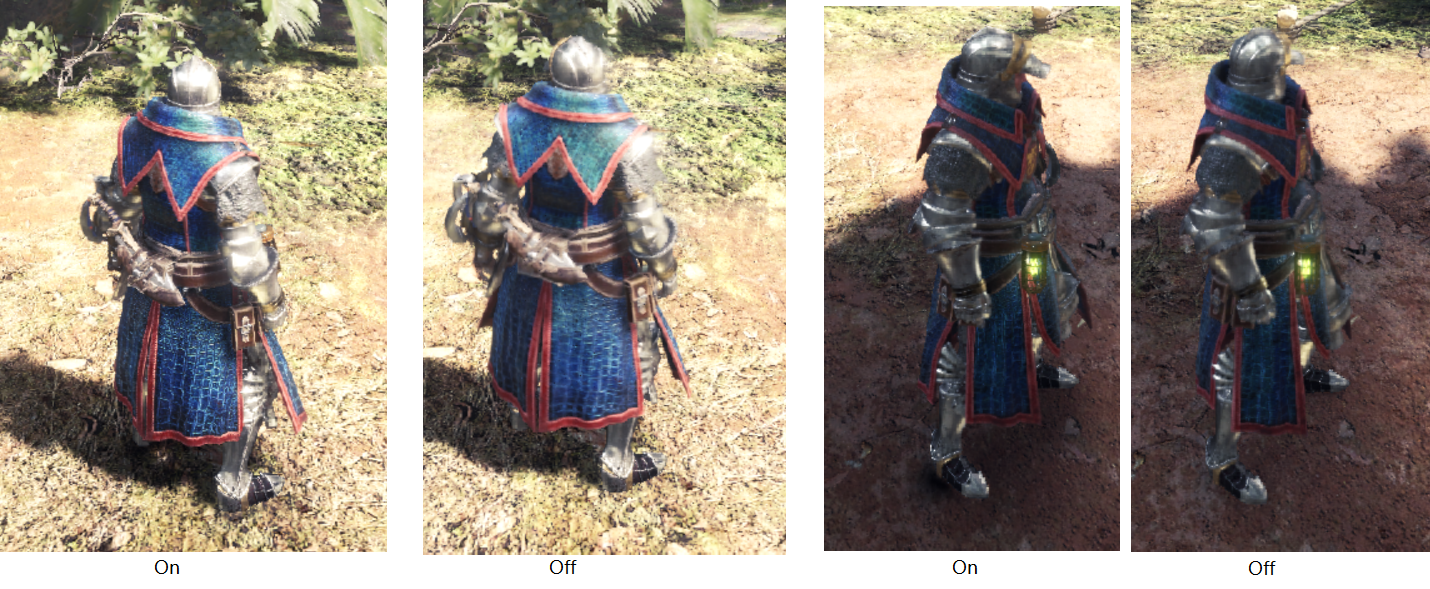
当角色处于阴影中时,CapsuleAO的效果比较明显。当角色在露天环境中,效果较弱。
下图是我自己游戏里截图的效果,以做参考:
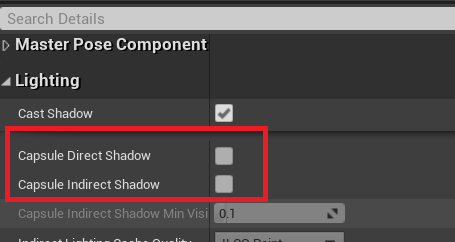
不同项目有不同的实现,UE4中也有类似实现,叫做Capsule Shadow,这里不多做介绍:
2.CapsuleAO实现尝试
首先用自己的思路实现一下,首先参考了IQ大神的SphereAO:
https://www.shadertoy.com/view/4djSDy
抛开公式的话,其实就是一个点光源的做法,然后把颜色改成黑色加上函数系数进行调节,使其更接近AO的感觉。
这是尝试实现的效果:
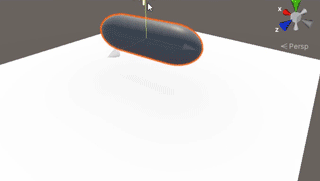
实现时要将球体变为胶囊,要在胶囊的长度轴上计算投影。投影完后对投影长度进行Clamp约束,约束后的两个端点
和周围像素进行Distance计算,这样直接就是胶囊的效果了,而不是圆柱。做了个简单的图:

具体见代码。
Shader:
Shader "Unlit/CapsuleAOShader"

{

    Properties

    {

        _Adjust("Adjust", float) = 2

        _CapsuleRadius("Capsule Radius", float) = 0.3

        _DistanceFix("Distance Fix", float) = 0.3

    }

    SubShader

    {

        Tags { "RenderType"="Opaque" }

        Pass

        {

            CGPROGRAM

            #pragma vertex vert

            #pragma fragment frag

            #include "UnityCG.cginc"

            struct appdata

            {

                float4 vertex : POSITION;

                float2 uv : TEXCOORD0;

            };

            struct v2f

            {

                float2 uv : TEXCOORD0;

                float4 vertex : SV_POSITION;

                float3 wPos : TEXCOORD2;

            };

            float4 _PlanePos;

            float4 _PlaneNormal;

            float4 _CapsuleP0;

            float4 _CapsuleP1;

            float _Adjust;

            float _CapsuleRadius;

            float _DistanceFix;

            float3 Formula(float3 sphP0, float3 sphP1, float length, float radius, float3 comparePoint)

            {

                float3 norm1 = normalize(sphP1 - sphP0);

                float3 relativeComparePoint = comparePoint-sphP0;

                float3 projValue = dot(relativeComparePoint, norm1);

                float x = clamp(projValue, -length, length);

                float3 projPoint = sphP0 + x * norm1;

                float3 norm2 = normalize(comparePoint - projPoint);

                return projPoint + norm2 * radius;

            }

            float3 DistanceFix(float3 distancePoint, float wPos, float3 norm, float distanceFix)

            {

                return distancePoint + norm * distanceFix;

            }

            float Occlusion(float3 pos, float3 nor, float3 sphP0, float3 sphP1)

            {

                float3 finalPoint = Formula(sphP0, sphP1, distance(sphP1,sphP0), _CapsuleRadius, pos);/*Add*/

                finalPoint = DistanceFix(finalPoint, pos, nor, _DistanceFix);/*Add*/

                float3  di = finalPoint - pos;

                float l = length(di);

                float nl = dot(nor, di / l);

                float h = l / 0.5;

                float h2 = h * h;

                float k2 = 1.0 - h2 * nl*nl;

                float res = pow(clamp(0.5*(nl*h + 1.0) / h2, 0.0, 1.0), 1.5);

                return res;

            }

            v2f vert (appdata v)

            {

                v2f o = (v2f)0;

                o.vertex = UnityObjectToClipPos(v.vertex);

                o.uv = v.uv;

                o.wPos = mul(unity_ObjectToWorld, v.vertex).xyz;

                return o;

            }

            fixed4 frag (v2f i) : SV_Target

            {

                float occ0 = Occlusion(i.wPos, _PlaneNormal.xyz, _CapsuleP0.xyz, _CapsuleP1.xyz);

                return 1.0 - occ0;

            }

            ENDCG

        }

    }

}
c#部分,控制胶囊的传入,与球体不同;胶囊需要一个长度向量信息表示长度轴的朝向:
using System.Collections;

using System.Collections.Generic;

using UnityEngine;

public class CapsuleAOParamUpdate : MonoBehaviour

{

    public Transform capsuleP0;

    public Transform capsuleP1;

    Material mMaterial;

    private void Update()

    {

        mMaterial = GetComponent<MeshRenderer>().sharedMaterial;

        mMaterial.SetVector("_PlanePos", transform.position);

        mMaterial.SetVector("_PlaneNormal", transform.up);

        mMaterial.SetVector("_CapsuleP0", new Vector4(capsuleP0.position.x, capsuleP0.position.y, capsuleP0.position.z, 1f));

        mMaterial.SetVector("_CapsuleP1", new Vector4(capsuleP1.position.x, capsuleP1.position.y, capsuleP1.position.z, 1f));

    }

}
3.Capsule Shadow实现尝试
看了下UE里的实现代码,比较复杂。这部分自己处理比较简单。
先看最终效果(支持非平面表面,光照方向改变,但某些光照角度有一定穿帮感):

首先,以主光平行光的方向作为投影平面,在shader的frag里得到地面每个像素世界坐标时,
将像素位置,胶囊位置,胶囊方向向量等都投影到平面上进行计算。
大致如下图:
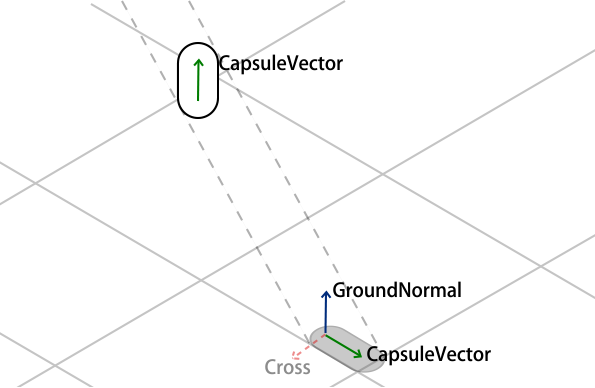
胶囊体需要两个参数,以确定胶囊方向。根据投影后的胶囊方向和地面法线位置,得到叉乘位置,然后可以作为x,y坐标采样贴图。
采样贴图虽然效果好些,但开销较高,所以也可以自己去拟合。
接着混合3个权重信息:
- 对平行光的相反方向做一个点乘处理,防止反方向上也被映射上阴影(FadeDirectionWeight)。
- 对主要投影区域做一个权重系数,让只有被投影地面上有阴影图案(MaskWeight)。
- 将投影前的地面世界空间坐标和投影前的胶囊位置做一个权重,让阴影有一个深到浅的渐变效果(FadeWeight)。
最后将所有权重混合:
return shadowCol * maskWeight * fadeWeight * faceDirectionWeight;
最后上代码,代码为采样贴图版本,开销比较高。
shader部分:
Shader "Unlit/CapsuleShadowShader"

{

    Properties

    {

        _MainShapeTex ("Main Shape Tex (RGB)", 2D) = "white" {}

        _UvOffset("Uv Offset", vector) = (0.0, 0.0, 0.0, 0.0)

        _ShadowScaleFactor("Shadow Scale Factor", float) = 1.0

        _FadeWeightFactor("Fade Weight Factor", float) = 10.0

        _FadeDirectionFactor("Fade Direction Factor", float) = 1.0

    }

    SubShader

    {

        Tags { "RenderType"="Opaque" }

        Pass

        {

            CGPROGRAM

            #pragma vertex vert

            #pragma fragment frag

            #include "UnityCG.cginc"

            struct appdata

            {

                float4 vertex : POSITION;

                float2 uv : TEXCOORD0;

            };

            struct v2f

            {

                float2 uv : TEXCOORD0;

                float4 vertex : SV_POSITION;

                float3 wPos : TEXCOORD2;

            };

            uniform float4 _LightDirectionVector;

            uniform float4 _CapsulePos1;

            uniform float4 _CapsulePos2;

            uniform float4 _CapsulePos3;

            uniform float4 _CapsulePos4;

            uniform float4 _CapsulePos5;

            uniform float4 _CapsulePos6;

            uniform float4 _CapsulePos7;

            uniform float4 _CapsulePos8;

            uniform float4 _CapsulePos9;

            uniform float4 _CapsulePos10;

            uniform float4 _CapsulePos11;

            uniform float4 _CapsulePos12;

            uniform float4 _CapsulePos13;

            uniform float4 _CapsulePos14;

            sampler2D _MainShapeTex;

            float4 _UvOffset;

            float _ShadowScaleFactor;

            float _FadeWeightFactor;

            float _FadeDirectionFactor;

            v2f vert (appdata v)

            {

                v2f o = (v2f)0;

                o.vertex = UnityObjectToClipPos(v.vertex);

                o.uv = v.uv;

                o.wPos = mul(unity_ObjectToWorld, v.vertex).xyz;

                return o;

            }

            half3 ProjectOnPlane(half3 vec, half3 planeNormal)

            {

                float num = dot(planeNormal, planeNormal);

                float num2 = dot(vec, planeNormal);

                return half3(vec.x - planeNormal.x * num2 / num, vec.y - planeNormal.y * num2 / num, vec.z - planeNormal.z * num2 / num);

            }

            half CapsuleShadow(float3 capsulePos, float3 capsulePosDirectVec, float3 wPos)

            {

                half faceDirectionWeight = max(_FadeDirectionFactor, dot(normalize(capsulePos - wPos), _WorldSpaceLightPos0.xyz));

                half fadeDistance = distance(wPos, capsulePos);

                half fadeWeight = (1.0/distance(wPos, capsulePos)) * _FadeWeightFactor;

                half3 proj = ProjectOnPlane(wPos, _WorldSpaceLightPos0.xyz);

                half3 centerProj = ProjectOnPlane(capsulePos, _WorldSpaceLightPos0.xyz);

                half3 centerVectorProj = ProjectOnPlane(capsulePosDirectVec, _WorldSpaceLightPos0.xyz);

                half3 dir1 = normalize(centerVectorProj - centerProj);

                half3 dir2 = normalize(cross(dir1, _WorldSpaceLightPos0.xyz));

                half x = dot(proj - centerProj, dir1) * _UvOffset.z + _UvOffset.x;

                half y = dot(proj - centerProj, dir2) * _UvOffset.w + _UvOffset.y;

                half shadowCol = tex2D(_MainShapeTex, half2(x, y)).r;

                half maskWeight = saturate(distance(proj, centerProj) / _ShadowScaleFactor);

                maskWeight = max(0.4, maskWeight);

                return shadowCol * maskWeight * fadeWeight * faceDirectionWeight;

            }

            fixed4 frag (v2f i) : SV_Target

            {

                half col = CapsuleShadow(_CapsulePos1, _LightDirectionVector, i.wPos);

                col = max(col, CapsuleShadow(_CapsulePos2, _LightDirectionVector, i.wPos));

                col = max(col, CapsuleShadow(_CapsulePos3, _LightDirectionVector, i.wPos));

                col = max(col, CapsuleShadow(_CapsulePos4, _LightDirectionVector, i.wPos));

                col = max(col, CapsuleShadow(_CapsulePos5, _LightDirectionVector, i.wPos));

                col = max(col, CapsuleShadow(_CapsulePos6, _LightDirectionVector, i.wPos));

                col = max(col, CapsuleShadow(_CapsulePos7, _LightDirectionVector, i.wPos));

                col = max(col, CapsuleShadow(_CapsulePos8, _LightDirectionVector, i.wPos));

                col = max(col, CapsuleShadow(_CapsulePos9, _LightDirectionVector, i.wPos));

                col = max(col, CapsuleShadow(_CapsulePos10, _LightDirectionVector, i.wPos));

                col = max(col, CapsuleShadow(_CapsulePos11, _LightDirectionVector, i.wPos));

                col = max(col, CapsuleShadow(_CapsulePos12, _LightDirectionVector, i.wPos));

                col = max(col, CapsuleShadow(_CapsulePos13, _LightDirectionVector, i.wPos));

                col = max(col, CapsuleShadow(_CapsulePos14, _LightDirectionVector, i.wPos));

                return lerp(0.5, 0.0, col);

            }

            ENDCG

        }

    }

}
c#部分:
using System.Collections;

using System.Collections.Generic;

using UnityEngine;

public class CapsuleAOParamUpdate : MonoBehaviour

{

    public Transform capsuleHead;

    public Transform capsuleBody1;

    public Transform capsuleBody2;

    public Transform capsuleBody3;

    public Transform capsuleLeftArm1;

    public Transform capsuleLeftArm2;

    public Transform capsuleLeftArm3;

    public Transform capsuleRightArm1;

    public Transform capsuleRightArm2;

    public Transform capsuleRightArm3;

    public Transform capsuleLeftLeg1;

    public Transform capsuleLeftLeg2;

    public Transform capsuleLeftLeg3;

    public Transform capsuleRightLeg1;

    public Transform capsuleRightLeg2;

    public Transform capsuleRightLeg3;

    public Transform lightDirectionVector;

    private Material mMaterial;

    private void Update()

    {

        mMaterial = GetComponent<MeshRenderer>().sharedMaterial;

        if (capsuleHead)

            mMaterial.SetVector("_CapsulePos1", capsuleHead.position);

        if (capsuleBody1)

            mMaterial.SetVector("_CapsulePos2", capsuleBody1.position);

        if (capsuleBody2)

            mMaterial.SetVector("_CapsulePos2", capsuleBody2.position);

        if (capsuleBody3)

            mMaterial.SetVector("_CapsulePos2", capsuleBody3.position);

        if (capsuleLeftArm1)

            mMaterial.SetVector("_CapsulePos3", capsuleLeftArm1.position);

        if (capsuleLeftArm2)

            mMaterial.SetVector("_CapsulePos4", capsuleLeftArm2.position);

        if (capsuleLeftArm3)

            mMaterial.SetVector("_CapsulePos5", capsuleLeftArm3.position);

        if (capsuleRightArm1)

            mMaterial.SetVector("_CapsulePos6", capsuleRightArm1.position);

        if (capsuleRightArm2)

            mMaterial.SetVector("_CapsulePos7", capsuleRightArm2.position);

        if (capsuleRightArm3)

            mMaterial.SetVector("_CapsulePos8", capsuleRightArm3.position);

        if (capsuleLeftLeg1)

            mMaterial.SetVector("_CapsulePos9", capsuleLeftLeg1.position);

        if (capsuleLeftLeg2)

            mMaterial.SetVector("_CapsulePos10", capsuleLeftLeg2.position);

        if (capsuleLeftLeg3)

            mMaterial.SetVector("_CapsulePos11", capsuleLeftLeg3.position);

        if (capsuleRightLeg1)

            mMaterial.SetVector("_CapsulePos12", capsuleRightLeg1.position);

        if (capsuleRightLeg2)

            mMaterial.SetVector("_CapsulePos13", capsuleRightLeg2.position);

        if (capsuleRightLeg3)

            mMaterial.SetVector("_CapsulePos14", capsuleRightLeg3.position);

        mMaterial.SetVector("_LightDirectionVector", lightDirectionVector.position);

    }

}
4.总结
这篇文章以学习为主,就不提供下载工程了。具体使用还需自行开发。
若该方案需要在项目中的落地,我做如下建议:
1.不要一次性在shader里传入所有胶囊,可以分成多个pass来做,也可以放到屏幕blit里去做,或者先画到一张临时RT里。
2.当角色暴露在强光下,基本看不出CapsuleAO效果,当角色在阴影中或处于柔和光照环境下,才会有明显的CapsuleAO表现。
3.也可以只有主角有CapsuleAO效果。
4.也可以CapsuleAO+CapsuleShadow,但是要分成多个pass来做。
最新文章
- Juint整合Log4j
- (原创)vim配色------水果色,不伤眼。
- JavaScript强化教程——jQuery AJAX 实例
- Mac下搭建go语言开发环境
- 怎样使用AutoLayOut为UIScrollView添加约束
- 对Linux新手非常有用的 20个命令
- Visual Studio Professional 2015 (x86 and x64) - DVD (Chinese-Simplified)
- AndroidManifest.xml 详解 (四) 之uses-permission
- SaaS系列介绍之十三: SaaS系统体系架构
- CAD输出的局部平面坐标数据配准转换到WGS84坐标系
- [Gauss]POJ1681 Painter's Problem
- noip 2005 等价表达式
- 2.配置Spring+SpringMvc+Mybatis(分库or读写分离)--Intellij IDAE 2016.3.5
- 2D图形如何运动模拟出3D效果
- JavaCC的TokenManager和Parser
- c++ std 最小堆的使用 (用于实现top100之类的功能)
- from __future__ import包的作用
- Java消息中间件入门笔记 - ActiveMQ篇
- java随笔4 java中接参整形转字符串
- ConfuserEx壳