老猪带你玩转自定义控件三——sai大神带我实现ios 8 时间滚轮控件
ios 8 的时间滚轮控件实现了扁平化,带来很好用户体验,android没有现成控件,小弟不才,数学与算法知识不过关,顾十分苦恼,幸好在github上找到sai大神实现代码,甚为欣喜,顾把学习这个控件点滴记录下来,分享给大家。项目原地址https://github.com/saiwu-bigkoo/Android-PickerView。
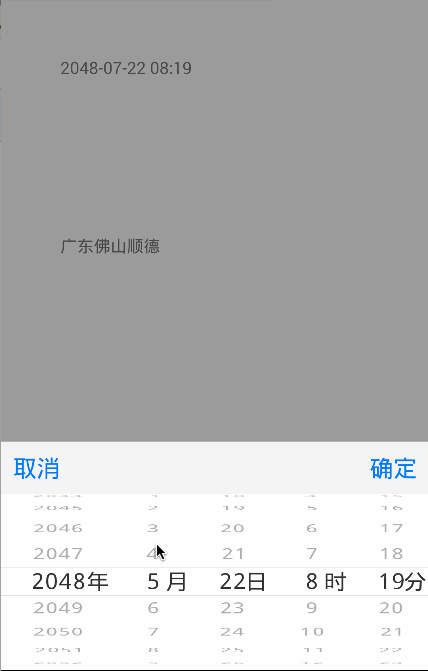
ios 8 滚轮的效果:

而sai大神控件的效果:
哎,妈呀是不是效果95%相识啊。
好了,废话少说,谈谈我从这个控件中收获的心得。
首先,我们要高瞻远瞩看一下他的整体架构图,让我们对这个控件有一个整体感觉。

通过这一个简单架构图,我们可以清晰看出:
这虽然是一个很小控件,但是麻雀虽小五脏俱全,采用典型的mvc模式将页面展示,逻辑控制,数据加载实现了有效的分离,接下来,我就浅尝辄止将这几个类分析一下吧。
万事开头难,我们当然是从最容易的开始,看看wheeladapter吧。
wheeladapter负责将数据填充进来,这是一个经典adapter模式,对于adapter的作用于好处,我想没有必要在这里赘述。我们看看它的全貌吧:
public interface WheelAdapter<T> {

    /**

     * Gets items count

     */

    public int getItemsCount();

    /**

     * Gets a wheel item by index.

     *

     * @param index the item index

     * @return the wheel item text or null

     */

    public T getItem(int index);

    /**

     * Gets maximum item length. It is used to determine the wheel width.

     * If -1 is returned there will be used the default wheel width.

     *

     * @return the maximum item length or -1

     */

    public int indexOf(T o);

}
这是一个接口,它三个方法分别能够获取数据条数,当前索引下所对应条目,以及当前条目所对应索引。这都是对数据频繁操作。
趁热打铁,我们更进一步,看看负责展示view又是长成什么样子。
public static DateFormat dateFormat = new SimpleDateFormat("yyyy-MM-dd HH:mm");

    private View view;

    private WheelView wv_year;

    private WheelView wv_month;

    private WheelView wv_day;

    private WheelView wv_hours;

    private WheelView wv_mins;

    private Type type;

    private static int START_YEAR = 1990, END_YEAR = 2100;

    public View getView() {

        return view;

    }

    public void setView(View view) {

        this.view = view;

    }

    public static int getSTART_YEAR() {

        return START_YEAR;

    }

    public static void setSTART_YEAR(int sTART_YEAR) {

        START_YEAR = sTART_YEAR;

    }

    public static int getEND_YEAR() {

        return END_YEAR;

    }

    public static void setEND_YEAR(int eND_YEAR) {

        END_YEAR = eND_YEAR;

    }

    public WheelTime(View view) {

        super();

        this.view = view;

        type = Type.ALL;

        setView(view);

    }

    public WheelTime(View view,Type type) {

        super();

        this.view = view;

        this.type = type;

        setView(view);

    }

    public void setPicker(int year ,int month,int day){

        this.setPicker(year, month, day, 0, 0);

    }

    /**

     * @Description: TODO 弹出日期时间选择器

     */

    public void setPicker(int year ,int month ,int day,int h,int m) {

        // 添加大小月月份并将其转换为list,方便之后的判断

        String[] months_big = { "1", "3", "5", "7", "8", "10", "12" };

        String[] months_little = { "4", "6", "9", "11" };

        final List<String> list_big = Arrays.asList(months_big);

        final List<String> list_little = Arrays.asList(months_little);

        Context context = view.getContext();

        // 年

        wv_year = (WheelView) view.findViewById(R.id.year);

        wv_year.setAdapter(new NumericWheelAdapter(START_YEAR, END_YEAR));// 设置"年"的显示数据

        wv_year.setLabel(context.getString(R.string.pickerview_year));// 添加文字

        wv_year.setCurrentItem(year - START_YEAR);// 初始化时显示的数据

        // 月

        wv_month = (WheelView) view.findViewById(R.id.month);

        wv_month.setAdapter(new NumericWheelAdapter(1, 12));

        wv_month.setLabel(context.getString(R.string.pickerview_month));

        wv_month.setCurrentItem(month);

        // 日

        wv_day = (WheelView) view.findViewById(R.id.day);

        // 判断大小月及是否闰年,用来确定"日"的数据

        if (list_big.contains(String.valueOf(month + 1))) {

            wv_day.setAdapter(new NumericWheelAdapter(1, 31));

        } else if (list_little.contains(String.valueOf(month + 1))) {

            wv_day.setAdapter(new NumericWheelAdapter(1, 30));

        } else {

            // 闰年

            if ((year % 4 == 0 && year % 100 != 0) || year % 400 == 0)

                wv_day.setAdapter(new NumericWheelAdapter(1, 29));

            else

                wv_day.setAdapter(new NumericWheelAdapter(1, 28));

        }

        wv_day.setLabel(context.getString(R.string.pickerview_day));

        wv_day.setCurrentItem(day - 1);

        wv_hours = (WheelView)view.findViewById(R.id.hour);

        wv_hours.setAdapter(new NumericWheelAdapter(0, 23));

        wv_hours.setLabel(context.getString(R.string.pickerview_hours));// 添加文字

        wv_hours.setCurrentItem(h);

        wv_mins = (WheelView)view.findViewById(R.id.min);

        wv_mins.setAdapter(new NumericWheelAdapter(0, 59));

        wv_mins.setLabel(context.getString(R.string.pickerview_minutes));// 添加文字

        wv_mins.setCurrentItem(m);

        // 添加"年"监听

        OnItemSelectedListener wheelListener_year = new OnItemSelectedListener() {

            @Override

            public void onItemSelected(int index) {

                int year_num = index + START_YEAR;

                // 判断大小月及是否闰年,用来确定"日"的数据

                int maxItem = 30;

                if (list_big

                        .contains(String.valueOf(wv_month.getCurrentItem() + 1))) {

                    wv_day.setAdapter(new NumericWheelAdapter(1, 31));

                    maxItem = 31;

                } else if (list_little.contains(String.valueOf(wv_month

                        .getCurrentItem() + 1))) {

                    wv_day.setAdapter(new NumericWheelAdapter(1, 30));

                    maxItem = 30;

                } else {

                    if ((year_num % 4 == 0 && year_num % 100 != 0)

                            || year_num % 400 == 0){

                        wv_day.setAdapter(new NumericWheelAdapter(1, 29));

                        maxItem = 29;

                    }

                    else{

                        wv_day.setAdapter(new NumericWheelAdapter(1, 28));

                        maxItem = 28;

                    }

                }

                if (wv_day.getCurrentItem() > maxItem - 1){

                    wv_day.setCurrentItem(maxItem - 1);

                }

            }

        };

        // 添加"月"监听

        OnItemSelectedListener wheelListener_month = new OnItemSelectedListener() {

            @Override

            public void onItemSelected(int index) {

                int month_num = index + 1;

                int maxItem = 30;

                // 判断大小月及是否闰年,用来确定"日"的数据

                if (list_big.contains(String.valueOf(month_num))) {

                    wv_day.setAdapter(new NumericWheelAdapter(1, 31));

                    maxItem = 31;

                } else if (list_little.contains(String.valueOf(month_num))) {

                    wv_day.setAdapter(new NumericWheelAdapter(1, 30));

                    maxItem = 30;

                } else {

                    if (((wv_year.getCurrentItem() + START_YEAR) % 4 == 0 && (wv_year

                            .getCurrentItem() + START_YEAR) % 100 != 0)

                            || (wv_year.getCurrentItem() + START_YEAR) % 400 == 0){

                        wv_day.setAdapter(new NumericWheelAdapter(1, 29));

                        maxItem = 29;

                    }

                    else{

                        wv_day.setAdapter(new NumericWheelAdapter(1, 28));

                        maxItem = 28;

                    }

                }

                if (wv_day.getCurrentItem() > maxItem - 1){

                    wv_day.setCurrentItem(maxItem - 1);

                }

            }

        };

        wv_year.setOnItemSelectedListener(wheelListener_year);

        wv_month.setOnItemSelectedListener(wheelListener_month);

        // 根据屏幕密度来指定选择器字体的大小(不同屏幕可能不同)

        int textSize = 6;

        switch(type){

        case ALL:

            textSize = textSize * 3;

            break;

        case YEAR_MONTH_DAY:

            textSize = textSize * 4;

            wv_hours.setVisibility(View.GONE);

            wv_mins.setVisibility(View.GONE);

            break;

        case HOURS_MINS:

            textSize = textSize * 4;

            wv_year.setVisibility(View.GONE);

            wv_month.setVisibility(View.GONE);

            wv_day.setVisibility(View.GONE);

            break;

        case MONTH_DAY_HOUR_MIN:

            textSize = textSize * 3;

            wv_year.setVisibility(View.GONE);

            break;

        case YEAR_MONTH:

            textSize = textSize * 4;

            wv_day.setVisibility(View.GONE);

            wv_hours.setVisibility(View.GONE);

            wv_mins.setVisibility(View.GONE);

        }

        wv_day.setTextSize(textSize);

        wv_month.setTextSize(textSize);

        wv_year.setTextSize(textSize);

        wv_hours.setTextSize(textSize);

        wv_mins.setTextSize(textSize);

    }

    /**

     * 设置是否循环滚动

     * @param cyclic

     */

    public void setCyclic(boolean cyclic){

        wv_year.setCyclic(cyclic);

        wv_month.setCyclic(cyclic);

        wv_day.setCyclic(cyclic);

        wv_hours.setCyclic(cyclic);

        wv_mins.setCyclic(cyclic);

    }

    public String getTime() {

        StringBuffer sb = new StringBuffer();

            sb.append((wv_year.getCurrentItem() + START_YEAR)).append("-")

            .append((wv_month.getCurrentItem() + 1)).append("-")

            .append((wv_day.getCurrentItem() + 1)).append(" ")

            .append(wv_hours.getCurrentItem()).append(":")

            .append(wv_mins.getCurrentItem());

        return sb.toString();

    }
这个控件主要负责数据展示,因此他需要加载一个view视图,加载年月日视图的时候,我们要对相应的大小月,平闰年进行逻辑的判断,另外,为了其他地方能够很方便的调用,我们还需要将选择时间数据进行封装,嗯,这个控件就负责数据的展示,就这么简单。
既然是自定义控件,前面都应该是一些铺垫,下面,我们需要对重头戏——wheelview进行一下庖丁解牛般的剖析。
前面说了wheelview控件是个controller,那么他一定有什么独特逻辑在里面,其实无论是自己自定义控件也好,还是瞻仰像sai大神也罢,无非对控件的onDraw方法,onMeasure方法,OnTouch事件搞定,一个控件也就弄明白了。我们这里也把握这个节奏来分析wheelView的代码。
从那里开始了,万事开头难,还是从最简单开始吧!
 @Override

    protected void onMeasure(int widthMeasureSpec, int heightMeasureSpec) {

        this.widthMeasureSpec = widthMeasureSpec;

        remeasure();

        setMeasuredDimension(measuredWidth, measuredHeight);

    }

    private void remeasure() {

        if (adapter == null) {

            return;

        }

        measureTextWidthHeight();

        //最大Text的高度乘间距倍数得到 可见文字实际的总高度,半圆的周长

        halfCircumference = (int) (maxTextHeight * lineSpacingMultiplier * (itemsVisible - 1)) ;

        //整个圆的周长除以PI得到直径,这个直径用作控件的总高度

        measuredHeight = (int) ((halfCircumference * 2) / Math.PI);

        //求出半径

        radius = (int) (halfCircumference / Math.PI);

        //控件宽度,这里支持weight

        measuredWidth = MeasureSpec.getSize(widthMeasureSpec);

        //计算两条横线和控件中间点的Y位置

        firstLineY = (int) ((measuredHeight - lineSpacingMultiplier * maxTextHeight) / 2.0F);

        secondLineY = (int) ((measuredHeight + lineSpacingMultiplier * maxTextHeight) / 2.0F);

        centerY = (int) ((measuredHeight + maxTextHeight) / 2.0F - CENTERCONTENTOFFSET);

        //初始化显示的item的position,根据是否loop

        if (initPosition == -1) {

            if (isLoop) {

                initPosition = (adapter.getItemsCount() + 1) / 2;

            } else {

                initPosition = 0;

            }

        }

        preCurrentIndex = initPosition;

    }
这个方法主要作用就是重新测量子控件位置,由于子控件是以半圆形式进行排列的,我们需要计算出半圆的周长,以及半圆半径,以及中间两条横线与中间点y位置,以及控件初始化位置,这些变量将在后面ondraw方法绘制时候将有很大作用。
既然能够滚动,就需要监听触摸事件,那么ontouch事件代码是怎么样的了:
    @Override

    public boolean onTouchEvent(MotionEvent event) {

        boolean eventConsumed = gestureDetector.onTouchEvent(event);

        float itemHeight = lineSpacingMultiplier * maxTextHeight;

        switch (event.getAction()) {

            case MotionEvent.ACTION_DOWN:

                startTime = System.currentTimeMillis();

                cancelFuture();

                previousY = event.getRawY();

                break;

            case MotionEvent.ACTION_MOVE:

                float dy = previousY - event.getRawY();

                previousY = event.getRawY();

                totalScrollY = (int) (totalScrollY + dy);

                // 边界处理。

                if (!isLoop) {

                    float top = -initPosition * itemHeight;

                    float bottom = (adapter.getItemsCount() - 1 - initPosition) * itemHeight;

                    if (totalScrollY < top) {

                        totalScrollY = (int) top;

                    } else if (totalScrollY > bottom) {

                        totalScrollY = (int) bottom;

                    }

                }

                break;

            case MotionEvent.ACTION_UP:

            default:

                if (!eventConsumed) {

                    float y = event.getY();

                    double l = Math.acos((radius - y) / radius) * radius;

                    int circlePosition = (int) ((l + itemHeight / 2) / itemHeight);

                    float extraOffset = (totalScrollY % itemHeight + itemHeight) % itemHeight;

                    mOffset = (int) ((circlePosition - itemsVisible / 2) * itemHeight - extraOffset);

                    if ((System.currentTimeMillis() - startTime) > 120) {

                        // 处理拖拽事件

                        smoothScroll(ACTION.DAGGLE);

                    } else {

                        // 处理条目点击事件

                        smoothScroll(ACTION.CLICK);

                    }

                }

                break;

        }

        invalidate();

        return true;

    }
在action_down中,我们需要记录用户按下坐标位置,再action_move中处理用户移动的边界值,这样做有什么好处了,就是移动条目最终都处于控件正中的位置,而在action_up,我们要确认用户到底使移动多大距离,这样子,调用重绘的方法,滚轮就会滚动相应距离,实现最终滚动效果。
如果说wheelView是本控件的核心,那么ondraw方法就是wheelView代码核心,最高潮终于来了。
 protected void onDraw(Canvas canvas) {

        if (adapter == null) {

            return;

        }

        //可见的item数组

        Object visibles[] = new Object[itemsVisible];

        //更加滚动的Y值高度除去每行Item的高度,得到滚动了多少个item,即change数

        change = (int) (totalScrollY / (lineSpacingMultiplier * maxTextHeight));

        try {

            //滚动中实际的预选中的item(即经过了中间位置的item) = 滑动前的位置 + 滑动相对位置

            preCurrentIndex = initPosition + change % adapter.getItemsCount();

        }catch (ArithmeticException e){

            System.out.println("出错了!adapter.getItemsCount() == 0,联动数据不匹配");

        }

        if (!isLoop) {//不循环的情况

            if (preCurrentIndex < 0) {

                preCurrentIndex = 0;

            }

            if (preCurrentIndex > adapter.getItemsCount() - 1) {

                preCurrentIndex = adapter.getItemsCount() - 1;

            }

        } else {//循环

            if (preCurrentIndex < 0) {//举个例子:如果总数是5,preCurrentIndex = -1,那么preCurrentIndex按循环来说,其实是0的上面,也就是4的位置

                preCurrentIndex = adapter.getItemsCount() + preCurrentIndex;

            }

            if (preCurrentIndex > adapter.getItemsCount() - 1) {//同理上面,自己脑补一下

                preCurrentIndex = preCurrentIndex - adapter.getItemsCount();

            }

        }

        //跟滚动流畅度有关,总滑动距离与每个item高度取余,即并不是一格格的滚动,每个item不一定滚到对应Rect里的,这个item对应格子的偏移值

        int itemHeightOffset = (int) (totalScrollY % (lineSpacingMultiplier * maxTextHeight));

        // 设置数组中每个元素的值

        int counter = 0;

        while (counter < itemsVisible) {

            int index = preCurrentIndex - (itemsVisible / 2 - counter);//索引值,即当前在控件中间的item看作数据源的中间,计算出相对源数据源的index值

            //判断是否循环,如果是循环数据源也使用相对循环的position获取对应的item值,如果不是循环则超出数据源范围使用""空白字符串填充,在界面上形成空白无数据的item项

            if (isLoop) {

                if (index < 0) {

                    index = index + adapter.getItemsCount();

                    if(index < 0){

                        index = 0;

                    }

                }

                if (index > adapter.getItemsCount() - 1) {

                    index = index - adapter.getItemsCount();

                    if (index > adapter.getItemsCount() - 1){

                        index = adapter.getItemsCount() - 1;

                    }

                }

                visibles[counter] = adapter.getItem(index);

            } else if (index < 0) {

                visibles[counter] = "";

            } else if (index > adapter.getItemsCount() - 1) {

                visibles[counter] = "";

            } else {

                visibles[counter] = adapter.getItem(index);

            }

            counter++;

        }

        //中间两条横线

        canvas.drawLine(0.0F, firstLineY, measuredWidth, firstLineY, paintIndicator);

        canvas.drawLine(0.0F, secondLineY, measuredWidth, secondLineY, paintIndicator);

        //单位的Label

        if(label != null) {

            int drawRightContentStart = measuredWidth - getTextWidth(paintCenterText,label);

            //靠右并留出空隙

            canvas.drawText(label, drawRightContentStart - CENTERCONTENTOFFSET, centerY, paintCenterText);

        }

        counter = 0;

        while (counter < itemsVisible) {

            canvas.save();

            // L(弧长)=α(弧度)* r(半径) (弧度制)

            // 求弧度--> (L * π ) / (π * r)   (弧长X派/半圆周长)

            float itemHeight = maxTextHeight * lineSpacingMultiplier;

            double radian = ((itemHeight * counter - itemHeightOffset) * Math.PI) / halfCircumference;

            // 弧度转换成角度(把半圆以Y轴为轴心向右转90度,使其处于第一象限及第四象限

            float angle = (float) (90D - (radian / Math.PI) * 180D);

            if (angle >= 90F || angle <= -90F) {

                canvas.restore();

            } else {

                String contentText = getContentText(visibles[counter]);

                //计算开始绘制的位置

                measuredCenterContentStart(contentText);

                measuredOutContentStart(contentText);

                int translateY = (int) (radius - Math.cos(radian) * radius - (Math.sin(radian) * maxTextHeight) / 2D);

                //根据Math.sin(radian)来更改canvas坐标系原点,然后缩放画布,使得文字高度进行缩放,形成弧形3d视觉差

                canvas.translate(0.0F, translateY);

                canvas.scale(1.0F, (float) Math.sin(radian));

                if (translateY <= firstLineY && maxTextHeight + translateY >= firstLineY) {

                    // 条目经过第一条线

                    canvas.save();

                    canvas.clipRect(0, 0, measuredWidth, firstLineY - translateY);

                    canvas.scale(1.0F, (float) Math.sin(radian) * SCALECONTENT);

                    canvas.drawText(contentText, drawOutContentStart, maxTextHeight, paintOuterText);

                    canvas.restore();

                    canvas.save();

                    canvas.clipRect(0, firstLineY - translateY, measuredWidth, (int) (itemHeight));

                    canvas.scale(1.0F, (float) Math.sin(radian) * 1F);

                    canvas.drawText(contentText, drawCenterContentStart, maxTextHeight - CENTERCONTENTOFFSET, paintCenterText);

                    canvas.restore();

                } else if (translateY <= secondLineY && maxTextHeight + translateY >= secondLineY) {

                    // 条目经过第二条线

                    canvas.save();

                    canvas.clipRect(0, 0, measuredWidth, secondLineY - translateY);

                    canvas.scale(1.0F, (float) Math.sin(radian) * 1.0F);

                    canvas.drawText(contentText, drawCenterContentStart, maxTextHeight - CENTERCONTENTOFFSET, paintCenterText);

                    canvas.restore();

                    canvas.save();

                    canvas.clipRect(0, secondLineY - translateY, measuredWidth, (int) (itemHeight));

                    canvas.scale(1.0F, (float) Math.sin(radian) * SCALECONTENT);

                    canvas.drawText(contentText, drawOutContentStart, maxTextHeight, paintOuterText);

                    canvas.restore();

                } else if (translateY >= firstLineY && maxTextHeight + translateY <= secondLineY) {

                    // 中间条目

                    canvas.clipRect(0, 0, measuredWidth, (int) (itemHeight));

                    canvas.drawText(contentText, drawCenterContentStart, maxTextHeight - CENTERCONTENTOFFSET, paintCenterText);

                    int preSelectedItem = adapter.indexOf(visibles[counter]);

                    if(preSelectedItem != -1){

                        selectedItem = preSelectedItem;

                    }

                } else {

                    // 其他条目

                    canvas.save();

                    canvas.clipRect(0, 0, measuredWidth, (int) (itemHeight));

                    canvas.scale(1.0F, (float) Math.sin(radian) * SCALECONTENT);

                    canvas.drawText(contentText, drawOutContentStart, maxTextHeight, paintOuterText);

                    canvas.restore();

                }

                canvas.restore();

            }

            counter++;

        }

    }
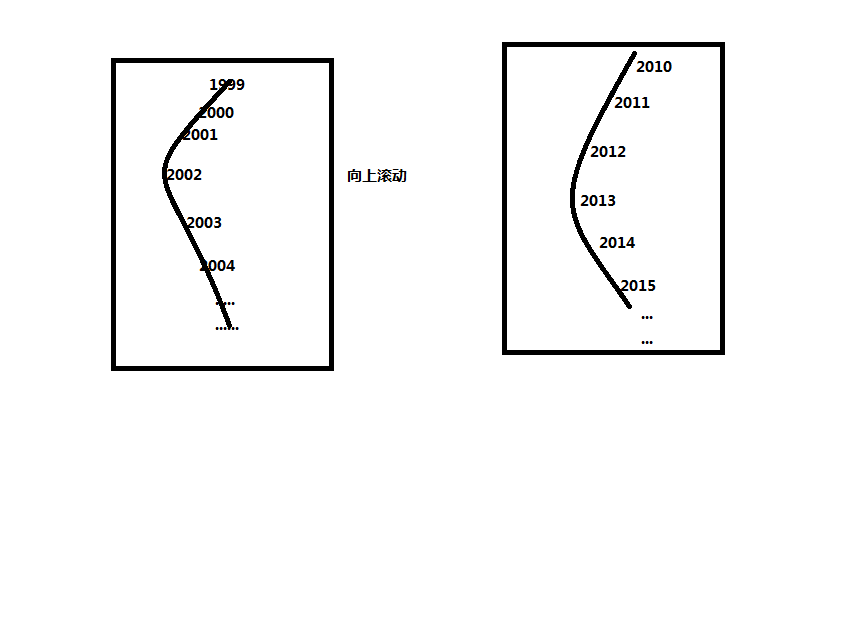
前文提到过,根据用户滚动的距离,计算出最终滚动到条目,然后把这条目周围一定数目的数据绘制出来,最难理解,就是到底如何绘制的了,我们可以这样理解根据位置来计算应该把画布哪部分进行缩放,上下就是压小高度,中间放大高度,然后下面判断这个文字位置到哪里了,超过第一条线就是说明进入中间位置,放大文字,超过第二条线说明出了中间位置,缩回去。也许,你还会问,他y轴是如何移动的,它移动距离其实就是你可以理解为一条线曲成弧形,然后根据在这条线上的位置计算出这个弧形上面的位置再折射出这个弧形对应一条竖的射影位置。示意图如下:
这就是我对这个控件一点心得。
最新文章
- About_PHP_函数
- (转)Linux grep
- (推荐)WPF动画教程
- 鸟哥的linux私房菜之磁盘与文件系统管理
- Android开发UI之给ListView设置布局动画效果
- hdu3949 XOR xor高斯消元
- ThinkPHP自动验证
- 微信公众号菜单openid 点击菜单即可打开并登录微站
- 在windows下的QT编程中的_TCHAR与QString之间的转换
- Spring整合CXF webservice restful 实例
- PHP操作MySQL对表增加一列(一个字段)
- Ext.Net 1.X_读写配置文件
- python笔记--2--字符串、正则表达式
- storage.go
- Operation not allowed on a unidirectional dataset错误?
- FineUILearning
- android-基础编程-democoderjoy-架构篇
- iOS: 获取UITableViewCell上添加的子控件对应的cell
- Hadoop Hive概念学习系列之hive里的分区(九)
- 8分钟丨教你玩转 API