day52 进程与守护进程
http://www.cnblogs.com/Eva-J/articles/8253549.html 博客参考.


多进程聊天
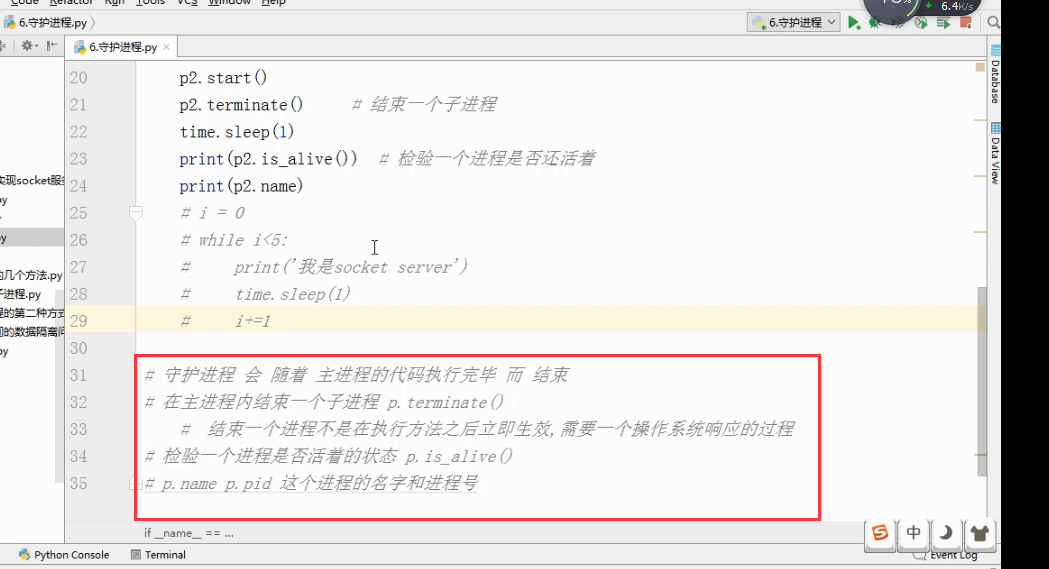
守护进程.

多进程
1、Unix/Linux:fork()调用实现多进程。
2、Windows没有fork(),multiprocessing模块就是跨平台版本的多进程模块。multiprocessing模块提供了一个Process类来代表一个进程对象。
#启动一个子进程并等待其结束:
from multiprocessing import Process
import os # 子进程要执行的代码
def run_proc(name):
print('Run child process %s (%s)...' % (name, os.getpid())) #主函数
if __name__=='__main__':
print('Parent process %s.' % os.getpid()) #创建子进程时,只需要传入一个执行函数和函数的参数,
#创建一个Process实例,用start()方法启动。
p = Process(target=run_proc, args=('test',))
print('Child process will start.')
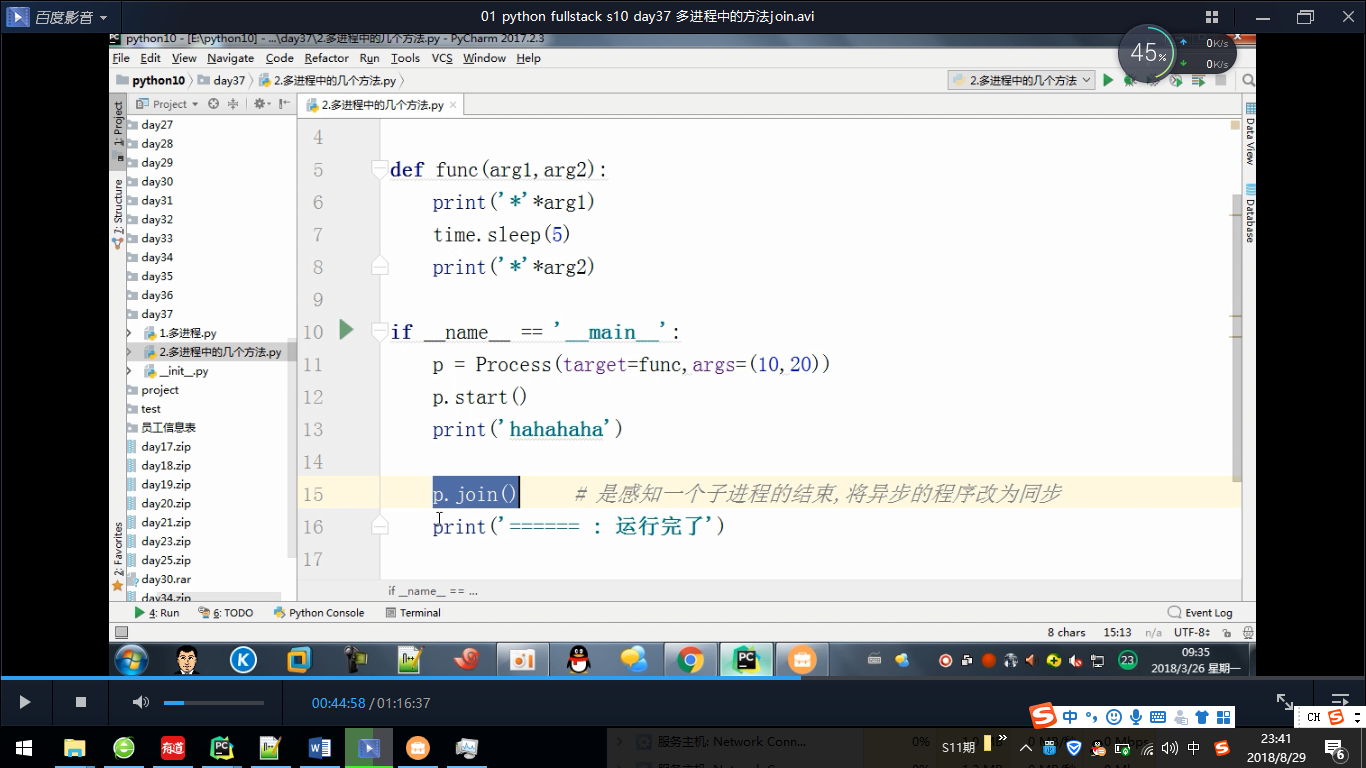
p.start() #join()可等待子进程结束后再继续往下运行,通常用于进程间的同步。
p.join()
print('Child process end.') 结果:
Parent process 928.
Process will start.
Run child process test (929)...
Process end.
进程间通信
1、Process之间肯定是需要通信的,Python的multiprocessing模块包装了底层的机制,提供了Queue、Pipes等多种方式来交换数据。
以Queue为例,在父进程中创建两个子进程,一个往Queue里写数据,一个从Queue里读数据:
from multiprocessing import Process, Queue

import os, time, random

# 写数据进程执行的代码:

def write(q):

    print('Process to write: %s' % os.getpid())

    for value in ['A', 'B', 'C']:

        print('Put %s to queue...' % value)

        q.put(value)

        time.sleep(random.random())

# 读数据进程执行的代码:

def read(q):

    print('Process to read: %s' % os.getpid())

    while True:

        value = q.get(True)

        print('Get %s from queue.' % value)

if __name__=='__main__':

    # 父进程创建Queue,并传给各个子进程:

    q = Queue()

    pw = Process(target=write, args=(q,))

    pr = Process(target=read, args=(q,))

    # 启动子进程pw,写入:

    pw.start()

    # 启动子进程pr,读取:

    pr.start()

    # 等待pw结束:

    pw.join()

    # pr进程里是死循环,无法等待其结束,只能强行终止:

    pr.terminate()

结果:

Process to write: 50563

Put A to queue...

Process to read: 50564

Get A from queue.

Put B to queue...

Get B from queue.

Put C to queue...

Get C from queue.
多线程
1、Python的标准库提供了两个模块:_thread(低级模块)和threading(高级模块,对_thread进行了封装)。绝大多数情况下,我们只需要使用threading这个高级模块。
2、启动一个线程就是把一个函数传入并创建Thread实例,然后调用start()开始执行:
import time, threading

# 新线程执行的代码:

def loop():

    print('thread %s is running...' % threading.current_thread().name)

    n =

    while n < :

        n = n +

        print('thread %s >>> %s' %(threading.current_thread().name, n))

        time.sleep()

    print('thread %s ended.' % threading.current_thread().name)

print('thread %s is running...' % threading.current_thread().name)

t = threading.Thread(target=loop, name='LoopThread')

t.start()

t.join()

print('thread %s ended.' % threading.current_thread().name)

结果:

thread MainThread is running...

thread LoopThread is running...

thread LoopThread >>>

thread LoopThread >>>

thread LoopThread >>>

thread LoopThread >>>

thread LoopThread >>>

thread LoopThread ended.

thread MainThread ended.
由于任何进程默认就会启动一个线程(主线程),主线程又可以启动新的线程,current_thread()永远返回当前线程的实例。主线程实例的名字叫MainThread,子线程的名字在创建时指定。名字仅仅在打印时用来显示,完全没有其他意义,如果不起名字Python就自动给线程命名为Thread-1,Thread-2……
3、
多进程:同一个变量,各自有一份拷贝存在于每个进程中,互不影响。
多线程:所有变量都由所有线程共享。所以,任何一个变量都可以被任何一个线程修改,因此,线程之间共享数据最大的危险在于多个线程同时改一个变量,把内容给改乱了。
#来看看多个线程同时操作一个变量怎么把内容给改乱了

import time, threading

# 假定这是你的银行存款:

balance =

def change_it(n):

    # 先存后取,结果应该为0:

    global balance

    balance = balance + n

    balance = balance - n

def run_thread(n):

    for i in range():

        change_it(n)

t1 = threading.Thread(target=run_thread, args=(,))

t2 = threading.Thread(target=run_thread, args=(,))

t1.start()

t2.start()

t1.join()

t2.join()

print(balance)


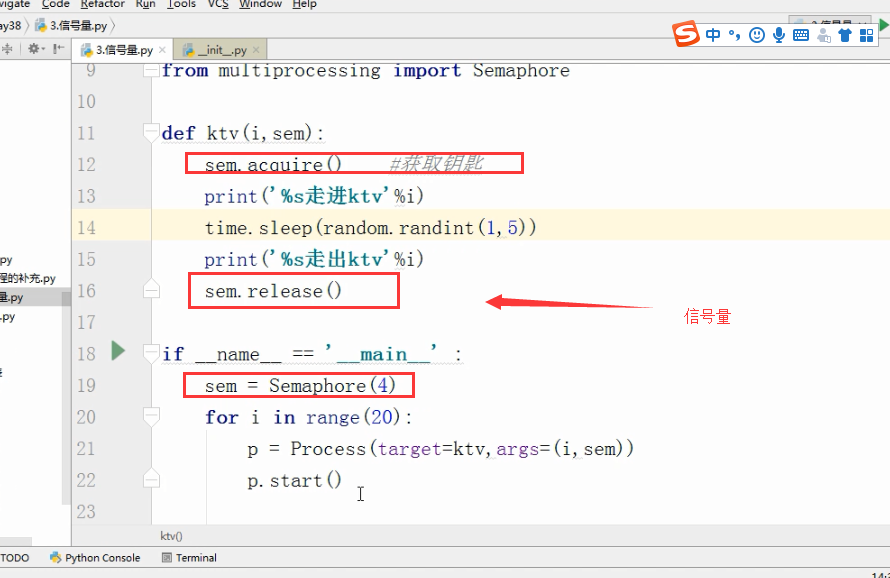
信号量:
Event事件

队列

线程:
守护线程:

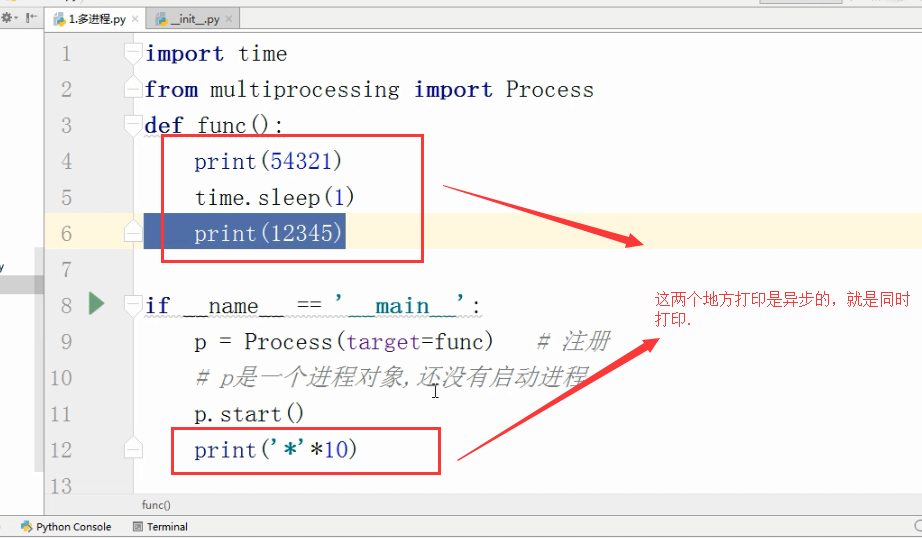
import time

from multiprocessing import Process

def func():

    time.sleep()

    print("func1")

if __name__=="__main__":

    Process(target=func).start()

    print()

打印结果:

func1

先打印999,打印完后等待两秒打印func1

案例2
import time

from threading import Thread

def func1():

    while True:

        print('*'*10)

        time.sleep(1)

def func2():

    print('in func2')

    time.sleep(5)

t = Thread(target=func1,)

t.daemon = True

t.start()

t2 = Thread(target=func2,)

t2.start()

t2.join()  #join 语句的执行会等待最后打印“”主线程“”

print('主线程')
打印结果:
**********

in func2

**********

**********

**********

**********

主线程

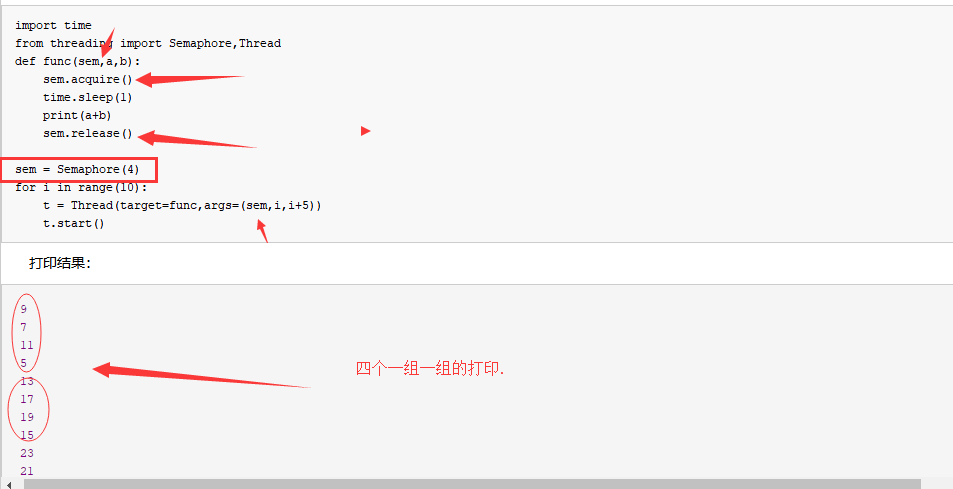
信号量

信号量
import time

from threading import Semaphore,Thread

def func(sem,a,b):

    sem.acquire()

    time.sleep(1)

    print(a+b)

    sem.release()

sem = Semaphore(4)

for i in range(10):

    t = Thread(target=func,args=(sem,i,i+5))

    t.start()
打印结果:
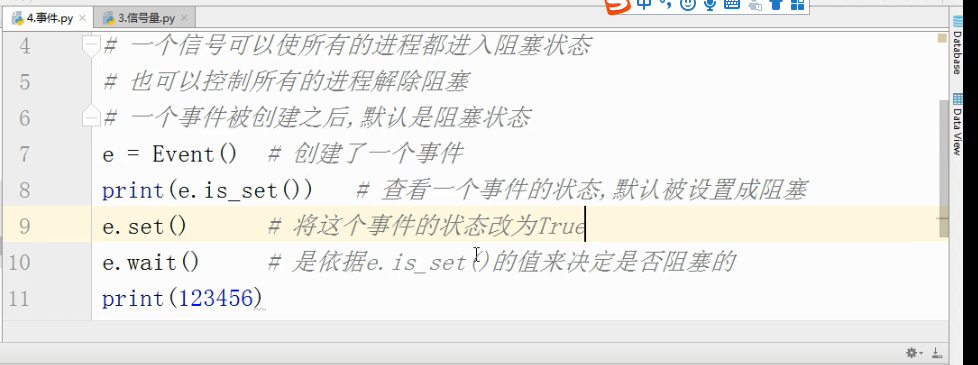
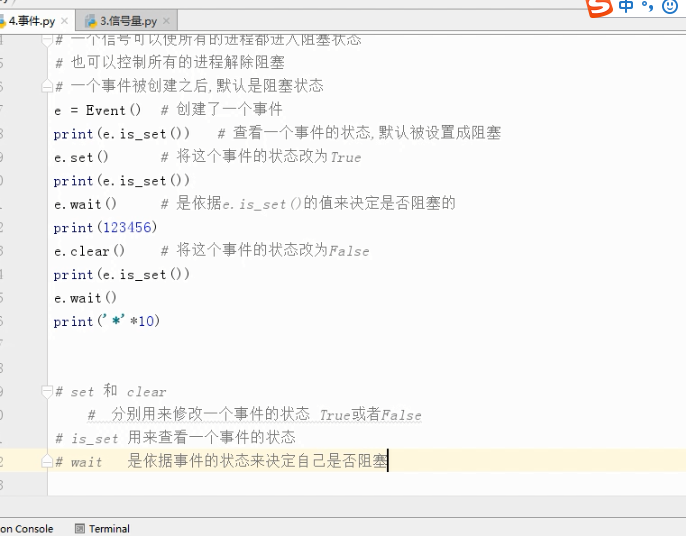
事件 :
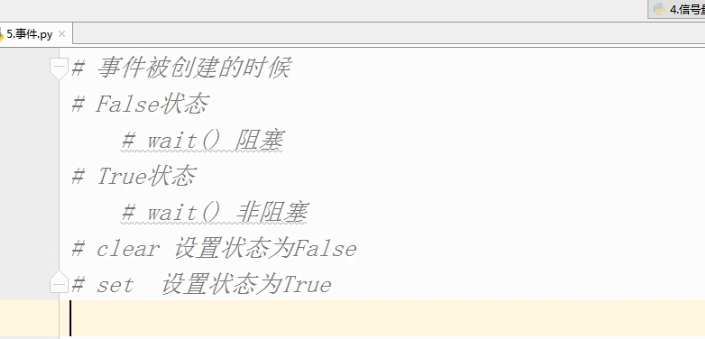
# 事件被创建的时候

# False状态

    # wait() 阻塞

# True状态

    # wait() 非阻塞

# clear 设置状态为False

# set  设置状态为True

#  数据库 - 文件夹

#  文件夹里有好多excel表格

    # .能够更方便的对数据进行增删改查

    # .安全访问的机制

#  起两个线程

#  第一个线程 : 连接数据库

        # 等待一个信号 告诉我我们之间的网络是通的

        # 连接数据库

#  第二个线程 : 检测与数据库之间的网络是否连通

        # time.sleep(,)

        # 将事件的状态设置为True

import time

import random

from threading import Thread,Event

def connect_db(e):

    count =

    while count < :

        e.wait(0.5)   # 状态为False的时候,我只等待1s就结束

        if e.is_set() == True:

            print('连接数据库')

            break

        else:

            count +=

            print('第%s次连接失败'%count)

    else:

        raise TimeoutError('数据库连接超时')

def check_web(e):

    time.sleep(random.randint(,))

    e.set()

e = Event()

t1 = Thread(target=connect_db,args=(e,))

t2 = Thread(target=check_web,args=(e,))

t1.start()

t2.start()
条件
# 条件

from threading import Condition

# 条件

# 锁

# acquire release

# 一个条件被创建之初 默认有一个False状态

# False状态 会影响wait一直处于等待状态

# notify(int数据类型)  造钥匙

from threading import Thread,Condition

def func(con,i):

    con.acquire()

    con.wait() # 等钥匙

    print('在第%s个循环里'%i)

    con.release()

con = Condition()

for i in range():

    Thread(target=func,args = (con,i)).start()

while True:

    num = int(input('>>>'))

    con.acquire()

    con.notify(num)  # 造钥匙

    con.release()
定时器
https://www.jb51.net/article/139000.htm
import time

from threading import Timer

def func():

    print('时间同步')   #-

while True:

    t = Timer(,func).start()   # 非阻塞的

    time.sleep()
队列和栈:
队列 ,先进先出
import  queue

q =queue.Queue()

q.put(100)

q.put(200)
结果:
栈,先进后出.
q = queue.LifoQueue()#栈 ,先进后出,

q.put()

q.put()

q.put()

print(q.get())

print(q.get())

print(q.get())
打印结果:
优先级队列
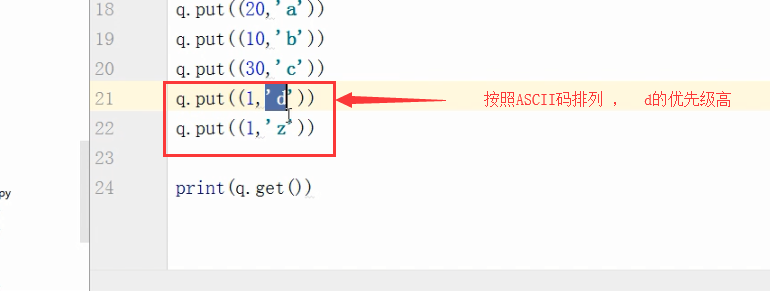
q=queue.PriorityQueue() #优先级队列

q.put((,"a"))

q.put((,"b"))

q.put((,"c"))

q.put((,"d"))

print(q.get())
打印结果:
(, 'b')
优先级高的是数字最小的。
池 .concurrent.futures.
import time

from concurrent.futures import ThreadPoolExecutor

def func(n):

    time.sleep()

    print(n)

    return n*n

def call_back(m):

    print('结果是 %s'%m.result())

tpool = ThreadPoolExecutor(max_workers=)   #  默认 不要超过cpu个数*

for i in  range():

    tpool.submit(func,i).add_done_callback(call_back)

# tpool.map(func,range())  # 拿不到返回值

# t_lst = []

# for i in  range():

#     t = tpool.submit(func,i)

#     t_lst.append(t)

# tpool.shutdown()  # close+join    #

# print('主线程')

# for t in t_lst:print('***',t.result())

# ftp

# 并发编程
Event(事件)
Event(事件):事件处理的机制:全局定义了一个内置标志Flag,如果Flag值为 False,那么当程序执行 event.wait方法时就会阻塞,如果Flag值为True,那么event.wait 方法时便不再阻塞。
Event其实就是一个简化版的 Condition。Event没有锁,无法使线程进入同步阻塞状态。
Event()
- set(): 将标志设为True,并通知所有处于等待阻塞状态的线程恢复运行状态。
- clear(): 将标志设为False。
- wait(timeout): 如果标志为True将立即返回,否则阻塞线程至等待阻塞状态,等待其他线程调用set()。
- isSet(): 获取内置标志状态,返回True或False。
Event案例1
场景:小伙伴a和b准备就绪,当收到通知event.set()的时候,会执行a和b线程
|
1
2
3
4
5
6
7
8
9
10
11
12
13
14
15
16
17
18
19
20
21
22
23
24
25
26
27
28
29
30
31
32
33
34
35
36
37
|
# coding:utf-8import threadingimport timeevent = threading.Event()def chihuoguo(name): # 等待事件,进入等待阻塞状态 print '%s 已经启动' % threading.currentThread().getName() print '小伙伴 %s 已经进入就餐状态!'%name time.sleep(1) event.wait() # 收到事件后进入运行状态 print '%s 收到通知了.' % threading.currentThread().getName() print '小伙伴 %s 开始吃咯!'%name# 设置线程组threads = []# 创建新线程thread1 = threading.Thread(target=chihuoguo, args=("a", ))thread2 = threading.Thread(target=chihuoguo, args=("b", ))# 添加到线程组threads.append(thread1)threads.append(thread2)# 开启线程for thread in threads: thread.start()time.sleep(0.1)# 发送事件通知print '主线程通知小伙伴开吃咯!'event.set() |
运行结果:
Thread-1 已经启动
小伙伴 a 已经进入就餐状态!
Thread-2 已经启动
小伙伴 b 已经进入就餐状态!
主线程通知小伙伴开吃咯!
Thread-1 收到通知了.
小伙伴 a 开始吃咯!
Thread-2 收到通知了.
小伙伴 b 开始吃咯!
Event案例2
场景:当小伙伴a,b,c集结完毕后,请客的人发话:开吃咯!
|
1
2
3
4
5
6
7
8
9
10
11
12
13
14
15
16
17
18
19
20
21
22
23
24
25
26
27
28
29
30
31
32
33
34
35
36
37
38
39
40
41
42
43
44
45
46
47
48
49
50
51
52
53
|
# coding:utf-8import threadingimport timeevent = threading.Event()def chiHuoGuo(name): # 等待事件,进入等待阻塞状态 print '%s 已经启动' % threading.currentThread().getName() print '小伙伴 %s 已经进入就餐状态!'%name time.sleep(1) event.wait() # 收到事件后进入运行状态 print '%s 收到通知了.' % threading.currentThread().getName() print '%s 小伙伴 %s 开始吃咯!'%(time.time(), name)class myThread (threading.Thread): # 继承父类threading.Thread def __init__(self, name): '''重写threading.Thread初始化内容''' threading.Thread.__init__(self) self.people = name def run(self): # 把要执行的代码写到run函数里面 线程在创建后会直接运行run函数 '''重写run方法''' chiHuoGuo(self.people) # 执行任务 print("qq交流群:226296743") print("结束线程: %s" % threading.currentThread().getName())# 设置线程组threads = []# 创建新线程thread1 = myThread("a")thread2 = myThread("b")thread3 = myThread("c")# 添加到线程组threads.append(thread1)threads.append(thread2)threads.append(thread3)# 开启线程for thread in threads: thread.start()time.sleep(0.1)# 发送事件通知print '集合完毕,人员到齐了,开吃咯!'event.set() |
运行结果:
Thread-1 已经启动
小伙伴 a 已经进入就餐状态!
Thread-2 已经启动
小伙伴 b 已经进入就餐状态!
Thread-3 已经启动
小伙伴 c 已经进入就餐状态!
集合完毕,人员到齐了,开吃咯!
Thread-1 收到通知了.
1516780957.47 小伙伴 a 开始吃咯!
qq交流群:226296743
结束线程: Thread-1
Thread-3 收到通知了.
1516780957.47 小伙伴 c 开始吃咯!Thread-2 收到通知了.
qq交流群:2262967431516780957.47 小伙伴 b 开始吃咯!结束线程: Thread-3
qq交流群:226296743
结束线程: Thread-2
以上就是本文的全部内容,希望对大家的学习有所帮助,也希望大家多多支持脚本之家。
最新文章
- 创建几个常用table展示方式插件
- Rust初步(二):使用Visual Studio Code编写Rust程序(猜猜看游戏)
- js页面刷新、前进、后退
- Nodejs断言测试
- mongoDB Replica集群配置(1主+1从+1仲裁)
- 【shell】变量
- maven 添加中央仓库中没有的jar
- Qt刷新机制的一些总结(Qt内部画的时候是相当于画在后台一个对象里,然后在刷新的时候调用bitblt统一画,调用window的api并不会影响到后面的那个对象)
- MVC - 布局
- 一次优化web项目的经历记录(三)
- session之退出登陆
- Boost Thread学习笔记
- 【Netty】Netty核心组件介绍
- 【移动开发】EditText输入字数限制总结(包括中文输入内存溢出的解决方法)
- Palette状态栏颜色提取,写的不错就分享了
- 理解 Web 中的Session
- 阿里巴巴Java开发规约及插件安装
- Spark记录-spark编程介绍
- SQL学习(持续更新)
- python的字符串格式化