cocos2d-x 绘制基本图元
2024-10-11 07:58:33
转自:http://4137613.blog.51cto.com/4127613/754729
第一部分:基本图形绘制
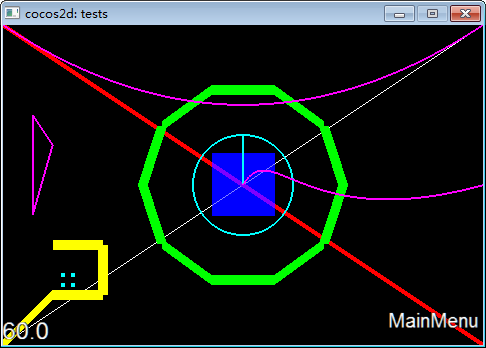
cocos2dx封装了大量opengl函数,用于快速绘制基本图形,这些代码的例子在,tests\DrawPrimitivesTest目录下
注意,该方法是重载node的draw方法实现的,在智能机上,并不推荐直接绘制几何图形,因为大量的坐标编码会极大降低工作效率,应尽量使用Image。而且cocos2dx的渲染机制会造成前后遮挡问题,尤其是几何图形与图片等其他node混合绘制时。
void DrawPrimitivesTest::draw()

{

    CCLayer::draw();

    CCSize s = CCDirector::sharedDirector()->getWinSize();

        // draw a simple line

        // The default state is:

        // Line Width: 1

        // color: 255,255,255,255 (white, non-transparent)

        // Anti-Aliased

        glEnable(GL_LINE_SMOOTH);

        ccDrawLine( CCPointMake(, ), CCPointMake(s.width, s.height) );

        // line: color, width, aliased

        // glLineWidth > 1 and GL_LINE_SMOOTH are not compatible

        //注意:线宽>1 则不支持GL_LINE_SMOOTH

        // GL_SMOOTH_LINE_WIDTH_RANGE = (1,1) on iPhone

        glDisable(GL_LINE_SMOOTH);

        glLineWidth( 5.0f );

        /*glColor4ub(255,0,0,255);*/

        glColor4f(1.0, 0.0, 0.0, 1.0);

        ccDrawLine( CCPointMake(, s.height), CCPointMake(s.width, ) );

        // TIP:

        // If you are going to use always the same color or width, you don't

        // need to call it before every draw

        //

        // Remember: OpenGL is a state-machine.

        // draw big point in the center

        // 注意:cocos2dx绘制的是方块点

        glPointSize();

        /*glColor4ub(0,0,255,128);*/

        glColor4f(0.0, 0.0, 1.0, 0.5);

        ccDrawPoint( CCPointMake(s.width / , s.height / ) );

        // draw 4 small points

        // 注意:cocos2dx绘制的是方块点

        CCPoint points[] = { CCPointMake(,), CCPointMake(,), CCPointMake(,), CCPointMake(,) };

        glPointSize();

        /*glColor4ub(0,255,255,255);*/

        glColor4f(0.0, 1.0, 1.0, 1.0);

        ccDrawPoints( points, );

        // draw a green circle with 10 segments

        glLineWidth();

        /*glColor4ub(0, 255, 0, 255);*/

        glColor4f(0.0, 1.0, 0.0, 1.0);

       //参数依次是:中心点,半径,角度,分段数,是否连接中心点

        ccDrawCircle( CCPointMake(s.width/,  s.height/), , , , false);

        // draw a green circle with 50 segments with line to center

        glLineWidth();

        /*glColor4ub(0, 255, 255, 255);*/

        glColor4f(0.0, 1.0, 1.0, 1.0);

        ccDrawCircle( CCPointMake(s.width/, s.height/), , CC_DEGREES_TO_RADIANS(), , true);

        // open yellow poly

        /*glColor4ub(255, 255, 0, 255);*/

        glColor4f(1.0, 1.0, 0.0, 1.0);

        glLineWidth();

        CCPoint vertices[] = { CCPointMake(,), CCPointMake(,), CCPointMake(,), CCPointMake(,), CCPointMake(,) };

        //参数依次是:点数组,点数量,是否封闭

        ccDrawPoly( vertices, , false);

        // closed purple poly

        /*glColor4ub(255, 0, 255, 255);*/

        glColor4f(1.0, 0.0, 1.0, 1.0);

        glLineWidth();

        CCPoint vertices2[] = { CCPointMake(,), CCPointMake(,), CCPointMake(,) };

        ccDrawPoly( vertices2, , true);

        // draw quad bezier path

          //绘制有一个控制点的贝塞尔曲线

       ccDrawQuadBezier(CCPointMake(,s.height), CCPointMake(s.width/,s.height/), CCPointMake(s.width,s.height), );

       // draw cubic bezier path

       //绘制有两个控制点的贝塞尔曲线

       ccDrawCubicBezier(CCPointMake(s.width/, s.height/), CCPointMake(s.width/+,s.height/+), CCPointMake(s.width/+,s.height/-),CCPointMake(s.width, s.height/),);

        //恢复opengl的正常参数

        // restore original values

        glLineWidth();

        /*glColor4ub(255,255,255,255);*/

        glColor4f(1.0, 1.0, 1.0, 1.0);

        glPointSize();

}
第二部分:字符串绘制
#1 cocos2dx的字符串绘制使用的是Label,cocos2dx并不直接支持在屏幕中绘制字符串(这是有道理的,因为我们不能直接把一个string做成一个节点,那样很难理解),如果要直接绘制的话,可以自己封装opengl函数(网上有很多例子,一般是用texture做)。
其实最简单的绘制例子就是最开始的那个Helloworld。核心代码如下:
// Create a label and initialize with string "Hello World".

CCLabelTTF* pLabel = CCLabelTTF::labelWithString("Hello World", "Thonburi", );

CC_BREAK_IF(! pLabel);

// Get window size and place the label upper.

CCSize size = CCDirector::sharedDirector()->getWinSize();

pLabel->setPosition(ccp(size.width / , size.height - ));

// Add the label to HelloWorld layer as a child layer.

this->addChild(pLabel, );
建立一个CCLabelTTF并添加到子节点即可。
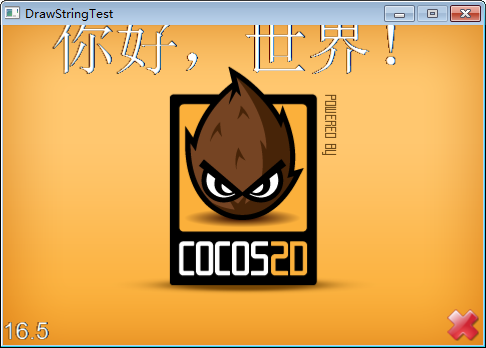
#2 绘制中文
但,如果绘制中文呢?
CCLabelTTF* pLabel = CCLabelTTF::labelWithString("你好,世界", "Thonburi", );
注意:需要使用VS的另存为功能
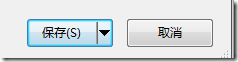
将含有中文字符串的源代码,保存为UTF-8格式

否则显示为乱码。
手动保存比较麻烦,可以使用批量转换工具,如:boomworks的“文件编码转换工具”
#3 文字锚点对齐与坐标计算
为了便于字体对齐,我们在很多游戏引擎中,都使用对齐锚点的功能,如j2me的anchor参数接口。
我们添加一个CCLayer,并重载他的draw函数,然后在draw中绘制十字线。
void HelloWorldLayer::draw()

{

        CCLayer::draw();

       CCSize s = CCDirector::sharedDirector()->getWinSize();

        glEnable(GL_LINE_SMOOTH);

        ccDrawLine( CCPointMake(, s.height/), CCPointMake(s.width, s.height/) );

        ccDrawLine( CCPointMake(s.width/, ), CCPointMake(s.width/, s.height) );

}
然后,我们重写绘制字体函数,将坐标修改为屏幕正中
pLabel->setPosition(ccp(size.width / , size.height/));
可以看到,cocos2d默认锚点是node的中心。
.png)

如果要采用其他方式对齐,如左上角,可以使用getContentSize()获取CCSize。然后调整位置。
注意:中文字符获取宽高似乎有bug,在win32上面获得不了准确的数值。
注意:由于手机不同平台的适配方案不同,我们在写坐标时,不要使用绝对坐标值的加减,而应使用比例,乘除等方法。否则,开启适配函数后,坐标值会被映射成多个像素点,造成渲染错位。
第三部分:绘制图片
cocos2dx中并没有直接绘制图片的概念,我们一般是使用CCSprite。核心代码如下:
// 3. Add add a splash screen, show the cocos2d splash image.

CCSprite* pSprite = CCSprite::spriteWithFile("HelloWorld.png");

CC_BREAK_IF(! pSprite);

// Place the sprite on the center of the screen

pSprite->setFlipX(true); //可以手动设置图形旋转和镜像,而不是使用Action,因为有许多Action是个过程,而不是直接显示结果

pSprite->setRotation();

pSprite->setPosition(ccp(size.width/, size.height/));

// Add the sprite to HelloWorld layer as a child layer.

this->addChild(pSprite, );
绘制后的效果如下:

最新文章
- 基于jQuery的Validate表单验证
- 获取当前正在执行的Javascript脚本文件的路径
- #8.11.16总结#CSS常用样式总结(二)
- 报表引擎API开发入门— EJB程序数据源
- Javascript学习笔记:9种创建对象的方式
- java使用xheditor Ajax异步上传错误
- bind的例子
- oracle 11g 64位安装sqldeveloper打开不了
- POJ 1704 Georgia and Bob (Nim游戏变形)
- hibernate update部分更新
- 内联函数 inline 漫谈
- iOS旋钮动画-CircleKnob
- Android开发学习之路--Activity之四种启动模式
- 20172328 2018-2019《Java软件结构与数据结构》第四周学习总结
- python爬虫简单的添加代理进行访问
- Java好的的工具类:JsonUtils
- luogu1196 银河英雄传说 (并查集)
- c# 多态 虚方法
- 2018-02-27 "Literate Programming"一书摘记之一
- JS事件覆盖问题和触发问题
热门文章
- 双缓冲(Double Buffer)原理和使用
- Bootstrap 貌似不错,先做一下记录
- MongoDB实战指南(二):索引与查询优化
- UVALive 6609 Minimal Subarray Length (查找+构建排序数组)
- USB (Universal Serial Bus)
- 第一章 USB Type C的基本原理
- ORA-12545:Connect failed beacuse target host or object does not exist
- Spring的annotation用在set方法上 hibernate的annotation用get方法上
- C#实现微信公众号群发消息(突破破解一天只能发一次的限制)
- BZOJ_1621_[Usaco2008_Open]_Roads_Around_The_Farm_分岔路口(模拟+大水题)