springboot结合开源editor.md集成markdonw编辑器
今天来实现一个简单的功能,通常blog后台编辑大多使用的是富文本编辑器,比如百度的Ueditor,比较轻巧的wangEditor,那么如何使用开源editor.md的markdown呢?
搭建一个springboot+mybatis的项目,然后通过markdown编辑器对表Content进行插入操作,下面开始
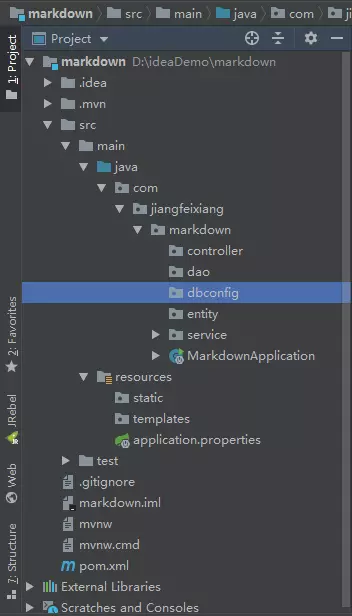
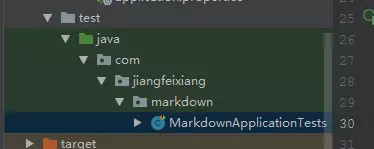
通过IDEA创建一个项目为markdown的springboot项目,结构如下:
添加依赖pom.xml
 <dependencies>

        <!--thymeleaf-->

        <dependency>

            <groupId>org.springframework.boot</groupId>

            <artifactId>spring-boot-starter-thymeleaf</artifactId>

        </dependency>

        <!-- web-->

        <dependency>

            <groupId>org.springframework.boot</groupId>

            <artifactId>spring-boot-starter-web</artifactId>

        </dependency>

        <!-- mybatis-->

        <dependency>

            <groupId>org.mybatis.spring.boot</groupId>

            <artifactId>mybatis-spring-boot-starter</artifactId>

            <version>1.3.2</version>

        </dependency>

        <!--数据库相关-->

        <!-- mysql-->

        <dependency>

            <groupId>mysql</groupId>

            <artifactId>mysql-connector-java</artifactId>

            <scope>runtime</scope>

        </dependency>

        <!--Druid数据库连接池-->

         <dependency>

            <groupId>com.alibaba</groupId>

            <artifactId>druid</artifactId>

            <version>1.1.10</version>

        </dependency>

        <!--自动get/set-->

        <dependency>

            <groupId>org.projectlombok</groupId>

            <artifactId>lombok</artifactId>

            <optional>true</optional>

        </dependency>

        <!--测试-->

        <dependency>

            <groupId>org.springframework.boot</groupId>

            <artifactId>spring-boot-starter-test</artifactId>

            <scope>test</scope>

        </dependency>
第一步,整合整合mybatis配置
在application.properties中进行数据源配置以及其他配置项
application.properties
#Tomcat配置

server.port=8081

server.tomcat.uri-encoding=UTF-8

#thymeleaf配置

spring.thymeleaf.prefix=classpath:/templates/

##解决静态文件访问不到的情况

spring.mvc.static-path-pattern= /static/**

##mybatis配置

mybatis.type-aliases-package= com.jiangfeixiang.springbootblog.entity

mybatis.mapper-locations= mapper/*.xml

## 数据库连接配置

## 数据库连接配置

spring.datasource.type=com.alibaba.druid.pool.DruidDataSource

spring.datasource.driver-class-name=com.mysql.jdbc.Driver

spring.datasource.url=jdbc:mysql://localhost:3306/markdown?characterEncoding=utf-8&serverTimezone=GMT%2B8

spring.datasource.username=root

spring.datasource.password=1234

# 连接池补充配置

# 初始化大小,最小,最大

spring.datasource.initialSize: 5

spring.datasource.minIdle: 5

spring.datasource.maxActive: 20

# 配置获取连接等待超时的时间

spring.datasource.maxWait: 60000

# 配置间隔多久才进行一次检测,检测需要关闭的空闲连接,单位是毫秒

spring.datasource.timeBetweenEvictionRunsMillis: 60000

# 配置一个连接在池中最小生存的时间,单位是毫秒

spring.datasource.minEvictableIdleTimeMillis: 300000

spring.datasource.validationQuery: SELECT 1 FROM DUAL

spring.datasource.testWhileIdle: true

spring.datasource.testOnBorrow: false

spring.datasource.testOnReturn: false

# 打开PSCache,并且指定每个连接上PSCache的大小

spring.datasource.poolPreparedStatements: true

spring.datasource.maxPoolPreparedStatementPerConnectionSize: 20

# 配置监控统计拦截的filters,去掉后监控界面sql无法统计,'wall'用于防火墙

spring.datasource.filters: {stat,wall,log4j}

# 通过connectProperties属性来打开mergeSql功能;慢SQL记录

spring.datasource.connectionProperties: druid.stat.mergeSql=true;druid.stat.slowSqlMillis=5000

# 合并多个DruidDataSource的监控数据

spring.datasource.useGlobalDataSourceStat: true
第二步,在dbconfig包下创建DruidConfig类配置druid数据连接池
DruidConfig.class
@Configuration

public class DruidConfig {

    private Logger logger = LoggerFactory.getLogger(DruidConfig.class);

    @ConfigurationProperties(prefix = "spring.datasource")

    @Bean

    public DruidDataSource druid(){

        return new DruidDataSource();

    }

    @Bean

    public ServletRegistrationBean druidServlet() {

        logger.info("init Druid Servlet Configuration ");

        ServletRegistrationBean bean = new ServletRegistrationBean(new StatViewServlet(),"/druid/*");

        Map<String,String> params = new HashMap<>();

        //用户名

        params.put("loginUsername","姜飞祥");

        //密码

        params.put("loginPassword","1234");

        //IP白名单 (不填写代表允许所有IP)

        params.put("allow","");

        //IP黑名单 (存在共同时,deny优先于allow)

        //initParameters.put("deny", "192.168.20.38");

        bean.setInitParameters(params);

        return bean;

    }

    /**

     * druid的过滤器设置

     * @return

     */

    @Bean

    public FilterRegistrationBean filterRegistrationBean() {

        FilterRegistrationBean bean = new FilterRegistrationBean();

        bean.setFilter(new WebStatFilter());

        Map<String,String> initParams = new HashMap<>();

        //排除拦截

        initParams.put("exclusions","*.js,*.css,/druid/*");

        bean.setInitParameters(initParams);

        bean.setUrlPatterns(Arrays.asList("/*"));

        return  bean;

    }

}
以上配置好之后开始完成实体类Content.class,在entity包中创建Content实体类
Content.class
/**

 * @Author: 姜飞祥

 * @Description:

 * @Date: Create in 2019/1/29/0029 13:24

 * 使用lombok注解@Data省略set/get方法

 */

@Data

public class Content {

    private Integer id;

    /**

     * 内容

     */

    private String text;

}
实体类完成之后就是dao与之对应的mapper.xml了,在dao包下创建ContentMapper接口
@Mapper

public interface ContentMapper {

    /**

     * 查询文本内容

     * @return

     */

   List<Content> getText();

    /**

     * 添加文本内容

     * @param content

     * @return

     */

    int addText(Content content);

}
接口上使用了注解@Mapper,如果不使用此注解的话,可以做哎入口类上添加@MapperScan("com.jiangfeixiang.markdown.dao"),l选择其一即可如下
@SpringBootApplication

@MapperScan("com.jiangfeixiang.markdown.dao")

public class MarkdownApplication {

    public static void main(String[] args) {

        SpringApplication.run(MarkdownApplication.class, args);

    }

}
下面是对应的ContentMapper.xml,在resources下mapper包中
<?xml version="1.0" encoding="UTF-8"?>

<!DOCTYPE mapper PUBLIC "-//mybatis.org//DTD Mapper 3.0//EN" "http://mybatis.org/dtd/mybatis-3-mapper.dtd">

<mapper namespace="com.jiangfeixiang.markdown.dao.ContentMapper">

  <!--查询-->

  <select id="getText" resultType="com.jiangfeixiang.markdown.entity.Content">

    select id,text from content

  </select>

  <!--添加-->

<insert id="addText">

   insert into content(text) values(#{text})

</insert>

</mapper>
到此dao部分已经完成了,下面创建对应的数据库添加一条数据,进行测试
- 数据库名称请跟进需求在配置文件数据源中进行修改
数据库sql
SET FOREIGN_KEY_CHECKS=0;

DROP TABLE IF EXISTS `content`;

CREATE TABLE `content` (

  `id` int(11) NOT NULL AUTO_INCREMENT,

  `text` text,

  PRIMARY KEY (`id`)

) ENGINE=InnoDB AUTO_INCREMENT=2 DEFAULT CHARSET=utf8;

INSERT INTO `content` VALUES ('1', '第一天文本内容');
数据库创建完成之后,接下来开始进行查询测试
@RunWith(SpringRunner.class)

@SpringBootTest

public class MarkdownApplicationTests {

    /**

     * 注入ContentMapper接口

     */

    @Autowired

    private ContentMapper contentMapper;

    /**

     * 查询

     */

    @Test

    public void getText() {

        Content text = contentMapper.getText();

        System.out.println(text);

    }

}
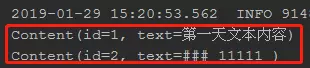
可以在控制台看到输出的内容:

下面为了节约时间,我service接口以及实现类就直接贴代码参考了,如下
ContentService 接口
public interface ContentService {

    /**

     * 查询文本内容

     * @return

     */

    List<Content> getText();

    /**

     * 添加文本内容

     * @param content

     * @return

     */

    int addText(Content content);

}
ContentServiceImpl实现类
@Service

public class ContentServiceImpl implements ContentService {

    @Autowired

    private ContentMapper contentMapper;

    /**

     * 查询

     * @return

     */

    @Override

    public List<Content>getText() {

        return contentMapper.getText();

    }

    /**

     * 添加

     * @param content

     * @return

     */

    @Override

    public int addText(Content content) {

        return contentMapper.addText(content);

    }

}
接下来是ContentController
@Controller

public class ContentController {

    @Autowired

    private ContentService contentService;

    /**

     * 编辑页

     * @return

     */

    @RequestMapping("/edit")

    public String getText(){

        return "context";

    }

}
访问URL路径进入编辑页edit.html,在templates/edit.html下,这里是咱们要实现的开源editor.md markdown编辑器

原材料准备
editor.md
是国人开发的开源在线Markdown编辑器,单纯基于前端JavaScript,无需后台代码加持,适用于任何语言首页地址
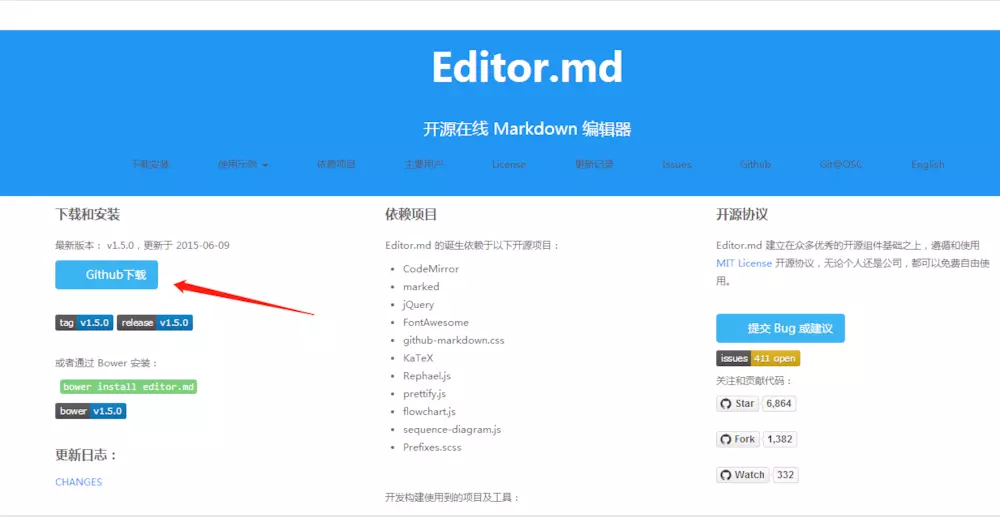
直接点击 Github下载 即可
下载好进行解压之后如下:
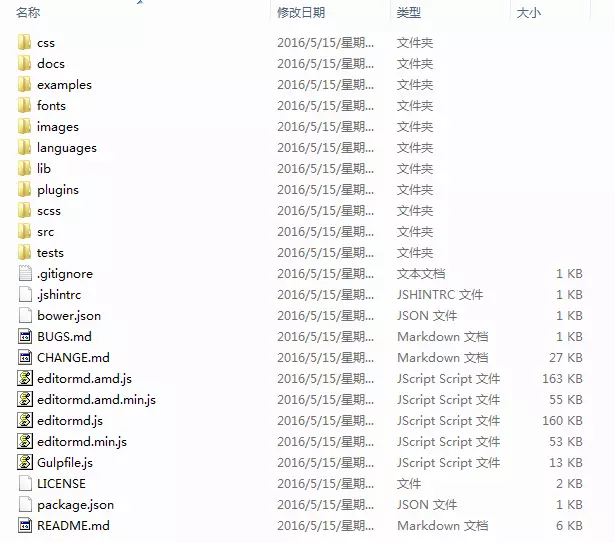
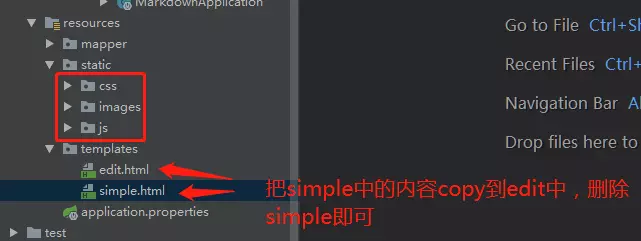
- 接下来直接将examples文件夹中的css、js资源,拷贝到resources下的static中
- 将examples文件夹中的simple.html示例文件拷贝到工程的templates下面,如下图
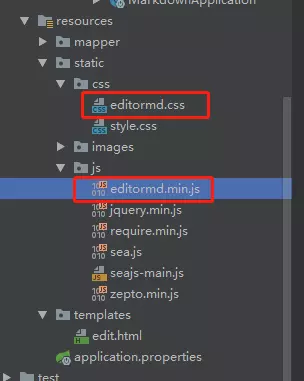
编辑edit.html文件,将资源文件js,css路径根据你的项目进行调整,由于edit.html中的editormd.css和editormd.min.js没有,这里需要进行拷贝进来,拷贝进来后如下图
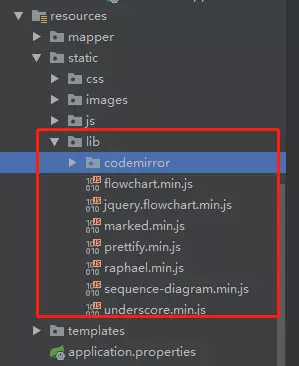
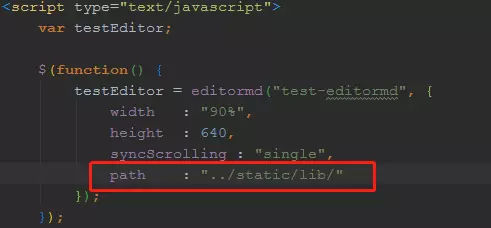
拷贝外层的lib目录并设置edit.html中对应的lib路径,如图:
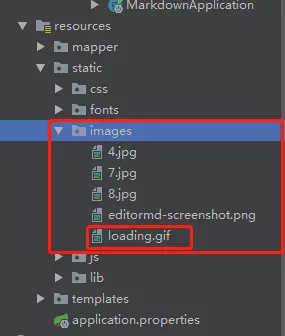
拷贝外层的fonts目录,并且将外层文件夹images中的loading.gif拷贝到我们项目的images中
最终 调整后的edit.html文件内容为

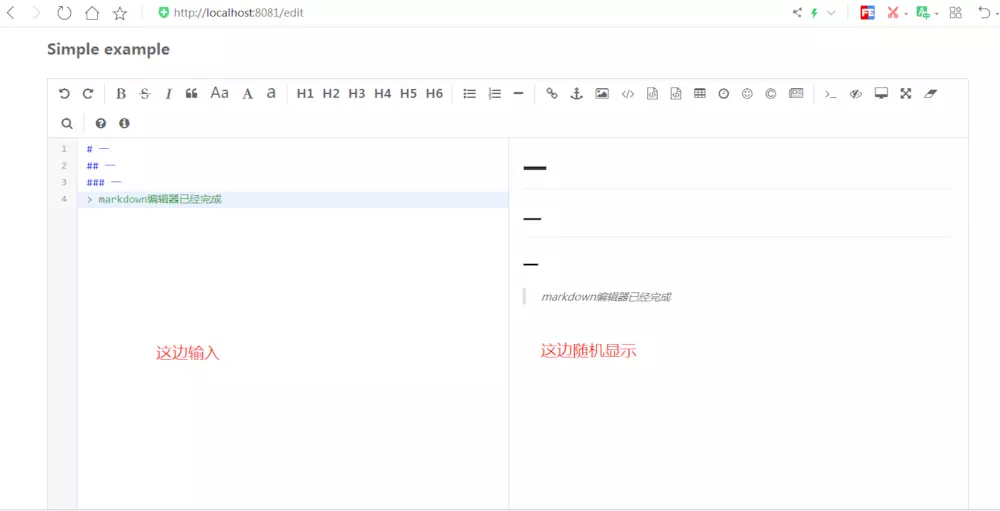
最后启动项目,访问localhost:8081/edit进入编辑页面
下面还没有完,接下来就是开始编写内容,进行提交到数据库了
开始提交
在eidt.html页面中,加入form表单,在text,修改JS,简单的提交客户端完成,内容如下:
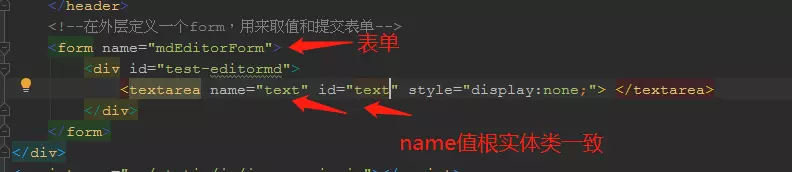
代码
<form name="mdEditorForm">

        <div id="test-editormd">

            <textarea name="text" id="text" style="display:none;"> </textarea>

        </div>

    </form>
之后再新增js函数,如图
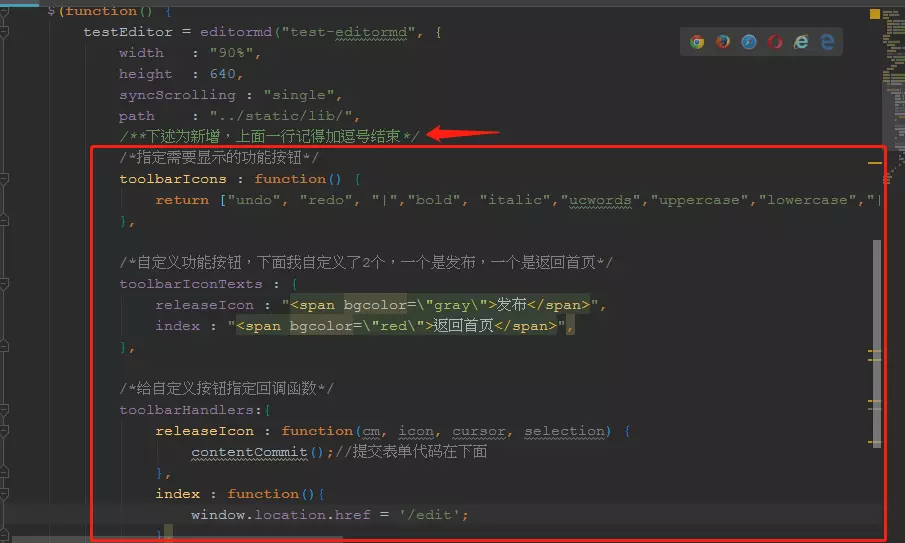
代码
 /**下述为新增,上面一行记得加逗号结束*/

            /*指定需要显示的功能按钮*/

            toolbarIcons : function() {

                return ["undo", "redo", "|","bold", "italic","ucwords","uppercase","lowercase","|","h1","h2","h3","h4","h5","h6","|","list-ul","list-ol","table","datetime","hr",  "||",  "watch", "fullscreen", "preview", "releaseIcon", "index"]

            },

            /*自定义功能按钮,下面我自定义了2个,一个是发布,一个是返回首页*/

            toolbarIconTexts : {

                releaseIcon : "<span bgcolor=\"gray\">发布</span>",

                index : "<span bgcolor=\"red\">返回首页</span>",

            },

            /*给自定义按钮指定回调函数*/

            toolbarHandlers:{

                releaseIcon : function(cm, icon, cursor, selection) {

                        contentCommit();//提交表单代码在下面

                },

                index : function(){

                    window.location.href = '返回首页的路径.html';

                },

            }
另外上面需要提交JS的代码contentCommit();
/*提交表单的js*/

    function contentCommit(){

        mdEditorForm.method = "post";

        mdEditorForm.action = "addText";//提交至服务器的路径

        mdEditorForm.submit();

    }
最后在Controller中编写提交的方法,返回成功页面
@RequestMapping("/addText")

    public String addText(Content content){

        contentService.addText(content);

        return "success";

    }
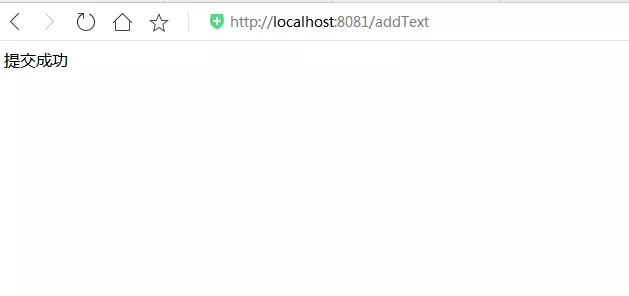
因为查询没有显示数据页面,为了节省时间,查询返回的页面就不写了,为了验证是否提交成功,咱还在测试里进行测试
有两条记录
最新文章
- Access forbidden! You don't have permission to access the requested object. It is either read-protected or not readable by the server
- Windows下用Python 3.4+自带的venv模块创建虚拟环境
- JavaWeb---总结(十七)JSP中的九个内置对象
- MVVM(Model-View-View-Model)简单分析(及代码示例)
- hyperstart 容器创建流程分析
- 【转】pageX、clientX、screenX、offsetX、layerX、x
- WebService是什么?
- php的public、protected、private三种访问控制模式的区别
- 弹出框、遮罩层demo
- ActiveMQ in Action(2) - Transport
- 深入理解JAVA虚拟机之JVM性能篇---垃圾回收
- Java基础学习笔记十七 集合框架(三)之Map
- Jenkins学习
- Git安装配置,和使用的简介
- Sql server 系统表
- 【NLP CS224N笔记】Lecture 1 - Introduction of NLP
- CentOS6上ftp服务器搭建实战
- layer中每次用到都要查来查去的功能
- SE Springer小组之《Spring音乐播放器》需求分析说明书一
- import Vue form 'vue’的意思