google tensorflow bert代码分析
参考网上博客阅读了bert的代码,记个笔记。代码是 bert_modeling.py
参考的博客地址:
https://blog.csdn.net/weixin_39470744/article/details/84401339
https://www.jianshu.com/p/2a3872148766
主要分为三部分:
1、输入数据处理,将词(中文的字)转换为对应的embeddging,增加positional embeddding 和token type embedding.
positional embedding 是词的位置信息,词在句子中的位置。token type embedding表示是哪个句子中的词。
输出的数据格式是[batch_size,seq_length;width], width是词向量的长度。
2、encoder部分主要是使用transformer对句子进行编码,transformer的主要结构是来自 attention is all you need,但是和论文中的结构有些小区别。
3、decoder部分主要是解码部分。
先介绍数据处理部分:
1、bert模型输入的文本处理之后封装为InputExample类,这个类包扩 guid,text_a,text_b,label
这些内容会被转换成一下的格式。##表示被mark的词,[CLS]起始第一个,在分类任务中表示句子的 sentence vector
[seq]表示句子的分隔符,如果只有一个句子text_b可以为空
tokens:   [CLS] is this jack ##son ##ville ? [SEP] no it is not . [SEP]
#  type_ids: 0     0  0    0    0     0       0 0     1  1  1  1   1 1
这里的输入句子会限定一个最大输入长度,不足的补0,这个0是指词对应的token_id。处理完成之后,将词的ID序列
转化为词向量的序列。
词ID序列到词向量序列的代码如下:
 # Perform embedding lookup on the word ids.

 (self.embedding_output, self.embedding_table) = embedding_lookup(

     input_ids=input_ids,

     vocab_size=config.vocab_size,

     embedding_size=config.hidden_size,

     initializer_range=config.initializer_range,

     word_embedding_name="word_embeddings",

     use_one_hot_embeddings=use_one_hot_embeddings)
下面代码在词向量序列上增加了 positional embeddings 和 token type embeddings。embedding_postprocessor 它包括token_type_embedding和position_embedding。也就是图中的Segement Embeddings和Position Embeddings。

##配置项 这部分代码注释写的非常详细,embedding_postprocessor的具体实现可以看源码的注释,Bert的position Embedding是作为参数学习得到的,
transformer的论文里是计算得到的。
 self.embedding_output = embedding_postprocessor(

     input_tensor=self.embedding_output,

     use_token_type=True,

     token_type_ids=token_type_ids,

     token_type_vocab_size=config.type_vocab_size,

     token_type_embedding_name="token_type_embeddings",

     use_position_embeddings=True,

     position_embedding_name="position_embeddings",

     initializer_range=config.initializer_range,

     max_position_embeddings=config.max_position_embeddings,

     dropout_prob=config.hidden_dropout_prob)
特别说明一下,最后的输出增加了 norm和dropout output = layer_norm_and_dropout(output, dropout_prob)
2、Encoder部分代码
首先是对输入做了个attention_mask的处理
attention_mask = create_attention_mask_from_input_mask(input_ids, input_mask)
这个主要是减少对于mask的词和填充部分的词的关注。mask部分和填充部分在计算attention的时候分数自然应该很低才对。
然后是transformer_model,这部分主要是transformer,关于transformer可以参考 attention is all you need,这篇博客写的也不错,https://blog.csdn.net/yujianmin1990/article/details/85221271,这是翻译的一篇。
 self.all_encoder_layers = transformer_model(

     input_tensor=self.embedding_output,

     attention_mask=attention_mask,

     hidden_size=config.hidden_size,

     num_hidden_layers=config.num_hidden_layers,

     num_attention_heads=config.num_attention_heads,

     intermediate_size=config.intermediate_size,

     intermediate_act_fn=get_activation(config.hidden_act),

     hidden_dropout_prob=config.hidden_dropout_prob,

     attention_probs_dropout_prob=config.attention_probs_dropout_prob,

     initializer_range=config.initializer_range,

     do_return_all_layers=True)
接下来详细写写transformer_model的代码
函数定义如下:
 def transformer_model(input_tensor,

                       attention_mask=None,

                       hidden_size=768,

                       num_hidden_layers=12,

                       num_attention_heads=12,

                       intermediate_size=3072,

                       intermediate_act_fn=gelu,

                       hidden_dropout_prob=0.1,

                       attention_probs_dropout_prob=0.1,

                       initializer_range=0.02,

                       do_return_all_layers=False):
input_tensor是[batch_size, seq_length, hidden_size]
attention_mask就是之前提过的用于处理padding部分和mask部分attention值的 形状[batch_size, seq_length,seq_length]
hidden_size这个是transformer的隐层的大小
num_hidden_layers:transformer有多少层,也就是blocks的数目。一个block的结构如下:
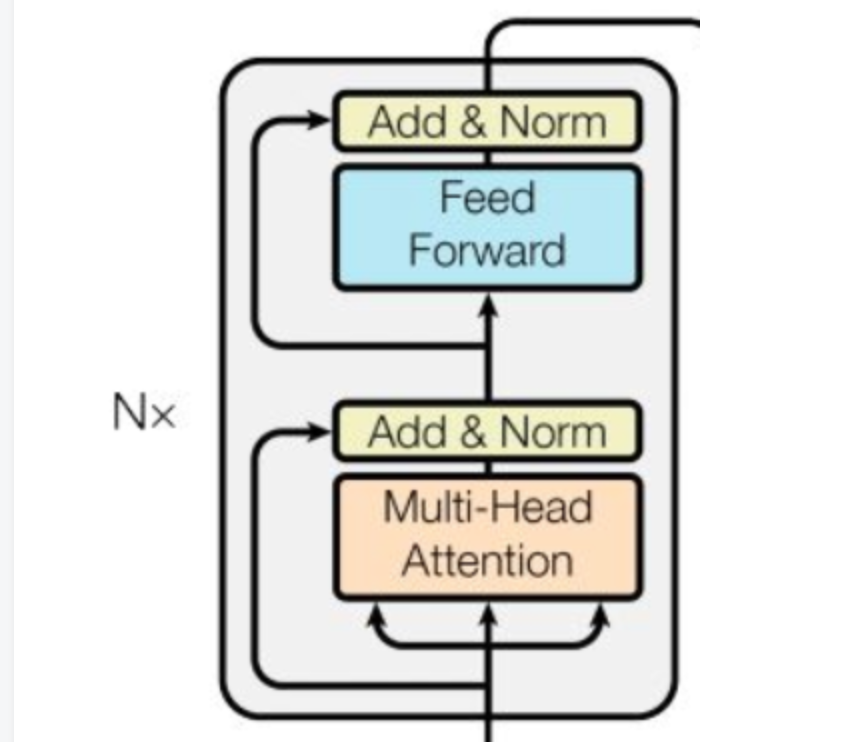
num_attention_heads: transformer中attention heads的个数,比如bert设置的是12,多头机制中head数。
intermediate_size:feed forward中间层的大小
接下来开始介绍代码,开始判断了一下hidden_size是否是num_attention_size的整数倍
对输入由三维改为二维,避免处理过程中多次tensor的变相,提高效率。
这一步将[batch_size,seq_len,width]改为[batch_size*seq_len,width]
prev_output = reshape_to_matrix(input_tensor)

接下来是 attention layer,这个是计算self-attention,当然如果 query和key一样的话,就是self-attention
首先第一步是计算query_layer,key_layer,value_layer。
这里把attention的计算抽象为 query,key和value三部分,通常key和value是一样的,然后根据query来计算不同的key 其value贡献的大小。
比如如果RNN这种seq2seq的话(encoder和decoder都是RNN),query是decoder前一时刻的输出,key和value是encoder RNN各个时刻的状态。
在计算时query_layer=W*query ,其他key value类似
 # `query_layer` = [B*F, N*H]

 query_layer = tf.layers.dense(

     from_tensor_2d,

     num_attention_heads * size_per_head,

     activation=query_act,

     name="query",

     kernel_initializer=create_initializer(initializer_range))

 # `key_layer` = [B*T, N*H]

 key_layer = tf.layers.dense(

     to_tensor_2d,

     num_attention_heads * size_per_head,

     activation=key_act,

     name="key",

     kernel_initializer=create_initializer(initializer_range))

 # `value_layer` = [B*T, N*H]

 value_layer = tf.layers.dense(

     to_tensor_2d,

     num_attention_heads * size_per_head,

     activation=value_act,

     name="value",

     kernel_initializer=create_initializer(initializer_range))
然后是计算attention的分数,这个和transformer论文中的计算方式一致,
 attention_scores = tf.matmul(query_layer, key_layer, transpose_b=True)

 attention_scores = tf.multiply(attention_scores,

                                1.0 / math.sqrt(float(size_per_head)))
这部分代码中tensor的形状变化,和矩阵乘法的应用比较巧妙,可以推一下看看,代码写的很简洁。
这个部分是对attention mask的使用,如果是之前被mask和padding的部分,对应的分数设置为-10000,然后使用softmax计算分数
if attention_mask is not None:

  # `attention_mask` = [B, 1, F, T]

  attention_mask = tf.expand_dims(attention_mask, axis=[1])

  # Since attention_mask is 1.0 for positions we want to attend and 0.0 for

  # masked positions, this operation will create a tensor which is 0.0 for

  # positions we want to attend and -10000.0 for masked positions.

  adder = (1.0 - tf.cast(attention_mask, tf.float32)) * -10000.0

  # Since we are adding it to the raw scores before the softmax, this is

  # effectively the same as removing these entirely.

  attention_scores += adder

# Normalize the attention scores to probabilities.

# `attention_probs` = [B, N, F, T]

attention_probs = tf.nn.softmax(attention_scores)
attention的分数这部分也有dropout

# This is actually dropping out entire tokens to attend to, which might
# seem a bit unusual, but is taken from the original Transformer paper.
attention_probs = dropout(attention_probs, attention_probs_dropout_prob)
接下来就是value_layer乘以attention_probs
attention_layer最后的输出是
[B*F, N*V]或者[B, F, N*V]
# Scalar dimensions referenced here:
#   B = batch size (number of sequences)
#   F = `from_tensor` sequence length
#   T = `to_tensor` sequence length
#   N = `num_attention_heads`
#   H = `size_per_head`

对于多头机制,每个head都计算完attention_layer之后,将这些结果全都拼接起来。
attention_output = tf.concat(attention_heads, axis=-1)
注意这里attention_output最后一维的维度和layer_input一样的
attention_output = dropout(attention_output, hidden_dropout_prob)
attention_output = layer_norm(attention_output + layer_input)
这个是加上残差链接。
两个全连接层,最后加上dropout和 layer_norm
 # The activation is only applied to the "intermediate" hidden layer.

 with tf.variable_scope("intermediate"):

   intermediate_output = tf.layers.dense(

       attention_output,

       intermediate_size,

       activation=intermediate_act_fn,

       kernel_initializer=create_initializer(initializer_range))

 # Down-project back to `hidden_size` then add the residual.

 with tf.variable_scope("output"):

   layer_output = tf.layers.dense(

       intermediate_output,

       hidden_size,

       kernel_initializer=create_initializer(initializer_range))

   layer_output = dropout(layer_output, hidden_dropout_prob)

   layer_output = layer_norm(layer_output + attention_output)

   prev_output = layer_output

   all_layer_outputs.append(layer_output)
最新文章
- 机器学习笔记----Fuzzy c-means(FCM)模糊聚类详解及matlab实现
- poj 3253 Fence Repair
- DropDownList如何添加一个空白的选项
- PHP类方法重写原则
- GSS系列(1)——GSS1&&GSS3
- linux笔记:软件包管理-软件包简介
- 创建Web API
- 【转】linux mknod命令解析
- JAVA NIO 类库的异步通信框架netty和mina
- tomcat环境搭建
- 从文档流来看内联元素和块元素的css排版
- C++能在三个地方创造对象,而Delphi只有一个地方
- Repository、IUnitOfWork和IDbContext
- alibaba远程调用框架dubbo原理
- MySQL数据类型:SQL_MODE设置不容忽视
- ajax面试题
- python中线程和进程(二)
- Django_Form验证(三)字段,字段的参数,widgets种类
- db2 v9.7 新特性cur_commit 能够实现未提交读新特性cur_commit 能够实现未提交读
- js图的数据结构处理---迪杰斯特拉算法