ios 气泡聊天
2024-08-24 19:08:16
最近做的项目里面,有几个模块用到了聊天功能和评论回复的功能,使用的频率还是很高的,所以抽时间做了这个博客,希望能给自己和别人带来方便,
具体代码如下:
1,创建model,
#import <Foundation/Foundation.h>

@interface MessageObj : NSObject

@property(nonatomic,copy)NSString *message;

@property(nonatomic,assign)BOOL isMe;

@end
2,自定义cell
1)声明一个label和imageview
@property(nonatomic,strong)UIImageView *messageImg;

@property(nonatomic,strong)UILabel *messageLab;
2)初始化构造方法
-(id)initWithStyle:(UITableViewCellStyle)style reuseIdentifier:(NSString *)reuseIdentifier

{

    self = [super initWithStyle:style reuseIdentifier:reuseIdentifier];

    if (self) {

        //这里只需要初始化,不需要设置具体的坐标

        self.backgroundColor = [UIColor clearColor];

        self.selectionStyle = UITableViewCellSelectionStyleNone;

        _messageImg = [[UIImageView alloc]init];

        [self addSubview:_messageImg];

        _messageLab = [[UILabel alloc]init];

        _messageLab.numberOfLines = ;

        [self addSubview:_messageLab];

    }

    return self;

}
3,准备工作已做好,现在进行聊天功能的完善
1)声明所需的成员变量
@interface ViewController ()<UITextFieldDelegate,UITableViewDelegate,UITableViewDataSource>

{

    UITextField *tf;

    UIView *inputView;

    UIButton *rightBtn;

    UITableView *tableViews;

    int _count;

    NSMutableArray *_datasArray;

}
2)界面的布局,做好适配
- (void)viewDidLoad {

    [super viewDidLoad];

    // Do any additional setup after loading the view.

    _datasArray = [NSMutableArray array];//这里一定要记得初始化

    self.title = @"气泡聊天";

    self.view.backgroundColor = [UIColor whiteColor];

    tableViews = [[UITableView alloc]initWithFrame:CGRectMake(, , MainScreen_width, self.view.bounds.size.height-) style:UITableViewStylePlain];

    tableViews.delegate = self;

    tableViews.dataSource = self;

    tableViews.tableFooterView = [[UIView alloc]init];

    tableViews.separatorStyle = UITableViewCellSeparatorStyleNone;

    [self.view addSubview:tableViews];

    inputView = [[UIView alloc]initWithFrame:CGRectMake(, MainScreen_height - , MainScreen_width, )];

    inputView.backgroundColor = RGBAColor(, , , );

    [self.view addSubview:inputView];

    tf = [[UITextField alloc]initWithFrame:CGRectMake(, , MainScreen_width - , )];

    tf.delegate = self;

    tf.returnKeyType = UIReturnKeyDefault;

    [inputView addSubview:tf];

    rightBtn = [UIButton buttonWithType:UIButtonTypeCustom];

    rightBtn.frame = CGRectMake(MainScreen_width - -, , MainScreen_width - tf.frame.size.width, );

    [rightBtn setTitle:@"发送" forState:UIControlStateNormal];

    [rightBtn setTitleColor:[UIColor whiteColor] forState:UIControlStateNormal];

    [rightBtn addTarget:self action:@selector(btnClick:) forControlEvents:UIControlEventTouchUpInside];

    [inputView addSubview:rightBtn];

    //增加监听,当键盘改变是发出消息

    [[NSNotificationCenter defaultCenter]addObserver:self selector:@selector(keyboardWillShow:) name:UIKeyboardWillShowNotification object:nil];

    //增加监听,当键盘退出时发出消息

    [[NSNotificationCenter defaultCenter]addObserver:self selector:@selector(keyboardWillHide:) name:UIKeyboardWillHideNotification object:nil];

}
注:这里最后,声明了两个通知,这样是为了,监听键盘弹出和弹下的高度,
具体实现如下:
-(void)keyboardWillShow:(NSNotification *)hNotification

{

    //获取键盘的高度

    NSDictionary *userInfo = [hNotification userInfo];

    NSValue *aValue = [userInfo objectForKey:UIKeyboardFrameEndUserInfoKey];

    CGRect keyboardRect = [aValue CGRectValue];

    int height = keyboardRect.size.height;//获取到的键盘的高度

    [UIView animateWithDuration:0.1 animations:^{

        CGRect tableFrame = tableViews.frame;

        tableFrame.size.height = MainScreen_height - height - ;

        tableViews.frame = tableFrame;

        CGRect rect = inputView.frame;

        rect.origin.y = MainScreen_height - height - ;

        inputView.frame = rect;

    }];

}

-(void)keyboardWillHide:(NSNotification *)hNotification

{

    [UIView animateWithDuration:0.1 animations:^{

        CGRect tableViewRect = tableViews.frame;

        tableViewRect.size.height = MainScreen_height- ;

        tableViews.frame = tableViewRect;

        CGRect rect = inputView.frame;

        rect.origin.y = MainScreen_height - ;

        inputView.frame = rect;

    }];

    if (_datasArray.count > )

    {

        //让表的最后一行滚动到表的底部

        NSIndexPath * indexPath = [NSIndexPath indexPathForRow:_datasArray.count- inSection:];

        [tableViews scrollToRowAtIndexPath:indexPath atScrollPosition:UITableViewScrollPositionBottom animated:YES];

    }

}
3)发送按钮的点击方法
-(void)btnClick:(id)sender

{

    _count ++;//这里声明一个int类型的变量是为了下面区分是否是自己

    //这里使用model,会很方便,单独作为对象来使用,方便进行设置

    MessageObj *objets = [[MessageObj alloc]init];

    objets.message = tf.text;

    if (objets.message != nil && [objets.message isEqualToString:@""]) {

        UIAlertView *alertView = [[UIAlertView alloc]initWithTitle:@"温馨体香" message:@"不能为空" delegate:nil cancelButtonTitle:@"取消" otherButtonTitles:nil, nil];

        [alertView show];

        return;

    }else

    {

        //这里通过第一个发送的顺序,设为自己,其他为别人,然后绑定一个bool值的状态,yes为自己,no为别人

        if (_count% == ) {

            objets.isMe = YES;

        }else

        {

            objets.isMe = NO;

        }

        [_datasArray addObject:objets];

        NSLog(@"--%lu",(unsigned long)_datasArray.count);

        [tableViews reloadData];

        //让表的最后一行滚动到表的底部

        NSIndexPath * indexPath = [NSIndexPath indexPathForRow:_datasArray.count- inSection:];

        [tableViews scrollToRowAtIndexPath:indexPath atScrollPosition:UITableViewScrollPositionBottom animated:YES];

        tf.text = nil;

    }

}
注:这里面有比较重要的地方,代码很详细,我就不一一解释了,大家可以自己看
4)表的具体展现和自适应
-(NSInteger)tableView:(UITableView *)tableView numberOfRowsInSection:(NSInteger)section

{

    return _datasArray.count;

}

-(CGFloat)tableView:(UITableView *)tableView heightForRowAtIndexPath:(NSIndexPath *)indexPath

{

    MessageObj *object = _datasArray[indexPath.row];

    CGFloat contentW = MainScreen_width - ;

    UIFont *fnt = [UIFont fontWithName:@"HelveticaNeue" size:18.0f];

    //ios 7 以后的方法,这里得到自适应的高度,从而动态的设置cell的高度

    CGRect tempRect = [object.message boundingRectWithSize:CGSizeMake(contentW, ) options:NSStringDrawingUsesLineFragmentOrigin attributes:[NSDictionary dictionaryWithObjectsAndKeys:fnt,NSFontAttributeName, nil] context:nil];

    CGFloat contenH = tempRect.size.height;

    return contenH + ;

}

-(UITableViewCell *)tableView:(UITableView *)tableView cellForRowAtIndexPath:(NSIndexPath *)indexPath
{
    static NSString *cellIdentifiers = @"CELLES";
    EightyTableViewCell *cell = [tableView cellForRowAtIndexPath:indexPath];
    if (!cell) {

        cell = [[EightyTableViewCell alloc]initWithStyle:UITableViewCellStyleDefault reuseIdentifier:cellIdentifiers];
        cell.selectionStyle = UITableViewCellSelectionStyleDefault;
    }

    MessageObj *object = _datasArray[indexPath.row];
    /*
     CGFloat contentW = MainScreen_width - 34;

     UIFont *fnt = [UIFont fontWithName:@"HelveticaNeue" size:18.0f];

     CGRect tempRect = [object.message boundingRectWithSize:CGSizeMake(320, 1000) options:NSStringDrawingUsesLineFragmentOrigin attributes:[NSDictionary dictionaryWithObjectsAndKeys:fnt,NSFontAttributeName, nil] context:nil];
     CGFloat contenH = tempRect.size.height;
     */

    //在这里进行宽度和高度的自适应
    UIFont *fnt = [UIFont fontWithName:@"HelveticaNeue" size:18.0f];
    CGSize size = CGSizeMake(MainScreen_width,1000);
    CGSize labSize = [object.message sizeWithFont:fnt constrainedToSize:size lineBreakMode:UILineBreakModeWordWrap];


    if (object.isMe == YES) {

        cell.messageLab.frame = CGRectMake(20, 0, labSize.width, labSize.height);
        cell.messageLab.textAlignment = NSTextAlignmentLeft;
        cell.messageLab.numberOfLines = 0;
        cell.messageImg.frame = CGRectMake(10, 0, labSize.width+20, labSize.height+10);
    }else
    {
        cell.messageLab.frame = CGRectMake(MainScreen_width - 20 - labSize.width, 5, labSize.width, labSize.height);
        cell.messageLab.numberOfLines = 0;
        cell.messageLab.textAlignment = NSTextAlignmentRight;
        cell.messageImg.frame = CGRectMake(MainScreen_width - 30 - labSize.width, 2, labSize.width + 20, labSize.height + 10);
    }

    NSString *imageName = object.isMe?@"bubbleSelf.png":@"bubble.png";
    UIImage *oldImage = [UIImage imageNamed:imageName];
    UIImage *newImage = [oldImage stretchableImageWithLeftCapWidth:18 topCapHeight:8];
    cell.messageImg.image = newImage;
    cell.messageLab.font = fnt;
    cell.messageLab.text = object.message;

    return  cell;

}
注:主要就是cellforrow方法里面的lab自适应坐标的设置,还有气泡背景图片的坐标设置,还有heightforrow里面根据lab的高度,动态判定cell的高度
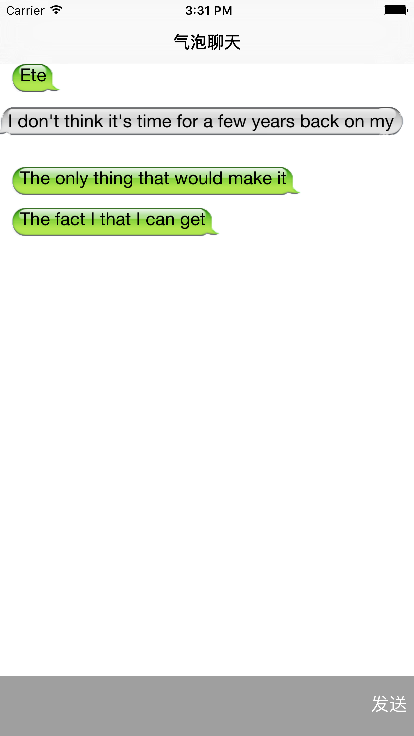
效果图如下:
如需源码,可从这里下载:http://code.cocoachina.com/view/131767
最新文章
- 【小程序分享篇 二 】web在线踢人小程序,维持用户只能在一个台电脑持登录状态
- 利用poi导出Excel
- Masonry使用注意事项
- javascript中数组去重的4种方法
- angularJS自定义指令模板替换
- juquery验证插件validation addMethod方法使用笔记
- thinkphp中的where()方法
- 自增或自减例子:i++和++i的相同点和不同点
- struts2+jquery +json实现异步加载数据,亲测(原创)
- nginx 内存池分析
- Java高级特性--自定义一个StringBuilder的类
- 【汤鸿鑫 3D太极】肩与膀的细分
- 【打印】windows打印控件,Lodop.js介绍
- 【PyQt5-Qt Designer】QLineEdit 文本输入
- Max Sum—hdu1003(简单DP) 标签: dp 2016-05-05 20:51 92人阅读 评论(0)
- linux命令学习——cat
- linux parallel rsync 拷贝N多文件
- Spring MVC 常用Jar包
- 弄啥嘞?热爱你的Bug
- python练习笔记——丑数的计算