【Android】4.4 示例--列出手机上的所有联系人
分类:C#、Android、VS2015;创建日期:2016-02-06
项目名:DesignerWalkthrough
模板:Blank App(Android)
功能:列出手机上的所有联系人。
说明:该例子提前使用了第9章介绍的列表视图。
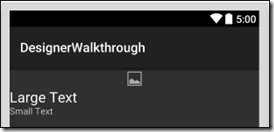
运行效果:
下图是在模拟器(Galaxy_Api19)下看到的运行效果:

注意:需要先在模拟器的通讯录中添加联系人,然后才能看到运行效果。
主要设计步骤:
(1)在ListItem.axml中设计列表项模板
新建VS2015项目,模板:“Blank App (Android)”,项目名:DesignerWalkthrough
鼠标右击Resources/layout文件夹,【添加】à【新建项】,在弹出的窗口中,选择【Android Layout】模板,文件名:ListItem.axml,单击【添加】按钮。
拖放Placeholder.png到drawable文件夹下。
从【工具箱】中拖放【ImageView】控件到设计界面中。
从【工具箱】中拖放【LinearLayout (Vertical)】控件到设计界面中,放到【ImageView】的下方。
从【工具箱】中拖放【Text (Large)】控件到设计界面中,放到【LinearLayout (Vertical)】内。
从【工具箱】中拖放【Text (Small)】控件到【Text (Large)】的下方。
下面修改布局,目标是:将ImageView放到两个Text的左边:
缩小ImageView的宽度,然后修改根目录下的LinearLayout控件,在【属性】窗口中,将其【orientation】属性改为“horizontal”,即得到下面的效果:
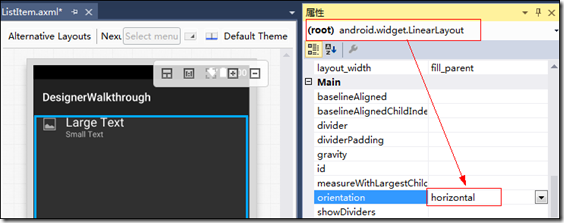
技巧:利用【文档大纲(Document Outline)】选择要操作的控件,然后再利用【属性】窗口设置对应的属性。
设置ImageView的属性:
src:选择icon.png图片,得到该属性的值为“@drawable/icon”。
paddingLeft:0dp
paddingTop:5dp
paddingRight:5dp
paddingBottom:0dp
layoutWidth:50dp
layoutHeight:50dp
adjustViewBounds:true
minWidth:25dp
minHeight:25dp
设置LinearLayout1的属性:
paddingLeft:0dp
paddingTop:5dp
paddingRight:5dp
paddingBottom:0dp
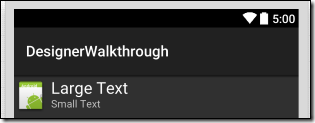
最终得到的结果如下:
最终得到的【Source】选项卡中对应的XML如下:
<?xml version="1.0" encoding="utf-8"?>

<LinearLayout xmlns:android="http://schemas.android.com/apk/res/android"

    android:orientation="horizontal"

    android:layout_width="fill_parent"

    android:layout_height="fill_parent">

    <ImageView

        android:src="@drawable/icon"

        android:layout_width="50dp"

        android:layout_height="50dp"

        android:id="@+id/imageView1"

        android:adjustViewBounds="true"

        android:paddingLeft="0dp"

        android:paddingRight="5dp"

        android:paddingBottom="0dp"

        android:paddingTop="5dp"

        android:minHeight="25dp"

        android:minWidth="25dp" />

    <LinearLayout

        android:orientation="vertical"

        android:layout_width="match_parent"

        android:layout_height="wrap_content"

        android:id="@+id/linearLayout1"

        android:paddingTop="5dp"

        android:paddingBottom="5dp"

        android:paddingLeft="0dp"

        android:paddingRight="0dp">

        <TextView

            android:text="Large Text"

            android:textAppearance="?android:attr/textAppearanceLarge"

            android:layout_width="match_parent"

            android:layout_height="wrap_content"

            android:id="@+id/textView1" />

        <TextView

            android:text="Small Text"

            android:textAppearance="?android:attr/textAppearanceSmall"

            android:layout_width="match_parent"

            android:layout_height="wrap_content"

            android:id="@+id/textView2" />

    </LinearLayout>

</LinearLayout>
(2)在Main.axml中添加列表
打开Main.axml。
删除默认添加的按钮。
从【工具箱】中拖放一个ListView到设计界面中,然后修改属性:
id:@+id/listViewContacts
最后得到的XML如下:
<?xml version="1.0" encoding="utf-8"?>

<LinearLayout xmlns:android="http://schemas.android.com/apk/res/android"

    android:orientation="vertical"

    android:layout_width="fill_parent"

    android:layout_height="fill_parent"

    android:minWidth="25px"

    android:minHeight="25px">

    <ListView

        android:minWidth="25px"

        android:minHeight="25px"

        android:layout_width="match_parent"

        android:layout_height="match_parent"

        android:id="@+id/listViewContacts" />

</LinearLayout>
(3)修改权限配置
修改项目属性,添加【READ_CONTACTS】权限:
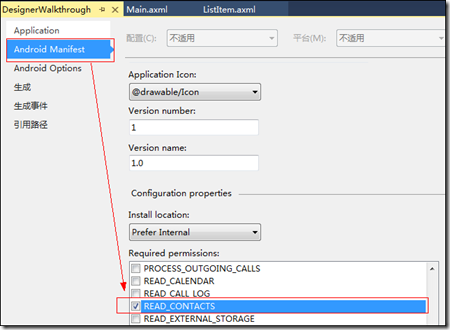
修改后,得到的AndroidMinifest.xml内容如下:
<?xml version="1.0" encoding="utf-8"?>

<manifest xmlns:android="http://schemas.android.com/apk/res/android" package="DesignerWalkthrough.DesignerWalkthrough" android:versionCode="1" android:versionName="1.0" android:installLocation="auto">

    <uses-sdk />

    <application android:label="DesignerWalkthrough" android:icon="@drawable/Icon"></application>

    <uses-permission android:name="android.permission.READ_CONTACTS" />

</manifest>
(4)添加ContactsAdapter.cs
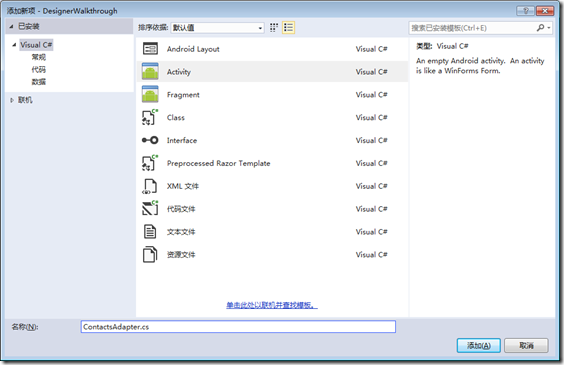
选择【Class】模板,输入文件名,然后将ContactsAdapter.cs的代码改为下面的内容:
using Android.Views;

using Android.Widget;

using Android.Content;

using Android.App;

using Android.Provider;

using System.Collections.Generic;

namespace DesignerWalkthrough

{

    public class ContactsAdapter : BaseAdapter

    {

        List<Contact> _contactList;

        Activity _activity;

        public ContactsAdapter(Activity activity)

        {

            _activity = activity;

            FillContacts();

        }

        public override int Count

        {

            get { return _contactList.Count; }

        }

        public override Java.Lang.Object GetItem(int position)

        {

            return null;

        }

        public override long GetItemId(int position)

        {

            return _contactList[position].Id;

        }

        public override View GetView(int position, View convertView, ViewGroup parent)

        {

            var view = convertView ?? _activity.LayoutInflater.Inflate(Resource.Layout.ListItem, parent, false);

            var contactName = view.FindViewById<TextView>(Resource.Id.textView1);

            var textView2 = view.FindViewById<TextView>(Resource.Id.textView2);

            var contactImage = view.FindViewById<ImageView>(Resource.Id.imageView1);

            textView2.Text = _contactList[position].Number;

            contactName.Text = _contactList[position].DisplayName;

            if (_contactList[position].PhotoId == null)

            {

                contactImage = view.FindViewById<ImageView>(Resource.Id.imageView1);

                contactImage.SetImageResource(Resource.Drawable.Placeholder);

            }

            else

            {

                var contactUri = ContentUris.WithAppendedId(ContactsContract.Contacts.ContentUri, _contactList[position].Id);

                var contactPhotoUri = Android.Net.Uri.WithAppendedPath(contactUri, ContactsContract.Contacts.Photo.ContentDirectory);

                contactImage.SetImageURI(contactPhotoUri);

            }

            return view;

        }

        void FillContacts()

        {

            var uri = ContactsContract.Contacts.ContentUri;

            string[] projection = {

                ContactsContract.Contacts.InterfaceConsts.Id,

                ContactsContract.Contacts.InterfaceConsts.DisplayName,

                ContactsContract.Contacts.InterfaceConsts.PhotoId

            };

            var cursor = _activity.ContentResolver.Query(uri, projection, null, null, null);

            _contactList = new List<Contact>();

            if (cursor.MoveToFirst())

            {

                do

                {

                    _contactList.Add(new Contact

                    {

                        Id = cursor.GetLong(cursor.GetColumnIndex(projection[])),

                        DisplayName = cursor.GetString(cursor.GetColumnIndex(projection[])),

                        PhotoId = cursor.GetString(cursor.GetColumnIndex(projection[])),

                        Number = "(123) 456 - 7890"

                    });

                } while (cursor.MoveToNext());

            }

        }

        class Contact

        {

            public long Id { get; set; }

            public string DisplayName { get; set; }

            public string PhotoId { get; set; }

            public string Number { get; set; }

        }

    }

}
(5)修改MainActivity.cs
将MainActivity.cs的代码改为下面的内容:
using Android.App;

using Android.Widget;

using Android.OS;

namespace DesignerWalkthrough

{

    [Activity(Label = "DesignerWalkthrough",

        Theme = "@android:style/Theme.DeviceDefault.Light",

        MainLauncher = true, Icon = "@drawable/icon")]

    public class MainActivity : Activity

    {

        protected override void OnCreate(Bundle bundle)

        {

            base.OnCreate(bundle);

            SetContentView(Resource.Layout.Main);

            var contactsAdapter = new ContactsAdapter(this);

            var contactsListView = FindViewById<ListView>(Resource.Id.listViewContacts);

            contactsListView.Adapter = contactsAdapter;

        }

    }

}
(6)运行
选择一种模拟器,然后按<F5>键调试运行。
最新文章
- Android内存清理
- substring,substr,和slice的区别详解。
- oracle中between
- LNMP环境搭建(discuz论坛)
- ThinkPHP框架的网站url重写
- 关于web项目中中文乱码问题的总结
- Android(java)学习笔记239:多媒体之撕衣服的案例
- Windows Server 2008 R2 SP1 下载地址
- Android OpenGL ES 开发(三): OpenGL ES 定义形状
- C语言实现Linux命令——od
- javascript ES6 新特性之 扩展运算符 三个点 ...
- Python第五天 文件访问 for循环访问文件 while循环访问文件 字符串的startswith函数和split函数 linecache模块
- 使用scp命令在多个Linux系统间进行文件复制
- python 全栈开发,Day11(函数名应用,闭包,装饰器初识,带参数以及带返回值的装饰器)
- discuz 忘记安全密码的处理方式 修改pre_common_setting表的数据,
- Decorator装饰者模式(结构型模式)
- 【巷子】---vue基于mint-ui三级联动---【vue】
- html05
- Java 访问控制关键字
- jmeter 配置元件之计数器Counter
热门文章
- Platinum UPnP
- c的链接详解
- VScode-Go can't load package: package .: no buildable Go source files in
- 使用Android编写录制视频小程序演示样例
- VB总结2——内部函数
- codeforces Epic Game 题解
- iOS开发 - 获取真机沙盒数据
- 解决 只能通过chrome网上应用商店安装该程序
- 解决Cydia出现红字提示“Sub-process/usr/bin/dpkg returned an error code(2)
- HDU 1017 A Mathematical Curiosity (数学)