四、spring的JDBC模板和事务管理
2024-09-27 08:57:34
Spring的JDBC模板
Spring是JavaEE开发的一站式框架,对各种持久化技术都提供了简单的模板
| ORM持久化技术 | 模板类 |
| JDBC | org.springframework.jdbc.core.JdbcTemplate |
| Hibernate5.0 | org.springframework.orm.hibernate5.HibernateTemplate |
| IBatis(MyBatis) | org.springframework.orm.ibatis.SqlMapClientTemplate |
| JPA | org.springfrmaework.orm.jpa.JpaTemplate |
JDBC模板的基本使用
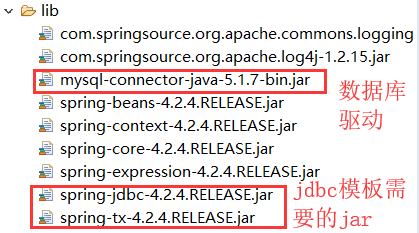
- 引入jar
- Spring项目的6个基础开发包
- 数据库驱动包
- Spring的JDBC模板的jar包
- 测试
- 编写测试类
public class TestDemo {

	@Test

	public void demo() {

		//创建连接池

		DriverManagerDataSource dataSource = new DriverManagerDataSource();

		dataSource.setDriverClassName("com.mysql.jdbc.Driver");

		dataSource.setUrl("jdbc:mysql:///test");

		dataSource.setUsername("root");

		dataSource.setPassword("root");

		//创建jdbc模板

		JdbcTemplate template = new JdbcTemplate(dataSource);

		List<Map<String,Object>> list = template.queryForList("select * from user");

		for (Map<String, Object> map : list) {

			Set<String> keySet = map.keySet();

			Iterator<String> iterator = keySet.iterator();

			while (iterator.hasNext()) {

				String key = iterator.next();

				System.out.println(key+" : "+map.get(key));

			}

		}

	}

} - 测试结果
id : 1

name : test

password : 0

id : 2

name : wxf

password : 1

id : 3

name : admin

password : 123
- 编写测试类
Spring管理模板和连接池
- 配置文件配置Spring管理
<?xml version="1.0" encoding="UTF-8"?>

<beans xmlns="http://www.springframework.org/schema/beans"

        xmlns:xsi="http://www.w3.org/2001/XMLSchema-instance"

        xmlns:aop="http://www.springframework.org/schema/aop"

        xmlns:tx="http://www.springframework.org/schema/tx"

        xsi:schemaLocation="

        http://www.springframework.org/schema/beans

		http://www.springframework.org/schema/beans/spring-beans.xsd

        http://www.springframework.org/schema/tx

        http://www.springframework.org/schema/tx/spring-tx.xsd">

        <!-- 管理数据库连接池 -->

	<bean id="dataSource" class="org.springframework.jdbc.datasource.DriverManagerDataSource">

		<property name="url" value="jdbc:mysql:///test"></property>

		<property name="driverClassName" value="com.mysql.jdbc.Driver"></property>

		<property name="username" value="root"></property>

		<property name="password" value="root"></property>

	</bean>

	<!-- 管理JDBC模板 -->

	<bean id="template" class="org.springframework.jdbc.core.JdbcTemplate">

		<property name="dataSource" ref="dataSource"/>

	</bean>

</beans> - 测试方法
@Test

public void demo2() {

	ApplicationContext context = new ClassPathXmlApplicationContext("applicationContext.xml");

	JdbcTemplate template = (JdbcTemplate) context.getBean("template");

	List<Map<String,Object>> list = template.queryForList("select * from user");

	for (Map<String, Object> map : list) {

		Set<String> keySet = map.keySet();

		Iterator<String> iterator = keySet.iterator();

		while (iterator.hasNext()) {

			String key = iterator.next();

			System.out.println(key+" : "+map.get(key));

		}

	}

}
Spring中使用开源数据库连接池
DBCP的使用
- 引入jar包
- com.springsource.org.apache.commons.pool-1.5.3.jar
- com.springsource.org.apache.commons.dbcp-1.2.2.osgi.jar
- Spring配置连接池
<bean id="dataSource" class="org.apache.commons.dbcp.BasicDataSource">

	<property name="url" value="jdbc:mysql:///test"></property>

	<property name="driverClassName" value="com.mysql.jdbc.Driver"></property>

	<property name="username" value="root"></property>

	<property name="password" value="root"></property>

</bean>
C3P0的使用
- 引入jar包
- com.springsource.com.mchange.v2.c3p0-0.9.1.2.jar
- Spring配置连接池
<!-- 管理c3p0数据库连接池 -->

<bean id="dataSource" class="com.mchange.v2.c3p0.ComboPooledDataSource">

	<property name="jdbcUrl" value="jdbc:mysql:///test"></property>

	<property name="driverClass" value="com.mysql.jdbc.Driver"></property>

	<property name="user" value="root"></property>

	<property name="password" value="root"></property>

</bean>
抽取连接池属性配置值到Properties文件
- 定义一个properties文件:jdbc.properties
jdbc.url=jdbc:mysql:///test

jdbc.driverClassName=com.mysql.jdbc.Driver

jdbc.username=root

jdbc.password=root - Spring引入jdbc.properties文件
- 第一种:使用<bean>标签
<bean class="org.springframework.beans.factory.config.PropertyPlaceholderConfigurer">

	<property name="location" value="classpath:jdbc.properties"/>

</bean> - 第二种:使用<context:property-placeholder>标签
<context:property-placeholder location="classpath:jdbc.properties" />
- 第一种:使用<bean>标签
- Spring配置文件使用jdbc.properties的属性值
<bean id="dataSource" class="org.springframework.jdbc.datasource.DriverManagerDataSource">

	<property name="url" value="${jdbc.url}"></property>

	<property name="driverClassName" value="${jdbc.driverClassName}"></property>

	<property name="username" value="${jdbc.username}"></property>

	<property name="password" value="${jdbc.password}"></property>

</bean>
Spring的事务管理
常用API
PlatformTransactionManager
- Spring的事务基础结构的中心接口,常用实现类
- DataSourceTransactionManager:使用JDBC管理事务
- HibernateTransactionManager:使用Hibernate管理事务
TransactionDefinition
- Spring的事务定义,用于定义事务相关的信息。例如,隔离级别、传播行为、是否只读、超时信息等
TransactionStatus
- 用于记录事务管理的过程中,事务的状态信息
Spring进行事务管理时,PlatformTransactionManager根据TransactionDefinition进行事务的管理,这个过程中会产生各种状态,将这些状态记录到TransactionStatus中
传播行为
基本认识
事务传播行为用来描述由某一个事务传播行为修饰的方法被嵌套进另一个方法的时事务如何传播
主要用来解决业务层方法(每个业务层方法有自己的事务)相互调用的问题
7种传播行为
class TestServiceImpl01 {

	...

	public void A() {

		testDao1.test1();

		testDao2.test2();

	}

}

class TestServiceImpl02 {

	...

	public void B() {

		new TestServiceImpl01().A();//A操作

		testDao3.test3();//B操作

		testDao4.test4();//B操作

	}

}
| 分类 | 传播行为类型 | 说明 |
|
多个操作在同一个事务中 (A、B操作在一个事务中) |
PROPAGATION_REQUIRED | 默认值,如果A中有事务,使用A中的事务;如果A中没有事务,创建一个新的事务,将操作(A、B)包含进来 |
| PROPAGATION_SUPPORTS | 如果A中有事务,使用A中的事务;如果A中没有事务,就不使用事务 | |
| PROPAGATION_MANDATORY | 如果A中有事务,使用A中的事务;如果A中没有事务,就抛出异常 | |
|
多个操作不在同一个事务中 (A、B操作不在一个事务中) |
PROPAGATION_REQUIRES_NEW | 如果A中有事务,将A的事务挂起,新建一个事务,只将自身操作(B)包含进来 |
| PROPAGATION_NOT_SUPPORTED | 如果A中有事务,将A的事务挂起,不使用事务 | |
| PROPAGATION_NEVER | 如果A中有事务,抛出异常 | |
| 嵌套式事务 | PROPAGATION_NESTED |
如果A中有事务,执行A事务,执行完成后设置一个保存点;再执行B中的操作,如果没有异常,执行通过;如果有异常 可以回滚到最初始位置(A操作前),也可以回滚到A操作后设置的保存点位置 |
基本使用
案例要求:
账户之间相互转账,一方转出的同时另一方必须转入才行
实现一:不使用事务管理
- 创建service层、dao层的接口和实现类
- dao层
- 接口
package com.qf.tx.demo;

public interface AccountDao {

	void addMoney(Long toId,Double money);

	void subMoney(Long fromId,Double money);

} - 实现类
package com.qf.tx.demo;

import org.springframework.jdbc.core.support.JdbcDaoSupport;

import org.springframework.stereotype.Repository;

@Repository("accountDao")

public class AccountDaoImpl extends JdbcDaoSupport implements AccountDao {

	@Override

	public void addMoney(Long toId, Double money) {

		this.getJdbcTemplate().update("update account set amount=amount+? where id=?", money, toId);

	}

	@Override

	public void subMoney(Long fromId, Double money) {

		this.getJdbcTemplate().update("update account set amount=amount-? where id=?", money, fromId);

	}

}
- 接口
- service层
- 接口
package com.qf.tx.demo;

public interface AccountService {

	void transerTo(Long fromId,Long toId,Double money);

} - 实现类
package com.qf.tx.demo;

import javax.annotation.Resource;

import org.springframework.stereotype.Service;

@Service("accountService")

public class AccountServiceImpl implements AccountService{

	@Resource(name="accountDao")

	private AccountDao accountDao;

	public void setAccountDao(AccountDao accountDao) {

		this.accountDao = accountDao;

	}

	@Override

	public void transerTo(Long fromId, Long toId, Double money) {

		accountDao.subMoney(fromId, money);

		//int a = 1/0;

		accountDao.addMoney(toId, money);

	}

}
- 接口
- dao层
- Spring管理service和dao的实现类
<!-- 配置数据源连接池 -->

<context:property-placeholder location="classpath:jdbc.properties" />

<bean id="dataSource" class="org.springframework.jdbc.datasource.DriverManagerDataSource">

	<property name="url" value="${jdbc.url}"></property>

	<property name="driverClassName" value="${jdbc.driverClassName}"></property>

	<property name="username" value="${jdbc.username}"></property>

	<property name="password" value="${jdbc.password}"></property>

</bean>

<!-- Spring管理dao -->

<bean id="accountDao" class="com.qf.tx.demo.AccountDaoImpl">

	<property name="dataSource" ref="dataSource"></property>

</bean>

<!-- Spring管理service -->

<bean id="accountService" class="com.qf.tx.demo.AccountServiceImpl">

	<property name="accountDao" ref="accountDao"></property>

</bean> - 测试
package com.qf.tx.demo;

import javax.annotation.Resource;

import org.junit.Test;

import org.junit.runner.RunWith;

import org.springframework.test.context.ContextConfiguration;

import org.springframework.test.context.junit4.SpringJUnit4ClassRunner;

@RunWith(SpringJUnit4ClassRunner.class)

@ContextConfiguration("classpath:applicationContext_tx.xml")

public class TestDemo {

	@Resource(name="accountService")

	private AccountService accountService;

	@Test

	public void test() {

		accountService.transerTo(1L, 2L, 100d);

	}

}
实现二:编程式事务管理
- 配置事务平台管理器
<!-- 配置事务平台管理器 -->

<bean id="txManager" class="org.springframework.jdbc.datasource.DataSourceTransactionManager">

	<property name="dataSource" ref="dataSource"></property>

</bean> - 配置事务管理模板
- 事务管理模板
- 使用TransactionTemplate 不需要显式地开始事务,甚至不需要显式地提交事务。这些步骤都由模板完成。
- 出现异常时,应通过TransactionStatus 的setRollbackOnly 显式回滚事务。
- TransactionTemplate 的execute 方法接收一个TransactionCallback 实例。Callback 也是Spring 的经典设计,用于简化用户操作
- 配置
<!-- 配置简化管理事务的模板 -->

<bean id="txTemplate" class="org.springframework.transaction.support.TransactionTemplate">

	<property name="transactionManager" ref="txManager"/>

</bean>
- 事务管理模板
- service层注入事务管理模板,用于管理事务
<!-- Spring管理service,在service层注入事务管理的模板 -->

<bean id="accountService" class="com.qf.tx.demo.AccountServiceImpl">

	<property name="accountDao" ref="accountDao"/>

	<property name="txTemplate" ref="txTemplate"/>

</bean> - 修改service的实现类
package com.qf.tx.demo;

import javax.annotation.Resource;

import org.springframework.stereotype.Service;

import org.springframework.transaction.TransactionStatus;

import org.springframework.transaction.support.TransactionCallback;

import org.springframework.transaction.support.TransactionCallbackWithoutResult;

import org.springframework.transaction.support.TransactionTemplate;

@Service("accountService")

public class AccountServiceImpl implements AccountService{

	@Resource(name="accountDao")

	private AccountDao accountDao;

	public void setAccountDao(AccountDao accountDao) {

		this.accountDao = accountDao;

	}

	@Resource(name="txTemplate")

	private TransactionTemplate txTemplate;

	public void setTxTemplate(TransactionTemplate txTemplate) {

		this.txTemplate = txTemplate;

	}

	@Override

	public void transerTo(final Long fromId, final Long toId, final Double money) {

		txTemplate.execute(new TransactionCallbackWithoutResult() {

			@Override

			protected void doInTransactionWithoutResult(TransactionStatus status) {

				accountDao.subMoney(fromId, money);

				int a = 1/0;

				accountDao.addMoney(toId, money);

			}

		});

	}

}
实现三:声明式事务管理
声明式事务管理
- 不需要修改代码就可以实现事务管理
- 采用AOP实现,所以可以使用XML和注解两种方式来实现
XML方式
- 使用实现一的接口和实现类即可,不需要修改代码
- 引入AOP开发需要的jar包
- spring-aop-4.2.4.RELEASE.jar
- spring-aspects-4.2.4.RELEASE.jar
- com.springsource.org.aspectj.weaver-1.6.8.RELEASE.jar
- com.springsource.org.aopalliance-1.0.0.jar
- 配置事务平台管理器
<!-- 配置事务平台管理器 -->

<bean id="txManager" class="org.springframework.jdbc.datasource.DataSourceTransactionManager">

	<property name="dataSource" ref="dataSource"></property>

</bean> - AOP配置
- 配置切面
<!-- 配置事务的增强 -->

<tx:advice id="txAdvice" transaction-manager="txManager">

	<tx:attributes>

		<tx:method name="trans*" propagation="REQUIRED" />

	</tx:attributes>

</tx:advice> - 将切面应用到目标类
<!-- 配置AOP -->

<aop:config>

	<aop:pointcut expression="execution(* com.qf.tx.demo.AccountServiceImpl.*(..))" id="pointcut"/>

	<aop:advisor advice-ref="txAdvice" pointcut-ref="pointcut"/>

</aop:config>
- 配置切面
注解方式
- 引入AOP开发需要的jar包
- spring-aop-4.2.4.RELEASE.jar
- spring-aspects-4.2.4.RELEASE.jar
- com.springsource.org.aspectj.weaver-1.6.8.RELEASE.jar
- com.springsource.org.aopalliance-1.0.0.jar
- 配置事务平台管理器
<!-- 配置事务平台管理器 -->

<bean id="txManager" class="org.springframework.jdbc.datasource.DataSourceTransactionManager">

	<property name="dataSource" ref="dataSource"></property>

</bean> - 开启注解事务
<!-- 开启注解事务 -->

<tx:annotation-driven transaction-manager="txManager"/> - service层添加注解
@Transactional

@Service("accountService")

public class AccountServiceImpl implements AccountService
最新文章
- Java基础知识点1:基本类型包装类
- 【转】valueof()用法
- Addthis使用
- CSS与JQuery的相关问题
- Java制作证书的工具keytool用法总结
- iOS证书失效
- traceroute小结 come from CSDN author:houdong
- sublime text 2安装及使用
- 何为分类,UIImageView举例
- PHP 二维数组排序保持键名不变
- iOS 类方法 、野指针与空指针
- Oracle 基础概念
- 【CSS】面试知识整理
- [python] 3 、基于串口通信的嵌入式设备上位机自动测试程序框架(简陋框架)
- 前端 HTML 常用标签 head标签相关内容 style标签 定义内部样式表
- 使用fddb的测试工具测试自己的检测器
- SharePoint 2013 Farm 安装指南——构建一个双层SharePoint Farm
- PI接口开发之调java WS接口(转)
- 非ROOT用户不能识别声卡问题
- bzoj 2150 最小路径覆盖
