java图形化界面编程(AWT)
1.AWT编程简介
在JDK发布时,sun公司提供了一套基本的GUI类库,这个GUI类库希望可以在所有平台下都能运行,这套基本类库被称为“抽象窗口工具集”,它为java应用程序提供了基本的图形组件,AWT是窗口框架,他从不同平台的窗口系统中提取出不同的组件,当程序运行时,将这些组件和动作委托给程序所在的运行平台,简而言之,当使用AWT编写图形界面应用时,程序仅指定了界面组件的位置和行为,并未提供真正的实现,JVM调用操作系统本地的图形界面来创建和平台一致的对等体,使用AWT创建的图形界面应用和所在的运行平台有相同的界面风格。
2.AWT继承体系
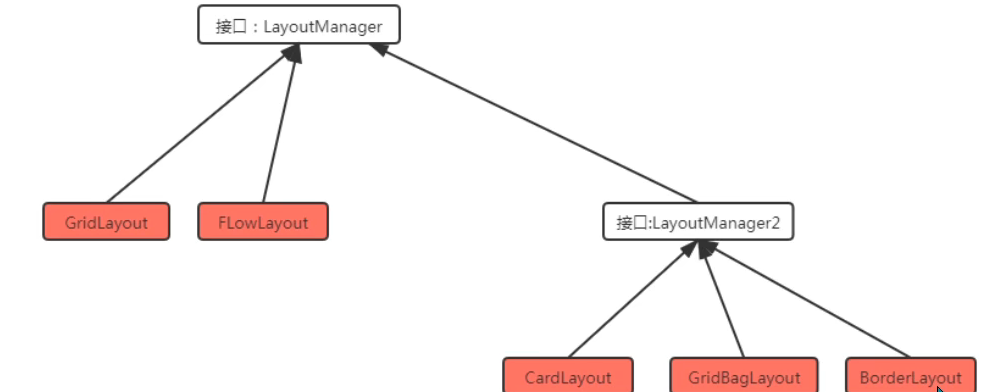
所有的和AWT编程相关的类都放在java.awt包和它的子包中,AWT编程中有两个基类:
Component:代表一个能以图形化方式显示出来,并可以用于与用户交互的对象
MenuComponent:图形界面的菜单组件
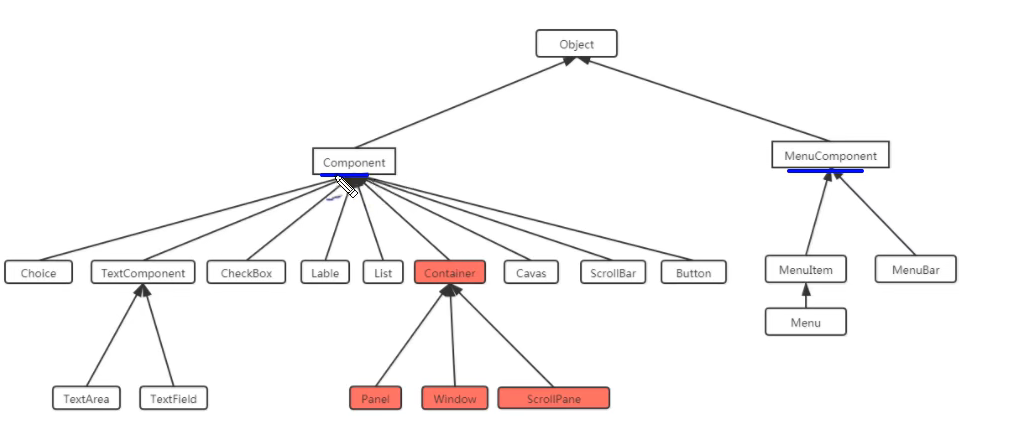
其中Container是一种特殊的Component,它代表一种容器,可以装普通的Component
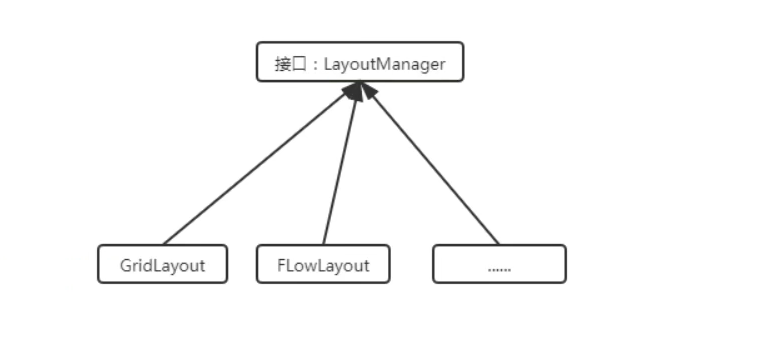
3.LayoutManager接口
LayoutManager接口,若一个容器中有多个组件,那么容器就需要使用LayoutManager来管理这些组件的布局方式
2.3.1.Container继承体系
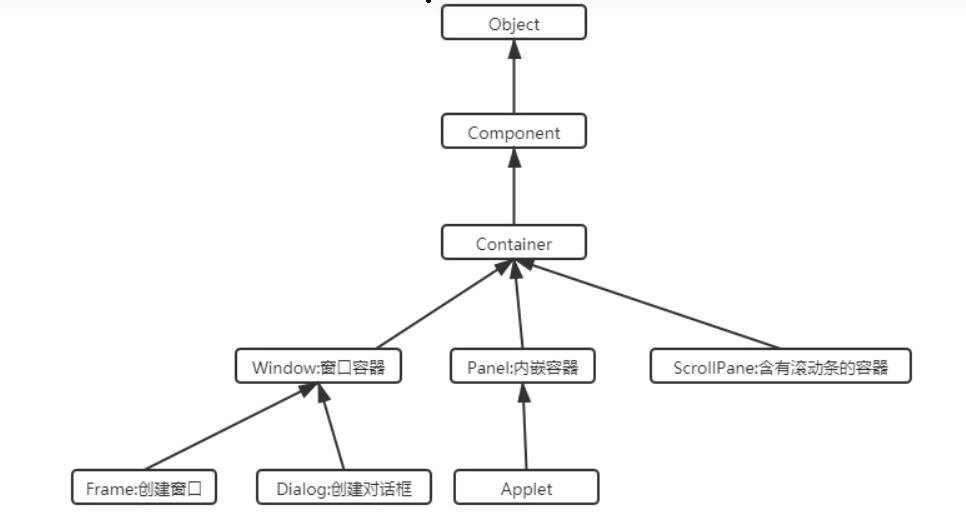
Window可以独立存在顶级窗口,默认使用BorderLayout管理内部组件布局
Panel可以容纳其他组件,但不能独立存在,必须内嵌到其他的容器中使用,默认使用FlowLayout管理内部布局
ScrollPane是一个带滚动条的容器,不能独立存在,使用BorderLayout管理内部组件布局
2.3.2.API
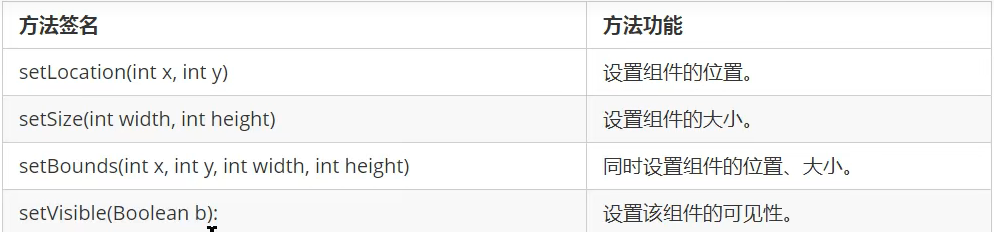
Component提供的方法
Container容器提供的方法
2.3.3容器演示
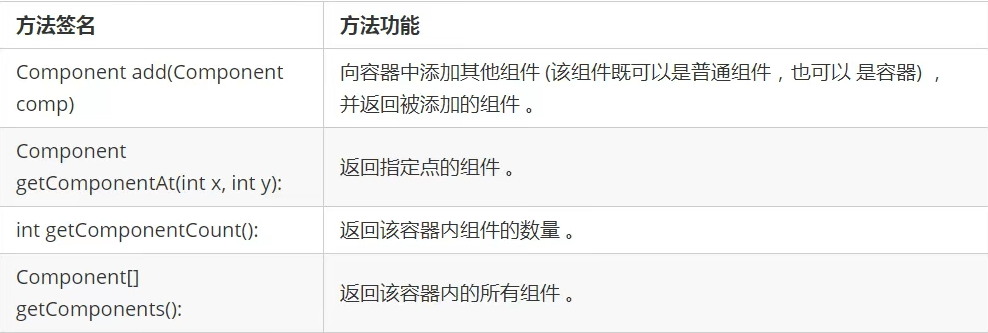
2.3.3.1Window容器
public class WindowDemo {

    public static void main(String[] args) {

        //1.创建窗口对象

        Frame frame = new Frame("测试window窗口");

        //设置窗口的出现的位置

        frame.setBounds(100,100,500,300);

        //设置窗口可见性

        frame.setVisible(true);

    }

}
运行结果如下:
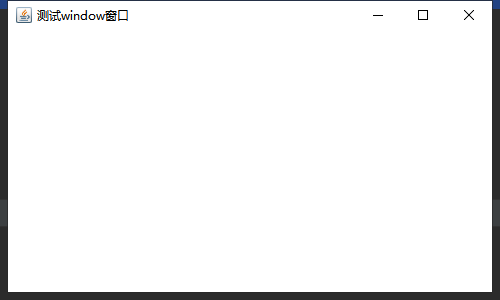
2.3.3.2 Panel内嵌容器演示
public class PanelDemo {

    public static void main(String[] args) {

        //创建一个window对象,使panel容器有所依赖,因为panel不能独立存在

        Frame frame = new Frame("测试Panel容器");

        //创建Panel对象

        Panel panel = new Panel();

        //创建一个文本框和一个按钮,并且把他们存放到容器中

        panel.add(new TextField("测试文本"));

        panel.add(new Button("测试按钮"));

        //把panel放入到window系统中

         frame.add(panel);

        //设置window的位置以及大小

        frame.setBounds(100,100,500,300);

        //设置window可见性

        frame.setVisible(true);

    }

}
效果展示
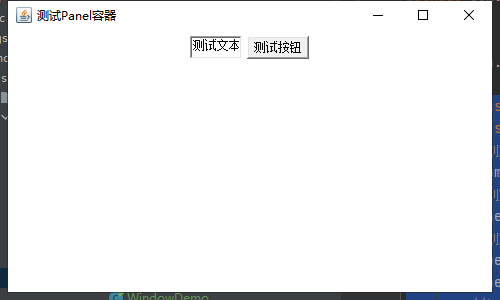
2.3.3.3 ScrollPanel内嵌容器演示
public class ScrollPaneDemo {

    public static void main(String[] args) {

        //创建一个window对象,使ScrollPane容器有所依赖,因为ScrollPane不能独立存在

        Frame frame = new Frame("测试ScrollPane");

        //创建ScrollPane对象

        ScrollPane scrollPane = new ScrollPane(ScrollPane.SCROLLBARS_ALWAYS);

        //创建一个文本框和一个按钮,并且把他们存放到容器中

        scrollPane.add(new TextField("测试文本框"));

        scrollPane.add(new Button("测试按钮"));

        //把scrollPane放入到window系统中

         frame.add(scrollPane);

        //设置window的位置以及大小

        frame.setBounds(100,100,500,300);

        //设置window可见性

        frame.setVisible(true);

    }

}
效果展示
2.4LayoutManager布局管理器
2.4.1FlowLayout布局管理器
在布局管理器在中,组件像水流一样向某些方向流动(排列),遇到障碍(边界)就折回。
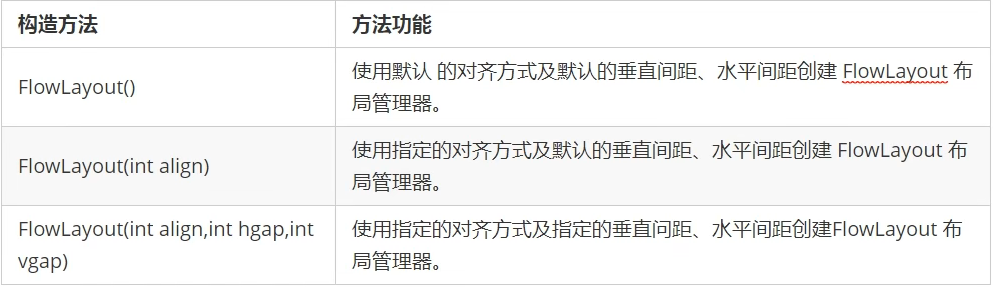
FlowLayout中组件的排列方向(从左到右,从右到左,从中间两边等),该参数应使用FlowLaout类的静态常量FlowLayout.LEFT、FlowLayout.CENTER、FlowLayout.RIGHT,默认是左对齐,组件中间距离通过整数设置,单位是像素,默认为5个像素
public class FlowLayoutDemo {

    public static void main(String[] args) {

        //创建Frame对象

        Frame frame = new Frame("测试FlowLayout布局管理器");

        //通过setLayout方法设置容器布局管理器

        frame.setLayout(new FlowLayout(FlowLayout.CENTER,20,20));

        for (int i = 1; i <=100 ; i++) {

            //添加多个按钮到frame中

            frame.add(new Button("按钮"+i));

        }

        //设最佳大小

        frame.pack();

        //可视化

        frame.setVisible(true);

    }

}
2.4.2BorderLayout边框布局
BroderLaout将容器分为EAST、SOUTH、WEST、NORTH、CENTER五个区域,普通组件可以被放置在这五个区域中的任意一个。
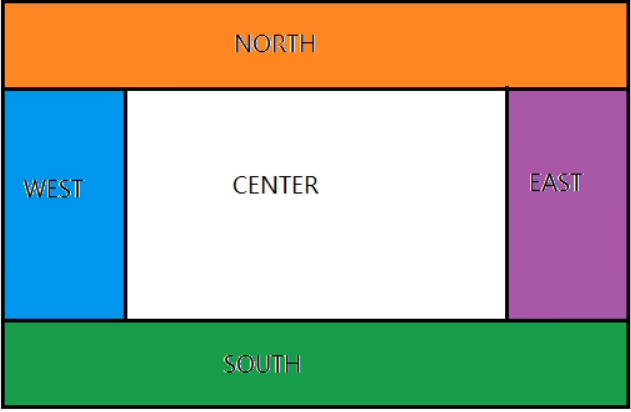
当改变使用BorderLaout的容器大小时,NORTH、SOUTH和CENTER区域水平调整,而EAST、WEST和CENTER区域垂直调整。
使用BorderLayout注意点:
1.使用BorderLayout布局管理器的容器中添加组件时,需要指定添加到那个区域中,如果没有指定则默认添加到中间区域;
2.如果向同一个区域添加多个组件时,后放的组件会覆盖先放入的组件;

代码演示
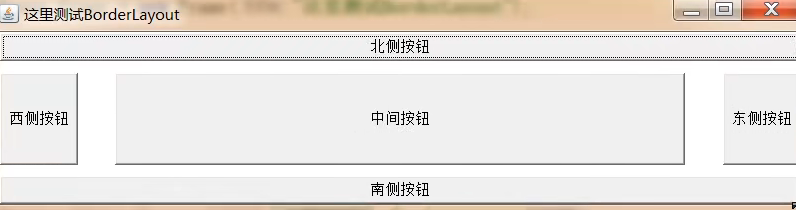
public class BorderLayoutDomo1 {

    public static void main(String[] args) {

        Frame frame = new Frame("边框布局测试");

        frame.setLayout(new BorderLayout(30,10));

        frame.add(new Button(" 北侧按钮"),BorderLayout.NORTH);

        frame.add(new Button("南侧按钮"),BorderLayout.SOUTH);

        frame.add(new Button("东侧按钮"),BorderLayout.EAST);

        frame.add(new Button("西侧按钮"),BorderLayout.WEST);

        frame.add(new Button("中间按钮"),BorderLayout.CENTER);

        frame.pack();

        frame.setVisible(true);

    }

}
代码演示
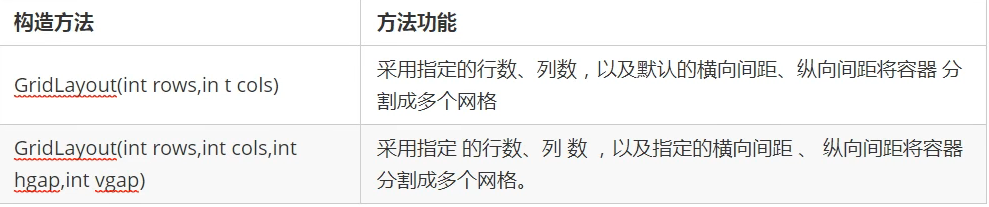
2.4.3GridLayout布局管理器
该布局管理器将容器分割成纵横线分隔的网格,每个网格所占的区域大小相同,默认从左到右、从上而下添加到每个网格中,各个组件的大小由组件所处的区域决定
案例
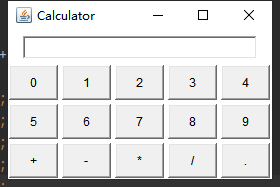
public class GridLayoutDemo {

    public static void main(String[] args) {

        Frame frame = new Frame("Calculator");

        //创建一个Panel对象,里面存放一个TextFiled组件

        Panel panel = new Panel();

        panel.add(new TextField(30));

        //把当前Panel存放到frame中的北侧区域

        frame.add(panel,BorderLayout.NORTH);

        //再创建一个Panel对象,设置它的布局管理器为GridLayout

        Panel panelGridLayout= new Panel();

        panelGridLayout.setLayout(new GridLayout(3,5,4,4));

        //往panel中添加内容

        for (int i = 0; i <10 ; i++) {

            panelGridLayout.add(new Button(i+""));

        }

        panelGridLayout.add(new Button("+"));

        panelGridLayout.add(new Button("-"));

        panelGridLayout.add(new Button("*"));

        panelGridLayout.add(new Button("/"));

        panelGridLayout.add(new Button("."));

        //把当前panel添加到frame中

        frame.add(panelGridLayout);

        frame.pack();

        frame.setVisible(true);

    }

}
代码演示
2.4.4GridLayout布局管理器
与GridLayout不同的是,在GridBagLaout中一个组件可以跨越一个或多个网格,并可以设置网格的大小互不相同,从而增强了布局的灵活性,java提供了GridBagConstaionts类,与特定的组件绑定,可以完成具体的大小和跨越性的设置
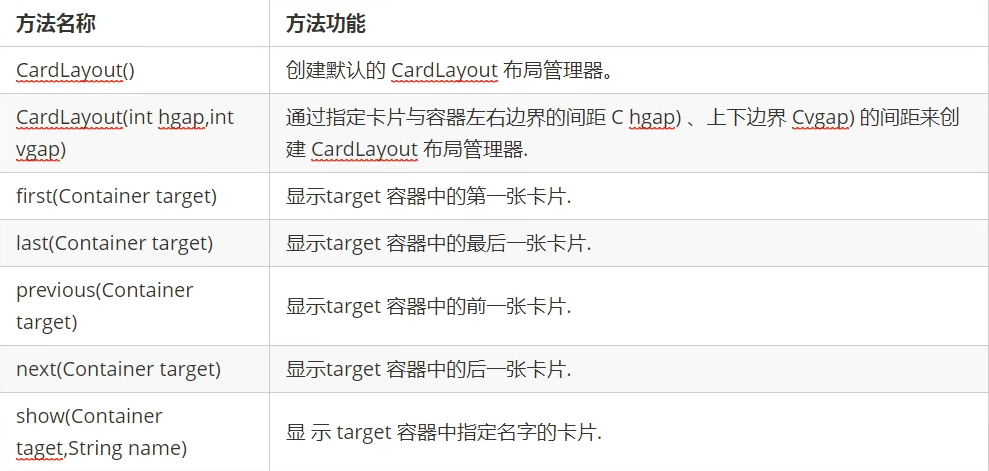
2.4.5CardLayout
以时间而非空间来管理它里面的组件,它将加入到的容器所有的组件看成一叠卡片,每个卡片其实就是一个组件,每次只有最上面的Component才可见。
案例
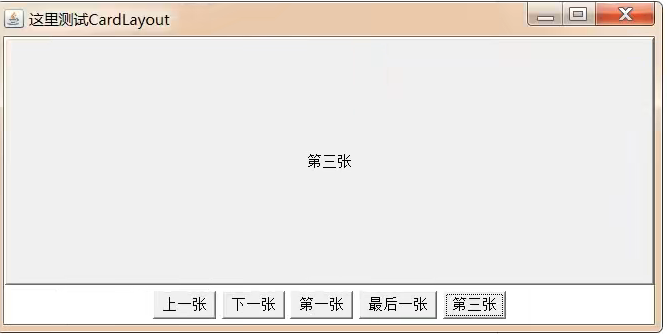
public class CardLayoutDemo {

    public static void main(String[] args) {

        Frame frame = new Frame("CardLayout");

        //创建一个Panel储存多个卡片

        Panel panel = new Panel();

        //创建CardLayout对象,并且把该对象设置到容器中

        CardLayout cardLayout = new CardLayout();

        panel.setLayout(cardLayout);

        //往panel中储存多个组件

        String[] names = {"第一张", "第二张", "第三张", "第四张", "第五张",};

        for (int i = 0; i < names.length; i++) {

            panel.add(names[i], new Button(names[i]));

        }

        //把panel放到frame中间区域

        frame.add(panel);

        //船舰另外一个panel存放底部按钮组件

        Panel panelButton = new Panel();

        //创建5个按钮组件

        Button b1 = new Button("上一张");

        Button b2 = new Button("下一张");

        Button b3 = new Button("第一张");

        Button b4 = new Button("最后一张");

        Button b5 = new Button("第三张");

        //创建一个事件监听器对象,用于监听按钮

        ActionListener actionListener = new ActionListener() {

            @Override

            public void actionPerformed(ActionEvent e) {

                //获取按钮对象

                String actionCommand = e.getActionCommand();

                switch (actionCommand) {

                    case "上一张":

                        cardLayout.previous(panel);

                        break;

                    case "下一张":

                        cardLayout.next(panel);

                        break;

                    case "第一张":

                        cardLayout.first(panel);

                        break;

                    case "最后一张":

                        cardLayout.last(panel);

                        break;

                    case "第三张":

                        cardLayout.show(panel, "第三张");

                        break;

                }

            }

        };

        //把当前这个事件监听器和多个按钮绑定到一起

        b1.addActionListener(actionListener);

        b2.addActionListener(actionListener);

        b3.addActionListener(actionListener);

        b4.addActionListener(actionListener);

        b5.addActionListener(actionListener);

        //把按钮添加到容器中

        panelButton.add(b1);

        panelButton.add(b2);

        panelButton.add(b3);

        panelButton.add(b4);

        panelButton.add(b5);

        //把panelButton存放的frame的那边区域

        frame.add(panelButton, BorderLayout.SOUTH);

        frame.pack();

        frame.setVisible(true);

    }

}
效果展示
2.4.6BoxLayout布局
BoxLayout是Swing提供的,该布局管理器可以在垂直和水平两个方向摆放组件。

代码演示
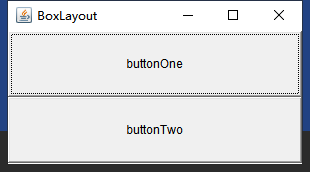
public class BoxLayoutDemo {

    public static void main(String[] args) {

        Frame frame = new Frame("BoxLayout");

        //创建BoxLayout对象,该对象的组件垂直存放

//        BoxLayout boxLayout = new BoxLayout(frame,BoxLayout.X_AXIS);

        BoxLayout boxLayout = new BoxLayout(frame,BoxLayout.Y_AXIS);

        //把boxlayout对象设置给frame

        frame.setLayout(boxLayout);

        //创建两个按钮组件

        frame.add(new Button("buttonOne"));

        frame.add(new Button("buttonTwo"));

        frame.pack();

        frame.setVisible(true);

    }

}
效果展示
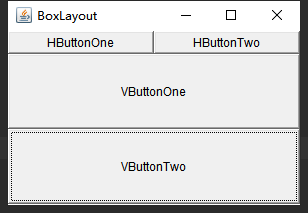
Box容器
在java.swing包中,提供了一个新的容器Box,该容器的默认布局管理器就是BoxLayout,大多数情况下使用Box容器去容纳多个GUI组件,然后把Box容器作为一个组件,添加到其他容器中,从而形成整体窗口布局。

案例
public class BoxLayoutDemo1 {

    public static void main(String[] args) {

        Frame frame = new Frame("BoxLayout");

        //创建Box水平排列组件的容器

        Box horizontalBox = Box.createHorizontalBox();

        //往容器中添加按钮

        horizontalBox.add(new Button("HButtonOne"));

        horizontalBox.add(new Button("HButtonTwo"));

        //创建Box垂直排列组件的容器

        Box verticalBox = Box.createVerticalBox();

        //往容器中添加按钮

        verticalBox.add(new Button("VButtonOne"));

        verticalBox.add(new Button("VButtonTwo"));

        //把容器添加到frame中

        frame.add(horizontalBox,BorderLayout.NORTH);

        frame.add(verticalBox);

        frame.pack();

        frame.setVisible(true);

    }

}
效果
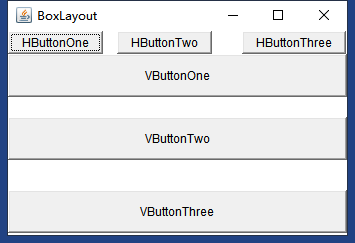
Box实现间隔组件
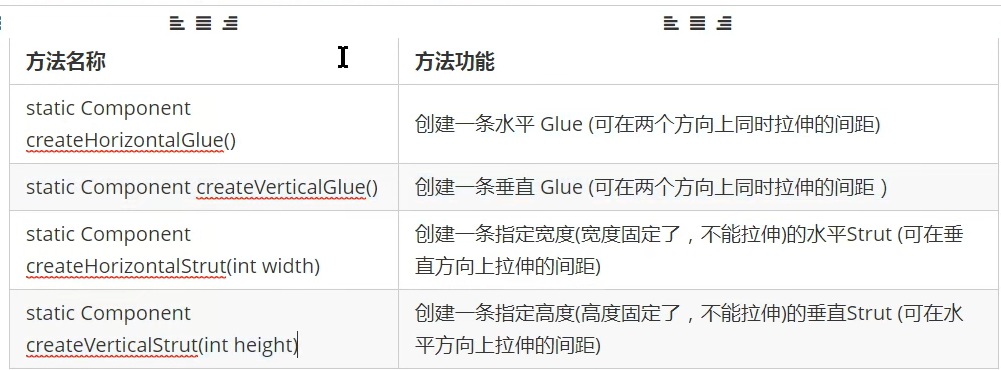
案例
public class BoxLayoutDomo3 {

    public static void main(String[] args) {

        Frame frame = new Frame("BoxLayout");

        //船舰水平排列的Box容器

        Box horizontalBox = Box.createHorizontalBox();

        //往容器中添加按钮和间隔

        horizontalBox.add(new Button("HButtonOne"));

        horizontalBox.add(Box.createHorizontalGlue());//默认间隔

        horizontalBox.add(new Button("HButtonTwo"));

        horizontalBox.add(Box.createHorizontalStrut(30));//指定间隔

        horizontalBox.add(new Button("HButtonThree"));

        //创建垂直排列的容器

        Box verticalBox = Box.createVerticalBox();

        //往容器中添加按钮和间隔

        verticalBox.add(new Button("VButtonOne"));

        verticalBox.add(Box.createVerticalGlue());

        verticalBox.add(new Button("VButtonTwo"));

        verticalBox.add(Box.createVerticalStrut(30));

        verticalBox.add(new Button("VButtonThree"));

        //把box容器添加到frame中

        frame.add(horizontalBox,BorderLayout.NORTH);

        frame.add(verticalBox);

        frame.pack();

        frame.setVisible(true);

    }

}
效果
2.5AWT中常用的组件
2.5.1基本组件
代码演示
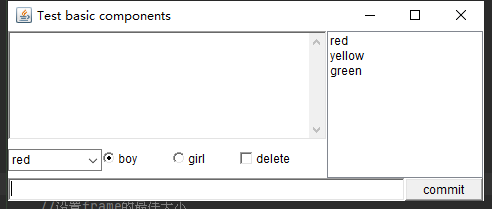
public class BasicComponentDemo {

    Frame frame = new Frame("Test basic components");

    TextArea textArea = new TextArea(5, 20);

    Choice choice = new Choice();

    CheckboxGroup checkboxGroup = new CheckboxGroup();

    Checkbox boy = new Checkbox("boy", checkboxGroup, true);

    Checkbox girl = new Checkbox("girl", checkboxGroup, false);

    Checkbox isDelete = new Checkbox("delete");

    TextField textField = new TextField(50);

    Button button = new Button("commit");

    List color = new List(6, true);

    public static void main(String[] args) {

        new BasicComponentDemo().init();

    }

    public void init() {

        //组装

        //组装底部

        Box horizontalBox = Box.createHorizontalBox();

        horizontalBox.add(textField);

        horizontalBox.add(button);

        frame.add(horizontalBox, BorderLayout.SOUTH);

        //组装选择部分

        choice.add("red");

        choice.add("yellow");

        choice.add("green");

        Box cBox = Box.createHorizontalBox();

        cBox.add(choice);

        cBox.add(boy);

        cBox.add(girl);

        cBox.add(isDelete);

        //组装文本域和选择部分

        Box topLeft = Box.createVerticalBox();

        topLeft.add(textArea);

        topLeft.add(cBox);

        //组装顶部左边列表框

        color.add("red");

        color.add("yellow");

        color.add("green");

        Box top = Box.createHorizontalBox();

        top.add(topLeft);

        top.add(color);

        frame.add(top);

        //设置frame的最佳大小

        frame.pack();

        //设置frame可见性

        frame.setVisible(true);

    }

}
效果展示
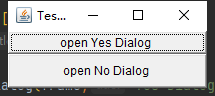
2.5.2对话框Dialog
2.5.2.1Dialog
Dialog是windos类的子类,是一个容器,属于特殊组件,对话框可以独立存在的顶级窗口,和普通窗口用法一样。使用对话框通常依赖其他窗口,对话框分为非模式和模式两种,当某个模式被打开之后该模式对话框位于它的父窗口之上,在模式对话框被关闭之前,父窗口无法获取焦点

代码:
public class DialogDemo {

    public static void main(String[] args) {

        Frame frame = new Frame("Test basic Dialog");

        //模式对话框

        Dialog yes_dialog = new Dialog(frame,"Yes Dialog",true);

        //非模式对话框

        Dialog no_dialog = new Dialog(frame, "No Dialog", false);

        //通过setBound设置对话框的位置与大小

        yes_dialog.setBounds(20,30,300,200);

        no_dialog.setBounds(20,30,300,200);

        //创建两个按钮

        Button open_yes_dialog = new Button("open Yes Dialog ");

        Button open_no_dialog = new Button("open No Dialog ");

        //给两个按钮设置点击事件

        open_yes_dialog.addActionListener(new ActionListener() {

            @Override

            public void actionPerformed(ActionEvent e) {

                yes_dialog.setVisible(true);

            }

        });

        open_no_dialog.addActionListener(new ActionListener() {

            @Override

            public void actionPerformed(ActionEvent e) {

                no_dialog .setVisible(true);

            }

        });

        //把按钮添加到frame中

        frame.add(open_yes_dialog,BorderLayout.NORTH);

        frame.add(open_no_dialog);

        //设置frame的最佳大小

        frame.pack();

        //设置frame可见性

        frame.setVisible(true);

    }

}
演示:
2.5.2.2FileDialog
FlieDialog是Dialog的一个子类,用于操作文件的对话框,打开或者保存文件,注意FileDialog无法指定模态或者非模态,这是因为依赖于运行平台实现,如果运行平台的文件对话框是模态的,那么FileDialog也是模态的;反之是非模态。
案例
public class FileDialogDemo {

    public static void main(String[] args) {

        Frame frame = new Frame("Test FileDialog");

        //创建两个对话框,一个保存文件的一个打开文件的

        FileDialog SelectFile = new FileDialog(frame, "SelectFile", FileDialog.LOAD);

        FileDialog SaveFile = new FileDialog(frame, "SaveFile", FileDialog.SAVE);

        //创建两个按钮

        Button bOpenFile = new Button("BOpenFile");

        Button bSaveFile = new Button("BSaveFile");

        //设置点击事件

        bOpenFile.addActionListener(new ActionListener() {

            @Override

            public void actionPerformed(ActionEvent e) {

                SelectFile.setVisible(true);

                //获取选择的路径和文件

                String directory = SelectFile.getDirectory();

                String file = SelectFile.getFile();

                System.out.println("打开的文件的路径为"+directory);

                System.out.println("打开的文件的名称为"+file);

            }

        });

        bSaveFile.addActionListener(new ActionListener() {

            @Override

            public void actionPerformed(ActionEvent e) {

                SaveFile.setVisible(true);

                //获取选择的路径和文件

                String directory = SaveFile.getDirectory();

                String file = SaveFile.getFile();

                System.out.println("打开的文件的路径为"+directory);

                System.out.println("打开的文件的名称为"+file);

            }

        });

        //把按钮添加到frame中

        frame.add(bOpenFile,BorderLayout.NORTH);

        frame.add(bSaveFile);

        frame.setVisible(true);

        frame.pack();

    }

}
2.6事件处理
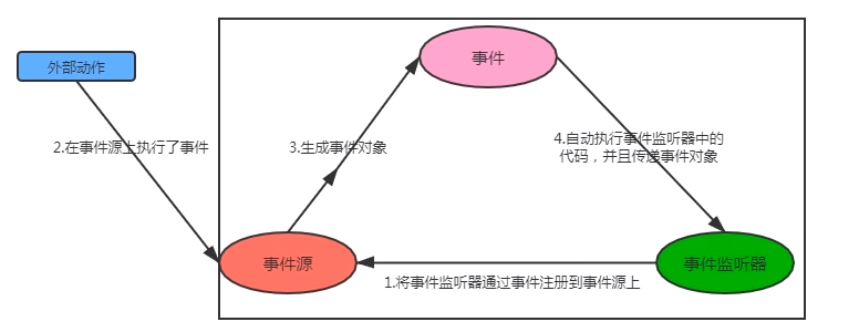
2.6.1GUI事件处理机制
定义:当某个组件发生默写操作的时候,会子自动触发一段代码的执行
事件源(Event Source):操作发生的场所,通常指的是某个组件,例如按钮、窗口等;
事件(Event):在事件源上发生的操作都可以叫事件,GUI会把事件封装到Event对象中,若需要知道事件的详细信息,可以使用Event对象来获取
事件监听器(Event Listenter):当某个事件源上发生了某个事件,事件监听器就可以对这些事件进行处理
注册监听:把某个事件监听器(A)通过某个事件(B)绑定到某个事件源(C)上,当事件源C上发生了事件B之后,那么事件监听器A的代码就会自动执行
2.6.2.1事件
低级事件:是基于某个特定的事件
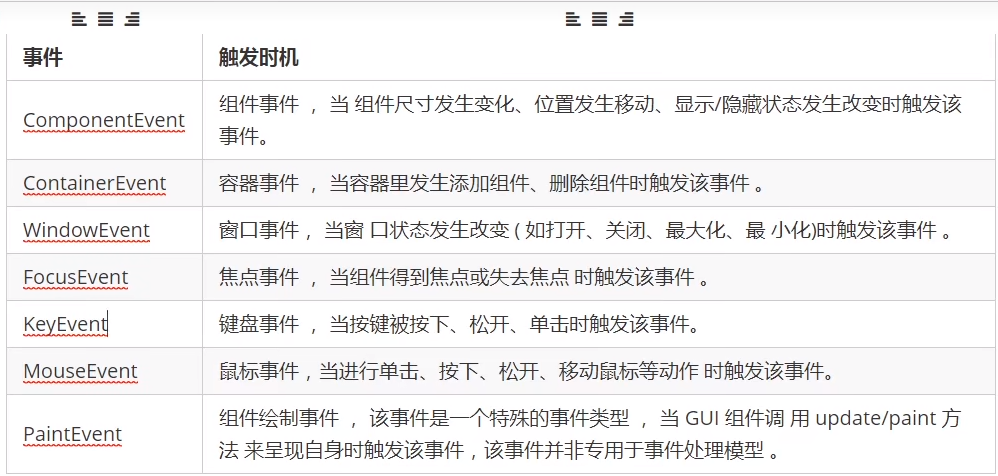
高级事件:根据功能的含义定义的事件
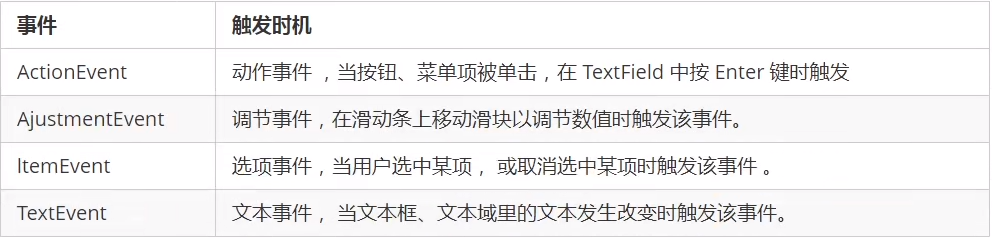
2.6.2事件监听器
不同的事件使用不同的监听器,不同的监听器需要实现不同的监听器接口,当指定事件发生后,事件监听器就会调用所包含的事件处理器来处理事件。

案例
public class ListenerDemo01 {

    public static void main(String[] args) {

        Frame frame = new Frame("Test Listener");

        //创建组件(事件源)

        TextField textField = new TextField(30);

        Choice choice = new Choice();

        choice.add("张三");

        choice.add("王五");

        choice.add("赵六");

        //给文本域添加文本监听器事件监听内容变化

        textField.addTextListener(new TextListener() {

            @Override

            public void textValueChanged(TextEvent e) {

                String text = textField.getText();

                System.out.println("当前文本框内容为"+text);

            }

        });

        //给下拉框添加itemListener事件

        choice.addItemListener(new ItemListener() {

            @Override

            public void itemStateChanged(ItemEvent e) {

                Object item = e.getItem();

                System.out.println("当前选择的条目为"+item);

            }

        });

        //给frame中添加容器监听事件

        frame.addContainerListener(new ContainerListener() {

            @Override

            public void componentAdded(ContainerEvent e) {

                Component child = e.getChild();

                System.out.println("frame中添加了"+child);

            }

            @Override

            public void componentRemoved(ContainerEvent e) {

            }

        });

        //添加到frame中

        Box horizontalBox = Box.createHorizontalBox();

        horizontalBox.add(choice);

        horizontalBox.add(textField);

        frame.add(horizontalBox);

        frame.setVisible(true);

        frame.pack();

    }

}
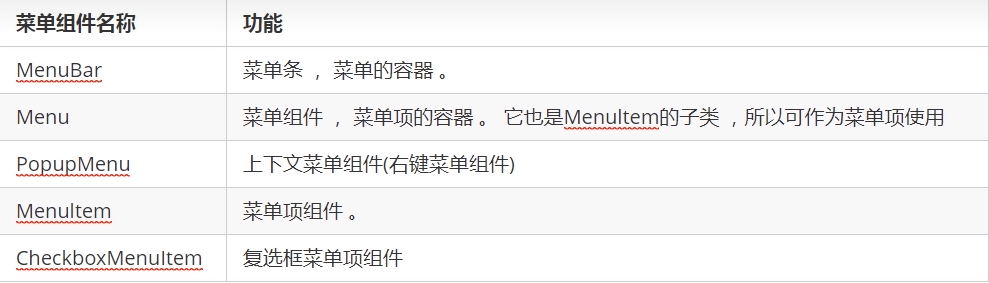
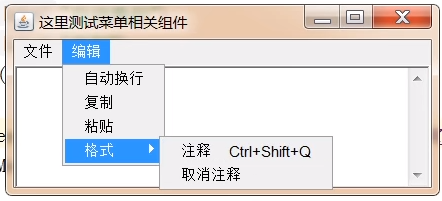
2.7菜单组件
可以通过菜单组件很方便的使用特定的功能,在AWT中,菜单相关组件的使用和之前学习的组件一模一样,只需要把菜单条、菜单、菜单项组合到一起,按照一定的布局,放到容器中即可
案例
public class SimpleMenu {

    //创建窗口

    Frame frame = new Frame("Test SimpleMenu");

    //创建菜单条

    MenuBar menuBar = new MenuBar();

    //创建菜单组件

    Menu fileMenu = new Menu("文件");

    Menu editMenu = new Menu("编辑");

    Menu formatMenu = new Menu("格式");

    //菜单项组件

    MenuItem auto = new MenuItem("自动换行");

    MenuItem copy = new MenuItem("复制");

    MenuItem paste = new MenuItem("粘贴");

    MenuItem comment = new MenuItem("注释", new MenuShortcut(KeyEvent.VK_Q, true));

    MenuItem cancelComment = new MenuItem("取消注释");

    TextArea textArea = new TextArea(6, 40);

    public void init() {

        comment.addActionListener(new ActionListener() {

            @Override

            public void actionPerformed(ActionEvent e) {

                textArea.append("you open menu" + e.getActionCommand());

            }

        });

        formatMenu.add(comment);

        formatMenu.add(cancelComment);

        //组装编辑菜单

        editMenu.add(auto);

        editMenu.add(copy);

        editMenu.add(paste);

        editMenu.add(formatMenu);

        //组装菜单条

        menuBar.add(fileMenu);

        menuBar.add(editMenu);

        //吧菜单条放入到frame

        frame.setMenuBar(menuBar);

        frame.add(textArea);

        //设置frame的最佳大小和可见

        frame.setVisible(true);

        frame.pack();

    }

    public static void main(String[] args) {

        new SimpleMenu().init();

    }

}
效果
2.8绘图
2.8.1组件绘图原理
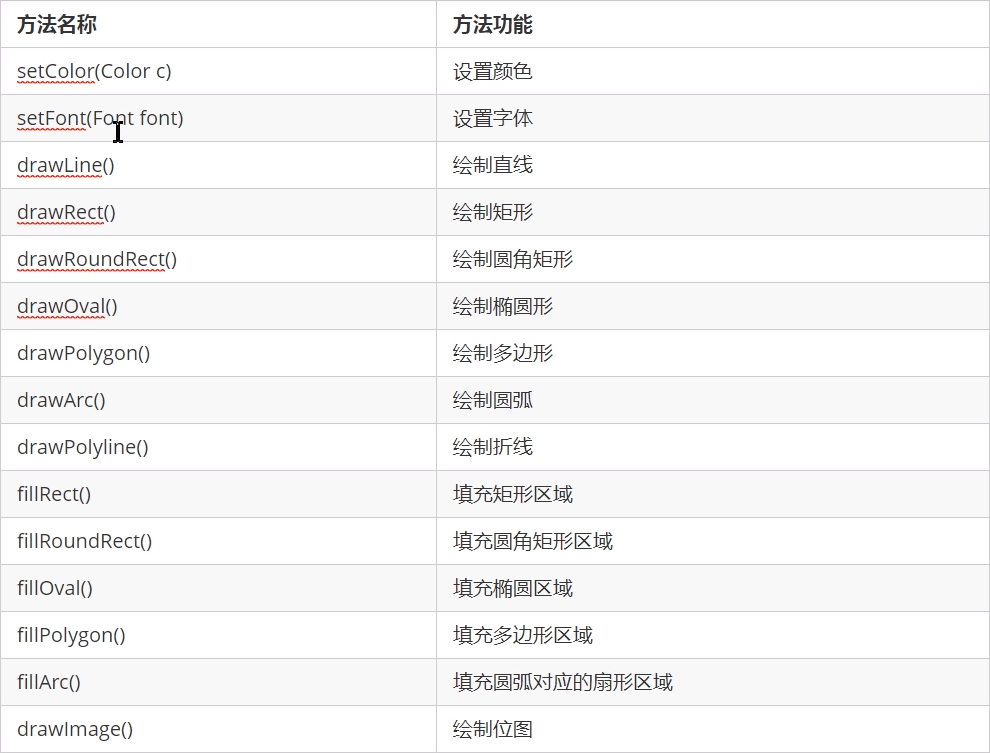
在AWT中提供绘图功能是Graphics对象,那么Component组件和Graphics对象存在什么关系,才能让Component绘制自身的图形呢?在Component中,提供了三个方法来完成组件图形的绘制与刷新:
paint(Graphics g) 绘制组件的外观;
update(Graphics g) 内部调用paint方法,刷新组件的外观;
repaint() 调用update方法,刷新组件的外观;
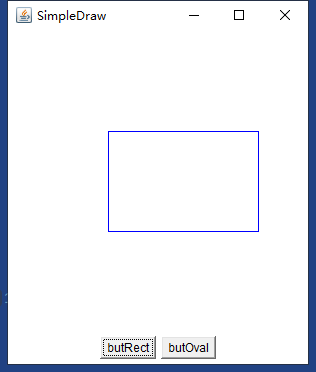
2.8.2Graphics对象的使用
案例
public class SimpleDraw {

    private final String RECT_SHAPE = "rect";

    private final String OVAL_SHAPE = "oval";

    private Frame frame = new Frame("SimpleDraw");

    Button butRect = new Button("butRect");

    Button butOval = new Button("butOval");

    //定义一个变量,记录当前绘制的图形

    private String shape = "";

    //自定义类继承Canvas类,从写paint方放完成画图

    private class MyCanvas extends Canvas {

        @Override

        public void paint(Graphics g) {

            //绘制不同的图形

            if (shape.equals(RECT_SHAPE)) {

                //矩形

                g.setColor(Color.BLUE);

                g.drawRect(100, 100, 150, 100);

            } else if (shape.equals(OVAL_SHAPE)) {

                //圆形

                g.setColor(Color.RED);

                g.drawOval(100, 100, 150, 100);

            }

        }

    }

    //创建自定义画布

    MyCanvas drawArea =new MyCanvas();

    public void  init(){

        //组装视图

        butRect.addActionListener(new ActionListener() {

            @Override

            public void actionPerformed(ActionEvent e) {

                //修改记录值为rect

                shape=RECT_SHAPE;

                drawArea.repaint();

            }

        });

        butOval.addActionListener(new ActionListener() {

            @Override

            public void actionPerformed(ActionEvent e) {

                //修改记录值为oval

                shape=OVAL_SHAPE;

                drawArea.repaint();

            }

        });

        //创建panel承载按钮

        Panel panel = new Panel();

        panel.add(butRect);

        panel.add(butOval);

        frame.add(panel,BorderLayout.SOUTH);

        drawArea.setPreferredSize(new Dimension(300,300));

        frame.add(drawArea);

        frame.pack();

        frame.setVisible(true);

    }

    public static void main(String[] args) {

        new SimpleDraw().init();

    }

}
效果
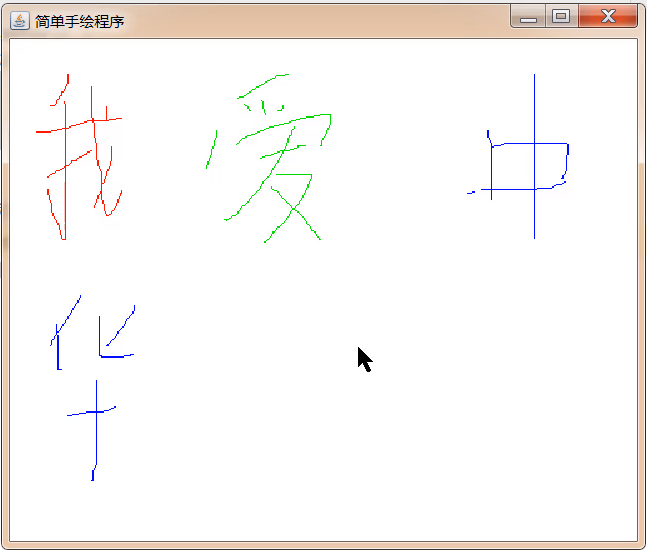
2.8.3处理位图
Graphics提供了drawImage方法来绘制位图,该方法需要一个image参数,通过该方法可以绘制出指定的位图
案例
public class HandDraw {

    Frame frame = new Frame("HandDraw");

    //定义画图区域的宽高

    private final int AREA_WIDTH = 500;

    private final int AREA_HEIGHT = 400;

    //定义右击菜单,设置画笔的color

    private PopupMenu colorMenu = new PopupMenu();

    private MenuItem redItem = new MenuItem("red");

    private MenuItem greenItem = new MenuItem("green");

    private MenuItem blueItem = new MenuItem("blue");

    //定义一个变量定义,记录当前画笔的颜色

    private Color foceColor = Color.black;

    //创建一个位图对象

    BufferedImage image = new BufferedImage(AREA_WIDTH, AREA_HEIGHT, BufferedImage.TYPE_INT_RGB);

    //通过位图获取关联的Graphics对象

    Graphics g = image.getGraphics();

    //自定义一个类 继承Canvas

    private class MyCanvas extends Canvas {

        @Override

        public void paint(Graphics g) {

            g.drawImage(image, 0, 0, null);

        }

    }

    MyCanvas drawArea = new MyCanvas();

    //定义变量,记录鼠标拖动过程中上一处的坐标

    private  int preX=-1;

    private  int preY=-1;

    public void init() {

        ActionListener listener = new ActionListener() {

            @Override

            public void actionPerformed(ActionEvent e) {

                String actionCommand = e.getActionCommand();

                switch (actionCommand) {

                    case "red":

                        foceColor = Color.RED;

                        break;

                    case "green":

                        foceColor = Color.GREEN;

                        break;

                    case "blue":

                        foceColor = Color.BLUE;

                        break;

                }

            }

        };

        redItem.addActionListener(listener);

        greenItem.addActionListener(listener);

        blueItem.addActionListener(listener);

        colorMenu.add(redItem);

        colorMenu.add(greenItem);

        colorMenu.add(blueItem);

        //把colorMenu设置绘图区域

        drawArea.add(colorMenu);

        drawArea.addMouseListener(new MouseAdapter() {

            @Override

            public void mouseReleased(MouseEvent e) {

                boolean popupTrigger = e.isPopupTrigger();

                if (popupTrigger){

                    colorMenu.show(drawArea,e.getX(),e.getY());

                }

                //重置

                preX=-1;

                preY=-1;

            }

        });

        // 设置位图的背景色

        g.setColor(Color.white);

        g.fillRect(0,0,AREA_WIDTH,AREA_HEIGHT);

        //鼠标点击移动事件

        drawArea.addMouseMotionListener(new MouseMotionAdapter() {

            @Override

            public void mouseDragged(MouseEvent e) {

                if (preX>0&&preY>0){

                    g.setColor(foceColor);

                    g.drawLine(preX,preY,e.getX(),e.getY());

                }

                //修正preX值和preY的值

                preX=e.getX();

                preY=e.getY();

                //重绘组件

                drawArea.repaint();

            }

        });

        drawArea.setPreferredSize(new Dimension(AREA_WIDTH,AREA_HEIGHT));

        frame.add(drawArea);

        //组装视图

        frame.setVisible(true);

        frame.pack();

    }

    public static void main(String[] args) {

        new HandDraw().init();

    }

}
效果
2.8.4ImageIO的使用
很多软件都支持打开本地磁盘已经存在的图片,然后进行编辑,编辑完成之后,重新保存到本地磁盘,AWT中ImageIO这个类就可以操作本地磁盘的图片文件
.
案例
public class HandDraw {

    Frame frame = new Frame("HandDraw");

    //定义画图区域的宽高

    private final int AREA_WIDTH = 500;

    private final int AREA_HEIGHT = 400;

    //定义右击菜单,设置画笔的color

    private PopupMenu colorMenu = new PopupMenu();

    private MenuItem redItem = new MenuItem("red");

    private MenuItem greenItem = new MenuItem("green");

    private MenuItem blueItem = new MenuItem("blue");

    //定义一个变量定义,记录当前画笔的颜色

    private Color foceColor = Color.black;

    //创建一个位图对象

    BufferedImage image = new BufferedImage(AREA_WIDTH, AREA_HEIGHT, BufferedImage.TYPE_INT_RGB);

    //通过位图获取关联的Graphics对象

    Graphics g = image.getGraphics();

    //自定义一个类 继承Canvas

    private class MyCanvas extends Canvas {

        @Override

        public void paint(Graphics g) {

            g.drawImage(image, 0, 0, null);

        }

    }

    MyCanvas drawArea = new MyCanvas();

    //定义变量,记录鼠标拖动过程中上一处的坐标

    private  int preX=-1;

    private  int preY=-1;

    public void init() {

        ActionListener listener = new ActionListener() {

            @Override

            public void actionPerformed(ActionEvent e) {

                String actionCommand = e.getActionCommand();

                switch (actionCommand) {

                    case "red":

                        foceColor = Color.RED;

                        break;

                    case "green":

                        foceColor = Color.GREEN;

                        break;

                    case "blue":

                        foceColor = Color.BLUE;

                        break;

                }

            }

        };

        redItem.addActionListener(listener);

        greenItem.addActionListener(listener);

        blueItem.addActionListener(listener);

        colorMenu.add(redItem);

        colorMenu.add(greenItem);

        colorMenu.add(blueItem);

        //把colorMenu设置绘图区域

        drawArea.add(colorMenu);

        drawArea.addMouseListener(new MouseAdapter() {

            @Override

            public void mouseReleased(MouseEvent e) {

                boolean popupTrigger = e.isPopupTrigger();

                if (popupTrigger){

                    colorMenu.show(drawArea,e.getX(),e.getY());

                }

                //重置

                preX=-1;

                preY=-1;

            }

        });

        // 设置位图的背景色

        g.setColor(Color.white);

        g.fillRect(0,0,AREA_WIDTH,AREA_HEIGHT);

        //鼠标点击移动事件

        drawArea.addMouseMotionListener(new MouseMotionAdapter() {

            @Override

            public void mouseDragged(MouseEvent e) {

                if (preX>0&&preY>0){

                    g.setColor(foceColor);

                    g.drawLine(preX,preY,e.getX(),e.getY());

                }

                //修正preX值和preY的值

                preX=e.getX();

                preY=e.getY();

                //重绘组件

                drawArea.repaint();

            }

        });

        drawArea.setPreferredSize(new Dimension(AREA_WIDTH,AREA_HEIGHT));

        frame.add(drawArea);

        //组装视图

        frame.setVisible(true);

        frame.pack();

    }

    public static void main(String[] args) {

        new HandDraw().init();

    }

}
效果
最新文章
- UWP中实现自定义标题栏
- C#设计模式系列:备忘录模式(Memento)
- 安装 Ubuntu 后的个人常用配置
- poj1190
- Python高级特性(1):Iterators、Generators和itertools(参考)
- Qt使用一个事件队列对所有发出的事件进行维护(QObject的event()函数相当于dispatch函数),用EventLabel 继承QLabel作为例子(简单明了) good
- oracle PL/SQL基础编程
- Activity与Service通信(不同进程之间)
- Matlab中unifrnd函数使用解析
- 关于H5 storage 的一些注意事项以及用法
- Deep Learning论文笔记之(八)Deep Learning最新综述
- 设置IE兼容模式
- Andorid Async-HttpClient阅览
- Java8 新特性之Stream----java.util.stream
- Java基础学习笔记十五 集合、迭代器、泛型
- javascript日期格式yyyyMMddHHmmss
- _spellmod
- Linux内核分析第四章 读书笔记
- 《高性能Mysql》讲聚簇索引
- 07: mysql锁和事物隔离