Ansible 多机自动化工具 初学笔记
此文档仅张聪明同学个人笔记;新负责KTH-RPL Cluster GPU的漫漫学习长路
English Docs:
- https://docs.ansible.com/ansible/latest/index.html
- https://gits-15.sys.kth.se/rpl-gpus/ClusterConfiguration/tree/master/ansible
中文相关文档:
- https://ansible.leops.cn/basic/Quickstart/
- https://blog.csdn.net/xinshuzhan/article/details/115915698 ← 这篇博文写的更为仔细
请注意下面有引用框的 均为这些参考文档中的话语,相关图片也由他们而来,不再在文中单独说明
测试学习阶段 请不要运行危险的指令,比如 rm -rf * 当然你没有sudo的话 删的只是自己用户下的 问题不大,切记管理人员 不要运行 自己直接copy过来看都没看的script 或者 指令! 建议以下学习时,就打印打印信息
简要介绍
Ansible是一款为类Unix系统开发的自由开源的配置和自动化工具。
它用Python写成,类似于saltstack和Puppet,但是有一个不同和优点是我们不需要在节点中安装任何客户端。 它使用SSH来和节点进行通信。
Ansible基于 Python paramiko 开发,分布式,无需客户端,轻量级,配置语法使用 YMAL 及 Jinja2模板语言,更强的远程命令执行操作。
主要呢 可以通过这幅图看出来,也就是东西是装在你自己的主机上的:
- 通过 主机清单 和playbooks进行配置 当然也可以单独就运行一段指令 后续的实践部分再介绍
- 主机【也就是自己的电脑】通过SSH 进行其他机器的连接
- 然后就可以 快乐一个ansible 所有ssh 机器都执行
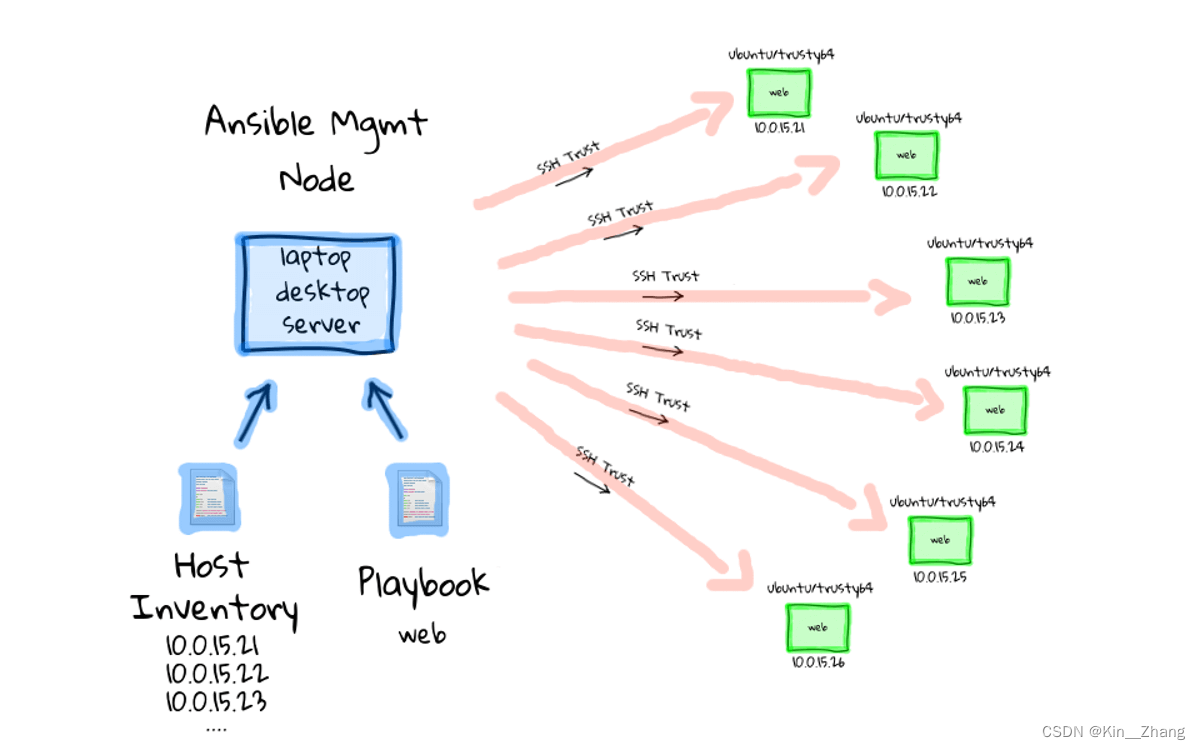
所以ansible 是安装在自己电脑上的 [没错 我一开始以为每个node server都得装 hhhh 理解没到位
安装
sudo apt-add-repository ppa:ansible/ansible

sudo apt-get update

sudo apt-get install ansible
当然因为本身是Python 代码 可以通过pip install或者是conda install进行library的安装,建议感兴趣的可以看 官方文档的 这个部分
安装完后 第一件事! 所有的工具类 安装完后都可以试着运行 —help 去快速了解指令
ansible --help
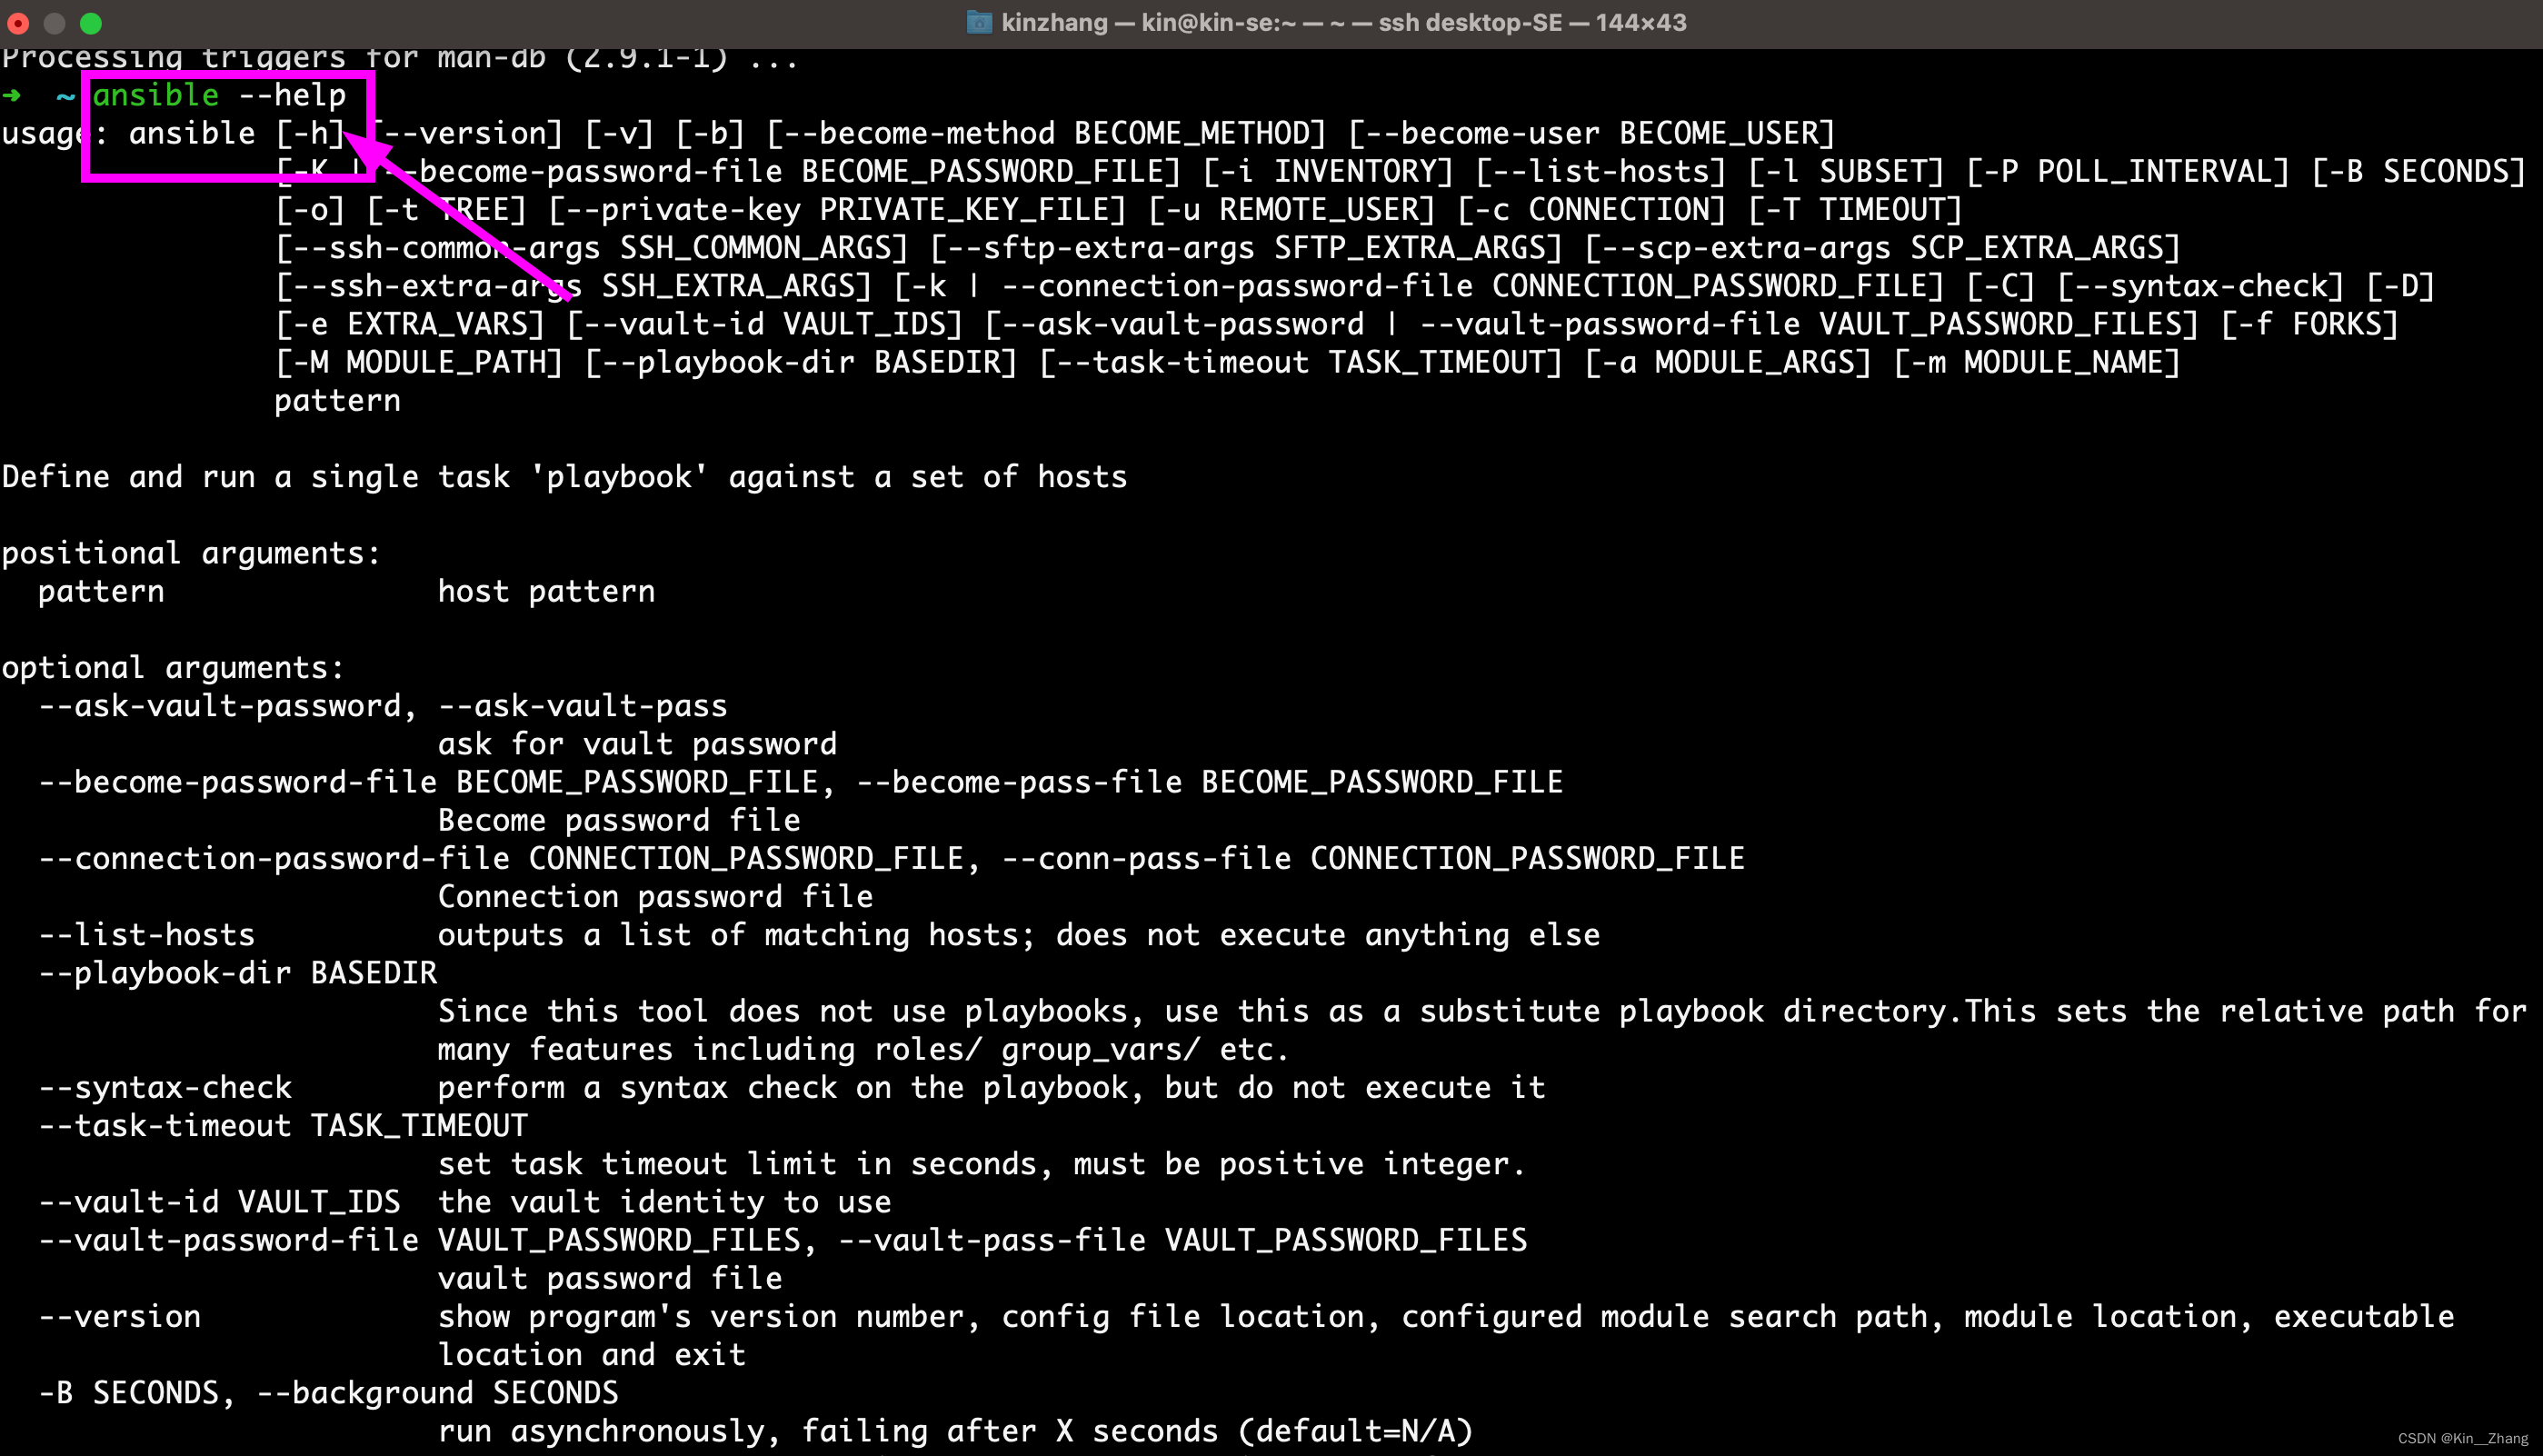
常用指令开头为 截取至 官方文档 建议都再次 --help :
ansible

ansible-inventory

ansible-playbook

ansible-config

ansible-console

ansible-doc

ansible-galaxy

ansible-pull

ansible-vault
初步尝试
根据上面简要介绍中内容,我们首先确定一下 ansible 知道的host 应该是什么? 才能去连接到各个节点进行指令运行
设置 host
根据官方文档 我们得知 应该要写一个 /etc/ansible/hosts 内容大概长这样
mail.example.com

[webservers]

foo.example.com

bar.example.com

[dbservers]

one.example.com

two.example.com

three.example.com
然后我们回到自己电脑上可以看到 有一个这样的文件 打开虽然都注释掉了 但也能理解
#

#   - Comments begin with the '#' character

#   - Blank lines are ignored

#   - Groups of hosts are delimited by [header] elements

#   - You can enter hostnames or ip addresses

#   - A hostname/ip can be a member of multiple groups

# Ex 1: Ungrouped hosts, specify before any group headers:

## green.example.com

## blue.example.com

## 192.168.100.1

## 192.168.100.10

# Ex 2: A collection of hosts belonging to the 'webservers' group:

## [webservers]

## alpha.example.org

## beta.example.org

## 192.168.1.100

## 192.168.1.110

# If you have multiple hosts following a pattern, you can specify

# them like this:

## www[001:006].example.com

# Ex 3: A collection of database servers in the 'dbservers' group:

## [dbservers]

##

## db01.intranet.mydomain.net

## db02.intranet.mydomain.net

## 10.25.1.56

## 10.25.1.57

# Here's another example of host ranges, this time there are no

# leading 0s:

## db-[99:101]-node.example.com
对于服务器的话 因为之前我们有写在 ~/.ssh/config 大概一个config长这样:
Host Server3

    HostName xxx # ip or hostnames

    IdentityFile ~/.ssh/id_rsa

    Port xxx # 可连通的Port节点

    User xxx # node节点上登录的用户名

Host Server10

    HostName xxx # ip or hostnames

    IdentityFile ~/.ssh/id_rsa

    Port xxx # 可连通的Port节点

    User xxx # node节点上登录的用户名
如果是给是我之前那样的设置的话 我会把 ``/etc/ansible/hosts` 写成这样:
[local]

localhost ansible_connection=local ansible_python_interpreter=/usr/bin/python3

[compute]

Server3

Server5

Server8

Server4

Server12

Server13

Server11

[cluster:children]

compute

[cluster:vars]

ansible_python_interpreter=/usr/bin/python3
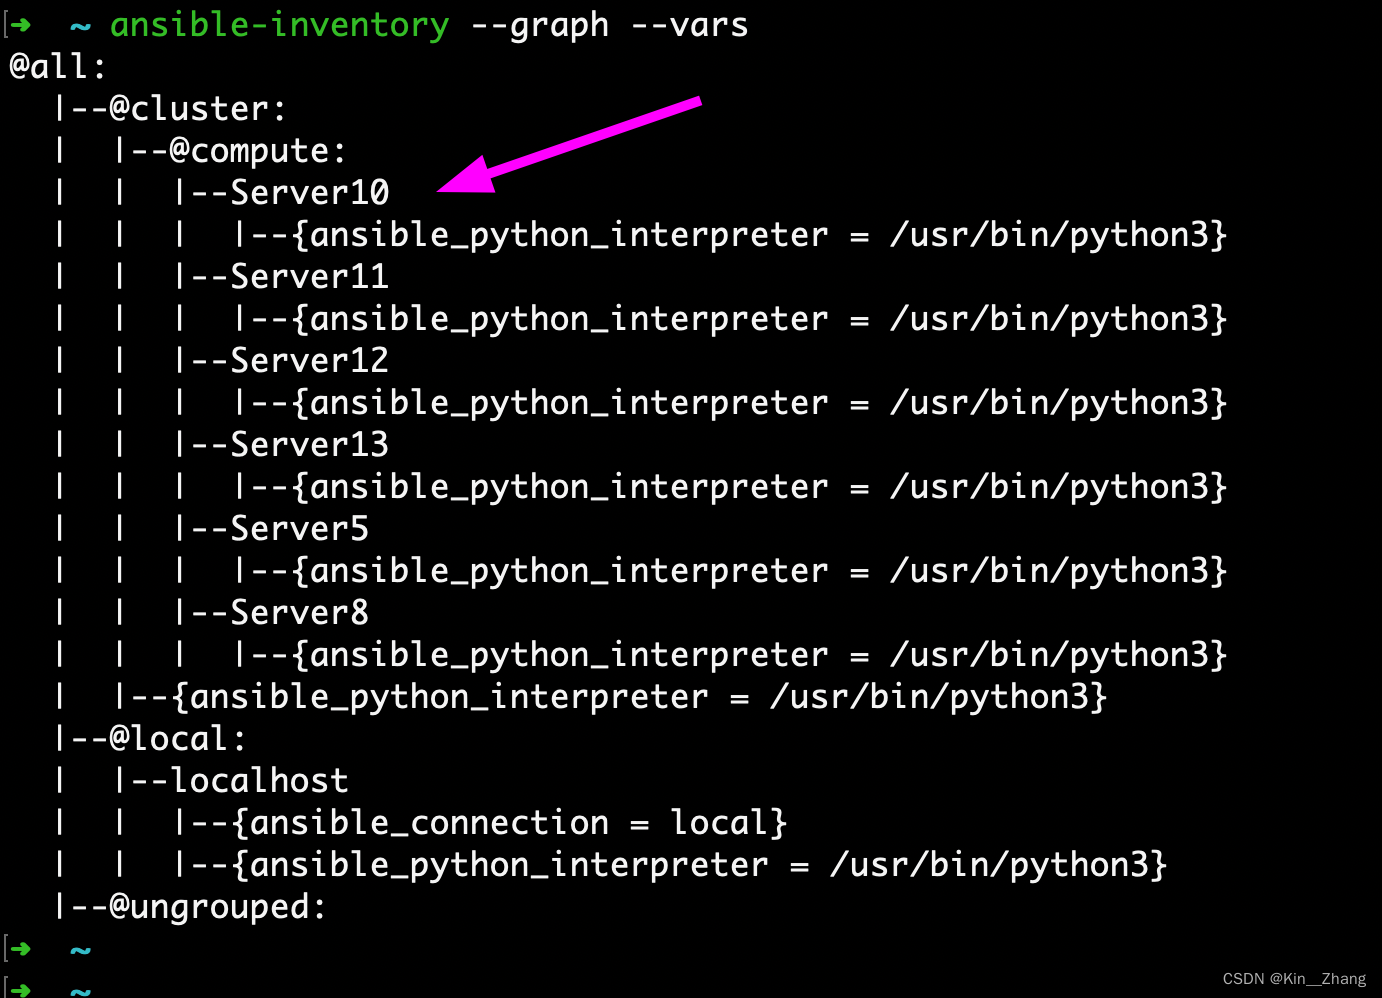
打印 graph
然后 设置完成后,保存退出,在终端输入:
ansible-inventory --graph --vars
比如我的设置完 服务器的所有节点:
运行 command
首先我们测试几个点,然后再仔细解释一下 即更进阶的版本
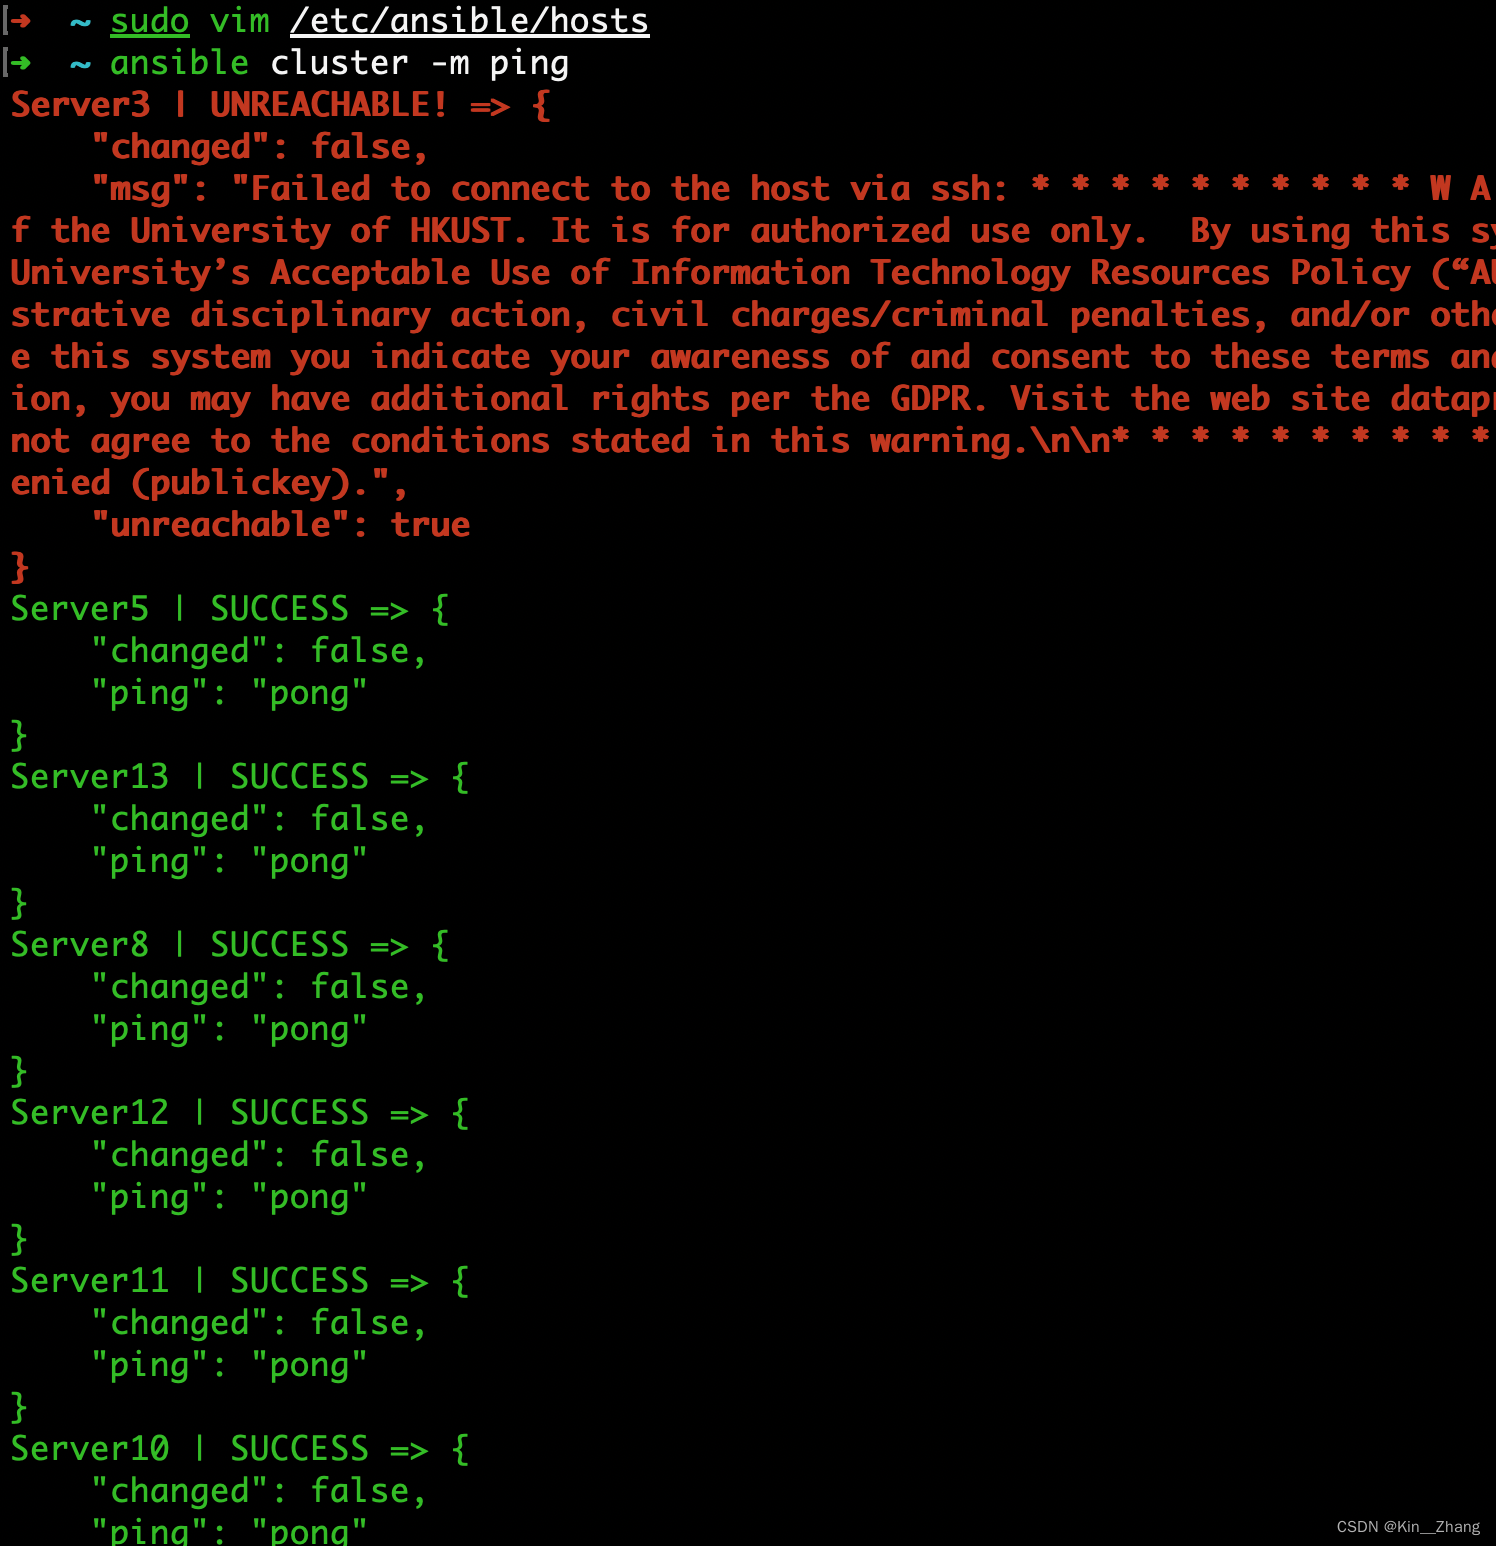
小试一下 连通这些节点 :
ansible cluster -m ping
可以看到 server3 不能被连通 其他的都可
那么我们再试一下 读取所有服务器上的的gpu 状态
ansible cluster -m command -a "nvidia-smi"
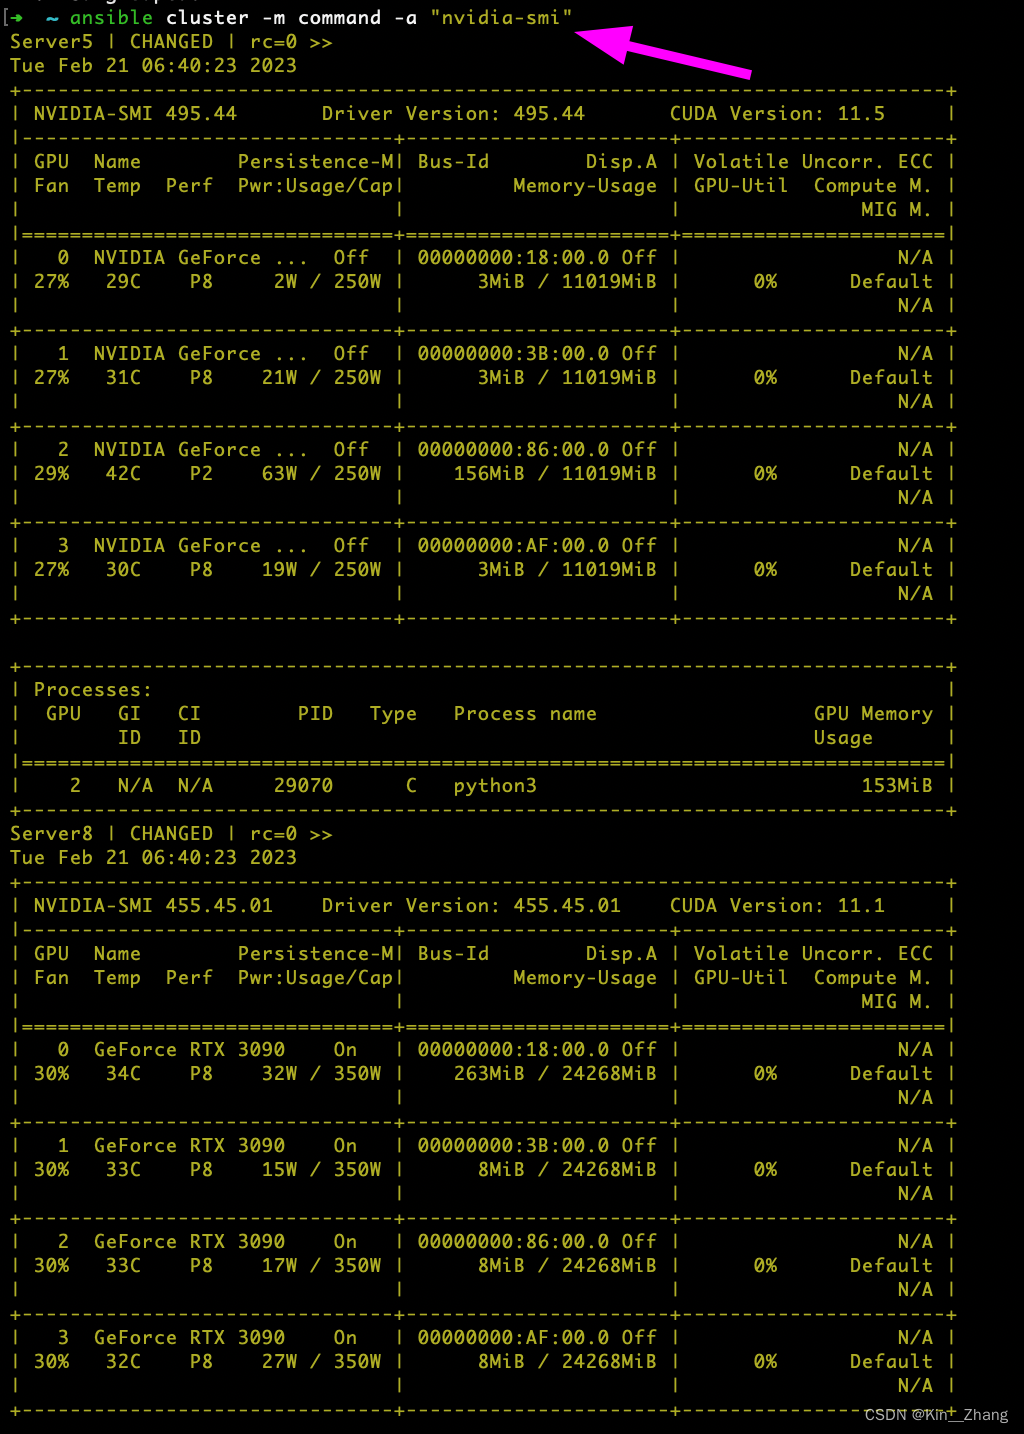
好了,是时候要解释一下了 【再次提醒 --help 是个好东西】:
ansible使用的工具名字cluster我对host里面的命名,比如上面举例ansible-inventory --graph --vars这个运行完后 能看到 graph是从cluster 这个名字打开的,所以 也就是在cluster组的所有节点上都运行-m command-m 是 ansible的参数,从第一次安装完 我们打印了--help里面有提到这个- m MODULE_NAME, --module-name MODULE_NAME
Name of the action to execute (default=command)
command 的意思就是 我自己会给指令让他运行
-m ping因为ping是ansible里面内置的module名字 所以 -m 带上 ping就是测试这个组的所有节点是否连通- m MODULE_NAME, --module-name MODULE_NAME
-a "nvidia-smi"一般 -a 跟着的是 -m command 或者 是没有(因为默认是command) 因为一般只有自己输入特定指令需要给这个参数- a MODULE_ARGS, --args MODULE_ARGS
The action's options in space separated k=v format: -a 'opt1=val1 opt2=val2'
- a MODULE_ARGS, --args MODULE_ARGS
ok 随堂测试 这条指令干什么 【可以自己试试】:
ansible cluster -m command -a "nvidia-smi --query-gpu=index,gpu_name,utilization.gpu,memory.total,memory.used,temperature.gpu --format=csv,noheader,nounits"
实际上到这里 普通用户用来 看看 server的状态 就差不多了,进阶呢 就是把command -a 后面的 搞成一个yaml文件,这样就不用输入一系列长的指令了
进阶尝试
主要 适用人员 就是对node节点要干些什么,不是单纯的打印信息了;比如统一升级某个包、统一添加一个用户、统一卸载什么东西 等等等
首先介绍一下ansible 的模块
command:也就是上面我们介绍过了的 常见命令都可以使用,但是执行不是通过shell的 所以 < > | and & 等操作 nopeansible cluster -m command -a "nvidia-smi"
shell:默认/bin/sh执行,所以终端输入的命令都可以使用可以看到 -m 后面跟的是shell! 然后我们还接了一个 &&
ansible cluster -m shell -a "nvidia-smi && ls | grep config"
当然看到这里,确实shell 是可以把自己的scripts 先 cp 过去,然后再运行,但是呢 这样需要调用两次ansible 第一次 cp 第二次 run
# copy 过去

ansible cluster -m copy -a "src=/home/kin/echo_test.sh dest=/home/kin owner=kin group=kin mode=0777"

# 然后运行

ansible cluster -m shell -a "./home/kin/echo_test.sh"
而下面介绍的scripts 和 playbook 就不需要了
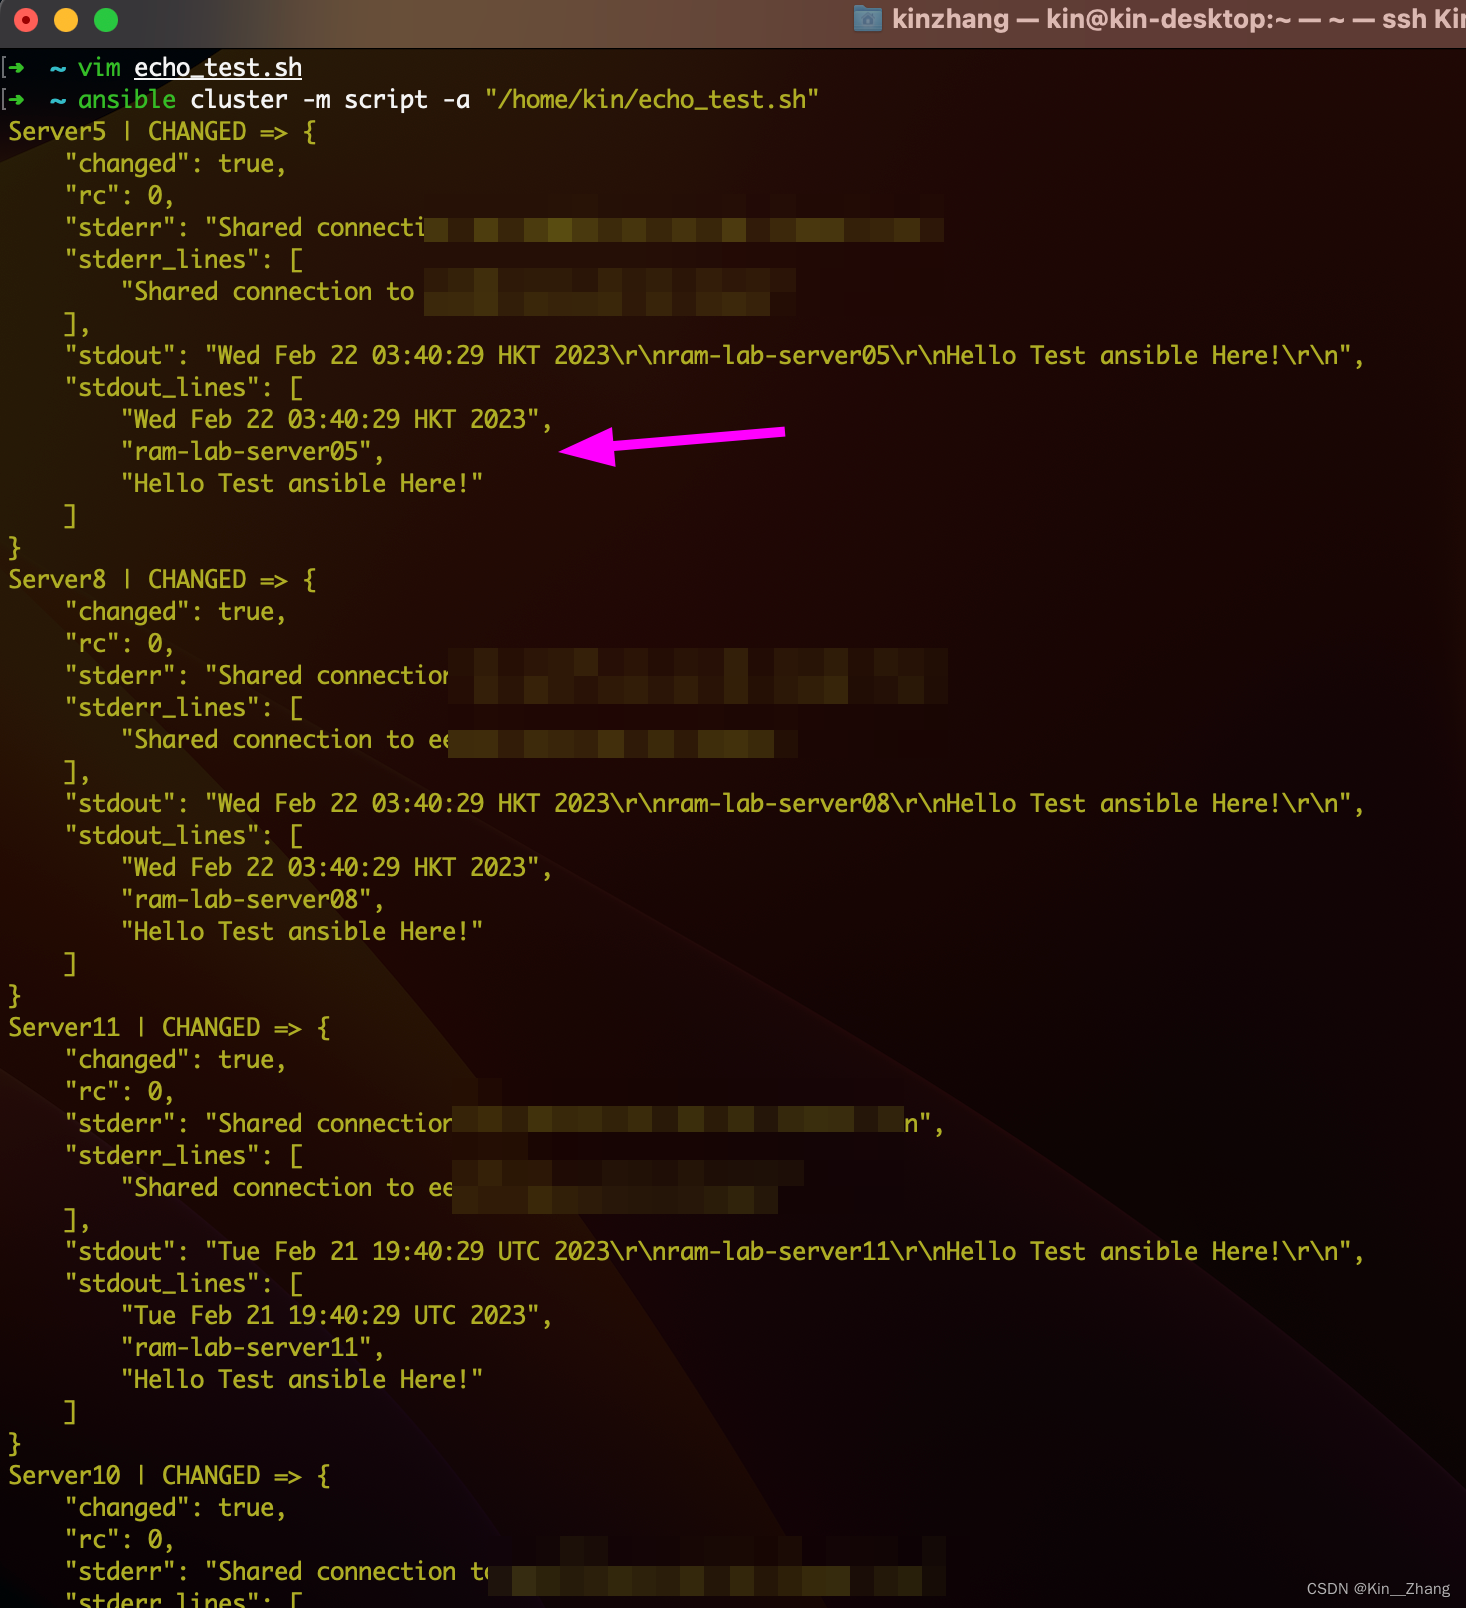
scripts:在本地写一个脚本,在远程服务器上执行
scripts运行
首先这个 我们需要写好一个脚本,举个例子
写个echo_test.sh 就打印一下显卡和 echo Hello
#!/bin/bash

#nvidia-smi

date

hostname

echo "Hello Test ansible Here!"
然后运行:
ansible cluster -m script -a "/home/kin/echo_test.sh"
playbook 介绍
终于到大头了 看到这里还记得第一幅图的东西吗?所有的部分基本快速过了一遍 还差一个playbook! 关于ansible自己文档的介绍 在这里
- Playbooks are automation blueprints, in
YAMLformat 并使用它进行部署和配置节点等
那么为什么上面的script不够用呢? 可以停下想想
因为 在你运行上面scripts 的时候 没法说 node B执行这段,node B执行第二段;或者是不同的用户属性不同操作等等 【官方的答案还有几个点 感兴趣可以点上面的link;这么一看 playbook这个名字取得真不错 按照剧本 演】
好 进入正题,先给一个参考博客里的 playbooks 样子:
---

- name: Update web servers

  hosts: webservers

  remote_user: root

  tasks:

  - name: Ensure apache is at the latest version

    ansible.builtin.yum:

      name: httpd

      state: latest

  - name: Write the apache config file

    ansible.builtin.template:

      src: /srv/httpd.j2

      dest: /etc/httpd.conf
解释一下:
nametask description 任务描述信息hosts要执行这个task的 节点组,比如我们之前一直的命名是clusteransible.builti这里都是使用了ansible 内置的模块功能module_namemodule_args #需要使用的模块名字: 模块参数shell使用shell模块
---

- hosts: mongo_servers

  tasks:

  - include: roles/mongod/tasks/shards.yml
其中include 的playbook 长这样:
---

#This Playbooks adds shards to the mongos servers once everythig is added

- name: Create the file to initialize the mongod Shard

  template: src=shard_init.j2 dest=/tmp/shard_init_{{ inventory_hostname }}.js

  delegate_to: '{{ item }}'

  with_items: groups.mongos_servers

- name: Add the shard to the mongos

  shell: /usr/bin/mongo localhost:{{ mongos_port }}/admin -u admin -p {{ mongo_admin_pass }} /tmp/shard_init_{{ inventory_hostname }}.js

  delegate_to: '{{ item }}'

  with_items: groups.mongos_servers
这是官方的一个示例
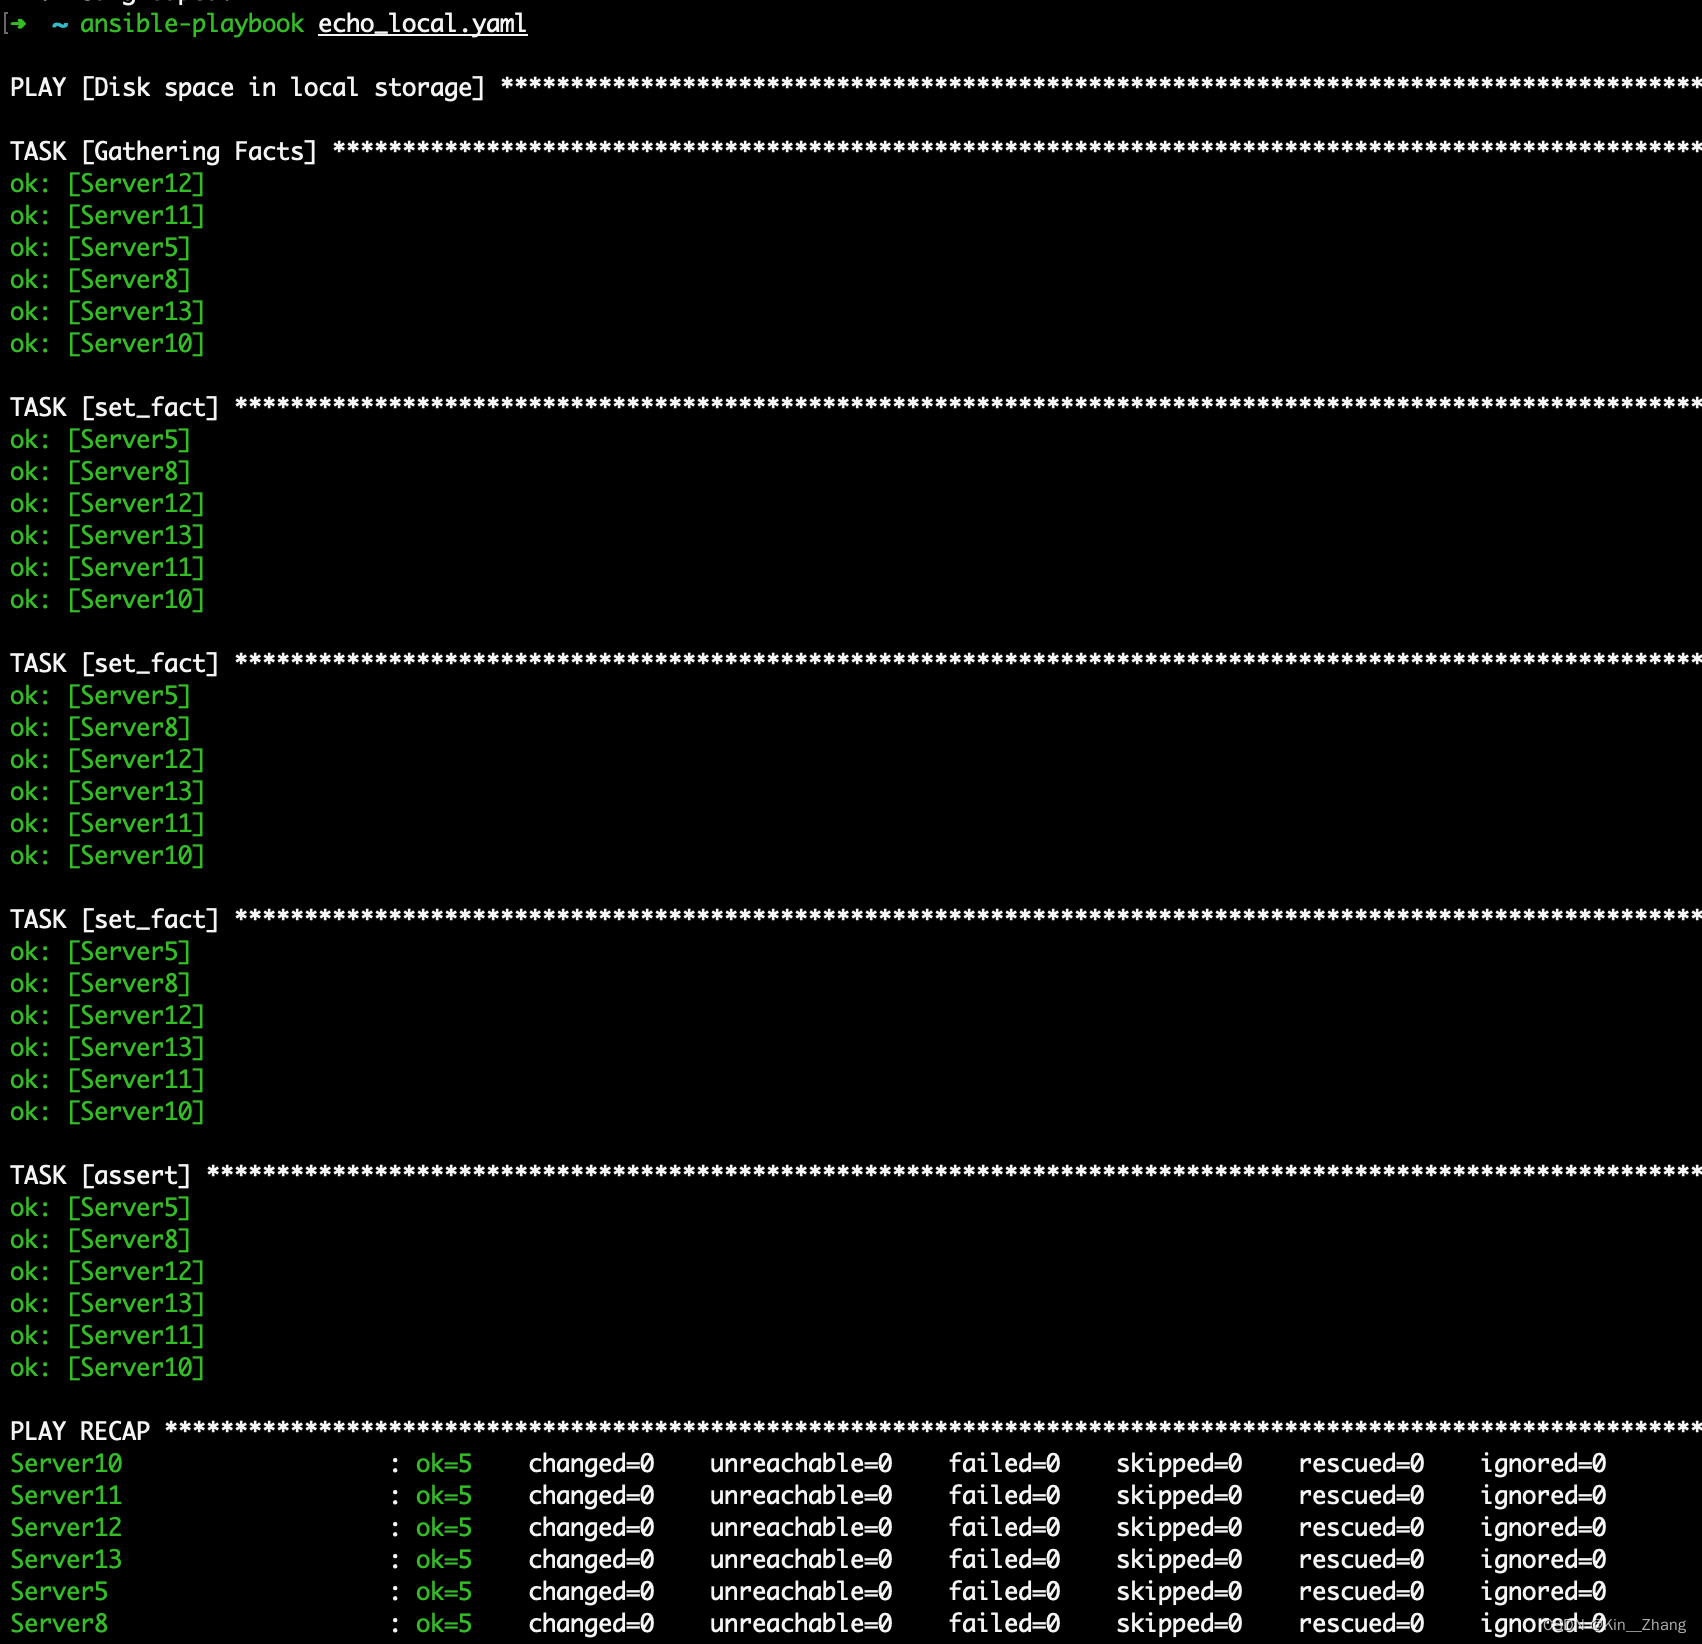
是不是大概看懂了?【反正我第一次是没看懂 一堆admin 也不敢运行 所以还是 祖传!检查disk space 是不是剩余ok
- name: Disk space in local storage

  hosts: cluster

  tasks:

  - set_fact:

      mount: "{{ ansible_mounts | selectattr('mount', 'equalto', '/')  | first }}"

  - set_fact:

      size_total_gb: "{{ (mount.size_total / (1024*1024*1024)) }}"

      size_used_gb: "{{ ((mount.size_total - mount.size_available) / (1024*1024*1024)) }}"

      size_used_percent: "{{ 100 * (mount.size_total - mount.size_available) / mount.size_total }}"

  - set_fact:

      size_ok: "{{ ( (mount.size_total - mount.size_available) / mount.size_total ) < 0.80 }}"

      size_msg: "Local storage: {{ size_used_gb|float|round(1) }}/{{ size_total_gb|float|round(1) }}GB ({{ size_used_percent|float|round(1) }}%)"

  - assert:

      that: size_ok

      quiet: true

      fail_msg: "{{size_msg}}"
vim 完了 可以试一下check,这个check mode只是一个模拟 不会输入任务的output,但是是一个非常适合验证这个playbook在一个节点上 运行的一些配置管理操作【当然 我们上面只是判断一下 硬盘还有存储空间
ansible-playbook echo_local.yaml --check
如果只想在一个node上运行可以 加 --limit node_name 比如:
ansible-playbook echo_local.yaml --limit Server5
实际的运行指令很简单,直接跟yaml即可:
总结
意犹未尽?ansible 自己官方给了很多很多 examples,欢迎去探索:https://github.com/ansible/ansible-examples
然后这个 文档 真的是一个特别特别特别简单的入门 了解 尝试,也是张聪明同学第一次学的时候 边学边写的… 有错误很正常 或者是随时间 万一指令不对了 过时了 大家都看官方文档为主哈
赠人点赞 手有余香 ;正向回馈 才能更好开放记录 hhh
最新文章
- Python开发程序:RPC异步执行命令(RabbitMQ双向通信)
- Hibernate和Struts2整合的增、删、改、查
- Java Web项目的发布
- java util包概述
- 使用IDEA自带的rest client参数传递乱码问题
- Centos GPG key retrieval failed: [Errno 14] Could not open/read file:///etc/pki/rpm-gpg/RPM-GPG-KEY-EPEL
- VMware中CentOS设置静态IP
- Android Priority Job Queue (Job Manager):线程任务的容错重启机制(二)
- 记一段使用node对mysql数据库做处理
- Linux软链接和硬链接
- 25个App免费资源网站
- cocos2d-x Tests讲解 Particle System(粒子系统)
- Spring的OpenEntityManagerInViewFilter
- WPFPath素材
- Make Yahoo! Web Service REST Calls With C#
- twitter接口开发
- 基于多线程多用户的FTP服务器与客户端功能实现
- 201521123103 《Java学习笔记》第二周学习笔记
- Dynamics CRM2013/2015 插件注册工具登录后无法显示assembly列表问题的解决办法二
- HNOI2019 苟命记
热门文章
- Python基础之数据库:5、创建表的完整语法、MySQL数据类型
- linux系统编码修改
- JavaEE Day01 基础加强
- bug处理记录:Error running 'WorkflowApplication': Command line is too long. Shorten command line for WorkflowApplication or also for Spring Boot default configuration?
- 解决笔记本安装centos7后无法调节屏幕亮度
- Velero 系列文章(二):使用 Helm 安装 Velero
- codeforce E - Binary Inversions题解
- html排版,样式
- golang在win10安装、环境配置 和 goland(IDE开发golang配置)
- 【转载】EXCEL VBA 通过VBA中的Union合并多个Range选择区域