Ansible实现主备模式的高可用(Keepalived)
2024-08-20 15:22:47
前言
Ansible是一款极其简单的IT自动化运维工具,基于Python开发,集合了众多运维工具(puppet、cfengine、chef、func、fabric)的优点,实现了批量系统配置、批量程序部署、批量运行命令等功能。Ansible是基于模块工作的,本身没有批量部署的能力,真正具有批量部署的是Ansible所运行的模块,Ansible只是提供一种框架。Ansible主要承担的工作包括:配置管理、服务即时开通、应用部署、流程编排、监控告警、日志记录等。
Ansible的基本架构:
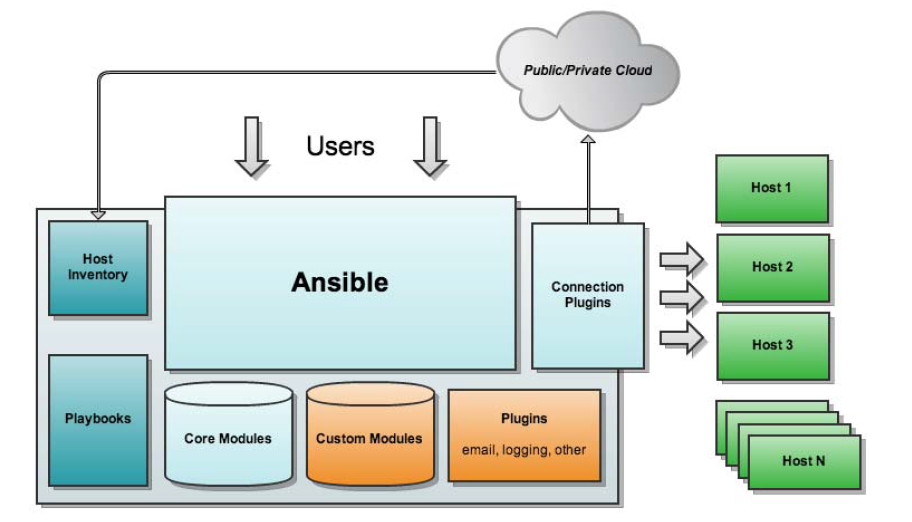
- 核心模块(Core Module):在模块库(Module Library)中分为两块,一个是核心模块,另外一个就是自定义模块(Custom Modules)。核心模块中都是Ansible自带的模块,模块资源分发到远程节点使其执行特定任务或匹配一个特定的状态;
- 自定义模块(Custom Modules):如果Ansible满足不了你所需求的模块,则在此处添加自定义化的模块;
- 插件(Plugins):协助模块来完成某个功能;
- 剧本(Playbooks):定义需要给远程主机执行的一系列任务;
- 连接插件(Connectior Plugins):Ansible默认基于SSH连接到目标机器上执行操作的,但也支持不同的连接方法,此时需要连接插件来帮助我们完成连接;
- 主机清单(Host Inventory):定义需要管理的主机,小型环境中我们只需要在host文件中写入主机的IP地址即可,但到了中大型环境我们有可能需要使用静态inventory或者动态主机清单来生成我们所需要执行的目标主机。
实验拓扑图
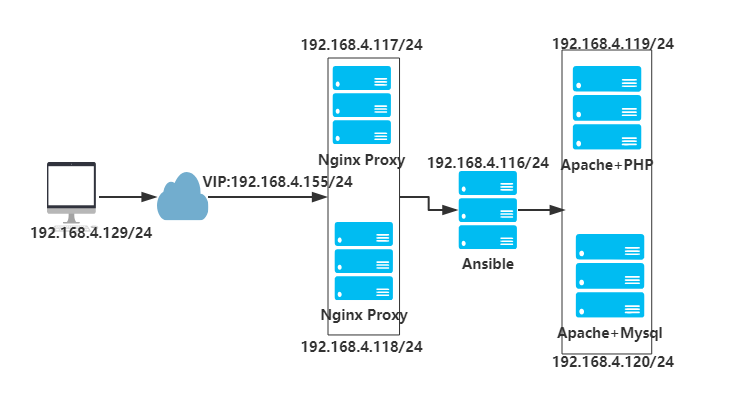
两台Nginx作为Web Proxy,配置实现KeepAlived做主备;后端两台Apache,一台部署Apache+PHP,一台部署Apache+MySQL。
搭建Ansible
[root@ansible ~]# systemctl stop firewalld.service

[root@ansible ~]# systemctl disable firewalld.serive

[root@ansible ~]# vim /etc/selinux/config

    ...

    SELINUX=disabled

    ...

[root@ansible ~]# init 6

[root@ansible ~]# ntpdate ntp1.aliyun.com

[root@ansible ~]# yum -y install ansible

[root@ansible ~]# vim /etc/ansible/hosts

    ...

    [hasrvs]

    192.168.4.117

    192.168.4.118

    [websrvs]

    192.168.4.119

    192.168.4.120
  [php]
  192.168.4.119
  [mysql]
  192.168.4.120

[root@ansible ~]# vim /etc/hosts

    ...

    192.168.4.117 nginx1

    192.168.4.118 nginx2

    192.168.4.119 apache1

    192.168.4.120 apache2

[root@ansible ~]# ssh-keygen -t rsa -N ''  #生成密钥对,实现ssh免密码登录

    Generating public/private rsa key pair.

    Enter file in which to save the key (/root/.ssh/id_rsa):

    Created directory '/root/.ssh'.

    Your identification has been saved in /root/.ssh/id_rsa.

    Your public key has been saved in /root/.ssh/id_rsa.pub

[root@ansible ~]# ssh-copy-id -i .ssh/id_rsa.pub root@192.168.4.117  #复制公钥到各远程主机

[root@ansible ~]# ssh-copy-id -i .ssh/id_rsa.pub root@192.168.4.118

[root@ansible ~]# ssh-copy-id -i .ssh/id_rsa.pub root@192.168.4.119

[root@ansible ~]# ssh-copy-id -i .ssh/id_rsa.pub root@192.168.4.120
测试连通性
[root@ansible ~]# ansible all -m ping

    192.168.4.117 | SUCCESS => {

        "changed": false,

        "ping": "pong"

    }

    192.168.4.118 | SUCCESS => {

        "changed": false,

        "ping": "pong"

    }

    192.168.4.120 | SUCCESS => {

        "changed": false,

        "ping": "pong"

    }

    192.168.4.119 | SUCCESS => {

        "changed": false,

        "ping": "pong"

    }
同步时间,关闭firewalld及selinux
[root@ansible ~]# ansible all -m shell -a 'echo "TZ='Asia/Shanghai'; export TZ" >> /etc/profile'

[root@ansible ~]# ansible all -m cron -a 'minute=*/5 job="/usr/sbin/ntpdate ntp1.aliyun.com &> /dev/null" name=UpdateTime'  #每隔3分钟同步一次时间

[root@ansible ~]# ansible all -m shell -a 'systemctl stop firewalld.service; systemctl disable firewalld.service; setenfore 0'
配置Apache服务的roles
[root@ansible ~]# mkdir -pv /etc/ansible/roles/apache/{files,templates,tasks,handlers,vars,meta,default}  #创建相关目录

[root@ansible ~]# vim /etc/ansible/roles/apache/templates/vhost.conf.j2  #Apache主机模板

    <virtualhost *:80>

        ServerName www.test.org

        DirectoryIndex index.html index.php

        DocumentRoot /var/www/html

        ProxyRequests off

        ProxyPassMatch ^/(.*\.php)$ fcgi://192.168.4.119:9000/var/www/html/$1

        ProxyPassMatch ^/(ping|status)$ fcgi://192.168.4.119:9000/$1

        <Directory />

        options FollowSymlinks

        Allowoverride None

        Require all granted

        </Directory>

    </virtualhost>

[root@ansible ~]# vim /etc/ansible/roles/apache/templates/index.html  #Apache主页

    <h1> This is {{ ansible_hostname }} </h1>

[root@ansible ~]# vim /etc/ansible/roles/apache/files/index.php

    <?php

        phpinfo();

    ?>

[root@ansible ~]# vim /etc/ansible/roles/apache/tasks/main.yml  #定义实现Apache的task

    - name: install apache

      yum: name=httpd state=latest

    - name: copy conf

      template: src=vhost.conf.j2 dest=/etc/httpd/conf.d/vhost.conf

    - name: copy index.html

      template: src=index.html dest=/var/www/html/index.html

    - name: copy index.php

      copy: src=index.php dest=/var/www/html/index.php

    - name: start httpd

      service: name=httpd state=started
配置php-fpm服务的roles
[root@ansible ~]# mkdir -pv /etc/ansible/roles/php-fpm/{files,templates,tasks,handlers,vars,meta,default}  #创建相关目录

[root@ansible ~]# cp /etc/php-fpm.d/www.conf /etc/ansible/roles/php-fpm/templates/www.conf.j2  #直接复制事先准备的配置模板

[root@ansible ~]# vim /etc/ansible/roles/php-fpm/templates/www.conf.j2

    #修改如下配置

    listem = 0.0.0.0:9000

    ;listen.allowed_clients = 127.0.0.1

    pm.status_path = /status

    ping.path = /ping

    ping.response = pong

[root@ansible ~]# vim /etc/ansible/roles/php-fpm/tasks/main.yml  #定义实现php-fpm的task

    - name: install php

      yum: name={{ item }} state=latest

      with_items:

      - php-fpm

      - php-mysql

      - php-mbstring

      - php-mcrypt

    - name: copy config

      template: src=www.conf.j2 dest=/etc/php-fpm.d/www.conf

    - name: create directory

      file: path=/var/lib/php/session group=apache owner=apache state=directory

    - name: start php-fpm

      service: name=php-fpm state=started
配置MySQL服务的roles
[root@ansible ~]# mkdir -pv /etc/ansible/roles/mysql/{files,templates,tasks,handlers,vars,meta,default}  #创建相关目录

[root@ansible ~]# cp /etc/my.cnf /etc/ansible/roles/mysql/templates/my.cnf.j2  #复制事先准备的模板

[root@ansible ~]# vim /etc/ansible/roles/mysql/templates/my.cnf.j2

    #添加如下配置

    skip-name-resolve=ON

    innodb-file-per-table=ON

[root@ansible ~]# vim /etc/ansible/roles/mysql/tasks/main.yml  #定义实现MySQL的task

    - name: install mysql

      yum: name=mariadb-server state=latest

    - name: copy config

      template: src=my.cnf.j2 dest=/etc/my.cnf

    - name: start mysql

      service: name=mariadb state=started
配置Nginx服务的roles
[root@ansible ~]# mkdir -pv /etc/ansible/roles/nginx/{files,templates,tasks,handlers,vars,meta,default}  #创建相关目录

[root@ansible ~]# cp /etc/nginx/nginx.conf /etc/ansible/roles/nginx/templates/nginx.conf.j2  #复制事先准备的模板

[root@ansible ~]# vim /etc/ansible/roles/nginx/templates/nginx.conf.j2
  #修改配置

    http {

        ...

        upstream websrvs {

            server 192.168.4.119:80;

            server 192.168.4.120:80;

            server 127.0.0.1:80 backup;

        }

        server {

            listen 80;

            include /etc/nginx/default.d/*.conf;

            location / {

                proxy_pass http://websrvs;

                proxy_set_header host $http_host;

                proxy_set_header X-Forward-For $remote_addr;

            }

            ...

        }

        ...

    }

[root@ansible ~]# vim /etc/ansible/roles/nginx/templates/localhost.conf.j2  #定义本地的Nginx服务

    server {

        listen 127.0.0.1:80;

        root /usr/share/nginx/html;

        index index.html;

    }

[root@ansible ~]# vim /etc/ansible/roles/nginx/templates/index.html

    <h1> Balance Server {{ ansible_hostname }} </h1>

[root@ansible ~]# vim /etc/ansible/roles/nginx/tasks/main.yml  #定义实现Nginx的task

    - name: install nginx

      yum: name=nginx state=latest

    - name: copy nginx conf

      template: src=nginx.conf.j2 dest=/etc/nginx/nginx.conf

    - name: copy local conf

      template: src=localhost.conf.j2 dest=/etc/nginx/conf.d/localhost.conf

    - name: copy index

      template: src=index.html dest=/usr/share/nginx/html/index.html

    - name: start nginx

      service: name=nginx state=started
配置KeepAlived服务的roles
[root@ansible keepalived]# mkdir -pv /etc/ansible/roles/keepalived/{files,templates,tasks,handlers,vars,meta,default}  #创建相关目录

[root@ansible keepalived]# vim /etc/ansible/roles/keepalived/templates/keepalived.conf.j2  #KeepAlived配置文件

    global_defs {

           notification_email {

             root@localhost

           }

           notification_email_from keepalived@localhost

           smtp_server 127.0.0.1

           smtp_connect_timeout 30

           router_id {{ ansible_nodename }}

           vrrp_skip_check_adv_addr

           vrrp_mcast_group4 224.0.0.10

    }

    vrrp_instance VIP_1 {

        state {{ keepalived_role }}

        interface eno16777736

        virtual_router_id 1

        priority {{ keepalived_pri }}

        advert_int 1

        authentication {

            auth_type PASS

            auth_pass %&hhjj99

        }

        virtual_ipaddress {

          192.168.4.155/24 dev eno16777736 label eno16777736:0

        }

    }

[root@ansible keepalived]# vim /etc/ansible/hosts  #添加变量

        ...

    [hasrvs]

    192.168.4.117 keepalived_role=MASTER keepalived_pri=100

    192.168.4.118 keepalived_role=BACKUP keepalived_pri=99

    ...

[root@ansible keepalived]# vim /etc/ansible/roles/keepalived/tasks/main.yml  #定义实现Keepalived的task

    - name: install keepalived

      yum: name=keepalived state=latest

    - name: copy config

      template: src=keepalived.conf.j2 dest=/etc/keepalived/keepalived.conf

    - name: start keepalived

      service: name=keepalived state=started
配置Apache+PHP服务的playbook
[root@ansible keepalived]# mkdir /etc/ansible/playbooks  #创建playbook存放目录

[root@ansible roles]# vim /etc/ansible/playbooks/ap1.yml  定义实现Apache+php-fpm的playbook

    - hosts: php

      remote_user: root

      roles:

      - apache

      - php-fpm

[root@ansible roles]# ansible-playbook --syntax-check /etc/ansible/playbooks/ap1.yml  #检查是否有语法错误

[root@ansible roles]# ansible-playbook /etc/ansible/playbooks/ap1.yml  #执行
配置Apache+MySQL服务的playbook
[root@ansible ~]# vim /etc/ansible/playbooks/ap2.yml

    - hosts: mysql

      remote_user: root

      roles:

      - apache

      - mysql

[root@ansible ~]# ansible-playbook --syntax-check /etc/ansibleplaybooks/ap2.yml

[root@ansible ~]# ansible-playbook /etc/ansibleplaybooks/ap2.yml
配置Nginx+Keepalived服务的playbook
[root@ansible ~]# vim /etc/ansible/playbooks/ha.yml

    - hosts: hasrvs

      remote_user: root

      roles:

      - nginx

      - keepalived

[root@ansible ~]# ansible-playbook --syntax-check /etc/ansible/playbooks/ha.yml

[root@ansible ~]# ansible-playbook /etc/ansible/playbooks/ha.yml
客户端测试访问
[root@client ~]# vim /etc/hosts

    ...

    192.168.4.155 www.test.org

    ...

[root@client ~]# for i in {1..10};do curl http://www.test.org;done

    <h1> This is apache2 </h1>

    <h1> This is apache1 </h1>

    <h1> This is apache2 </h1>

    <h1> This is apache1 </h1>

    <h1> This is apache2 </h1>

    <h1> This is apache1 </h1>

    <h1> This is apache2 </h1>

    <h1> This is apache1 </h1>

    <h1> This is apache2 </h1>

    <h1> This is apache1 </h1>
小插曲:
[root@ansible ~]# ansible all -m ping --list-hosts
ERROR! Unexpected Exception, this is probably a bug: (cryptography 0.8.2 (/usr/lib64/python2.7/site-packages), Requirement.parse('cryptography>=1.1'))
运行ansible命令时报错,python的cryptography版本必须>=1.1。
解决办法:
[root@ansible ~]# yum -y install python-pip
[root@ansible ~]# pip install --upgrade cryptography
最新文章
- 浏览器中的Javascript的简单对话框
- 工具介绍 - NimbleText
- 使用NodeJS、GruntCLI遇到的问题
- DDD:建模原语 之 四象图(转载的神文)
- python实现删除文件与目录的方法
- OC多线程管理
- UI1_UITabBarController
- 三个特殊资源目录 /res/xml /res/raw 和 /assets
- 第 1 章 策略模式【Strategy Pattern】
- noip2014 考试总结
- 配置java软件
- [RxJS] Refactoring CombineLatest to WithLatestFrom
- c++ 友元类
- 两种方式在Tableau Desktop 中创建子弹图(Bullet Chart)
- position:fixed 居中问题
- ROS学习记录(一)————创建简单的机器人模型smartcar
- SSM 框架搭建
- SCU-4437 Carries
- SkylineGlobe Android 开发 面积计算示例代码
- jmeter4.0 执行jmeter_server.bat报错