Spring之rmi实例演示
2024-10-21 11:28:37
环境介绍:本文中服务端客户端使用的都是ssm框架,配置文件分为spring_servlet.xml,spring_service.xml,mybatis.xml
在spring里面使用rmi完成远程调用步骤分以下几步:
一、在服务端
1.编写服务端接口
 package com.dzf.service;

 import java.util.List;

 import com.dzf.entity.Author;

 public interface RmiServerService {

     public List<Author> getAuthorByName(String name);

     public Integer insertAuthor(Author author);

 }
2.编写具体的实现类
 package com.dzf.service;

 import java.util.List;

 import org.springframework.beans.factory.annotation.Autowired;

 import org.springframework.stereotype.Service;

 import org.springframework.transaction.annotation.Transactional;

 import com.dzf.dao.AuthorDao;

 import com.dzf.entity.Author;

 //@Service   //这里面不需要自动注入,需要手写bean

 public class RmiServerServiceImpl implements RmiServerService {

     @Autowired

     private AuthorDao authorDao;

     @Override

     public List<Author> getAuthorByName(String name) {

         // TODO Auto-generated method stub

         if(name==null && "".equals(name)){

             return null;

         }

         return authorDao.getAuthorByName(name);

     }

     @Transactional

     @Override

     public Integer insertAuthor(Author author) {

         // TODO Auto-generated method stub

         if(author == null){

             return null;

         }

         authorDao.insert(author);

         return author.getId(); //返回的插入这条数据的主键值

     }

 }
3.在spring-service.xml中添加服务端的配置
 <bean name = "rmiServerService" class="com.dzf.service.RmiServerServiceImpl"></bean>

     <bean name="rmiTest" class="org.springframework.remoting.rmi.RmiServiceExporter">

        <property name="service" ref="rmiServerService" />

        <property name="serviceName" value="rmiServerService" />

        <!--这个地方必须写接口的位置全限定名  -->

        <property name="serviceInterface" value="com.dzf.service.RmiServerService"/>

        <!-- 这个端口不能和项目的端口一样,是个独立的端口 -->

        <property name="registryPort" value="8083" />

 </bean>
我这里把dao层的写法也贴出来,仅供查考
package com.dzf.dao;

import java.util.List;

import org.apache.ibatis.annotations.Insert;

import org.apache.ibatis.annotations.Options;

import org.apache.ibatis.annotations.Select;

import org.springframework.stereotype.Repository;

import com.dzf.entity.Author;

@Repository

public interface AuthorDao {

    @Select("select * from author t where t.id = #{id}")

    public Author getAuthorById(Integer Id);

    @Select("select * from author t where t.name like concat('%',#{name},'%')")

    public List<Author> getAuthorByName(String name);

    @Insert("insert into author(name,age,tel) values (#{name},#{age},#{tel})")

    @Options(useGeneratedKeys=true,keyProperty="id")

    public Integer insert(Author author);

}
二、客户端(调用端的配置)
1.编写一个和服务端一模一样的接口
 1 package com.dzf.service;

 2

 3 import java.util.List;

 4

 5 import com.dzf.entity.Author;

 6

 7 public interface RmiServerService {

 8     public List<Author> getAuthorByName(String name);

 9

10     public Integer insertAuthor(Author author);

11 }
2.编写配置文件
 <!-- Spring Rmi 客户端配置 -->

     <bean id="rmiServerService" class="org.springframework.remoting.rmi.RmiProxyFactoryBean">

        <property name="serviceUrl" value="rmi://127.0.0.1:8083/rmiServerService"/>

         <property name="serviceInterface" value="com.dzf.rmi.service.RmiServerService"/>

         <property name="lookupStubOnStartup" value="false"/>

         <property name="refreshStubOnConnectFailure" value="true"></property>

     </bean>
3.编写controller层的代码
 package com.dzf.rmi.controller;

 import java.util.List;

 import org.springframework.beans.factory.annotation.Autowired;

 import org.springframework.stereotype.Controller;

 import org.springframework.web.bind.annotation.RequestMapping;

 import org.springframework.web.bind.annotation.ResponseBody;

 import com.dzf.entity.Author;

 import com.dzf.rmi.service.RmiServerService;

 @Controller

 @RequestMapping("/rmi")

 public class RmiServlet {

     @Autowired

     private RmiServerService rmiServerService; //这个起的名字要和配置文件里面的一样

     @RequestMapping("/getAuthorByName")

     @ResponseBody

     public List<Author> getAuthorByName(){

         String name  = "a";

         return rmiServerService.getAuthorByName(name);

     }

     @RequestMapping("/insert")

     @ResponseBody

     public Integer insert(){

         Author author = new Author();

         author.setName("丁");

         author.setAge(23);

         author.setTel("13033563156");

         return  rmiServerService.insertAuthor(author);

     }

 }
4.使用接口工具调用
1.
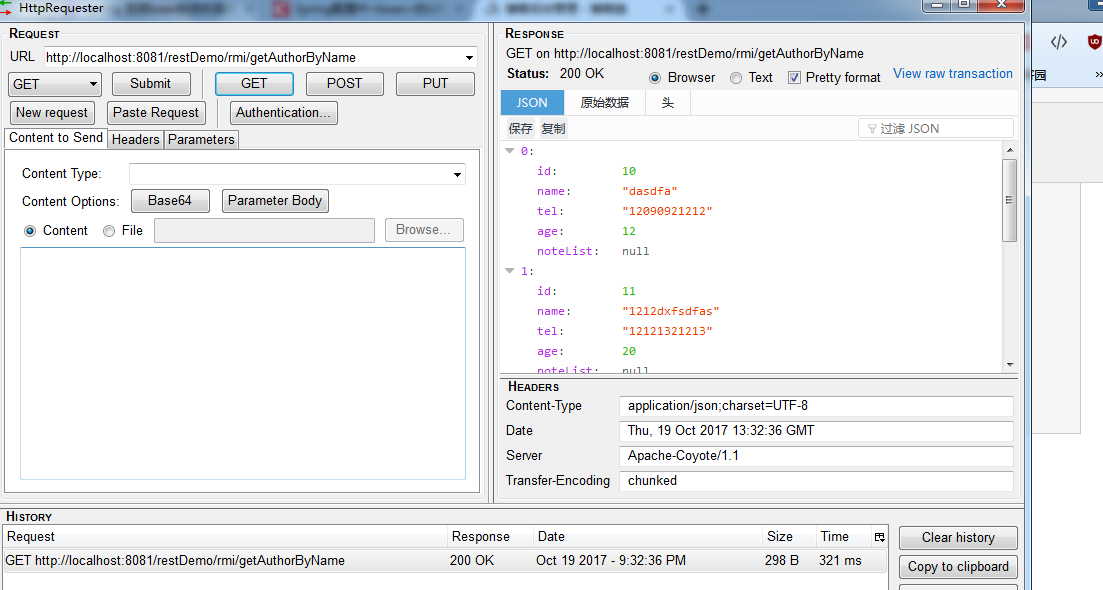
2.

到此可以看到,调用完全没有问题!
总结下:
核心
1.服务端通过org.springframework.remoting.rmi.RmiServiceExporter这个类暴露服务接口
2.服务端和客户端定义同样的接口
3.调用端通过org.springframework.remoting.rmi.RmiProxyFactoryBean调用服务端的暴露的接口
注意:实体类需要实现序列化接口!
最新文章
- 摆花(2012Noip普及组第3题)
- Android: R cannot be resolved to a varia...
- oauth授权协议的原理
- IntelliJ IDEA(六) :Settings(下)
- Linux查看CPU、内存、进程使用情况(转)
- transmission跳过文件校验功能实现
- B - Alyona and towers CodeForces - 739C
- 雷林鹏分享:C# 常量
- git在不同平台windows、linux、mac 上换行符的问题
- SoapUI使用笔记备忘
- 基于bootstrap-multiselect.js的下拉框联动
- Elixir's keyword lists as option parameters
- RabbitMQ基础教程之使用进阶篇
- opencv-学习笔记(1)常用函数和方法。
- MVVM架构说明1
- 《TomCat与Java Web开发技术详解》(第二版) 第三章节的学习总结--利用Context元素来自定义web应用的存储位置
- jfinal的配置文件详解
- 利用virt-manager,xmanager, xshell启动界面来管理虚拟机
- 音频单元组件服务参考(Audio Unit Component Services Reference)
- Spring框架xml配置文件 复杂类型属性注入——数组 list map properties DI dependency injection 依赖注入——属性值的注入依赖于建立的对象(堆空间)
热门文章
- ubuntu在vmware下使用问题
- 网络摄像机进行互联网视频直播录像方案的选择,EasyNVS or EasyCloud or EasyGBS?
- UI auto程序结构组织方式
- CodedUI Test 测试WPF程序,无法获取控件属性值的解决方法
- dbUtils 工具类介绍
- js在页面输出信息的几种方式alert,confirm,prompt,document.write
- vue禁止复制的方式
- TypeError: save() missing 1 required positional argument: 'self'
- random生成六位随机数验证码
- 人工智能-baidu-aip语音识别(语音转文字)