SMB共享
[root@samba1 ~]# yum install samba samba-client samba-common -y
因为只有真实存在的用户才能在samba中建立,所以我们新建两个测试用户
[root@samba1 ~]# useradd test
[root@samba1 ~]# id test
uid=1001(test) gid=1001(test) groups=1001(test)
[root@samba1 ~]# useradd bss
[root@samba1 ~]# id bss
uid=1002(bss) gid=1002(bss) groups=1002(bss)
[root@samba1 ~]# smbpasswd -a test ##添加一个samba用户
New SMB password:
Retype new SMB password:
Added user test.
[root@samba1 ~]# pdbedit -L ##查看samba用户
test:1001:
[root@samba1 ~]# pdbedit -x test ##删除samba用户
[root@samba1 ~]# pdbedit -L
建上两个用户用来测试:test bss
Client机器:
[root@samba2 ~]# yum install samba-client -y
[root@samba2 ~]# smbclient -L //192.168.52.145 ##访问失败
Enter root's password:
session setup failed: NT_STATUS_LOGON_FAILURE
在服务端:
[root@samba1 ~]# getsebool -a | grep samba
samba_enable_home_dirs --> on ##将此项打开
client端
[root@samba2 ~]# smbclient -L //192.168.52.145 -U bss ##用建立的用户查看信息
Enter bss's password:
Domain=[SAMBA] OS=[Windows 6.1] Server=[Samba 4.4.4]
Sharename Type Comment
--------- ---- -------
print$ Disk Printer Drivers
IPC$ IPC IPC Service (Samba 4.4.4)
bss Disk Home Directories
Domain=[SAMBA] OS=[Windows 6.1] Server=[Samba 4.4.4]
Server Comment
--------- -------
Workgroup Master
--------- -------
[root@samba2 ~]# smbclient //192.168.52.145/bss -U bss ##用用户登陆,可以查看信息目录内容
Enter bss's password:
Domain=[SAMBA] OS=[Windows 6.1] Server=[Samba 4.4.4]
smb: \> ls
. D 0 Thu Mar 14 18:08:34 2019
.. D 0 Thu Mar 14 18:08:34 2019
.mozilla DH 0 Mon Mar 11 19:06:49 2019
.bash_logout H 18 Tue Jul 12 23:17:09 2016
.bash_profile H 193 Tue Jul 12 23:17:09 2016
.bashrc H 231 Tue Jul 12 23:17:09 2016
18093056 blocks of size 1024. 14720464 blocks available
上传文件:
###通过登陆的方式去上传
[root@samba2 ~]# cd /mnt/ ##需要在文件所在目录上传
[root@samba2 mnt]# ls
[root@samba2 mnt]# touch file
[root@samba2 mnt]# ls
file
[root@samba2 mnt]# smbclient //192.168.52.145/bss -U bss
Enter bss's password:
Domain=[SAMBA] OS=[Windows 6.1] Server=[Samba 4.4.4]
smb: \> ls
. D 0 Thu Mar 14 18:08:34 2019
.. D 0 Thu Mar 14 18:08:34 2019
.mozilla DH 0 Mon Mar 11 19:06:49 2019
.bash_logout H 18 Tue Jul 12 23:17:09 2016
.bash_profile H 193 Tue Jul 12 23:17:09 2016
.bashrc H 231 Tue Jul 12 23:17:09 2016
18093056 blocks of size 1024. 14720660 blocks available
smb: \> put file
putting file file as \file (0.0 kb/s) (average 0.0 kb/s) ##上传成功
###用挂载的方式写入文件:
Client端:
[root@samba2 mnt]# mount //192.168.52.145/bss /media/ -o username=bss,password=westos
[root@samba2 mnt]# df
Filesystem 1K-blocks Used Available Use% Mounted on
/dev/sda3 18093056 3348660 14744396 19% /
devtmpfs 918960 0 918960 0% /dev
tmpfs 933644 144 933500 1% /dev/shm
tmpfs 933644 9196 924448 1% /run
tmpfs 933644 0 933644 0% /sys/fs/cgroup
/dev/sda1 2037760 172088 1865672 9% /boot
tmpfs 186732 16 186716 1% /run/user/0
/dev/sr0 3704296 3704296 0 100% /run/media/root/RHEL-7.3 Server.x86_64
//192.168.52.145/bss 18093056 3372484 14720572 19% /media
[root@samba2 mnt]# cd /media/
[root@samba2 media]# ls
file
[root@samba2 media]# touch file{1..6}
[root@samba2 media]# ls
file file1 file2 file3 file4 file5 file6
[root@samba2 media]# vim /etc/fstab ##设置开机自启,但此种方式一旦服务方端启动,会导致客户端也无法启动
//192.168.52.145/bss /media cifs defaults,username=bss,password=westos 0 0
[root@samba2 /]# umount /media/ ##先卸载已挂载的目录
[root@samba2 /]# mount -a ##通过此命令进行挂载,如果没有报错即成功
Ps:也可以将挂载命令写入/etc/rc.d/rc.local 此文件中,也可以实现开机自启,需要给予此文件执行权限
挂载命令: mount //192.168.52.145/bss /media/ -o username=bss,password=westos
共享文件:
服务端:
[root@samba1 /]# mkdir /bss
[root@samba1 /]# touch /bss/test9
[root@samba1 /]# semanage fcontext -a -t samba_share_t '/bss(/.*)?' #修改安全上下文
[root@samba1 /]# semanage fcontext -l | grep /bss
/bss(/.*)? all files system_u:object_r:samba_share_t:s0
[root@samba1 /]# restorecon -RvvF /bss/
Restorecon reset /bss context unconfined_u:object_r:default_t:s0->system_u:object_r:samba_share_t:s0
[root@samba1 /]# vim /etc/samba/smb.conf ##添加模块
[bss]
comment = bss dir
path = /bss
[root@samba1 /]# systemctl restart smb.service
客户端:
[root@samba2 /]# smbclient //192.168.52.145/bss -U bss ##客户登陆
Enter bss's password:
Domain=[SAMBA] OS=[Windows 6.1] Server=[Samba 4.4.4]
smb: \> ls
. D 0 Thu Mar 14 19:28:12 2019
.. DR 0 Thu Mar 14 19:23:39 2019
test9 N 0 Thu Mar 14 19:28:12 2019
18093056 blocks of size 1024. 14713772 blocks available
共享系统目录:
服务端:
[root@samba1 /]# vim /etc/samba/smb.conf ##添加系统目录模块
[mnt]
comment = systemctl share file
path = /mnt
[root@samba1 /]# systemctl restart smb.service
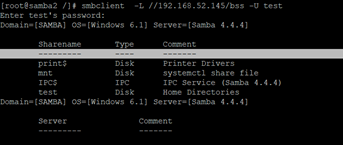
此时可以在客户端查询,但登入后无法操作
[root@samba2 /]# smbclient -L //192.168.52.145/mnt -U bss
Enter bss's password:
Domain=[SAMBA] OS=[Windows 6.1] Server=[Samba 4.4.4]
Sharename Type Comment
--------- ---- -------
print$ Disk Printer Drivers
DIR Disk bss dir
mnt Disk systemctl share file
IPC$ IPC IPC Service (Samba 4.4.4)
bss Disk Home Directories
因为是系统目录,如果更改安全上下文,会影响其他用户使用,所以对samba服务开放一些权限;
在服务端:
[root@samba1 /]# setsebool -P samba_export_all_ro on
[root@samba1 /]# setsebool -P samba_export_all_rw on
[root@samba1 /]# getsebool -a | grep samba
samba_export_all_ro --> on ##开方读写权限
samba_export_all_rw --> on
再次在客户端登陆:
[root@samba2 /]# smbclient //192.168.52.145/mnt -U test
Enter test's password:
Domain=[SAMBA] OS=[Windows 6.1] Server=[Samba 4.4.4]
smb: \> ls
. D 0 Thu Mar 10 19:05:55 2016
.. DR 0 Thu Mar 14 19:23:39 2019
file N 0 Thu Mar 14 23:23:52 2019
18093056 blocks of size 1024. 14713952 blocks available
权限管理:
[root@samba1 mnt]# vim /etc/samba/smb.conf ##在自己共享的目录中添加如下

writable = yes ##代表所有用户可写
Ps:需要注意自己共享目录的可写权限。
客户端登陆后可对共享目录中的内容进行删改
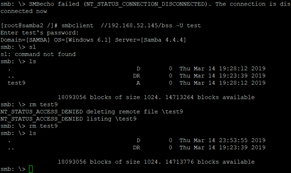
[root@samba2 /]# smbclient //192.168.52.145/bss -U test
Enter test's password:
Domain=[SAMBA] OS=[Windows 6.1] Server=[Samba 4.4.4]
smb: \> ls
. D 0 Thu Mar 14 19:28:12 2019
.. DR 0 Thu Mar 14 19:23:39 2019
test9 A 0 Thu Mar 14 19:28:12 2019
18093056 blocks of size 1024. 14713264 blocks available
smb: \> rm test9

指定用户可写:
在服务端
[root@samba1 bss]# vim /etc/samba/smb.conf
在自己的共享目录中添加如下策略
write list = @test ##仅写test代表仅有test用户可以操作,加上@代表test用户组的成员都可以操作。
在客户端可以使用不同用户登入测试:
bss用户:

test用户:

指定用户登陆:
[root@samba1 bss]# vim /etc/samba/smb.conf
在自己的共享目录模块下
valid users = test ##指定只有test用户可以登陆
valid users = +test ##指定只有test组的用户可以登陆
[root@samba1 bss]# systemctl restart smb.service
隐藏共享目录:
[root@samba1 bss]# vim /etc/samba/smb.conf
browseable = no ##代表将此目录隐藏
[root@samba1 bss]# systemctl restart smb.service
客户端:

匿名用户登陆:
[root@samba1 bss]# vim /etc/samba/smb.conf
map to guest = bad user ##其他用户映射到guest
guest ok = yes ##允许其他用户登陆
[root@samba1 bss]# systemctl restart smb.service
将普通用户指定为root用户;
服务端:
[root@samba1 bss]# vim /etc/samba/smb.conf
admin users = bss ##指定bss为超级用户
[root@samba1 bss]# systemctl restart smb.service
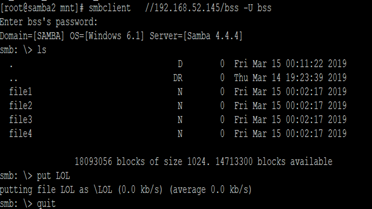
客户端测试:

在服务端查看这个文件:
我们以bss用户上传的文件,在这里却是属于root用户,这时因为我们将bss用户指定成为了超级用户

多用户挂载:
首先在客户端卸掉与服务端共享目录的挂载
[root@samba2 mnt]# yum install cifs-utils.x86_64 -y
[root@samba2 mnt]# vim /root/smbpass
##填写用户信息,此处用户必须在samba服务器上存在
username=bss
password=westos
[root@samba2 mnt]# chmod 600 /root/smbpass
[root@samba2 mnt]# mount -o credentials=/root/smbpass,sec=ntlmssp,multiuser //192.168.52.145/bss /media/
[root@samba2 mnt]# df
Filesystem 1K-blocks Used Available Use% Mounted on
/dev/sda3 18093056 3349384 14743672 19% /
devtmpfs 918960 0 918960 0% /dev
tmpfs 933644 144 933500 1% /dev/shm
tmpfs 933644 9168 924476 1% /run
tmpfs 933644 0 933644 0% /sys/fs/cgroup
/dev/sda1 2037760 172088 1865672 9% /boot
tmpfs 186732 16 186716 1% /run/user/0
/dev/sr0 3704296 3704296 0 100% /run/media/root/RHEL-7.3 Server.x86_64
//192.168.52.145/bss 18093056 3379408 14713648 19% /media ##挂载成功
[root@samba2 mnt]# cd /media/
[root@samba2 media]# ls
file1 file2 file3 file4 LOL
[root@samba2 media]# touch pps ##超级用户没有问题
[root@samba2 media]# su – test ##切换到普通用户,会发现无法查看
[test@samba2 ~]$ cd /media
[test@samba2 media]$ ls
ls: reading directory .: Permission denied
[test@samba2 media]$ cifscreds add -u bss 192.168.52.145 ##客户端的普通用户test通过
Password:
[test@samba2 media]$ ls
file1 file2 file3 file4 LOL pps
其他区用户同理
最新文章
- 线程优先级抢占实验【RT-Thread学习笔记 3】
- 【译】用jQuery 处理XML--写在前面的话
- wicket基础应用(3)——wicket控件的隐藏和显示
- 自定义JSTL标签和函数库
- LINQ学习之旅(六)
- dede留言板链接变成localhost的解决办法
- The breakpoint will not currently be hit. No symbols have been loaded for this document."
- vim emmet配置
- 遍历Jenkins全部项目的配置
- USB系列之四:向U盘上写数据
- c# 窗体最小化后截图实现
- 转 excel表怎么自动分列
- php 面向对象的三大特性
- 安装cocoa pods时出现Operation not permitted - /usr/bin/xcodeproj的问题
- python decorators
- Ex 2_25 n位十进制整数转换为二进制形式..._第四次作业
- 剑指Offer 41. 和为S的连续正数序列 (其他)
- 《HTTP - http2.0》
- jquery如何获取checkbox的值
- RunAsPolicy Exit Code 1替代
热门文章
- Fiddldr 教程之:HTTP协议详解(转)
- HDU 6201 transaction transaction transaction (树形DP)
- CodeForces 814D An overnight dance in discotheque(贪心+dfs)
- POJ 3660 Cow Contest(传递闭包)
- selenium+jenkins+maven+testNG搭建持续集成环境
- .net core 高性能对象映射
- 【原创】vim插件安装简介
- FPN(feature pyramid networks)
- 从FastDFS官网下载我们需要的安装包
- socket-详细分析No buffer space available(转载)