Keras简单使用
2024-08-31 06:10:10
Keras简单使用
在keras中建立模型
相对于自己写机器学习相关的函数,keras更能快速搭建模型,流程如下:
通过调用下面的函数创建模型
通过调用
model.compile(optimizer = "...", loss = "...", metrics = ["accuracy"])编译模型通过调用
model.fit(x = ..., y = ..., epochs = ..., batch_size = ...)在训练集上训练模型通过调用
model.evaluate(x = ..., y = ...)在测试集上测试模型
如果你想查阅更多有关model.compile(), model.fit(), model.evaluate() 的信息和它们的参数, 请参考官方文档 Keras documentation.
代码如下:
def model(input_shape):
# Define the input placeholder as a tensor with shape input_shape. Think of this as your input image!
X_input = Input(input_shape)
# Zero-Padding: pads the border of X_input with zeroes
X = ZeroPadding2D((3, 3))(X_input)
# CONV -> BN -> RELU Block applied to X
X = Conv2D(32, (7, 7), strides = (1, 1), name = 'conv0')(X)
X = BatchNormalization(axis = 3, name = 'bn0')(X)
X = Activation('relu')(X)
# MAXPOOL
X = MaxPooling2D((2, 2), name='max_pool')(X)
# FLATTEN X (means convert it to a vector) + FULLYCONNECTED
X = Flatten()(X)
X = Dense(1, activation='sigmoid', name='fc')(X)
# Create model. This creates your Keras model instance, you'll use this instance to train/test the model.
model = Model(inputs = X_input, outputs = X, name='HappyModel')
return model
step 1:
happyModel = HappyModel(X_train.shape[1:]) # 只保留一个例子
step 2:
happyModel.compile(optimizer = 'sgd', loss = 'binary_crossentropy', metrics = ['accuracy'])
step 3:
happyModel.fit(x = X_train,y = Y_train, epochs = 5, batch_size = 16)
step 4:
preds = happyModel.evaluate(x = X_test, y = Y_test)
# preds[0] = Loss
# preds[1] = Test Accuracy
此时,模型参数均已确定,可用来测试自己的图片
测试自己的图片
1 img_path = 'your picture path'
2 img = image.load_img(img_path, target_size=(64, 64))
3 imshow(img)
4
5 x = image.img_to_array(img)
6 x = np.expand_dims(x, axis=0)
7 x = preprocess_input(x)
8
9 print(happyModel.predict(x))
一些有用的函数(持续更新)
happyModel.summary():统计并打印如下内容
plot_model()画出流程图plot_model(happyModel, to_file='HappyModel.png')
SVG(model_to_dot(happyModel).create(prog='dot', format='svg'))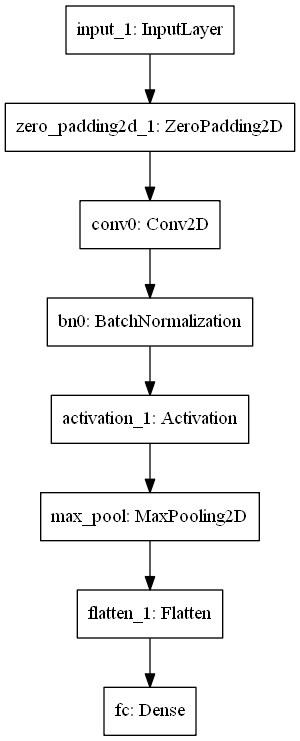
最新文章
- MSVCRTD.lib(mfc.obj) : error LNK2019: 无法解析的外部符号 _WinMain@16,该符号在函数 ___tmainC (转)
- Hadoop 之MongoDB
- 洛谷 P2661 信息传递 Label:并查集||强联通分量
- 论文阅读之:Photo-Realistic Single Image Super-Resolution Using a Generative Adversarial Network
- Progress Reporting
- android ipc通信机制之之三,进程通讯方式。
- DEV gridcontrol 设置行数据超宽换行
- MATLAB中的多项式运算
- 【多重背包模板】poj 1014
- SQLServer2008开放windows防火墙配置
- Android异常分析(转)
- [国嵌笔记][024][ARM汇编编程概述]
- NoSQL简介
- android launcher 之踩到的坑
- 错误问题:OpenGL version to old,GLViewinitWithRect(const stdbasic_stringchar,stdchar_traitschar,stdalloca
- python爬取网易云周杰伦所有专辑,歌曲,评论,并完成可视化分析
- [系统软件]Ubuntu 18.04中的Shutter禁用了“编辑”选项解决
- 2.sklearn库中的标准数据集与基本功能
- jqgrid 将列头设置为超链接或按钮
- 字符串转换成整型,到底使用int.Parse,Convert.ToInt32还是int.TryParse?