Onenote代码高亮的实现方法
- 最终效果图
- 最终的效果图如下:
- VBA的编写参考
- 主要参考的是这篇博客中的思路:如何在Word中排出漂亮的代码
- 将VBA脚本复制到Word中并设置快捷键
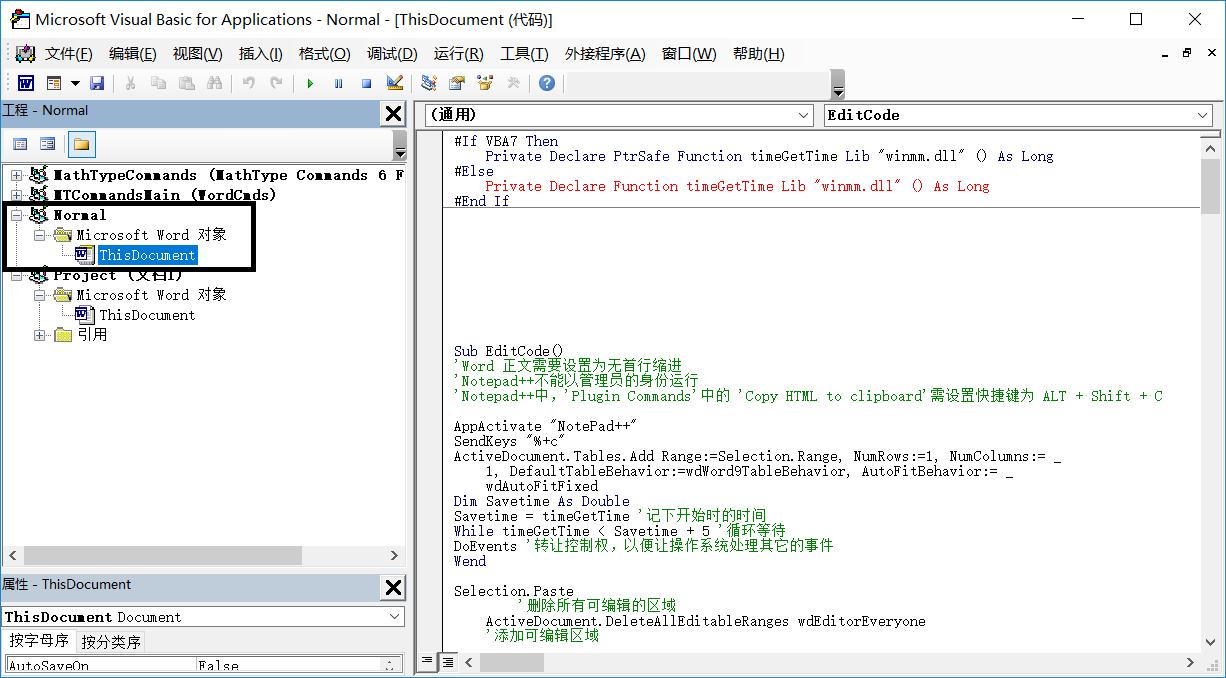
- Alt+F11 打开Word中的 VBS,将下列的VB代码复制 Normal 模板下的 Microsoft 对象下的 ThisDocument中
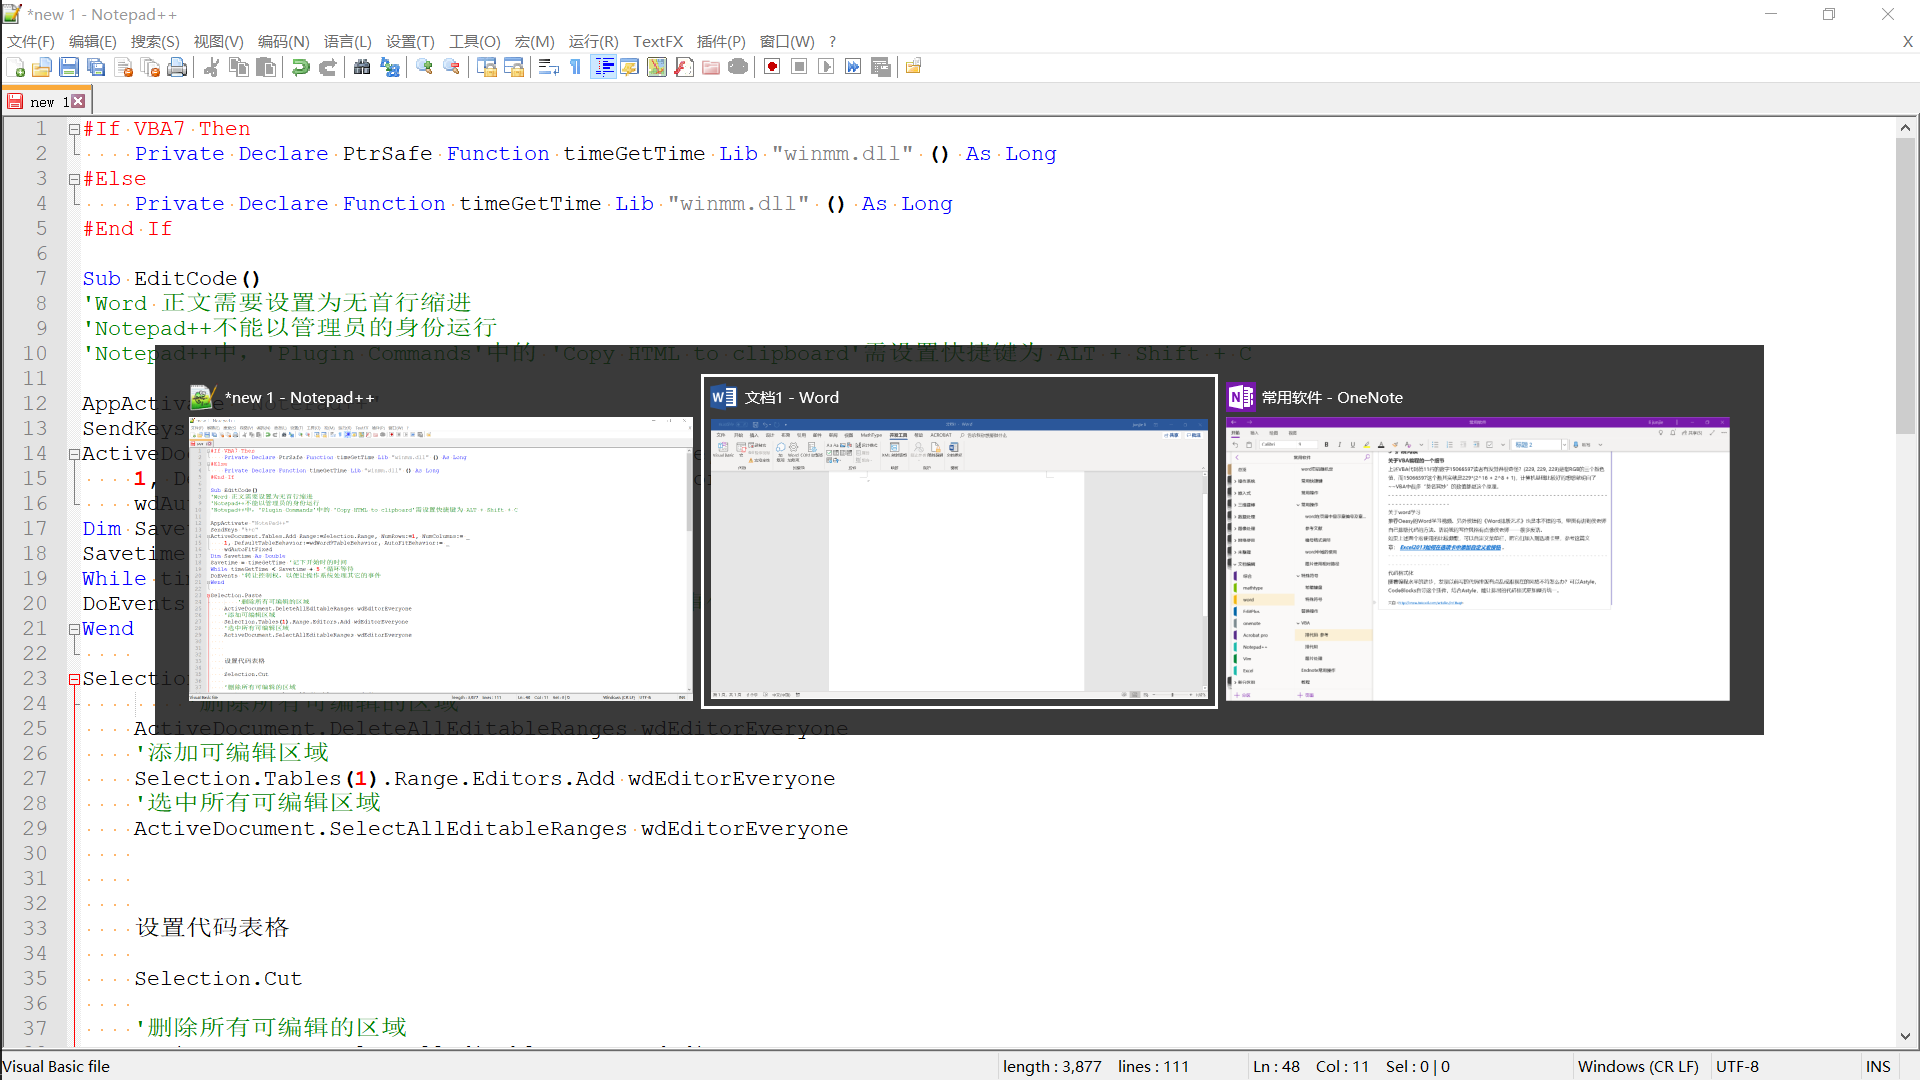
- 复制位置
- VB代码
#If VBA7 Then
Private Declare PtrSafe Function timeGetTime Lib "winmm.dll" () As Long
#Else
Private Declare Function timeGetTime Lib "winmm.dll" () As Long
#End If
Sub EditCode()
'Word 正文需要设置为无首行缩进
'Notepad++不能以管理员的身份运行
'Notepad++中,'Plugin Commands'中的 'Copy HTML to clipboard'需设置快捷键为 ALT + Shift + C
AppActivate "NotePad++"
SendKeys "%+c"
, NumColumns:= _
, DefaultTableBehavior:=wdWord9TableBehavior, AutoFitBehavior:= _
wdAutoFitFixed
Dim Savetime As Double
Savetime = timeGetTime '记下开始时的时间
While timeGetTime < Savetime + 5 '循环等待
DoEvents '转让控制权,以便让操作系统处理其它的事件
Wend
Selection.Paste
'删除所有可编辑的区域
ActiveDocument.DeleteAllEditableRanges wdEditorEveryone
'添加可编辑区域
).Range.Editors.Add wdEditorEveryone
'选中所有可编辑区域
ActiveDocument.SelectAllEditableRanges wdEditorEveryone
设置代码表格
Selection.Cut
'删除所有可编辑的区域
ActiveDocument.DeleteAllEditableRanges wdEditorEveryone
SendKeys ("^%({TAB})")
End Sub
Sub 设置代码表格()
' author: code4101
' 设置代码表格 宏
'
'
' 背景色为morning的配色方案,RGB为(229,229,229)
With Selection.Tables(1)
With .Shading
.Texture = wdTextureNone
.ForegroundPatternColor = wdColorAutomatic
.BackgroundPatternColor = 15066597
End With
.Borders(wdBorderLeft).LineStyle = wdLineStyleNone
.Borders(wdBorderRight).LineStyle = wdLineStyleNone
.Borders(wdBorderTop).LineStyle = wdLineStyleNone
.Borders(wdBorderBottom).LineStyle = wdLineStyleNone
.Borders(wdBorderVertical).LineStyle = wdLineStyleNone
.Borders(wdBorderDiagonalDown).LineStyle = wdLineStyleNone
.Borders(wdBorderDiagonalUp).LineStyle = wdLineStyleNone
.Borders.Shadow = False
.AutoFitBehavior (wdAutoFitContent) '自动调整大小
End With
With Options
.DefaultBorderLineStyle = wdLineStyleSingle
.DefaultBorderLineWidth = wdLineWidth050pt
.DefaultBorderColor = wdColorAutomatic
End With
磅
With Selection.ParagraphFormat
)
)
.SpaceBefore = 0
.SpaceBeforeAuto = False
.SpaceAfter = 0
.SpaceAfterAuto = False
.LineSpacingRule = wdLineSpaceExactly
.LineSpacing = 12
.KeepWithNext = False
.KeepTogether = False
.PageBreakBefore = False
.NoLineNumber = False
.Hyphenation = True
)
.OutlineLevel = wdOutlineLevelBodyText
.CharacterUnitLeftIndent = 0
.CharacterUnitRightIndent = 0
.CharacterUnitFirstLineIndent = 0
.LineUnitBefore = 0
.LineUnitAfter = 0
.MirrorIndents = False
.TextboxTightWrap = wdTightNone
.AutoAdjustRightIndent = True
.DisableLineHeightGrid = False
.FarEastLineBreakControl = True
.WordWrap = True
.HangingPunctuation = True
.HalfWidthPunctuationOnTopOfLine = False
.AddSpaceBetweenFarEastAndAlpha = True
.AddSpaceBetweenFarEastAndDigit = True
.BaseLineAlignment = wdBaselineAlignAuto
End With
' 清除原有的段落底纹
Selection.ParagraphFormat.Shading.BackgroundPatternColor = wdColorAutomatic
Selection.Font.Name = "Consolas"
End Sub
- 设置宏 EditCode的快捷键
- 在Word选项的自定义功能区,选项自定义键盘快捷键
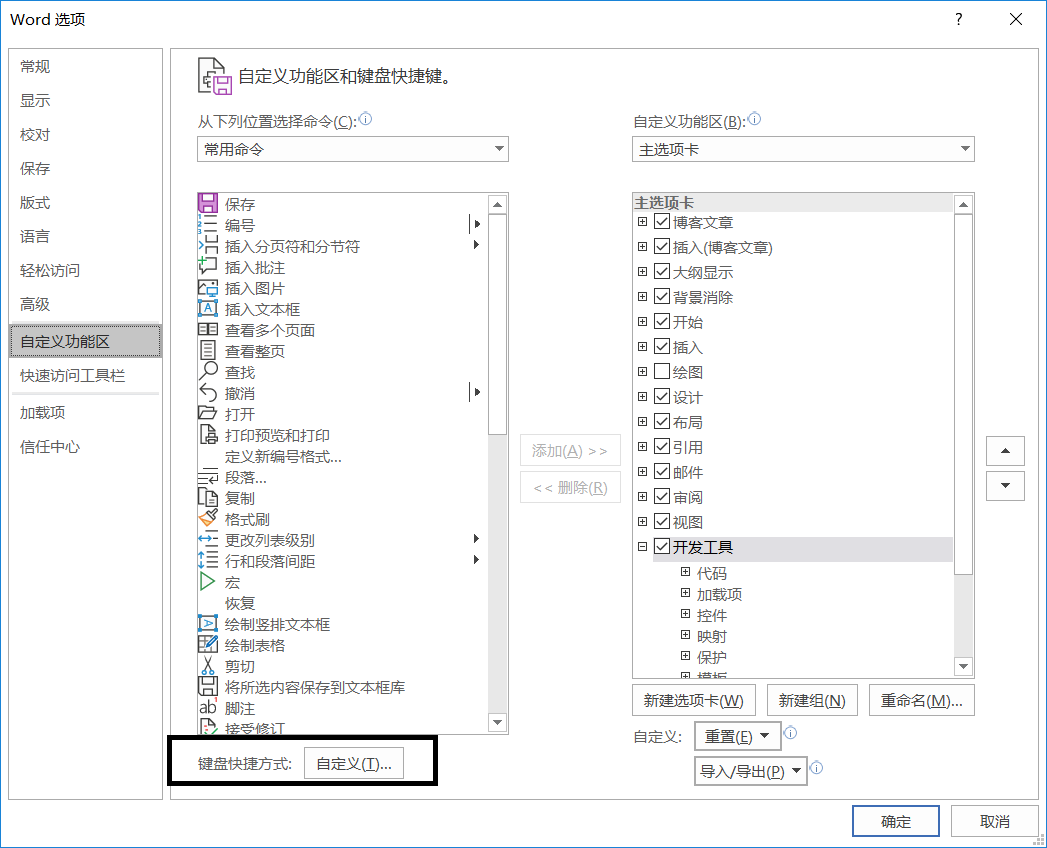
- 将EditCode设置为自己想要的快捷键,我设置的是 Alt + 1,注意不要与现存的快捷键冲突

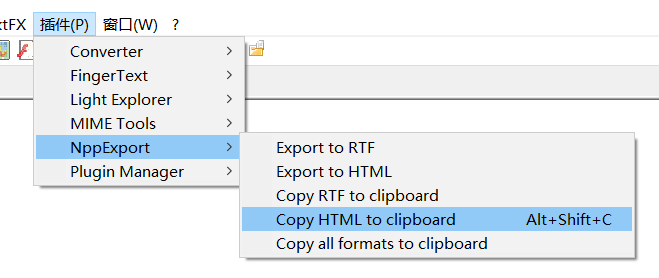
- NotePad++设置
- 确保NotePad++安装了NppExport插件,并设置 Copy HTML to clipboard 的快捷键为 Alt + Shift + C
- 宏的使用
- 首先确保只打开一个NotePad++窗口,并且把当前的文件设置为要复制的文件,而且要确保NotePad++ 中的代码是高亮状态。
- ,等到出现Alt + Tab 页面时,就说明复制完成。
- 此时,直接在Onenote中按 Ctrl + V 即可完成复制
- 使用注意事项
- Word 正文需要设置为无首行缩进
- 'Notepad++不能以管理员的身份运行
- 后续改进方向
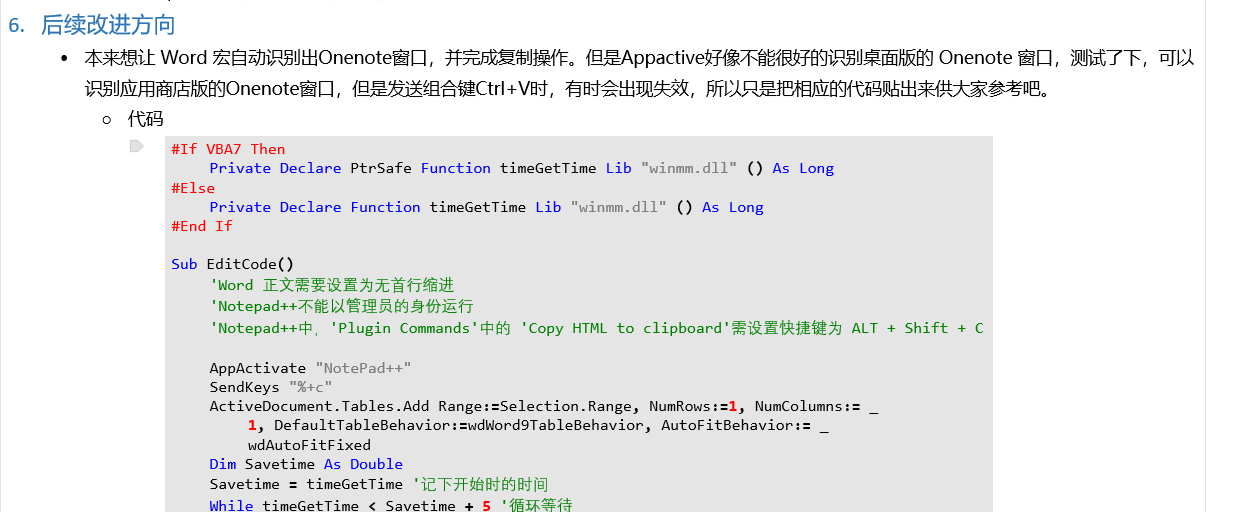
- 本来想让Word宏自动识别出Onenote窗口,并完成复制操作。但是Appactive好像不能很好的识别桌面版的 Onenote 窗口,测试了下,可以识别应用商店版的Onenote窗口,但是发送组合键Ctrl+V时,有时会出现失效,所以只是把相应的代码贴出来供大家参考吧。
- 代码
#If VBA7 Then
Private Declare PtrSafe Function timeGetTime Lib "winmm.dll" () As Long
#Else
Private Declare Function timeGetTime Lib "winmm.dll" () As Long
#End If
Sub EditCode()
'Word 正文需要设置为无首行缩进
'Notepad++不能以管理员的身份运行
'Notepad++中,'Plugin Commands'中的 'Copy HTML to clipboard'需设置快捷键为 ALT + Shift + C
AppActivate "NotePad++"
SendKeys "%+c"
, NumColumns:= _
, DefaultTableBehavior:=wdWord9TableBehavior, AutoFitBehavior:= _
wdAutoFitFixed
Dim Savetime As Double
Savetime = timeGetTime '记下开始时的时间
While timeGetTime < Savetime + 5 '循环等待
DoEvents '转让控制权,以便让操作系统处理其它的事件
Wend
Selection.Paste
'删除所有可编辑的区域
ActiveDocument.DeleteAllEditableRanges wdEditorEveryone
'添加可编辑区域
).Range.Editors.Add wdEditorEveryone
'选中所有可编辑区域
ActiveDocument.SelectAllEditableRanges wdEditorEveryone
设置代码表格
Selection.Cut
'删除所有可编辑的区域
ActiveDocument.DeleteAllEditableRanges wdEditorEveryone
'SendKeys ("^%({TAB})")
AppActivate "OneNote"
SendKeys ("{ESC}{ESC}^v")
End Sub
Sub 设置代码表格()
' author: code4101
' 设置代码表格 宏
'
'
' 背景色为morning的配色方案,RGB为(229,229,229)
With Selection.Tables(1)
With .Shading
.Texture = wdTextureNone
.ForegroundPatternColor = wdColorAutomatic
.BackgroundPatternColor = 15066597
End With
.Borders(wdBorderLeft).LineStyle = wdLineStyleNone
.Borders(wdBorderRight).LineStyle = wdLineStyleNone
.Borders(wdBorderTop).LineStyle = wdLineStyleNone
.Borders(wdBorderBottom).LineStyle = wdLineStyleNone
.Borders(wdBorderVertical).LineStyle = wdLineStyleNone
.Borders(wdBorderDiagonalDown).LineStyle = wdLineStyleNone
.Borders(wdBorderDiagonalUp).LineStyle = wdLineStyleNone
.Borders.Shadow = False
.AutoFitBehavior (wdAutoFitContent) '自动调整大小
End With
With Options
.DefaultBorderLineStyle = wdLineStyleSingle
.DefaultBorderLineWidth = wdLineWidth050pt
.DefaultBorderColor = wdColorAutomatic
End With
磅
With Selection.ParagraphFormat
)
)
.SpaceBefore = 0
.SpaceBeforeAuto = False
.SpaceAfter = 0
.SpaceAfterAuto = False
.LineSpacingRule = wdLineSpaceExactly
.LineSpacing = 12
.KeepWithNext = False
.KeepTogether = False
.PageBreakBefore = False
.NoLineNumber = False
.Hyphenation = True
)
.OutlineLevel = wdOutlineLevelBodyText
.CharacterUnitLeftIndent = 0
.CharacterUnitRightIndent = 0
.CharacterUnitFirstLineIndent = 0
.LineUnitBefore = 0
.LineUnitAfter = 0
.MirrorIndents = False
.TextboxTightWrap = wdTightNone
.AutoAdjustRightIndent = True
.DisableLineHeightGrid = False
.FarEastLineBreakControl = True
.WordWrap = True
.HangingPunctuation = True
.HalfWidthPunctuationOnTopOfLine = False
.AddSpaceBetweenFarEastAndAlpha = True
.AddSpaceBetweenFarEastAndDigit = True
.BaseLineAlignment = wdBaselineAlignAuto
End With
' 清除原有的段落底纹
Selection.ParagraphFormat.Shading.BackgroundPatternColor = wdColorAutomatic
Selection.Font.Name = "Consolas"
End Sub
- 使用时,要先将Onenote中的光标放在要插入代码的位置,运行宏后可以实现自动插入。
最新文章
- SQL SERVER全面优化-------Expert for SQL Server 诊断系列
- 为什么 C++ 中成员函数指针是 16 字节?
- bootstrap学习笔记--bootstrap排版类的使用
- CoordinatorLayout+TabLayout+ViewPager
- chrome developer tool—— 断点调试篇
- 卸载自己编译的程序(ubuntu14.04)
- MySQL数据库初识(一)
- Html-Css-a标签的使用
- DATASNAP 自增长字段问题
- NSRangeFromString(<#NSString * _Nonnull aString#>) 和rangeOfString
- SUP (SAP Mobile SDK 2.2) 连接 Sybase SQL Anywhere sample 数据库
- JS 之完美运动框架
- iOS 8自定义动画转场上手指南
- git分支管理之分支管理策略
- JS中简单的二级城市联动
- 视频信号中xyz的提取
- Hbase Shell命令详解+API操作
- PyQt5--ToolBar
- 简单易懂的GBDT
- iOS:转载:同步、异步、并行、串行的详解