Hadoop之HDFS文件系统(二)
HDFS客户端
通过IO流操作HDFS
HDFS文件上传
|
@Test public void putFileToHDFS() throws Exception{ // 1 创建配置信息对象 Configuration configuration = new Configuration(); FileSystem fs = FileSystem.get(new URI("hdfs://hadoop102:9000"),configuration, "root"); // 2 创建输入流 FileInputStream inStream = new FileInputStream(new File("e:/hello.txt")); // 3 获取输出路径 String putFileName = "hdfs://hadoop102:9000/user/root/hello1.txt"; Path writePath = new Path(putFileName); // 4 创建输出流 FSDataOutputStream outStream = fs.create(writePath); // 5 流对接 try{ IOUtils.copyBytes(inStream, outStream, 4096, false); }catch(Exception e){ e.printStackTrace(); }finally{ IOUtils.closeStream(inStream); IOUtils.closeStream(outStream); } } |
HDFS文件下载
|
@Test public void getFileToHDFS() throws Exception{ // 1 创建配置信息对象 Configuration configuration = new Configuration(); FileSystem fs = FileSystem.get(new URI("hdfs://hadoop102:9000"),configuration, "root"); // 2 获取读取文件路径 String filename = "hdfs://hadoop102:9000/user/root/hello1.txt"; // 3 创建读取path Path readPath = new Path(filename); // 4 创建输入流 FSDataInputStream inStream = fs.open(readPath); // 5 流对接输出到控制台 try{ IOUtils.copyBytes(inStream, System.out, 4096, false); }catch(Exception e){ e.printStackTrace(); }finally{ IOUtils.closeStream(inStream); } } |
定位文件读取(数据是分块存储,每一块为128M,数据大小超过这个值,就会存在多块)
下载第一块
|
@Test // 定位下载第一块内容 public void readFileSeek1() throws Exception { // 1 创建配置信息对象 Configuration configuration = new Configuration(); FileSystem fs = FileSystem.get(new URI("hdfs://hadoop102:9000"), configuration, "root"); // 2 获取输入流路径 Path path = new Path("hdfs://hadoop102:9000/user/atguigu/tmp/hadoop-2.7.2.tar.gz"); // 3 打开输入流 FSDataInputStream fis = fs.open(path); // 4 创建输出流 FileOutputStream fos = new FileOutputStream("e:/hadoop-2.7.2.tar.gz.part1"); // 5 流对接 byte[] buf = new byte[1024]; for (int i = 0; i < 128 * 1024; i++) { fis.read(buf); fos.write(buf); } // 6 关闭流 IOUtils.closeStream(fis); IOUtils.closeStream(fos); } |
下载第二块
|
@Test // 定位下载第二块内容 public void readFileSeek2() throws Exception{ // 1 创建配置信息对象 Configuration configuration = new Configuration(); FileSystem fs = FileSystem.get(new URI("hdfs://hadoop102:9000"), configuration, "root"); // 2 获取输入流路径 Path path = new Path("hdfs://hadoop102:9000/user/atguigu/tmp/hadoop-2.7.2.tar.gz"); // 3 打开输入流 FSDataInputStream fis = fs.open(path); // 4 创建输出流 FileOutputStream fos = new FileOutputStream("e:/hadoop-2.7.2.tar.gz.part2"); // 5 定位偏移量(第二块的首位) fis.seek(1024 * 1024 * 128); // 6 流对接 IOUtils.copyBytes(fis, fos, 1024); // 7 关闭流 IOUtils.closeStream(fis); IOUtils.closeStream(fos); } |
合并文件
在window命令窗口中执行
type hadoop-2.7.2.tar.gz.part2 >> hadoop-2.7.2.tar.gz.part1
HDFS的数据流
HDFS写数据流程
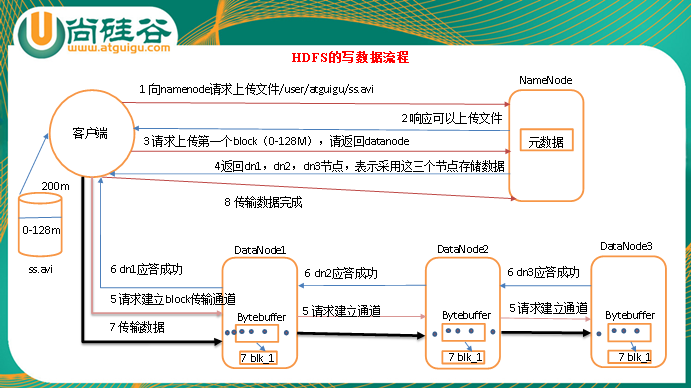
1)客户端向namenode请求上传文件,namenode检查目标文件是否已存在,父目录是否存在。
2)namenode返回是否可以上传。
3)客户端请求第一个 block上传到哪几个datanode服务器上。
4)namenode返回3个datanode节点,分别为dn1、dn2、dn3。
5)客户端请求dn1上传数据,dn1收到请求会继续调用dn2,然后dn2调用dn3,将这个通信管道建立完成
6)dn1、dn2、dn3逐级应答客户端
7)客户端开始往dn1上传第一个block(先从磁盘读取数据放到一个本地内存缓存),以packet为单位,dn1收到一个packet就会传给dn2,dn2传给dn3;dn1每传一个packet会放入一个应答队列等待应答
8)当一个block传输完成之后,客户端再次请求namenode上传第二个block的服务器。(重复执行3-7步)
HDFS读数据流程
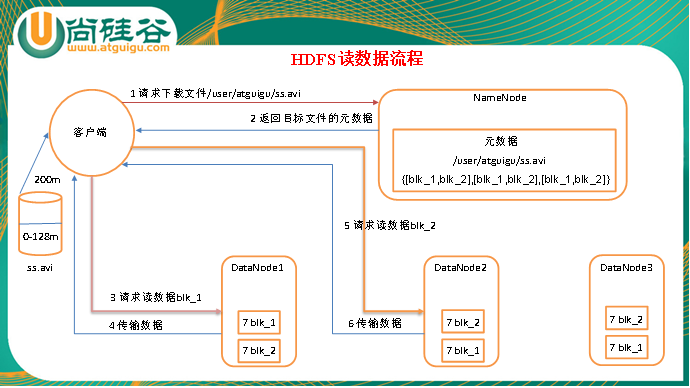
1)客户端向namenode请求下载文件,namenode通过查询元数据,找到文件块所在的datanode地址。
2)挑选一台datanode(就近原则,然后随机)服务器,请求读取数据。
3)datanode开始传输数据给客户端(从磁盘里面读取数据放入流,以packet为单位来做校验)。
4)客户端以packet为单位接收,先在本地缓存,然后写入目标文件。
最新文章
- CodeBlocks及LCM应用
- php中的gethostbyname函数有问题
- 烂泥:源码安装apache
- C#中值类型和引用类型图解
- Spring MVC小结
- Android:去掉默认的标题bar
- visual studio code(vscode) 调试php
- 【OpenStack】OpenStack系列7之Nova详解
- How to use Ubuntu Linux in virtual box
- PANIC : Error configuring AvalonLogSystem :
- 强烈推荐240多个jQuery插件提供下载
- windows下apache配置ssl(https)服务器
- [转] iOS使用NSMutableAttributedString 实现富文本(不同颜色字体、下划线等)
- 简单的div蒙层
- IOS 单例模式的学习
- hdu 1875 畅通project再续
- CPU自制入门——笔记
- 微信小程序的登陆流程详解
- 模拟poj1350
- ajax控件无法使用 iis配置及web修改(转载)
热门文章
- 解决html连续字符或数字换行的问题
- LeetCode 2: single-number II
- 【Bug】解决 SpringBoot Artifact contains illegal characters 错误
- Newtonsoft—Json.NET常用方法简述
- 使用SQLserver Management Studio连接VS2012自带数据库
- OracleService服务不见了|OracleServiceXE服务没有了
- [springboot 开发单体web shop] 2. Mybatis Generator 生成common mapper
- python:枚举类型
- C++学习笔记14_C#调用dll
- 使用ASP.NET Core 3.x 构建 RESTful API - 2. 什么是RESTful API