NHibernate系列学习(一)-看看用NH怎么做增速改查
2024-08-30 22:03:12
1.本次所有代码是在一下环境下运行的
| 学习系统:win8 64bit 开发环境:VS2013,MSSQL2012 NHibernate版本:NHibernate-4.0.3.GA 【文章结尾有本次笔记下载链接,里面只包含需要的程序集】 运行环境:.Net Framework 4.5 |
2.什么是NHibernate
NHibernate是ORM框架中的一种,那么什么是ORM框架,我在MVC那边有一篇介绍EF框架时说过。
大家可以看看这篇文章什么是ORM框架
这里就强调一句话:【ORM(Object Relational Mapping)是一种为了解决面向对象与关系型数据库互相匹配而存在的技术】。
3.开始NH之旅
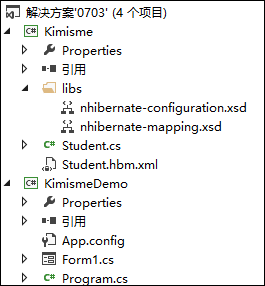
本次学习的代码结构如下
第一步:在数据库中创建.net类持久化的对应表
create table T_Student

  (

    SId int primary key identity(1,1),

    SName nvarchar(10),

    SAge int

  )
第二步:创建需要被持久化的.Net类
namespace Kimisme

{

    public class Student

    {

        public int Id { get; set; }

        public string Name { get; set; }

        public int Age { get; set; }

    }

}
第三步:创建映射文件,告诉NH怎么持久化这些类以及它的属性Student.hbm.xml
<?xml version="1.0" encoding="utf-8"?>

<hibernate-mapping xmlns="urn:nhibernate-mapping-2.2" default-lazy="false">

  <class name="Test.Student,Test" table="T_Student">

    <id name="Id" column="sId" type="int">

      <generator class="native" />

    </id>

    <property name="Name" column="sName" type="string"  />

    <property name="Age" column="sAge" type="int"  />

  </class>

</hibernate-mapping>
说明:
| <class name="Test.Student,Test" table="T_Student"></class>:DotNet中类Student(命名空间.类名)对应数据库中表T_Student <id name="Id" column="sId" type="int"></id>:类Student的字段Id对应于表T_Student中的SId <generator class="native" />:native表示自动生成,因为表中tId设置了主键 |
第四步:创建NH的配置文件,告诉NH要连接什么数据库以及怎么连接数据库App.config
<?xml version="1.0" encoding="utf-8" ?>

<configuration>

  <configSections>

    <section name="hibernate-configuration" type="NHibernate.Cfg.ConfigurationSectionHandler,NHibernate" requirePermission="false"/>

  </configSections>

  <hibernate-configuration  xmlns="urn:nhibernate-configuration-2.2" >

    <session-factory>

      <property name="connection.provider">NHibernate.Connection.DriverConnectionProvider, NHibernate</property>

      <property name="connection.driver_class">NHibernate.Driver.SqlClientDriver</property>

      <property name="connection.connection_string">Server=(local);initial catalog=KimDB;Integrated Security=SSPI</property>

      <property name="show_sql">true</property>

      <property name="dialect">NHibernate.Dialect.MsSql2012Dialect</property>

    </session-factory>

  </hibernate-configuration>

    <startup>

        <supportedRuntime version="v4.0" sku=".NETFramework,Version=v4.5" />

    </startup>

</configuration>
说明:
| <configSections> <section name="hibernate-configuration" /> </configSections>:NH配置文件,必须放在最上面 <property name="connection.provider"></property>:NH连接数据库提供程序 <property name="connection.driver_class"></property> :连接数据库的驱动程序 <property name="connection.connection_string"></property> :数据库连接 <property name="show_sql"></property> :是否显示sql语句 <property name="dialect"></property> :方言 |
第五步:使用NH提供的API做增速改查
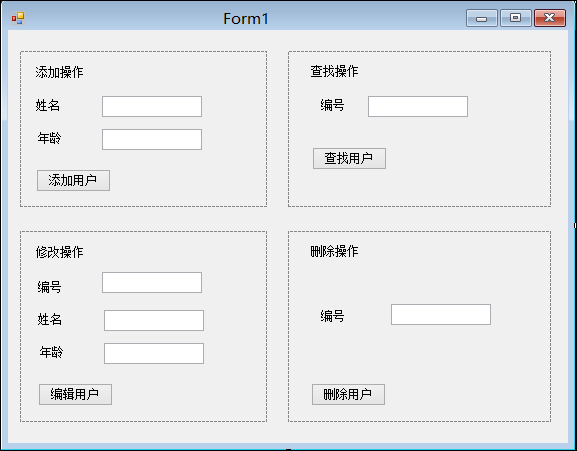
首先看看本次完成后的界面 以及 代码层次:
4.终于可以敲代码了
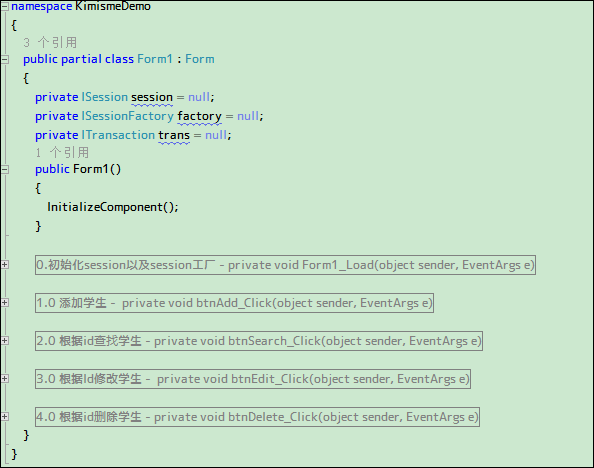
首先要引用两个文件,一个是Kimisme类库,一个是NHibernate.dll
namespace KimismeDemo

{

    public partial class Form1 : Form

    {

        private ISession session = null;

        private ISessionFactory factory = null;

        private ITransaction trans = null;

        public Form1()

        {

            InitializeComponent();

        }

        #region 0.初始化session以及session工厂 - private void Form1_Load(object sender, EventArgs e)

        private void Form1_Load(object sender, EventArgs e)

        {

            Configuration config = new Configuration().AddAssembly("Kimisme");

            factory = config.BuildSessionFactory();

            session = factory.OpenSession();

        }

        #endregion

        #region 1.0 添加学生 -  private void btnAdd_Click(object sender, EventArgs e)

        private void btnAdd_Click(object sender, EventArgs e)

        {

            trans = session.BeginTransaction();

            try

            {

                Student stu = new Student();

                stu.Name = txtName.Text;

                stu.Age = Convert.ToInt32(txtAge.Text);

                session.Save(stu);

                trans.Commit();

                MessageBox.Show("添加成功");

            }

            catch (Exception ex)

            {

                trans.Rollback();

                MessageBox.Show(ex.Message);

            }

        }

        #endregion

        #region 2.0 根据id查找学生 - private void btnSearch_Click(object sender, EventArgs e)

        private void btnSearch_Click(object sender, EventArgs e)

        {

            try

            {

                Student stu = session.Get(typeof(Student), int.Parse(txtId.Text)) as Student;

                MessageBox.Show("姓名:【" + stu.Name + "】年龄:" + stu.Age);

            }

            catch (Exception ex)

            {

                MessageBox.Show(ex.Message);

            }

        }

        #endregion

        #region 3.0 根据Id修改学生 -  private void btnEdit_Click(object sender, EventArgs e)

        private void btnEdit_Click(object sender, EventArgs e)

        {

            trans = session.BeginTransaction();

            try

            {

                Student stu = session.Get(typeof(Student), int.Parse(txtEditId.Text)) as Student;

                stu.Name = txtEditName.Text;

                stu.Age = Convert.ToInt32(txtEditAge.Text);

                session.Update(stu);

                trans.Commit();

                MessageBox.Show("修改成功");

            }

            catch (Exception ex)

            {

                trans.Rollback();

                MessageBox.Show(ex.Message);

            }

        }

        #endregion

        #region 4.0 根据id删除学生 - private void btnDelete_Click(object sender, EventArgs e)

        private void btnDelete_Click(object sender, EventArgs e)

        {

            trans = session.BeginTransaction();

            try

            {

                Student stu = session.Get(typeof(Student), int.Parse(txtDeleteId.Text)) as Student;

                session.Delete(stu);

                trans.Commit();

                MessageBox.Show("删除成功");

            }

            catch (Exception ex)

            {

                trans.Rollback();

                MessageBox.Show(ex.Message);

            }

        }

        #endregion

    }

}
5.代码下载
最新文章
- 许愿墙的搭建基于mysql
- How to create a launcher for a manually extracted program in Ubuntu
- DateTimePicker如何与Delphi自带Style同步
- 服务器程序DEBUG
- (C/C++) Interview in English - Class
- 关于com组件注册的问题
- 程序代码创建IISWEB站点
- Get Start StrangeIOC for Unity3D
- javascript系列之this
- poj2912 Rochambeau
- maven构建geotools应用工程
- WPF中使用WebBrowser
- [SDOI2006] 保安站岗
- django之关联field 描述子是如何实现的
- Maven中classifier
- bitbucket 上公钥SSH key如何add key并进行项目运用
- easyui多图片上传+预览切换+支持IE8
- 6.2Python文件的操作(二)
- eclipse中xml下Namespaces显示不全的解决办法
- keras-VGG16 猫狗分类器
热门文章
- 【DIP, OpenCV】Some Kinds Of Image Smoothing Methodologies
- Linux学习总结(21)——CentOS7环境下FTP服务器的安装和配置
- JRobin绘制指定时间段的流量图
- 在IIS6,7中部署ASP.NET网站[转]
- Codeforces Round #403(div 2)
- Bootstrap基础教程:tutorialspoint-bootstrap
- FreeMarker与Spring MVC 4集合的HelloWorld示例
- 【CV论文阅读】:Rich feature hierarchies for accurate object detection and semantic segmentation
- [JavaEE] Injecting Bean
- Windows 由于无法验证发布者,windows阻止控件安装怎么办