从底层源码浅析Mybatis的SqlSessionFactory初始化过程
搭建源码环境
在这里我提一下,在早期Mybatis版本中,Dao开发方式都是有Mapper接口和其实现类的,实现类是需要我们自己编写的,后来Mybatis使用JDK动态代理针对Mapper接口做了代理,替我们实现了实现类; 但是其底层也是使用了Mapper接口的实现类,不可能说只有一个即可就能和JDBC进行通讯 ! 其基础环境搭建可参照官方教程 http://www.mybatis.org/mybatis-3/zh/getting-started.html
POM依赖
<!-- https://mvnrepository.com/artifact/org.mybatis/mybatis -->

<dependency>

    <groupId>org.mybatis</groupId>

    <artifactId>mybatis</artifactId>

    <version>3.4.5</version>

</dependency>
测试SQL
CREATE TABLE `user` (

  `id` int(10) NOT NULL AUTO_INCREMENT,

  `username` varchar(10) NOT NULL,

  `password` varchar(52) NOT NULL,

  PRIMARY KEY (`id`)

) ENGINE=InnoDB AUTO_INCREMENT=6 DEFAULT CHARSET=latin1
Mybatis全局配置文件
<?xml version="1.0" encoding="UTF-8" ?>
<!DOCTYPE configuration
PUBLIC "-//mybatis.org//DTD Config 3.0//EN"
"http://mybatis.org/dtd/mybatis-3-config.dtd">
<configuration>
<environments default="development">
<environment id="development">
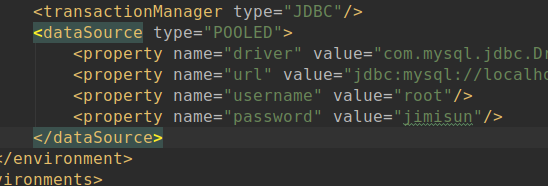
<transactionManager type="JDBC"/>
<dataSource type="POOLED">
<property name="driver" value="com.mysql.jdbc.Driver"/>
<property name="url" value="jdbc:mysql://localhost:3306/test"/>
<property name="username" value="root"/>
<property name="password" value="jimisun"/>
</dataSource>
</environment>
</environments>
<mappers>
<mapper resource="mapper/UserMapper.xml"/>
</mappers>
</configuration>
UserMapper接口
public interface UserMapper {

    User selectUser(Integer id);

}
UserMapper配置
<?xml version="1.0" encoding="UTF-8" ?>

<!DOCTYPE mapper

        PUBLIC "-//mybatis.org//DTD Mapper 3.0//EN"

        "http://mybatis.org/dtd/mybatis-3-mapper.dtd">

<mapper namespace="user">

    <select id="selectUser" resultType="com.jimisun.mybatis.domain.User">

        select *

        from user

        where id = #{id}

    </select>

</mapper>
User实体
public class User {

    private int id;

    private String username;

    private String password;

	getter and setter .....

}
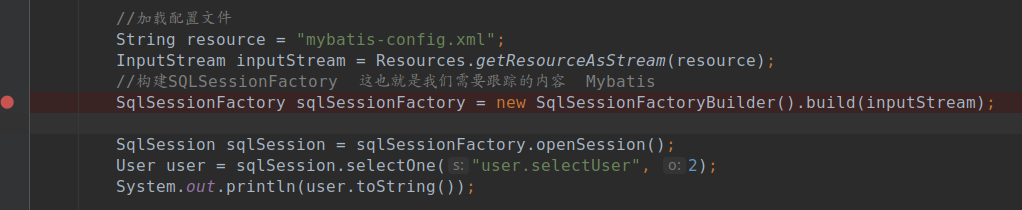
Main方法
    public static void main(String[] args) throws IOException {

        String resource = "mybatis-config.xml";

        InputStream inputStream = Resources.getResourceAsStream(resource);

        SqlSessionFactory sqlSessionFactory = new SqlSessionFactoryBuilder().build(inputStream);

        SqlSession sqlSession = sqlSessionFactory.openSession();

        User user = sqlSession.selectOne("user.selectUser", 2);

        System.out.println(user.toString());

    }
快速进入Debug跟踪
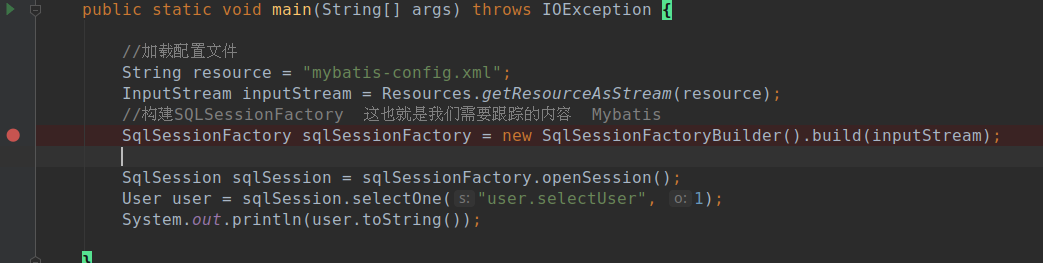
我们可以在此处打上断点,Debug模式启动进入断点,再按F7跟踪入其方法
源码分析准备
在进行Mybatis的初始化过程之前,我们需要把整个大纲拎出来放在前面,让大家能够有所了解,然后在进行每个步骤的时候心里有个大概;
- 什么是Mybatis的初始化过程?
从代码上来看 "SqlSessionFactory sqlSessionFactory = new SqlSessionFactoryBuilder().build(inputStream);" 这行代码就是执行的是Mybatis的初始化操作,这个操作通常在应用中只会操作一次,构建完成SqlSessionFactory就不再使用,而SqlSessionFactory会跟随整个应用生命周期;
从应用阶段上来说 : Mybatis根据全局XML配置文件生成SqlSessionFactory的过程就是Mybatis的初始化过程.
- 浅析一词含义
既然标题为浅析某某....相比大家也能看出说明本章不会深度挖掘底层代码,我个人认为浅析一次的主要意义是 ""能够快速地在我们心中建立底层源码的架构图,快速浏览代码,与概念进行核对 "",当然也不包含某些大牛谦虚的说法哈~~ 在这里提的主要目的是,本次浅析Mybatis是快速浏览代码; 稍后会出新的篇章对核心方法进行剖析
- Mybatis初始化过程中的主要步骤
- 将全局配置文件XML解析到Configuration对象
- 将映射配置文件XML解析到Configuration的mapperRegistry对象
- 将映射配置文件XML中的声明(Statement)解析成MappedStatement对象存入Configuration对象的mappedStatements集合中
- 最后将Configuration最为参数构建DefaultSqlSessionFactory对象
源码分析
第一步: 将全局配置文件XML加载到Configuration对象
XMLConfigBuilder parser = new XMLConfigBuilder(inputStream, environment, properties);

parser.parse();
主要功能 : 将全局配置文件中的配置加载到一个Configuration对象的属性中
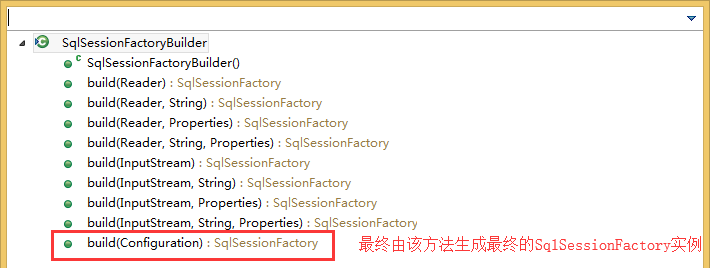
这是第一步,我们从Main方法的new SqlSessionFactoryBuilder().build(inputStream)进入断点,可以看到在构建完毕SqlSessionFactoryBuilder对象后由调用了重载的build方法
//SqlSessionFactoryBuilder的构造方法

public SqlSessionFactoryBuilder() {

}

//build方法

public SqlSessionFactory build(InputStream inputStream) {

        return this.build((InputStream)inputStream, (String)null, (Properties)null);

 }

//build方法(重载)

public SqlSessionFactory build(InputStream inputStream, String environment, Properties properties) {

        SqlSessionFactory var5;

        try {

            //第一步: 创建XML配置构建器,用来解析全局XML文件内容

            XMLConfigBuilder parser = new XMLConfigBuilder(inputStream, environment, properties);

            var5 = this.build(parser.parse());

        } catch (Exception var14) {

            throw ExceptionFactory.wrapException("Error building SqlSession.", var14);

        } finally {

            ErrorContext.instance().reset();

            try {

                inputStream.close();

            } catch (IOException var13) {

            }

        }

        return var5;

    }
在继续深入之前我们需要了解一下XMLConfigBuilder这个对象,从名字上来看就可以知道是解析XML配置文件的;XMLConfigBuilder又继承了BaseBuilder类,而在BaseBuilder类中有一个属性Configuration,这个Configuration对象就是用来存储全局配置文件和其他Mapper的配置信息, 同时我们从下图也可以看到XMLMapperBuilder,XMLStatementBuilder,MapperBuilderAssistant也继承了BaseBuilder类
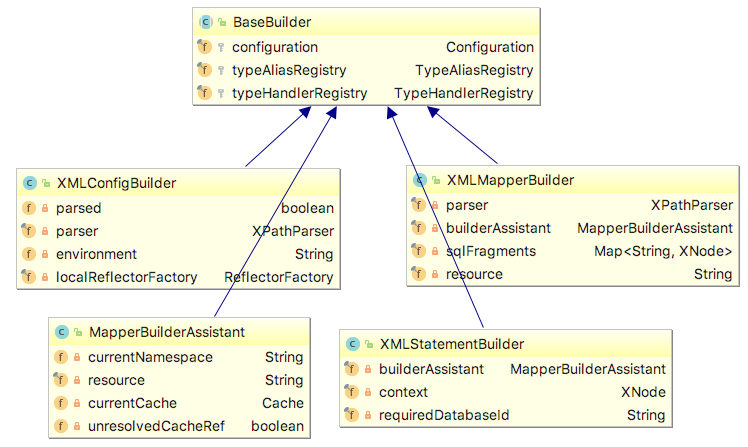
XMLxxxBuilder是用来解析XML配置文件的,不同类型XMLxxxBuilder用来解析MyBatis配置文件的不同部位。
- XMLConfigBuilder用来解析MyBatis的全局配置文件
- XMLMapperBuilder用来解析MyBatis中的映射文件
- XMLStatementBuilder用来解析映射文件中的statement语句。
- MapperBuilderAssistant用来辅助解析映射文件并生成MappedStatement对象
这些XMLxxxBuilder都有一个共同的父类——BaseBuilder。这个父类维护了一个全局的Configuration对象,MyBatis的配置文件解析后就以Configuration对象的形式存储
看源码果然能发现猫腻,不错不错,可以看到在new这个XMLConfigBuilder对象的时候,下图的断点位置super(new Configuration());

可以看到Configuration的构造方法如下所示,这也正解释了我们我们可以在全局配置文件中写个JDBC就行,因为在Configuration对象在构建的时候就加载了一些默认的别名. 别告诉我你不知道别名是啥哈~~
public Configuration() {

        this.safeResultHandlerEnabled = true;

        this.multipleResultSetsEnabled = true;

        this.useColumnLabel = true;

        this.cacheEnabled = true;

        this.useActualParamName = true;

        this.localCacheScope = LocalCacheScope.SESSION;

        this.jdbcTypeForNull = JdbcType.OTHER;

        this.lazyLoadTriggerMethods = new HashSet(Arrays.asList("equals", "clone", "hashCode", "toString"));

        this.defaultExecutorType = ExecutorType.SIMPLE;

        this.autoMappingBehavior = AutoMappingBehavior.PARTIAL;

        this.autoMappingUnknownColumnBehavior = AutoMappingUnknownColumnBehavior.NONE;

        this.variables = new Properties();

        this.reflectorFactory = new DefaultReflectorFactory();

        this.objectFactory = new DefaultObjectFactory();

        this.objectWrapperFactory = new DefaultObjectWrapperFactory();

        this.lazyLoadingEnabled = false;

        this.proxyFactory = new JavassistProxyFactory();

        this.mapperRegistry = new MapperRegistry(this);

        this.interceptorChain = new InterceptorChain();

        this.typeHandlerRegistry = new TypeHandlerRegistry();

        this.typeAliasRegistry = new TypeAliasRegistry();

        this.languageRegistry = new LanguageDriverRegistry();

        this.mappedStatements = new Configuration.StrictMap("Mapped Statements collection");

        this.caches = new Configuration.StrictMap("Caches collection");

        this.resultMaps = new Configuration.StrictMap("Result Maps collection");

        this.parameterMaps = new Configuration.StrictMap("Parameter Maps collection");

        this.keyGenerators = new Configuration.StrictMap("Key Generators collection");

        this.loadedResources = new HashSet();

        this.sqlFragments = new Configuration.StrictMap("XML fragments parsed from previous mappers");

        this.incompleteStatements = new LinkedList();

        this.incompleteCacheRefs = new LinkedList();

        this.incompleteResultMaps = new LinkedList();

        this.incompleteMethods = new LinkedList();

        this.cacheRefMap = new HashMap();

        this.typeAliasRegistry.registerAlias("JDBC", JdbcTransactionFactory.class);

        this.typeAliasRegistry.registerAlias("MANAGED", ManagedTransactionFactory.class);

        this.typeAliasRegistry.registerAlias("JNDI", JndiDataSourceFactory.class);

        this.typeAliasRegistry.registerAlias("POOLED", PooledDataSourceFactory.class);

        this.typeAliasRegistry.registerAlias("UNPOOLED", UnpooledDataSourceFactory.class);

        this.typeAliasRegistry.registerAlias("PERPETUAL", PerpetualCache.class);

        this.typeAliasRegistry.registerAlias("FIFO", FifoCache.class);

        this.typeAliasRegistry.registerAlias("LRU", LruCache.class);

        this.typeAliasRegistry.registerAlias("SOFT", SoftCache.class);

        this.typeAliasRegistry.registerAlias("WEAK", WeakCache.class);

        this.typeAliasRegistry.registerAlias("DB_VENDOR", VendorDatabaseIdProvider.class);

        this.typeAliasRegistry.registerAlias("XML", XMLLanguageDriver.class);

        this.typeAliasRegistry.registerAlias("RAW", RawLanguageDriver.class);

        this.typeAliasRegistry.registerAlias("SLF4J", Slf4jImpl.class);

        this.typeAliasRegistry.registerAlias("COMMONS_LOGGING", JakartaCommonsLoggingImpl.class);

        this.typeAliasRegistry.registerAlias("LOG4J", Log4jImpl.class);

        this.typeAliasRegistry.registerAlias("LOG4J2", Log4j2Impl.class);

        this.typeAliasRegistry.registerAlias("JDK_LOGGING", Jdk14LoggingImpl.class);

        this.typeAliasRegistry.registerAlias("STDOUT_LOGGING", StdOutImpl.class);

        this.typeAliasRegistry.registerAlias("NO_LOGGING", NoLoggingImpl.class);

        this.typeAliasRegistry.registerAlias("CGLIB", CglibProxyFactory.class);

        this.typeAliasRegistry.registerAlias("JAVASSIST", JavassistProxyFactory.class);

        this.languageRegistry.setDefaultDriverClass(XMLLanguageDriver.class);

        this.languageRegistry.register(RawLanguageDriver.class);

    }
第一步还没有执行完? 是的上述中我们在看构建XMLConfigBuilder对象过程,现在构建完成了我们就需要看这一行代码了parser.parse();; 当有了XMLConfigBuilder对象之后,接下来就可以用它来解析配置文件了
   public Configuration parse() {

       //判断是否已经解析,只能解析一次全局配置文件

        if (this.parsed) {

            throw new BuilderException("Each XMLConfigBuilder can only be used once.");

        } else {

            //将parsed标记为已经解析

            this.parsed = true;

            //解析全局配置文件的XML中的configuration节点

            this.parseConfiguration(this.parser.evalNode("/configuration"));

            return this.configuration;

        }

    }
//主要看一下解析全局配置文件的configuration节点的方法

private void parseConfiguration(XNode root) {

        try {

            //解析全局配置文件中的properties节点的配置信息存储到Configuration对象的variables属性中

            this.propertiesElement(root.evalNode("properties"));

            //解析全局配置文件中的settings节点的配置信息设置到Configuration对象的各个属性中

            Properties settings = this.settingsAsProperties(root.evalNode("settings"));

            this.loadCustomVfs(settings);

            this.settingsElement(settings);

           //解析全局配置文件中的typeAliases节点的配置信息设置到BaseBuilder对象的TypeAliasRegistry属性中

            this.typeAliasesElement(root.evalNode("typeAliases"));

            //解析全局配置文件的plugins

            this.pluginElement(root.evalNode("plugins"));

            //解析全局配置文件中的objectFactory设置到Configuration对象的objectFactory属性中

            this.objectFactoryElement(root.evalNode("objectFactory"));

            this.objectWrapperFactoryElement(root.evalNode("objectWrapperFactory"));

            this.reflectorFactoryElement(root.evalNode("reflectorFactory"));

            //解析全局配置文件中的Environment节点存储到Configuration对象中的Environment属性中

            this.environmentsElement(root.evalNode("environments"));

            this.databaseIdProviderElement(root.evalNode("databaseIdProvider"));

            this.typeHandlerElement(root.evalNode("typeHandlers"));

            //第二步 : 解析全局配置文件中的mappers节点  注意这是一个核心的方法 我们点进去看一下

            this.mapperElement(root.evalNode("mappers"));

        } catch (Exception var3) {

            throw new BuilderException("Error parsing SQL Mapper Configuration. Cause: " + var3, var3);

        }

    }
从上述代码中可以看到,XMLConfigBuilder会依次解析配置文件中的、、、、、等属性。
第二步 : 解析映射配置文件XML到Configuration的mapperRegistry容器
this.mapperElement(root.evalNode("mappers"));
主要功能 : MyBatis会遍历下所有的子节点,如果当前遍历到的节点是,则MyBatis会将该包下的所有Mapper Class注册到configuration的mapperRegistry容器中。如果当前节点为,则会依次获取resource、url、class属性,解析映射文件,并将映射文件对应的Mapper Class注册到configuration的mapperRegistry容器中。
XMLConfigBuilder解析全局配置文件中有一个比较重要的一步;就是解析映射文件this.mapperElement(root.evalNode("mappers"))这句代码开始解析映射文件,我们开看一下下图中构建了一个XMLMapperBuilder对象,这个对象是负责解析映射文件的;而第一步的XMLConfigBuilder对象是解析全局配置文件的
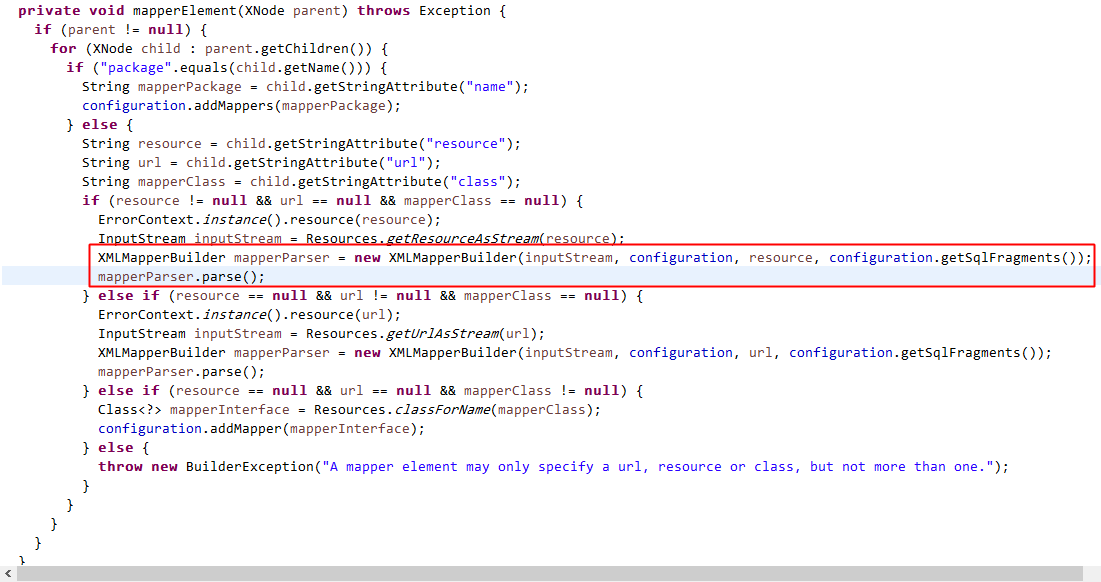
上图中红色圈中的是Mybatis解析映射文件的方法,我们进去看一下 mapperParser = new XMLMapperBuilder(inputStream, this.configuration, resource, this.configuration.getSqlFragments());
  private XMLMapperBuilder(XPathParser parser, Configuration configuration, String resource, Map<String, XNode> sqlFragments) {

      //首先会初始化父类BaseBuilder,并将configuration赋给BaseBuilder;

        super(configuration);

      //然后创建MapperBuilderAssistant对象,该对象为XMLMapperBuilder的协助者,用来协助XMLMapperBuilder完成一些解析映射文件的动作

        this.builderAssistant = new MapperBuilderAssistant(configuration, resource);

        this.parser = parser;

        this.sqlFragments = sqlFragments;

        this.resource = resource;

    }

    public void parse() {

        if (!this.configuration.isResourceLoaded(this.resource)) {

            this.configurationElement(this.parser.evalNode("/mapper"));

            this.configuration.addLoadedResource(this.resource);

            this.bindMapperForNamespace();

        }

        this.parsePendingResultMaps();

        this.parsePendingCacheRefs();

        this.parsePendingStatements();

    }
再看一下mapperParser.parse();
    public void parse() {

        //如果映射文件没有被加载过

        if (!this.configuration.isResourceLoaded(this.resource)) {

            //执行加载映射文件XML方法configurationElement

            this.configurationElement(this.parser.evalNode("/mapper"));

            //将此映射文件添加已经解析了的集合中

            this.configuration.addLoadedResource(this.resource);

            //绑定Namespace

            this.bindMapperForNamespace();

        }

        this.parsePendingResultMaps();

        this.parsePendingCacheRefs();

        this.parsePendingStatements();

    }
下面是具体Mybatis解析映射文件中的Statement的过程
   private void configurationElement(XNode context) {

        try {

            //获取namespace

            String namespace = context.getStringAttribute("namespace");

            //判断namespace,如果为空直接抛出异常

            if (namespace != null && !namespace.equals("")) {

                //设置namespace

                this.builderAssistant.setCurrentNamespace(namespace);

                //下面就是解析各个Statement中的各个XML节点

                this.cacheRefElement(context.evalNode("cache-ref"));

                this.cacheElement(context.evalNode("cache"));

                this.parameterMapElement(context.evalNodes("/mapper/parameterMap"));

                this.resultMapElements(context.evalNodes("/mapper/resultMap"));

                this.sqlElement(context.evalNodes("/mapper/sql"));

                //第三步 : 解析Statement声明   核心方法

                this.buildStatementFromContext(context.evalNodes("select|insert|update|delete"));

            } else {

                throw new BuilderException("Mapper's namespace cannot be empty");

            }

        } catch (Exception var3) {

            throw new BuilderException("Error parsing Mapper XML. Cause: " + var3, var3);

        }

    }
从上述代码中可以看到,XMLMapperBuilder借助MapperBuilderAssistant会对Mapper映射文件进行解析,在解析到最后,会将每一个中的节点解析为MappedStatement对象
第三步 : 解析映射文件的Statement为MappedStatement对象
this.buildStatementFromContext(context.evalNodes("select|insert|update|delete"));
主要功能 : 将映射文件的子节点解析为MappedStatement对象
我们进入 this.buildStatementFromContext(context.evalNodes("select|insert|update|delete"));这个方法看一下
    private void buildStatementFromContext(List<XNode> list) {

        if (this.configuration.getDatabaseId() != null) {

            this.buildStatementFromContext(list, this.configuration.getDatabaseId());

        }

        this.buildStatementFromContext(list, (String)null);

    }

    private void buildStatementFromContext(List<XNode> list, String requiredDatabaseId) {

        Iterator var3 = list.iterator();

        while(var3.hasNext()) {

            XNode context = (XNode)var3.next();

            XMLStatementBuilder statementParser = new XMLStatementBuilder(this.configuration, this.builderAssistant, context, requiredDatabaseId);

            try {

                statementParser.parseStatementNode();

            } catch (IncompleteElementException var7) {

                this.configuration.addIncompleteStatement(statementParser);

            }

        }

    }
其中主要的逻辑都在下示图中的两行代码中
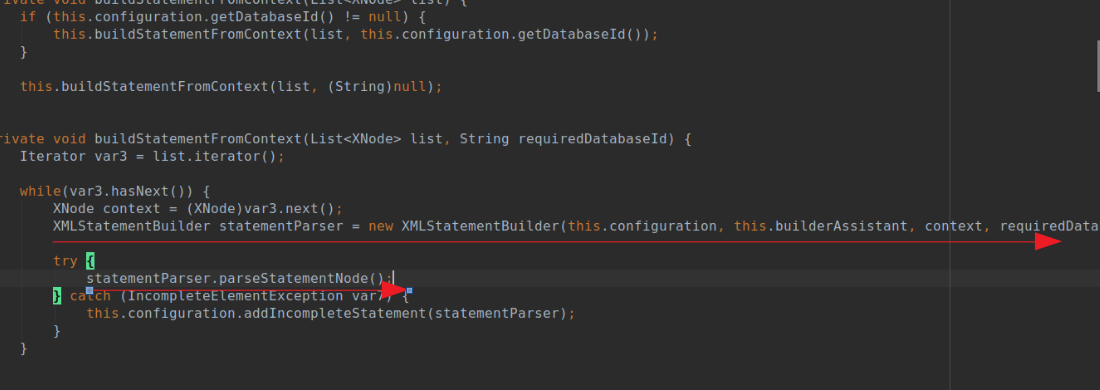
接下来我们进入XMLStatementBuilder类的parseStatementNode去看看
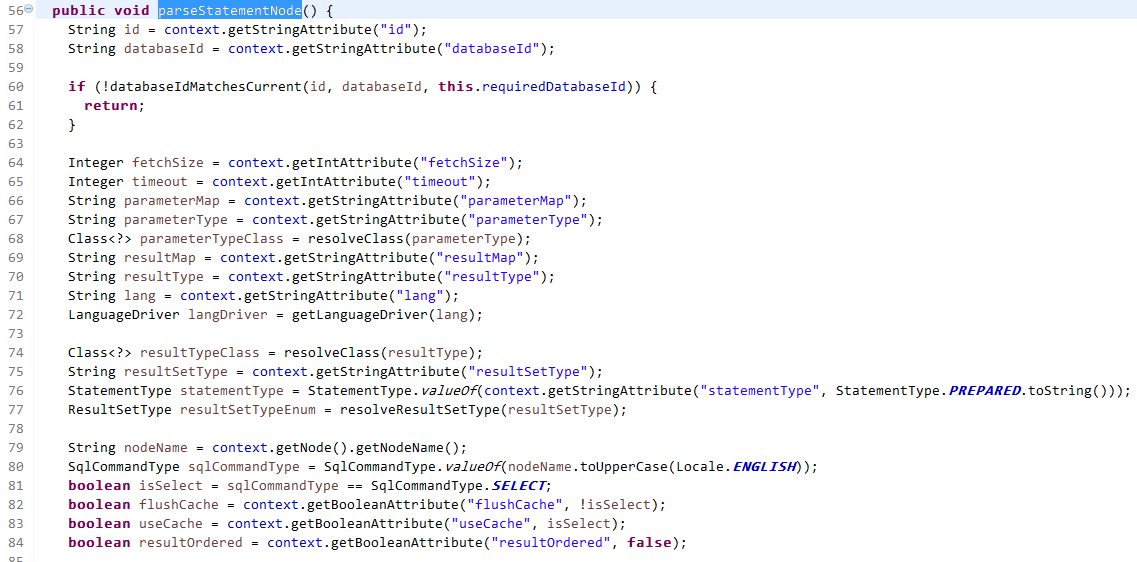
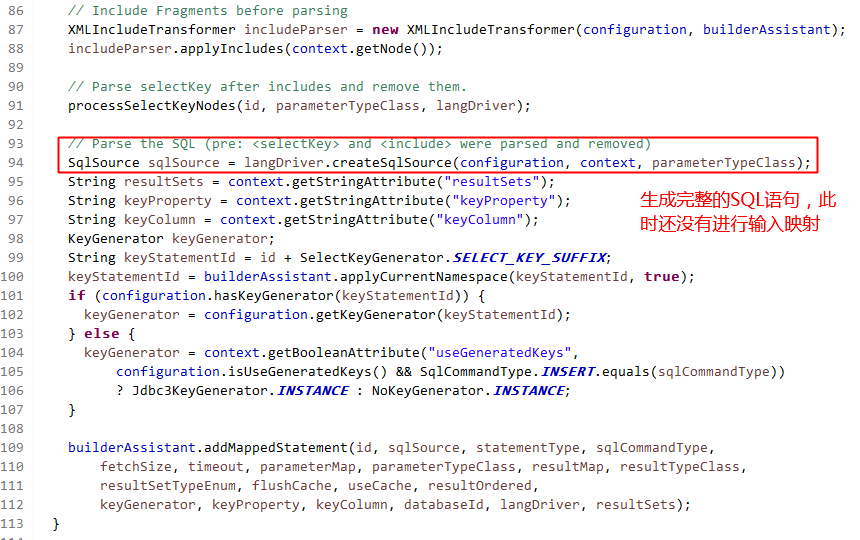
最终由MapperBuilderAssistant完成MappedStatement对象的封装,并且将MappedStatement对象放入Configuration对象的mappedStatements容器中

初始化完成
主要功能 : 将已经装载了各种XML信息的Configuration对象作为参数构建DefaultSqlSessionFactory返回,Mybatis初始化完成!!!
  public SqlSessionFactory build(Configuration config) {

        return new DefaultSqlSessionFactory(config);

    }
该教程所属Java工程师之Spring Framework深度剖析专栏,本系列相关博文目录 Java工程师之Spring Framework深度剖析专栏
最新文章
- 超强、超详细Redis数据库入门教程
- LoadRunner --HTML/URL录制方式的选择规则
- 【CSS】Intermediate2:Pseudo Classes
- iOS中常用的四种数据持久化技术
- tomcat原理
- oracle权限的分配
- 【Nginx】磁盘文件写入飞地发
- .NET链接Oracle 参数绑定问题
- 如何解决JavaScript中0.1+0.2不等于0.3
- linux 日常运维 目录
- EmailHelper
- _quick_response
- golang 自定义json解析
- windows镜像
- 转利用python实现电影推荐
- pom.xml配置指定仓库
- 会说话的ABAP report
- P4619 [SDOI2018]旧试题
- 跟我学AngularJs:Controller数据共享、继承、通信使用具体解释
- SAP采购寄售业务操作步骤