linux磁盘管理系列-软RAID的实现
磁盘管理系列
linux磁盘管理系列一:磁盘配额管理 http://www.cnblogs.com/zhaojiedi1992/p/zhaojiedi_linux_040_quota.html
linux磁盘管理系列二:软RAID的实现 http://www.cnblogs.com/zhaojiedi1992/p/zhaojiedi_linux_041_raid.html
linux磁盘管理系列三:LVM的使用 http://www.cnblogs.com/zhaojiedi1992/p/zhaojiedi_linux_042_lvm.html
1 什么是RAID
RAID全称是独立磁盘冗余阵列(Redundant Array of Independent Disks),基本思想是把多个磁盘组合起来,组合一个磁盘阵列组,使得性能大幅提高。
RAID分为几个不同的等级,各个不同的等级均在数据可靠性及读写性能做了不同的权衡。实际工作中根据自己的业务需求选择不同的RAID方案。
2 RAID的实现方式
- 外接式磁盘阵列:通过扩展卡提供适配能力
- 内接式RAID:主板集成RAID控制器安装OS前在BIOS里配置
- 软件RAID:通过OS实现
3 标准的RAID
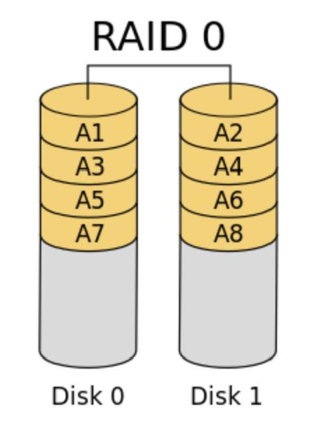
3.1 RAID0
RAID0称为条带化存储,将数据分段存储在各个磁盘中,读写均可以并行处理,因此读写速率为单个磁盘的N倍,没有冗余功能,任何一个磁盘的损坏就会导致的数据不可用。
3.2 RAID1
RADI1是镜像存储,没有数据校验,数据被同等的写入到2个或者多个磁盘中,写入速度相对慢, 但是读取速度比较快。

3.3 RAID 4
RADI4在RAID1的基础上,N个盘用于数据存储,另外加入了1个磁盘作为校验盘。一共N+1个盘,任何一个盘坏掉也不影响数据的访问
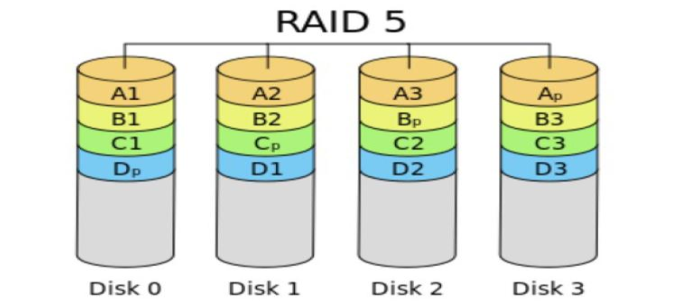
3.4 RAID 5
RAID5在RAID4的基础上,由原来的一个盘来存储校验数据,改为每个盘都有数据和校验信息的。
4 混合RAID
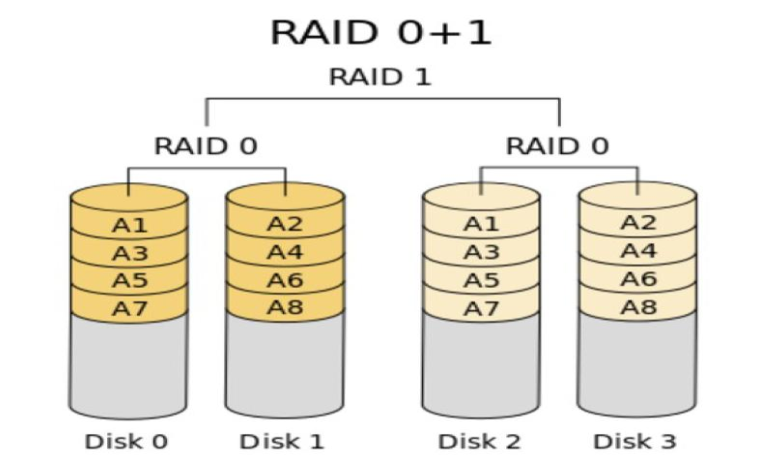
4.1 RAID01
先组成RAID0,然后组成RAID1.
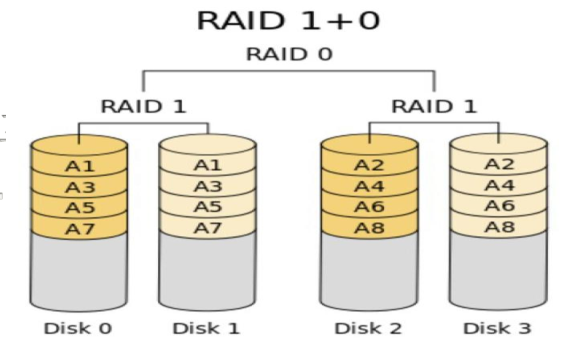
4.2 RAID10
先组成RAID1,然后组成RAID0
5 软RAID的实现
5.1 RAID5的实现
创建由三块硬盘组成的可用空间为2G的RAID5设备,要求其chunk大小为256k,文件系统为ext4,开机可自动挂载至/mydata目录
5.1.1 先看看我们的磁盘情况
[root@centos7 Bash]$ lsblk

NAME   MAJ:MIN RM  SIZE RO TYPE MOUNTPOINT

sda      8:0    0  200G  0 disk

├─sda1   8:1    0    1G  0 part /boot

├─sda2   8:2    0  128G  0 part

├─sda3   8:3    0 48.8G  0 part /

├─sda4   8:4    0  512B  0 part

└─sda5   8:5    0 19.5G  0 part /app

sdb      8:16   0  100G  0 disk

sdc      8:32   0   20G  0 disk

sdd      8:48   0   20G  0 disk

sde      8:64   0   20G  0 disk

sdf      8:80   0   20G  0 disk

sr0     11:0    1  8.1G  0 rom  /run/media/root/CentOS 7 x86_64
这里我们使用sdb,sdc,sdd,每个盘创建一个主分区1G,构建RADI5.
5.1.2 根据实际情况分区
[root@centos7 Bash]$ fdisk /dev/sdb

Welcome to fdisk (util-linux 2.23.).

Changes will remain in memory only, until you decide to write them.

Be careful before using the write command.

Device does not contain a recognized partition table

Building a new DOS disklabel with disk identifier 0x93d380cf.

Command (m for help): n

Partition type:

   p   primary ( primary,  extended,  free)

   e   extended

Select (default p): p

Partition number (-, default ):

First sector (-, default ):

Using default value

Last sector, +sectors or +size{K,M,G} (-, default ): +1G

Partition  of type Linux and of size  GiB is set

Command (m for help): t

Selected partition

Hex code (type L to list all codes): fd

Changed type of partition 'Linux' to 'Linux raid autodetect'

Command (m for help): p

Disk /dev/sdb: 107.4 GB,  bytes,  sectors

Units = sectors of  *  =  bytes

Sector size (logical/physical):  bytes /  bytes

I/O size (minimum/optimal):  bytes /  bytes

Disk label type: dos

Disk identifier: 0x93d380cf

   Device Boot      Start         End      Blocks   Id  System

/dev/sdb1                         fd  Linux raid autodetect

Command (m for help): w

The partition table has been altered!

Calling ioctl() to re-read partition table.

Syncing disks.

[root@centos7 Bash]$ fdisk /dev/sdc

Welcome to fdisk (util-linux 2.23.).

Changes will remain in memory only, until you decide to write them.

Be careful before using the write command.

Device does not contain a recognized partition table

Building a new DOS disklabel with disk identifier 0xc56b90d8.

Command (m for help): n

Partition type:

   p   primary ( primary,  extended,  free)

   e   extended

Select (default p): p

Partition number (-, default ):

First sector (-, default ):

Using default value

Last sector, +sectors or +size{K,M,G} (-, default ): +1G

Partition  of type Linux and of size  GiB is set

Command (m for help): t

Selected partition

Hex code (type L to list all codes): fd

Changed type of partition 'Linux' to 'Linux raid autodetect'

Command (m for help): p

Disk /dev/sdc: 21.5 GB,  bytes,  sectors

Units = sectors of  *  =  bytes

Sector size (logical/physical):  bytes /  bytes

I/O size (minimum/optimal):  bytes /  bytes

Disk label type: dos

Disk identifier: 0xc56b90d8

   Device Boot      Start         End      Blocks   Id  System

/dev/sdc1                         fd  Linux raid autodetect

Command (m for help): w

The partition table has been altered!

Calling ioctl() to re-read partition table.

Syncing disks.

[root@centos7 Bash]$ fdisk /dev/sdd

Welcome to fdisk (util-linux 2.23.).

Changes will remain in memory only, until you decide to write them.

Be careful before using the write command.

Device does not contain a recognized partition table

Building a new DOS disklabel with disk identifier 0x7e0900d8.

Command (m for help): n

Partition type:

   p   primary ( primary,  extended,  free)

   e   extended

Select (default p): p

Partition number (-, default ):

First sector (-, default ):

Using default value

Last sector, +sectors or +size{K,M,G} (-, default ): +1G

Partition  of type Linux and of size  GiB is set

Command (m for help): p

Disk /dev/sdd: 21.5 GB,  bytes,  sectors

Units = sectors of  *  =  bytes

Sector size (logical/physical):  bytes /  bytes

I/O size (minimum/optimal):  bytes /  bytes

Disk label type: dos

Disk identifier: 0x7e0900d8

   Device Boot      Start         End      Blocks   Id  System

/dev/sdd1                           Linux

Command (m for help): t

Selected partition

Hex code (type L to list all codes): fd

Changed type of partition 'Linux' to 'Linux raid autodetect'

Command (m for help): w

The partition table has been altered!

Calling ioctl() to re-read partition table.

Syncing disks.
5.1.3 创建raid
[root@centos7 Bash]$ mdadm -C /dev/md5 -a yes -l  -n  /dev/sd{b1,c1,d1} -c 256       # -C指定创建, -a yes 自动创建设备 , -l 设定level , -n 设定磁盘个数, -c chunk大小

Continue creating array? y

mdadm: Defaulting to version 1.2 metadata

mdadm: array /dev/md5 started.

[root@centos7 Bash]$ mdadm -Ds                                                          # 查看信息

ARRAY /dev/md5 metadata=1.2 name=centos7.magedu.com: UUID=2c8ae60d:a799fcb7:9008a046:ae6ea430

[root@centos7 Bash]$ mdadm -Ds >/etc/mdadm.conf                                         # 将软raid信息写入到配置文件中去
[root@centos7 Bash]$ mkdir /mnt/md5                                                     # 创建挂载点目录

[root@centos7 Bash]$ mkfs.ext4 /dev/md5                                                 # 创建文件系统

mke2fs 1.42. (-Dec-)

Filesystem label=

OS type: Linux

Block size= (log=)

Fragment size= (log=)

Stride= blocks, Stripe width= blocks

 inodes,  blocks

 blocks (5.00%) reserved for the super user

First data block=

Maximum filesystem blocks=

 block groups

 blocks per group,  fragments per group

 inodes per group

Superblock backups stored on blocks:

    , , , ,

Allocating group tables: done

Writing inode tables: done

Creating journal ( blocks): done

Writing superblocks and filesystem accounting information: done

[root@centos7 Bash]$ mount /dev/md5 /mnt/md5                                          # 挂载设备

[root@centos7 Bash]$ tail -n  /etc/mtab

/dev/md5 /mnt/md5 ext4 rw,seclabel,relatime,stripe=,data=ordered  0               # 查看挂载信息

[root@centos7 Bash]$ tail -n  /etc/mtab >>/etc/fstab                                 #添加到fstab文件中,确保开机启动,这里建议使用uuid
5.1.4 验证raid
[root@centos7 md5]$ mdadm -D /dev/md5                                                 #查看详细raid5详细信息,可以发现有3个都是working状态的

/dev/md5:

           Version : 1.2

     Creation Time : Wed Dec   ::

        Raid Level : raid5

        Array Size :  (2046.00 MiB 2145.39 MB)

     Used Dev Size :  (1023.00 MiB 1072.69 MB)

      Raid Devices :

     Total Devices :

       Persistence : Superblock is persistent

       Update Time : Wed Dec   ::

             State : clean

    Active Devices :

   Working Devices :

    Failed Devices :

     Spare Devices :

            Layout : left-symmetric

        Chunk Size : 256K

Consistency Policy : resync

              Name : centos7.magedu.com:  (local to host centos7.magedu.com)

              UUID : 2c8ae60d:a799fcb7:9008a046:ae6ea430

            Events :

    Number   Major   Minor   RaidDevice State

                                   active sync   /dev/sdb1

                                   active sync   /dev/sdc1

                                   active sync   /dev/sdd1

[root@centos7 md5]$ man mdadm

[root@centos7 md5]$ mdadm /dev/md5 -f /dev/sdc1                                                 # -f 设定指定设备故障, 将/dev/sdc1 这个盘标记失败, 看是否数据能访问,我这里使用-f标记失败,工作中可以根据硬盘指示灯判断磁盘状态

mdadm: set /dev/sdc1 faulty in /dev/md5

[root@centos7 md5]$ mdadm -D /dev/md5                                                           #在次查看信息,发现工作的是2个, 一个失败的设备

/dev/md5:

           Version : 1.2

     Creation Time : Wed Dec   ::

        Raid Level : raid5

        Array Size :  (2046.00 MiB 2145.39 MB)

     Used Dev Size :  (1023.00 MiB 1072.69 MB)

      Raid Devices :

     Total Devices :

       Persistence : Superblock is persistent

       Update Time : Wed Dec   ::

             State : clean, degraded                                                             # 这里注意了。 我们的一个盘坏掉了。 raid5状态为降级使用了。

    Active Devices :

   Working Devices :

    Failed Devices :

     Spare Devices :

            Layout : left-symmetric

        Chunk Size : 256K

Consistency Policy : resync

              Name : centos7.magedu.com:  (local to host centos7.magedu.com)

              UUID : 2c8ae60d:a799fcb7:9008a046:ae6ea430

            Events :

    Number   Major   Minor   RaidDevice State

                                   active sync   /dev/sdb1

       -                             removed

                                   active sync   /dev/sdd1

                             -      faulty   /dev/sdc1

[root@centos7 md5]$ cat a.txt                                          # 发现我们的数据还是能访问的。没有问题。
5.1.5 替换设备
我这里是磁盘坏掉后的执行替换的, 完全可以多一个备用盘, 坏掉自动替换的。
[root@centos7 md5]$ mdadm /dev/md5 -a /dev/sde1                        # 上面我们的sdc1数据损坏,我们需要更换新的磁盘来顶替他的位置。这里添加一个sde1的磁盘, fdisk操作这里省去了。

mdadm: added /dev/sde1

[root@centos7 md5]$ mdadm -Ds                                          # 查看详细信息

ARRAY /dev/md5 metadata=1.2 name=centos7.magedu.com: UUID=2c8ae60d:a799fcb7:9008a046:ae6ea430

[root@centos7 md5]$ mdadm -D /dev/md5                                  # 查看详细信息

/dev/md5:

           Version : 1.2

     Creation Time : Wed Dec   ::

        Raid Level : raid5

        Array Size :  (2046.00 MiB 2145.39 MB)

     Used Dev Size :  (1023.00 MiB 1072.69 MB)

      Raid Devices :

     Total Devices :

       Persistence : Superblock is persistent

       Update Time : Wed Dec   ::

             State : clean                                                  # 状态恢复正常了。没有问题

    Active Devices :

   Working Devices :

    Failed Devices :

     Spare Devices :

            Layout : left-symmetric

        Chunk Size : 256K

Consistency Policy : resync

              Name : centos7.magedu.com:  (local to host centos7.magedu.com)

              UUID : 2c8ae60d:a799fcb7:9008a046:ae6ea430

            Events :

    Number   Major   Minor   RaidDevice State

                                   active sync   /dev/sdb1

                                   active sync   /dev/sde1

                                   active sync   /dev/sdd1

                             -      faulty   /dev/sdc1             # 这个盘是坏掉的,我们已经加入了新的磁盘, 这个盘可以干掉了

[root@centos7 md5]$ man mdadm

[root@centos7 md5]$ mdadm /dev/md5 --remove /dev/sdc1                  # 这个盘我们从raid5中移除去。

mdadm: hot removed /dev/sdc1 from /dev/md5
5.1.6扩展raid
我们上面使用的是2+1构成的raid5,磁盘利用率为66%,如果我们想改成3+1 可以执行类似如下命令
[root@centos7 mnt]$ mkadm -G -r /dev/md5 -n -a /dev/sdxx # 这里我就不测试了。使用/dev/sdxx代替一个设备。-G 是Grown增长的意思,-r 是resizefs的意思,
5.1.7 清空raid信息
[root@centos7 mnt]$ umount /dev/md5                                   # 卸载设备

[root@centos7 mnt]$ mdadm -S /dev/md5                                 # 停止raid5

mdadm: stopped /dev/md5

[root@centos7 mnt]$ sed -i '$d' /etc/fstab                            # 删除fstab中关于raid5挂载的行

[root@centos7 mnt]$ cat /etc/fstab                                    # 确保fstab没有大问题

#

# /etc/fstab

# Created by anaconda on Tue Nov   ::

#

# Accessible filesystems, by reference, are maintained under '/dev/disk'

# See man pages fstab(), findfs(), mount() and/or blkid() for more info

#

UUID=59ccea87-3c4e-4bbc-9e2f-3fadb1dcf2e6 /                       ext4    defaults

UUID=f4e867e8-bcde-43a2-adc7-c80b0948e85f /app                    ext4    noatime,usrquota,grpquota

UUID=1d6cbe88-ffb4-4adf-bacf-76be1fa75708 /boot                   ext4    defaults

#UUID=b2c064f5-1ee5-4b5c-9e75-ed41cb99c5aa swap                    swap    defaults

#UUID=a0516c4f-40e6--905a-8b44db12ff7b swap               swap    defaults,pri=

#/dev/sdb2 /test ext4 rw,seclabel,relatime,data=ordered

#/dev/sdb1 /home xfs rw,seclabel,relatime,attr2,inode64,usrquota,grpquota

[root@centos7 mnt]$ rm -rf /etc/mdadm.conf                                   # 删除raid默认配置文件
[root@centos7 mnt]$ mdadm --zero-superblock /dev/sd{b1,e1,d1,c1} # 清空设置上的超级块信息
5.2 RAID10的实现
raid10 ,6个分区,2个一组raid1,3组raid0
5.2.1 案例分析
分析下,我们创建一个raid10设置,2个设备组成一个raid1,6个设备2个一组可以组成3个raid1, 然后把3个raid1组成一个raid0即可
5.2.2 先创建6个设备
[root@centos7 mnt]$ lsblk                                # 就是使用fdisk 创建的设备, 具体这里就不写了。 最终使用lsblk显示,我们可以看到sdb1,sdb2,sdd1,sde1一共6个磁盘

NAME   MAJ:MIN RM  SIZE RO TYPE MOUNTPOINT

sda      :      200G   disk

├─sda1   :        1G   part /boot

├─sda2   :      128G   part

├─sda3   :     .8G   part /

├─sda4   :      512B   part

└─sda5   :     .5G   part /app

sdb      :     100G   disk

├─sdb1   :       1G   part

└─sdb2   :       1G   part

sdc      :      20G   disk

├─sdc1   :       1G   part

└─sdc2   :       1G   part

sdd      :      20G   disk

└─sdd1   :       1G   part

sde      :      20G   disk

└─sde1   :       1G   part

sdf      :      20G   disk

sr0     :      .1G   rom  /run/media/root/CentOS  x86_64
5.2.3 创建raid
[root@centos7 mnt]$ mdadm -C /dev/md11 -a yes -l  -n  /dev/sd{b1,c1}                               # 创建第一个raid1

mdadm: /dev/sdb1 appears to be part of a raid array:

       level=raid5 devices= ctime=Wed Dec   ::

mdadm: Note: this array has metadata at the start and

    may not be suitable as a boot device.  If you plan to

    store '/boot' on this device please ensure that

    your boot-loader understands md/v1.x metadata, or use

    --metadata=0.90

mdadm: /dev/sdc1 appears to be part of a raid array:

       level=raid5 devices= ctime=Wed Dec   ::

Continue creating array? y

mdadm: Defaulting to version 1.2 metadata

mdadm: array /dev/md11 started.

[root@centos7 mnt]$ mdadm -C /dev/md12 -a yes -l  -n  /dev/sd{b2,c2}                                #创建第二个raid1

mdadm: Note: this array has metadata at the start and

    may not be suitable as a boot device.  If you plan to

    store '/boot' on this device please ensure that

    your boot-loader understands md/v1.x metadata, or use

    --metadata=0.90

Continue creating array? y

mdadm: Defaulting to version 1.2 metadata

mdadm: array /dev/md12 started.

[root@centos7 mnt]$ mdadm -C /dev/md13 -a yes -l  -n  /dev/sd{d1,e1}                                 # 创建第三个raid1

mdadm: /dev/sdd1 appears to be part of a raid array:

       level=raid5 devices= ctime=Wed Dec   ::

mdadm: Note: this array has metadata at the start and

    may not be suitable as a boot device.  If you plan to

    store '/boot' on this device please ensure that

    your boot-loader understands md/v1.x metadata, or use

    --metadata=0.90

mdadm: /dev/sde1 appears to be part of a raid array:

       level=raid5 devices= ctime=Wed Dec   ::

Continue creating array? y

mdadm: Defaulting to version 1.2 metadata

mdadm: array /dev/md13 started.

[root@centos7 mnt]$ mdadm -C /dev/md10 -a yes -l  -n  /dev/md{,,}                             # 将3个raid1 合并为一个raid0

mdadm: /dev/md11 appears to contain an ext2fs file system

       size=2095104K  mtime=Wed Dec   ::

mdadm: /dev/md13 appears to contain an ext2fs file system

       size=2095104K  mtime=Wed Dec   ::

Continue creating array? y

mdadm: Defaulting to version 1.2 metadata

mdadm: array /dev/md10 started.

[root@centos7 mnt]$ mkfs.ext

mkfs.ext2  mkfs.ext3  mkfs.ext4

[root@centos7 mnt]$ mkfs.ext4 /dev/md10                                                                 # 创建文件系统

mke2fs 1.42. (-Dec-)

Filesystem label=

OS type: Linux

Block size= (log=)

Fragment size= (log=)

Stride= blocks, Stripe width= blocks

 inodes,  blocks

 blocks (5.00%) reserved for the super user

First data block=

Maximum filesystem blocks=

 block groups

 blocks per group,  fragments per group

 inodes per group

Superblock backups stored on blocks:

    , , , ,

Allocating group tables: done

Writing inode tables: done

Creating journal ( blocks): done

Writing superblocks and filesystem accounting information: done

[root@centos7 mnt]$ mdadm -Ds                                                                             # 查看配置信息

ARRAY /dev/md11 metadata=1.2 name=centos7.magedu.com: UUID=0ce2cd6c:cd21fab6:3e65cfb5:64bd86f3

ARRAY /dev/md12 metadata=1.2 name=centos7.magedu.com: UUID=8af31dff:efab06ed:48e2613b:a599c774

ARRAY /dev/md13 metadata=1.2 name=centos7.magedu.com: UUID=a8c99d60:2d0c61e7:97a76809:9396c020

ARRAY /dev/md10 metadata=1.2 name=centos7.magedu.com: UUID=50b2fa58:4ce65d67:8c50c853:fa175a28

[root@centos7 mnt]$ mdadm -Ds  >> /etc/mdadm.conf                                                         # 写配置文件到mdadm的配置文件中

[root@centos7 mnt]$ mkdir /mnt/md10                                                                       # 创建挂载目录

[root@centos7 mnt]$ mount /dev/md10 /mnt/md10                                                             # 挂载文件系统

[root@centos7 mnt]$ tail -n  /etc/mtab                                                                   # 查看mtab文件中的最后一行, 也就是我们的md10挂载信息

/dev/md10 /mnt/md10 ext4 rw,seclabel,relatime,stripe=,data=ordered

[root@centos7 mnt]$ tail -n  /etc/mtab >> /etc/fstab                                                     #添加到开机启动
5.2.4 raid 清除工作
[root@centos7 mnt]$ umount /dev/md10                                                                      # 取消挂载

[root@centos7 mnt]$ rm -rf /etc/mdadm.conf                                                                # 删除mdadm的默认配置

[root@centos7 mnt]$ mdadm -S /dev/md10                                                                    # 停止raid0设置

mdadm: stopped /dev/md10

[root@centos7 mnt]$ mdadm -S /dev/md11                                                                    # 停止raid1设置

mdadm: stopped /dev/md11

[root@centos7 mnt]$ mdadm -S /dev/md12                                                                    # 停止radi1 设置

mdadm: stopped /dev/md12

[root@centos7 mnt]$ mdadm -S /dev/md13                                                                    # 停止raid 1 设置

mdadm: stopped /dev/md13

[root@centos7 mnt]$ sed -i '$d' /etc/fstab                                                                # 删除fstab的挂载

[root@centos7 mnt]$ cat /etc/fstab                                                                        # 确保正确

#

# /etc/fstab

# Created by anaconda on Tue Nov   ::

#

# Accessible filesystems, by reference, are maintained under '/dev/disk'

# See man pages fstab(), findfs(), mount() and/or blkid() for more info

#

UUID=59ccea87-3c4e-4bbc-9e2f-3fadb1dcf2e6 /                       ext4    defaults

UUID=f4e867e8-bcde-43a2-adc7-c80b0948e85f /app                    ext4    noatime,usrquota,grpquota

UUID=1d6cbe88-ffb4-4adf-bacf-76be1fa75708 /boot                   ext4    defaults

#UUID=b2c064f5-1ee5-4b5c-9e75-ed41cb99c5aa swap                    swap    defaults

#UUID=a0516c4f-40e6--905a-8b44db12ff7b swap               swap    defaults,pri=

#/dev/sdb2 /test ext4 rw,seclabel,relatime,data=ordered

#/dev/sdb1 /home xfs rw,seclabel,relatime,attr2,inode64,usrquota,grpquota

[root@centos7 mnt]$ mdadm -D                                                                                  # 再次查看下mdadm信息,确保没有了

mdadm: No devices given.
[root@centos7 mnt]$ mdadm --zero-superblock /dev/sd{b1,b2,c1,c2,d1,e1}                                        # 请求md的元数据信息
6 参考
博客参考:http://blog.jobbole.com/83808/
wiki参考:https://en.wikipedia.org/wiki/RAID
最新文章
- Android 的 AlarmManager 和 wakeLock联合使用
- hiho#1033 : 交错和
- Windows下编译objective-C
- 夺命雷公狗ThinkPHP项目之----企业网站6之栏目的添加(主要用模型来验证字段)
- POM的配置文件
- (转)C#进行图像处理的几种方法(Bitmap,BitmapData,IntPtr)
- docker安装caffe
- 好吧,使用sql实现Dijkstra算法
- 用C++写出hanoi
- 关于FND_PROFILE与FND_GLOBLE[Z]
- 配置maven和maven本地仓库
- 【转载】双调排序Bitonic Sort,适合并行计算的排序算法
- UML类图(Unified Modeling Language Class Diagrams)
- 写带有清晰图片的博客:如何将word中的图片复制到windows live writer保持大小不变--清晰度不变
- 《DSP using MATLAB》Problem 4.5
- 分布式理论系列(三)ZAB 协议
- Android Dialog 的一些特性
- Q4m使用手册
- Python基础部分的疑惑解析——运算符和数据类型(5)
- 使用jenkins SonarQube gitlab 构建自动化发布系统