Java-NIO(七):阻塞IO与非阻塞IO
- 阻塞IO
传统的 IO 流都是阻塞式的。
也就是说,当一个线程调用 read() 或 write()时,该线程被阻塞,直到有一些数据被读取或写入,该线程在此期间不能执行其他任务。
因此,在完成网络通信进行 IO 操作时,由于线程会阻塞,所以服务器端必须为每个客户端都提供一个独立的线程进行处理,当服务器端需要处理大量客户端时,性能急剧下降。
注意:在阻塞IO操作的过程中,用来提高程序的解决方案一般是使用多线程来处理,但是开辟线程也是比较耗费资源的。
测试NIO阻塞模式:
 @Test

     public void client() throws IOException {

         // 1、获取通道(channel)

         SocketChannel socketChannel = SocketChannel.open(new InetSocketAddress("127.0.0.1", 9898));

         FileChannel inChannel = FileChannel.open(Paths.get("Java NIO.pdf"),StandardOpenOption.READ);

         // 2、分配指定大小的缓冲区

         ByteBuffer byteBuffer=ByteBuffer.allocate(1024);

         // 3、读取本地文件,并写入发送channel

         while (inChannel.read(byteBuffer)!=-1) {

             byteBuffer.flip();// 切换到读模式

             socketChannel.write(byteBuffer);

             byteBuffer.clear();// 清空缓冲区

         }

         // 必须shutdown否则就没法切换到接收数据的模式

         socketChannel.shutdownOutput();

         System.out.println("client waiting reading server response");

         // 接收服务端的数据

         int length=0;

         while((length=socketChannel.read(byteBuffer))!=-1){

             byteBuffer.flip();

             System.out.println(new String(byteBuffer.array(),0,length));

             byteBuffer.clear();

         }

         System.out.println("end...");

         inChannel.close();

         socketChannel.close();

     }

     @Test

     public void server() throws IOException{

         // 1、获取通道

         ServerSocketChannel serverSocketChannel = ServerSocketChannel.open();

         FileChannel outChannel=FileChannel.open(Paths.get("33.pdf"), StandardOpenOption.READ,StandardOpenOption.WRITE,StandardOpenOption.CREATE);

         // 2、绑定连接

         serverSocketChannel.bind(new InetSocketAddress(9898));

         // 3、获取客户端的连接

         SocketChannel accept = serverSocketChannel.accept();

         // 4、分配指定大小的缓冲区

         ByteBuffer byteBuffer= ByteBuffer.allocate(1024);

         // 5、接收客户端的数据,并保存到本地

         while (accept.read(byteBuffer)!=-1) {

             byteBuffer.flip();

             outChannel.write(byteBuffer);

             byteBuffer.clear();

         }

         System.out.println("server print ...");

         byteBuffer.put("server success".getBytes());

         byteBuffer.flip();//切换到读模式

         accept.write(byteBuffer);

         // 6、关闭连接

         accept.close();

         outChannel.close();

         serverSocketChannel.close();

     }
打印结果:
client waiting reading server response
server success
end...
- 非阻塞
Java NIO 是非阻塞模式的。
当线程从某通道进行读写数据时,若没有数据可用时,该线程可以进行其他任务。线程通常将非阻塞 IO 的空闲时间用于在其他通道上执行 IO 操作,所以单独的线程可以管理多个输入和输出通道。
因此, NIO 可以让服务器端使用一个或有限几个线程来同时处理连接到服务器端的所有客户端。
- 如何形成非阻塞IO:
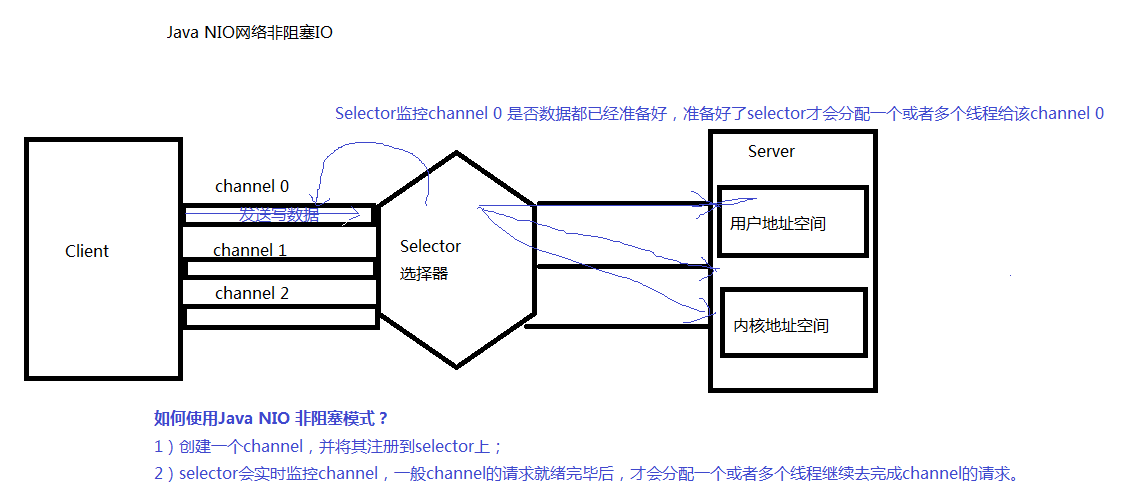
从上边的图中我们知道要构成NIO非阻塞模式,必须要引入Selector。那么,什么是Selector?
- 选择器(Selector)
选择器(Selector)是SelectableChannle对象的多路复用器,Selector可以同时监控多个SelectableChannel的IO状况,也就是说,利用Selector可以一个单独的线程管理多个Channel。Selector是非阻塞IO的核心。
- 使用NIO实现网络通信的三个核心:
1、通道(channel):负责连接
java.nio.channels.Channel接口:
|--SelectableChannel
|--SocketChannel
|--ServerSocketChannel
|--DatagramChannel
|--Pipe.SinkChannel
|--Pipe.SourceChannel
2、缓冲区(Buffer):负责数据的存储
3、选择器(Selector):是SelectableChannel的多路复用器。用于监控SelectableChannel的IO状况。
- 非阻塞IO示例:
     /**

      * 客户端

      */

     @Test

     public void client() throws IOException {

         // 1、获取通道(channel)

         SocketChannel socketChannel = SocketChannel.open(new InetSocketAddress("127.0.0.1", 9898));

         // 2、切换成非阻塞模式

         socketChannel.configureBlocking(false);

         // 3、分配指定大小的缓冲区

         ByteBuffer byteBuffer = ByteBuffer.allocate(1024);

         byteBuffer.put("你可理论上的 。。。".getBytes());

         byteBuffer.flip();

         socketChannel.write(byteBuffer);

         socketChannel.close();

     }

     @Test

     public void server() throws IOException {

         // 1、获取通道

         ServerSocketChannel serverSocketChannel = ServerSocketChannel.open();

         // 2.设置为非阻塞

         serverSocketChannel.configureBlocking(false);

         // 3、绑定连接

         serverSocketChannel.bind(new InetSocketAddress(9898));

         // 4、获取Selector选择器

         Selector selector = Selector.open();

         // 5、将通道注册到选择器上,并制定监听事件为:“接收”事件

         serverSocketChannel.register(selector, SelectionKey.OP_ACCEPT);

         // 6、采用轮询的方式获取选择器上“准备就绪”的任务

         while (selector.select() > 0) {

             // 7、获取当前选择器中所有注册的选择键(“已经准备就绪的事件”)

             Iterator<SelectionKey> selectedKeys = selector.selectedKeys().iterator();

             while (selectedKeys.hasNext()) {

                 // 8、获取“准备就绪”的时间

                 SelectionKey selectedKey = selectedKeys.next();

                 // 9、判断key是具体的什么事件

                 if (selectedKey.isAcceptable()) {

                     // 10、若接受的事件是“接收就绪”事件,就获取客户端连接

                     SocketChannel socketChannel = serverSocketChannel.accept();

                     // 11、切换为非阻塞模式

                     socketChannel.configureBlocking(false);

                     // 12、将该通道注册到selector选择器上

                     socketChannel.register(selector, SelectionKey.OP_READ);

                 } else if (selectedKey.isReadable()) {

                     // 13、获取该选择器上的“读就绪”状态的通道

                     SocketChannel socketChannel = (SocketChannel) selectedKey.channel();

                     // 14、读取数据

                     ByteBuffer byteBuffer = ByteBuffer.allocate(1024);

                     int length = 0;

                     while ((length = socketChannel.read(byteBuffer)) != -1) {

                         byteBuffer.flip();

                         System.out.println(new String(byteBuffer.array(), 0, length));

                         byteBuffer.clear();

                     }

                     socketChannel.close();

                 }

                 // 15、移除选择键

                 selectedKeys.remove();

             }

         }

         // 7、关闭连接

         serverSocketChannel.close();

     }
最新文章
- 使用Docker构建redis集群--最靠谱的版本
- Autofac的高级使用——Autofac.2.6.3.862
- unity3d基础01
- 用KNN算法分类CIFAR-10图片数据
- Resharp非常实用的快捷键
- TextView使用的方式
- VIM用法
- s性能优化方面的小知识
- entity framework core在独立类库下执行迁移操作
- Linux lvs三种模式工作原理
- MySQL索引背后的数据结构及算法原理(转)
- 基于maven javaweb编程缺少java源文件
- c# 7.0 学习笔记
- Python记录_day21 模块
- CentOS7安装cratedb
- SAS DATA ENCODING 解决odbc乱码问题
- 在Ubuntu虚拟机上安装DVWA
- MySQL ODBC 驱动安装
- ImageGrab.grab()全屏抓取错误
- JAX-RS(REST Web Services)2.0 can not be installed: One or more constraints have not been satisfied