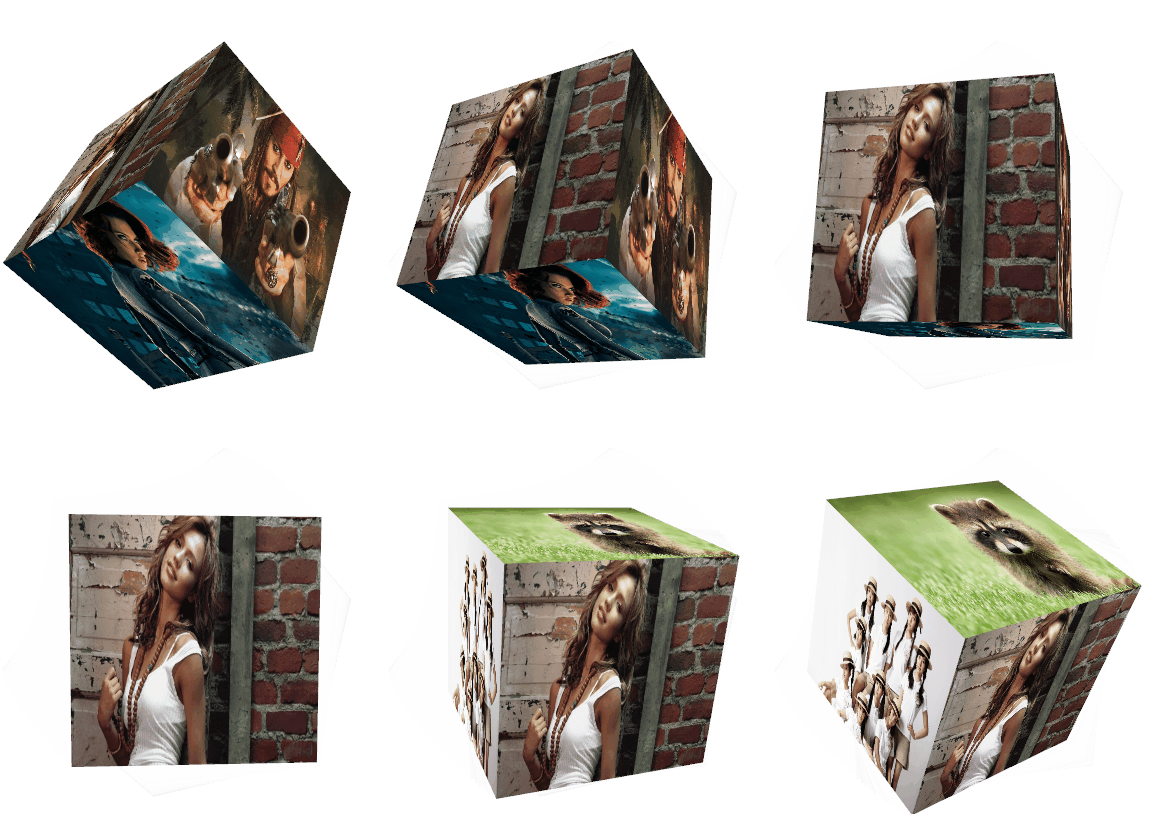
WPF 2D纹理的准确映射
2024-09-05 15:49:40
TextureCoordinates定义了如何将一副2D纹理映射到所建立的3D网格上,TextureCoordinates为Positions集合中的每一个3D顶点提供了一个2D顶点。
映射时方向确定比较麻烦,需要3D每个面映射都为正确的方向,在baidu上找了很多,映射基本是乱的。
通过归纳测试,有了准确的参数,需要的可参考使用,不必再费劲计算。
里面注销掉的部分,可以恢复并注销调自动转动部分,为手动点击对象转动。
通过VisualBrush写入的 image可以换为UserControl等组件。
代码不长,就100多行,仅供参考,如有错误,自行修正。

MainWindow.xaml
<Window x:Class="Test3.MainWindow"

        xmlns="http://schemas.microsoft.com/winfx/2006/xaml/presentation"

        xmlns:x="http://schemas.microsoft.com/winfx/2006/xaml"

        xmlns:d="http://schemas.microsoft.com/expression/blend/2008"

        xmlns:mc="http://schemas.openxmlformats.org/markup-compatibility/2006"

        mc:Ignorable="d"

        Title="MainWindow" Height="768" Width="1024">

    <Grid x:Name="main">

        <Button Content="纵向" HorizontalAlignment="Left" Margin="10,10,0,0" VerticalAlignment="Top" Width="75" Click="Button_Click"/>

        <Button Content="横向" HorizontalAlignment="Left" Margin="10,48,0,0" VerticalAlignment="Top" Width="75" Click="Button_Click_1"/>

        <Button Content="纵横" HorizontalAlignment="Left" Margin="10,85.74,0,0" VerticalAlignment="Top" Width="75" Click="Button_Click_2"/>

        <Button Content="横纵" HorizontalAlignment="Left" Margin="10,124.5,0,0" VerticalAlignment="Top" Width="75" Click="Button_Click_3"/>

    </Grid>

</Window>
MainWindow.xaml.cs
using System;

using System.Windows;

using System.Windows.Controls;

using System.Windows.Input;

using System.Windows.Media;

using System.Windows.Media.Animation;

using System.Windows.Media.Imaging;

using System.Windows.Media.Media3D;

namespace Test3

{

    public partial class MainWindow : Window

    {

        private AxisAngleRotation3D axisAngleRotation3D;

        public MainWindow()

        {

            InitializeComponent();

            main.MouseDown += Main_MouseDown;

            init_draw();

        }

        public void init_draw()

        {

            Point3DCollection[] positions = new Point3DCollection[6]

            {

                new Point3DCollection(new Point3D[] {

                    new Point3D(0.5, 0.5, -0.5), new Point3D(- 0.5, 0.5, -0.5), new Point3D(- 0.5, 0.5, 0.5),

                    new Point3D(- 0.5, 0.5, 0.5),new Point3D(0.5, 0.5, 0.5), new Point3D(0.5, 0.5, -0.5)

                }),

                new Point3DCollection(new Point3D[] {

                    new Point3D(-0.5,0.5,-0.5),new Point3D(-0.5,-0.5,-0.5), new Point3D(-0.5,-0.5,0.5),

                    new Point3D(-0.5,-0.5,0.5),new Point3D(-0.5,0.5,0.5),new Point3D(-0.5,0.5,-0.5)

                }),

                new Point3DCollection(new Point3D[] {

                    new Point3D(-0.5,-0.5,0.5),new Point3D(0.5,-0.5,0.5),new Point3D(0.5,0.5,0.5),

                    new Point3D(0.5,0.5,0.5),new Point3D(-0.5,0.5,0.5), new Point3D(-0.5,-0.5,0.5)

                }),

                new Point3DCollection( new Point3D[] {

                    new Point3D(-0.5,-0.5,-0.5),new Point3D(-0.5,0.5,-0.5),new Point3D(0.5,0.5,-0.5),

                    new Point3D(0.5,0.5,-0.5), new Point3D(0.5,-0.5,-0.5),new Point3D(-0.5,-0.5,-0.5)

                }),

                new Point3DCollection( new Point3D[] {

                    new Point3D(-0.5,-0.5,-0.5), new Point3D(0.5,-0.5,-0.5), new Point3D(0.5,-0.5,0.5),

                    new Point3D(0.5,-0.5,0.5),new Point3D(-0.5,-0.5,0.5), new Point3D(-0.5,-0.5,-0.5)

                }),

                new Point3DCollection( new Point3D[] {

                    new Point3D(0.5,-0.5,-0.5),new Point3D(0.5,0.5,-0.5),new Point3D(0.5,0.5,0.5),

                    new Point3D(0.5,0.5,0.5), new Point3D(0.5,-0.5,0.5), new Point3D(0.5,-0.5,-0.5)

                })

            };

            PointCollection[] texturepoints = new PointCollection[6]

            {

                new PointCollection {new Point(1,0), new Point(0,0), new Point(0,1), new Point(0,1), new Point(1,1),new Point(1,0) },

                new PointCollection { new Point(0,0),new Point(0,1),new Point(1,1),  new Point(1,1),new Point(1,0),new Point(0,0) },

                new PointCollection { new Point(0,1), new Point(1,1),new Point(1,0), new Point(1,0),new Point(0,0),new Point(0,1) },

                new PointCollection { new Point(1,1), new Point(1,0),new Point(0,0), new Point(0,0), new Point(0,1), new Point(1,1) },

                new PointCollection { new Point(0,1), new Point(1,1), new Point(1,0),new Point(1,0), new Point(0,0), new Point(0,1)},

                new PointCollection{ new Point(1,1), new Point(1,0),new Point(0,0),new Point(0,0), new Point(0,1),new Point(1,1)}

            };

            string[] filename = new string[6] //430251

            {

                "pack://application:,,,/Images/4.jpg",

                "pack://application:,,,/Images/3.jpg",

                "pack://application:,,,/Images/0.jpg",

                "pack://application:,,,/Images/2.jpg",

                "pack://application:,,,/Images/5.jpg",

                "pack://application:,,,/Images/1.jpg"

            };

            Viewport3D viewport3D = new Viewport3D();

            PerspectiveCamera perspectiveCamera = new PerspectiveCamera()

            {

                Position = new Point3D(0, 0, 3),

                LookDirection = new Vector3D(0, 0, -3),

                FieldOfView = 50,

                UpDirection = new Vector3D(0, 1, 0),

                FarPlaneDistance = 20,

                NearPlaneDistance = 0,

            };

            viewport3D.Camera = perspectiveCamera;

            ModelVisual3D modelVisual3D = new ModelVisual3D();

            Model3DGroup model3DGroup = new Model3DGroup();

            for (int i = 0; i < 6; i++)

            {

                GeometryModel3D geometryModel3D = new GeometryModel3D();

                DiffuseMaterial diffuse = new DiffuseMaterial();

                VisualBrush visualBrush = new VisualBrush();

                Image image = new Image();

                image.Source = new BitmapImage(new Uri(filename[i]));

                visualBrush.Visual = image;

                diffuse.Brush = visualBrush;

                geometryModel3D.Material = diffuse;

                MeshGeometry3D meshGeometry3D = new MeshGeometry3D()

                {

                    Positions = positions[i],

                    TextureCoordinates = texturepoints[i],

                };

                geometryModel3D.Geometry = meshGeometry3D;

                model3DGroup.Children.Add(geometryModel3D);

            }

            AmbientLight ambientLight = new AmbientLight();

            model3DGroup.Children.Add(ambientLight);

            modelVisual3D.Content = model3DGroup;

            viewport3D.Children.Add(modelVisual3D);

            main.Children.Add(viewport3D);

            /*

            axisAngleRotation3D = new AxisAngleRotation3D(new Vector3D(1, 1, 0), 0);

            RotateTransform3D rotateTransform3D = new RotateTransform3D(axisAngleRotation3D);

            rotateTransform3D.Rotation = axisAngleRotation3D;

            modelVisual3D.Transform = rotateTransform3D;

            */

            // 如恢复上面,以下可以注销

            axisAngleRotation3D = new AxisAngleRotation3D(new Vector3D(0, 1, 0), 0);

            RotateTransform3D rotate = new RotateTransform3D(axisAngleRotation3D);

            modelVisual3D.Transform = rotate;

            DoubleAnimation animation = new DoubleAnimation();

            animation.From = 0;

            animation.To = 360;

            animation.Duration = new Duration(TimeSpan.FromSeconds(10.0));

            animation.RepeatBehavior = RepeatBehavior.Forever;

            NameScope.SetNameScope(main, new NameScope());

            main.RegisterName("cubeaxis", axisAngleRotation3D);

            Storyboard.SetTargetName(animation, "cubeaxis");

            Storyboard.SetTargetProperty(animation, new PropertyPath(AxisAngleRotation3D.AngleProperty));

            Storyboard RotCube = new Storyboard();

            RotCube.Children.Add(animation);

            RotCube.Begin(main);

        }

        double tmp = 0;

        private void Main_MouseDown(object sender, MouseButtonEventArgs e)

        {

            // 点击对象手动转动

            /*

            tmp = axisAngleRotation3D.Angle;

            if (e.LeftButton == MouseButtonState.Pressed)

            {

                tmp -= 5;

            }

            if (e.RightButton == MouseButtonState.Pressed)

            {

                tmp += 5;

            }

            axisAngleRotation3D.Angle = tmp;

            */

        }

        private void Button_Click(object sender, RoutedEventArgs e)

        {

            axisAngleRotation3D.Axis = new Vector3D(1,0,0);

            axisAngleRotation3D.Angle = 0;

        }

        private void Button_Click_1(object sender, RoutedEventArgs e)

        {

            axisAngleRotation3D.Axis = new Vector3D(0,1,0);

            axisAngleRotation3D.Angle = 0;

        }

        private void Button_Click_2(object sender, RoutedEventArgs e)

        {

            axisAngleRotation3D.Axis = new Vector3D(1, 1, 0);

            axisAngleRotation3D.Angle = 0;

        }

        private void Button_Click_3(object sender, RoutedEventArgs e)

        {

            axisAngleRotation3D.Axis = new Vector3D(0, 1, 1);

            axisAngleRotation3D.Angle = 0;

        }

    }

}
下载:https://pan.baidu.com/s/1yJGS1_jJPL68nPX28NTl4g
最新文章
- [转]Linux下g++编译与使用静态库(.a)和动态库(.os) (+修正与解释)
- C#基础知识一之base关键字
- poj 1698 Alice‘s Chance
- Linux下的shell编程(一)BY 四喜三顺
- tomcat提供文件下载
- Windows Server 2012 R2 IIS8.5+PHP(FastCGI)+MySQL环境搭建教程
- js - 犀牛学习
- DBA_Oracle Startup / Shutdown启动和关闭过程详解(概念)
- 蓝牙4.0LED灯控方案
- 新工程软连接到原来的工程的out目录后,可以直接编译模块
- MemCache超详细解读 图
- winform下调用webservice,传参List<string>
- Eclipse IDE for Java EE Developers使用和新建工程helloworld
- Python学习--使用dlib、opencv进行人脸检测标注
- python学习笔记(五)、抽象
- 00004-20180324-20180517-fahrenheit_converter--华氏温度到摄氏温度转换计算器
- 认知:关于Android 调试的坑
- dubbo注册服务和消费服务---入门篇
- python中enumerate、变量类型转换
- java成员内部类